If you want a video guide to walk you through this, check out my tutorial: https://youtu.be/R5c25kV4tZ0
THIS GUIDE IS MEANT FOR ADVANCED ARCH LINUX USERS
To prepare, make sure you have virtualization enabled in your BIOS.
For AMD this could be done by enabling
• IOMMU • NX Mode • SVM Mode
For you lame Intel users, just enable
• VT-d • VT-x
And then clone the repository by typing:
git clone https://github.com/BigAnteater/KVM-GPU-Passthrough/ && cd KVM-GPU-Passthrough
And then you should be good to go.
Preparing GRUB is very simple. Just follow these instructions.
- Mark the script as executable: for AMD:
chmod +x grub_setup_amd.shfor Intel:chmod +x grub_setup_intel.sh. - Then run the script: AMD:
sudo ./grub_setup_amd.shIntel:sudo ./grub_setup_intel.sh. - Then just follow the instructions in script!
To configure libvirt run my script which configures libvirt and QEMU for you by typing sudo ./libvirt_configuration.sh.
- Download the latest ISO for Windows 10 from: https://www.microsoft.com/en-us/software-download/windows10ISO.
- Open up Virt Manager and create a new virtual machine.
- Select local install media, and choose your Windows 10 ISO. Then choose how much ram you want, and how many CPUs you want. You can select your own custom storage, but for the sake of this guide I will be using the default location. Make sure to allocate at least 60 gigabytes.
- Name the Virtual Machine Win10, and tick the box which says customize configuration before install.
- Make sure your firmware is set to OVMF_CODE.fd, because you need the special UEFI firmware for the VM to boot properly.

- Then go into the CPU options and change it so that it looks like the picture below. Change the ammount of cores to however many CPU cores you want, and make sure to set the threads ammount to 2 because it will give 2 threads to every 1 core.

- Lastly, go into your boot settings and make sure that your optical disk is checked.

- And then you should be able to click begin installation!
- After you finish installing windows, you should be good to shut down the VM and follow along with the next steps.
- Find your GPU's device ID:
lspci -vnn | grep '\[03'. You should see some output such as the following; the first bit (03:00.0in this case) is the device ID.
03:00.0 VGA compatible controller: Advanced Micro Devices [AMD] nee ATI RV710 [Radeon HD 4350/4550] (prog-if 00 [VGA controller])
- Run
find /sys/devices -name romand ensure the device ID matches. For example looking at the case above, you'll want the last part before the/romto be03:00.0, so you might see something like this (the extra0000:in front is fine):
/sys/devices/pci0000:00/0000:00:01.0/0000:03:00.0/rom
- For convenience's sake, let's call this PATH_TO_ROM. You can manually set this variable as well, by first becoming root (run
sudo su) then runningexport PATH_TO_ROM=/sys/devices/pci0000:00/0000:00:01.0/0000:03:00.0/rom - Then, still as
root, run the following commands:
echo 1 > $PATH_TO_ROM
mkdir -p /var/lib/libvirt/vbios/
cat $PATH_TO_ROM > /var/lib/libvirt/vbios/gpu.rom
echo 0 > $PATH_TO_ROM
- Run
exitor press Ctrl-D to stop acting asroot
This is an amazing hook script made by @risingprismtv on gitlab. What this script does is stop your display manager service and all of your running programs, and unhooks your graphics card off of Linux and rehooks it onto the Windows VM.
- Clone Risngprism's single GPU passthrough gitlab page:
git clone https://gitlab.com/risingprismtv/single-gpu-passthrough && cd single-gpu-passthrough. - Run the install script as sudo:
sudo ./install-hooks.sh. - The scripts will successfully install into their required places without issue!
For the VM to actually pass the gpu, you need to add the PCI device to your VM. Here is how to do so.
Before we edit pass through our GPU, make sure to enable XML editing.

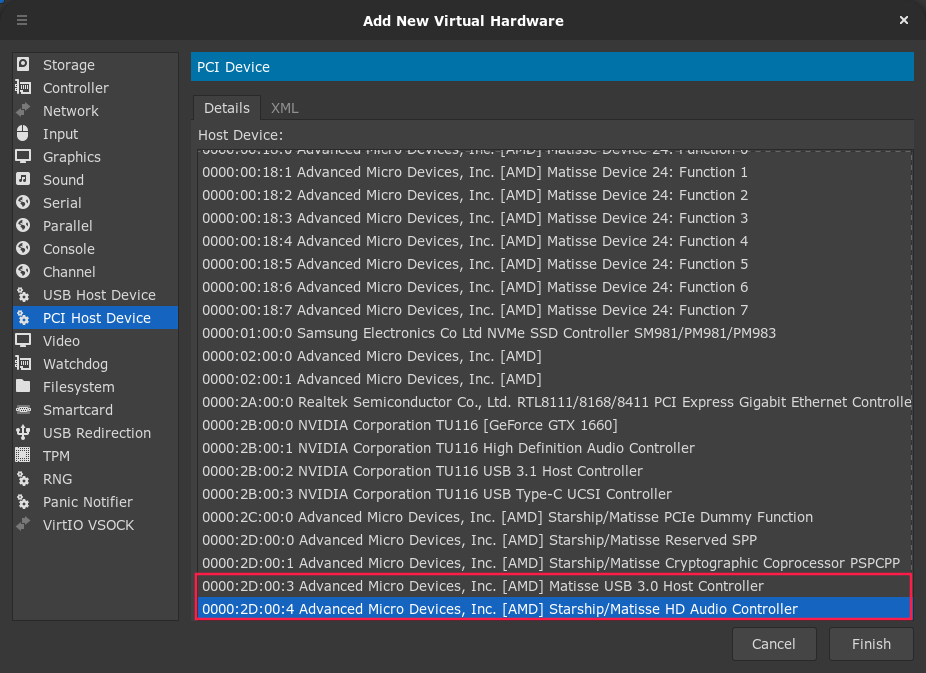
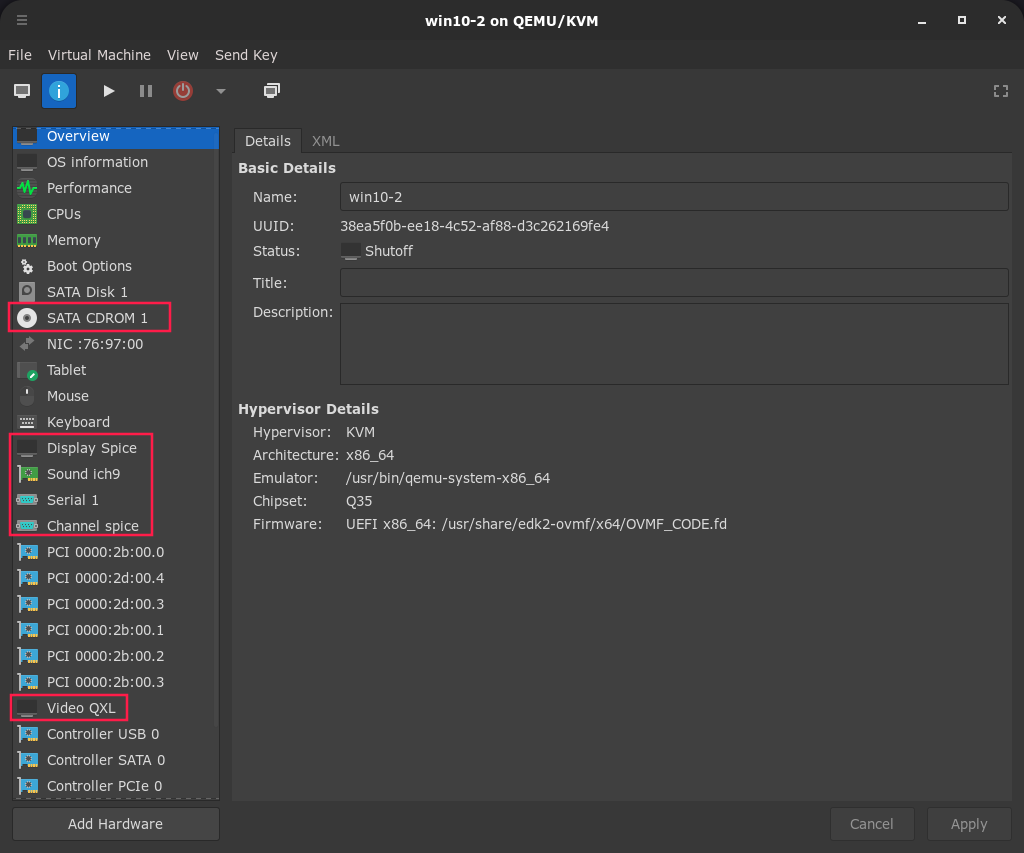
- Add every PCI device which has to do with your graphics card to the VM.
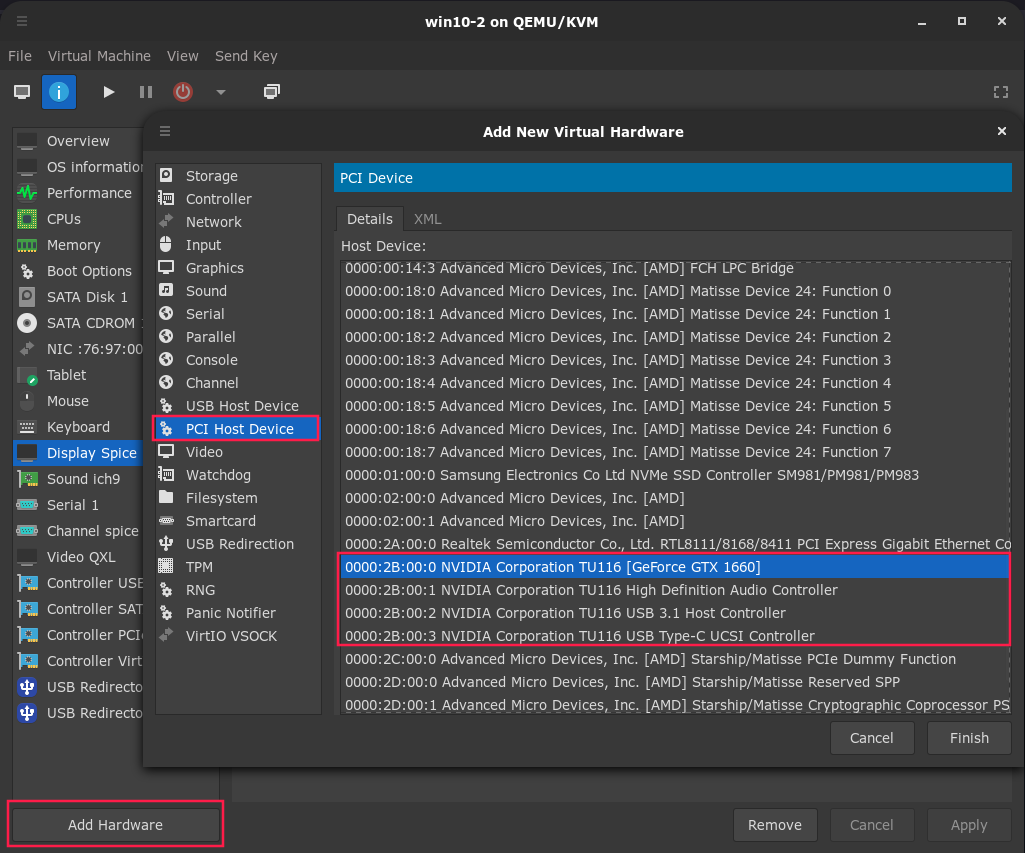
- Pass through your audio device and your USB controller. It will look like this for me
- Remember the ROM we exported? Well we're gonna use it now.
- Edit the XML of each passed through PCI device that has to do with your GPU and add the line
<rom file="/var/lib/libvirt/vbios/gpu.rom"/>.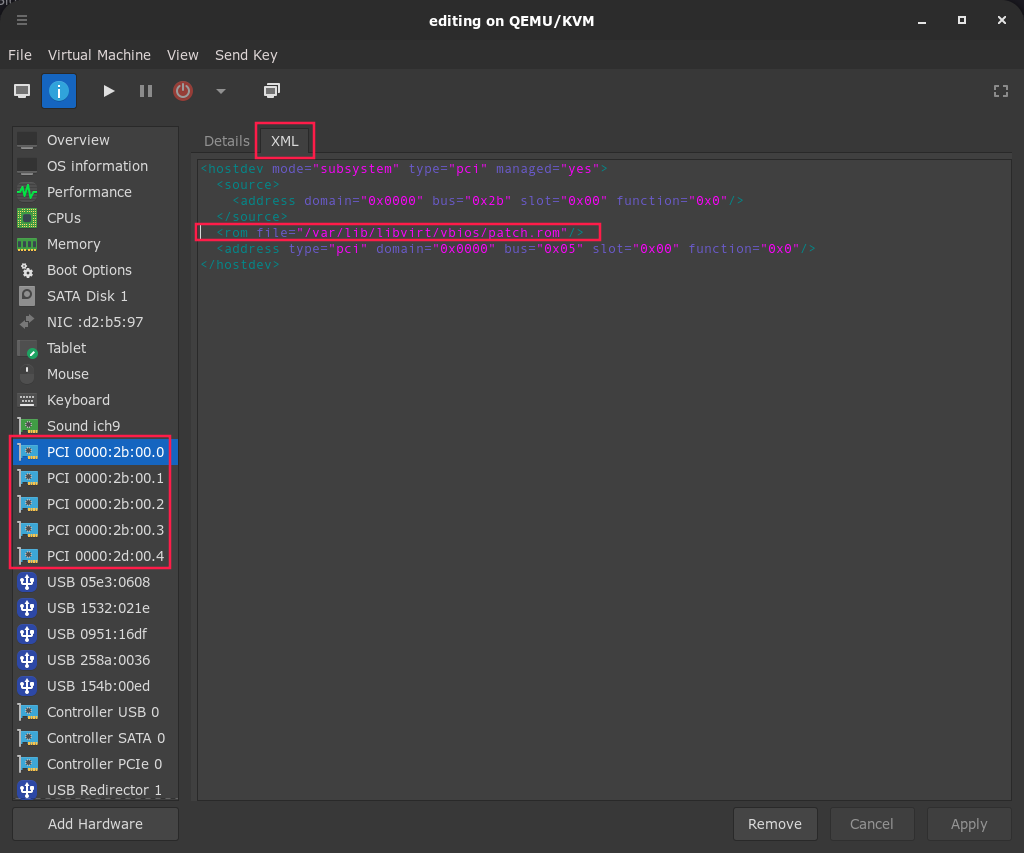
- Lastly, remove every spice/qxl device from your virtual machine
- If you are using an NVIDIA graphics card, add these lines to your XML overview.
  </os>
  <features>
    <acpi/>
    <apic/>
    <hyperv>
      <relaxed state='on'/>
      <vapic state='on'/>
      <spinlocks state='on' retries='8191'/>
      <vendor_id state='on' value='123456789123'/>
    </hyperv>
    <kvm>
      <hidden state='on'/>
    </kvm>
    <vmport state='off'/>
    <ioapic driver='kvm'/>

This is usefull for people who want to name their VMs to something other than win10.
- Edit the hooks script by typing
sudo nano /etc/libvirt/hooks/qemu - On the line with the if then statement, add in
|| [[ $OBJECT == "RENAME TO YOUR VM" ]]before the ;.
- Now you should be good to turn on your VM! On Windows drivers will auto install.