My Manjaro Linux Build for my Elminister rig
Get Manjaro Linux ISO file, I picked the KDE version
https://manjaro.org/get-manjaro/
Burn ISO to USB drive
Balena Etcher - https://www.balena.io/etcher/
dd - https://man7.org/linux/man-pages/man1/dd.1.html
Once done go into your BIOS and change boot priority to make sure that the usb drive is the first option. Then save and exit.
SUGGESTION >>> UNPLUG DRIVES THAT YOU DO NOT WANT TO INSTALL LINUX TO.
Make sure to use opensource drivers, since I am using an AMD GPU.
Launch installer from desktop and pick American English as language.
Pick the prefered timezone, Europe/Prague in my case.
Pick your keyboard layout. In my case Generic 105-key PC English (US) Default.
If you are using a VM, or scared of the manual part then just use Erase disk and Swap (with Hibernate).
Now click on Next.
Next fill out all the information needed.
- name: Thomas Mozdren
- login: beangreen247
- Computer Name: Elminister
- Password: not_gonna_dox_myself
And tick Use the same login for admin account
Now click on Next and you shlould see a system summary. Click Install. If a windows pops up, click Install now.
Make sure to reboot after the install has finished.
Once you reboot make sure to switch Dekstop Session from Plasma (Wayland) to Plasma(X11).
Open a terminal (Konsole) and type in sudo pacman -Syyuu to do a full system update and upgrade. After it is done, just reboot.
Install some packages (will be expanded)
sudo pacman -S neofetch htop git base-devel kdevelop multilib-devel vulkan-devel jre-openjdk jre11-openjdk jre8-openjdk jdk-openjdk jdk11-openjdk jdk8-openjdk gcc glibc yay notepadqq obs-studio
yay -S codium intellij-idea-community-edition google-chrome
Sidenote: if you install google chrome this way, it will automatically change in your taskbar, automatically replacing firefox. Oh sorry furryfox.
Download and use the update script
https://github.com/BeanGreen247/ArchLinuxUpdateScript
installing ssh stuff (needs configuring, not done yet)
sudo pacman -S openssh ufw
sudo systemctl enable sshd
sudo systemctl enable sshd.service
sudo systemctl enable ufw
sudo systemctl start sshd
sudo systemctl start ufw
sudo ufw allow ssh
sudo cp /etc/ssh/sshd_config ~/ssh_config_backup
sudo nano /etc/ssh/sshd_config
uncomment these two lines and add your ip, can be found using ip addr
Port 22
AddressFamily any
ListenAddress 192.168.1.115
sudo systemctl restart sshd
sudo nano /etc/hosts.allow
SSHD: ALL
sudo nano restart-sshd.sh
pass="not_gonna_dox_myself"
sleep 10
echo $pass | sudo -S systemctl restart sshd
create an autostart option in Autostart settings menu and add a Login script, navigate to the script that we created and add it, next click on properties and make sure it is executable and that everyone can wiev and execute the script, also in the command section make sure to add bash at the beginning like so
bash /home/beangreen247/restart-sshd.sh
make sure to change the location of the script based on your setup
installing discord
sudo pacman -S discord --noconfirm
installing aditional packages
sudo pacman -Sy wine-staging giflib lib32-giflib libpng lib32-libpng libldap lib32-libldap gnutls lib32-gnutls mpg123 lib32-mpg123 openal lib32-openal v4l-utils lib32-v4l-utils libpulse lib32-libpulse libgpg-error lib32-libgpg-error alsa-plugins lib32-alsa-plugins alsa-lib lib32-alsa-lib libjpeg-turbo lib32-libjpeg-turbo sqlite lib32-sqlite libxcomposite lib32-libxcomposite libxinerama lib32-libgcrypt libgcrypt lib32-libxinerama ncurses lib32-ncurses opencl-icd-loader lib32-opencl-icd-loader libxslt lib32-libxslt libva lib32-libva gtk3 lib32-gtk3 gst-plugins-base-libs lib32-gst-plugins-base-libs vulkan-icd-loader lib32-vulkan-icd-loader cups samba alsa alsa-utils alsa-tools gnutls libpng wine-mono lib32-libxml2 lib32-mpg123 lib32-lcms2 lib32-giflib lib32-libpng lib32-gnutls lib32-libpulse lib32-fontconfig lib32-libxcomposite lib32-libxrender lib32-libxslt lib32-gnutls lib32-libxi lib32-libxrandr lib32-libxinerama lib32-libcups lib32-freetype2 lib32-libpng lib32-openal python-pyopencl lib32-v4l-utils lib32-libxcursor lib32-mpg123 lib32-sdl xf86-video-intel lib32-mesa-libgl nss-mdns ninja nasm git-lfs jq oniguruma yarn gulp semver nodejs tmux nvm lib32-gamemode lib32-vkd3d vkd3d krita gimp --noconfirm
yay -S dxvk-bin
Open steam and go to Steam >> Settings >> Steam Play >> Enable Steam Play for all titles and leave Proton Experimental
sudo pacman -S gamemode
Make sure to reboot
DXVK stuff
sudo pacman -S vulkan-radeon lib32-vulkan-radeon amdvlk lib32-amdvlk vulkan-icd-loader lib32-vulkan-icd-loader vulkan-mesa-layers lib32-vulkan-mesa-layers
//this is for AMD GPUs for more go here https://wiki.archlinux.org/title/Vulkan#Installation
after this reboot
https://github.com/doitsujin/dxvk/releases download the latest .tar.gz and extract it to your downloads folder
next open two or three file explorers and open the dxvk folder in one and open these two dirs next
/home/beangreen247/.steam/steam/steamapps/common/Proton - Experimental/files/lib/wine/dxvk
and
/home/beangreen247/.steam/steam/steamapps/common/Proton - Experimental/files/lib32/wine/dxvk
and copy and replace them in this fassion
everything in /home/beangreen247/Downloads/dxvk-version/x32/ into here /home/beangreen247/.steam/steam/steamapps/common/Proton - Experimental/files/lib/wine/dxvk
everything in /home/beangreen247/Downloads/dxvk-version/x64/ into here /home/beangreen247/.steam/steam/steamapps/common/Proton - Experimental/files/lib64/wine/dxvk
And in steam add this into the launch options of each game to see if it works or not
DXVK_HUD=version,fps,gpuload %command%
Remapping Home dirs
sudo nano ~/.config/user-dirs.dirs
XDG_DESKTOP_DIR="/mnt/01D807332FB88CE0/Desktop"
XDG_DOWNLOAD_DIR="/mnt/01D807332FB88CE0/Downloads"
XDG_TEMPLATES_DIR="$HOME/Templates"
XDG_PUBLICSHARE_DIR="$HOME/Public"
XDG_DOCUMENTS_DIR="/mnt/01D807332FB88CE0/Documents"
XDG_MUSIC_DIR="/mnt/01D807332FB88CE0/Music"
XDG_PICTURES_DIR="/mnt/01D807332FB88CE0/Pictures"
XDG_VIDEOS_DIR="/mnt/01D807332FB88CE0/Videos"
sudo nano /etc/xdg/user-dirs.defaults
DESKTOP=/mnt/01D807332FB88CE0/Desktop
DOWNLOAD=/mnt/01D807332FB88CE0/Downloads
TEMPLATES=Templates
PUBLICSHARE=Public
DOCUMENTS=/mnt/01D807332FB88CE0/Documents
MUSIC=/mnt/01D807332FB88CE0/Music
PICTURES=/mnt/01D807332FB88CE0/Pictures
VIDEOS=/mnt/01D807332FB88CE0/Videos
Reboot in order for them to aplly.
Terminal stuff yay!!!
Apply my custom zshrc file and set the blue color scheme https://github.com/BeanGreen247/zsh-config
Open Konsole and go to Settings and untick Main Toolbar and Session Toolbar under Toolbars Shown for a clean look.
nano ~/.tmux.conf
set-option -g default-shell /bin/zsh
performance-mode.sh
#!/bin/bash
cat /sys/devices/system/cpu/cpu*/cpufreq/scaling_governor
for file in /sys/devices/system/cpu/cpu*/cpufreq/scaling_governor; do echo "performance" > $file; done
cat /sys/devices/system/cpu/cpu*/cpufreq/scaling_governor
to run use sudo for root access this will be done at startup with the following script
nano execute-performance-mode-sh-as-root.sh
sleep 3
chmod +x performance-mode.sh
echo $pass | sudo -S bash performance-mode.sh
chmod +x execute-performance-mode-sh-as-root.sh
Some info
- performance-mode.sh - to enable performace cpu governor, will be added to autostart at startup
create an autostart option in Autostart settings menu and add a Login script, navigate to the script that we created and add it, next click on properties and make sure it is executable and that everyone can wiev and execute the script, also in the command section make sure to add bash at the beginning like so
bash /home/beangreen247/execute-performance-mode-sh-as-root.sh
make sure to change the location of the script based on your setup
the script that we added at startup/on login will set the cpu scaling governor to performance once in linux
to check run cat /sys/devices/system/cpu/cpu*/cpufreq/scaling_governor
we will look into more performace improvements and tweaks, this VM is used for video editing and gaming if the game is proprietary and has anticheat software or drm built in.
Install packages
sudo pacman -S virt-manager qemu vde2 iptables-nft dnsmasq bridge-utils openbsd-netcat edk2-ovmf swtpm qemu qemu-block-gluster qemu-block-iscsi virt-manager libvirt ebtables dnsmasq bridge-utils
sudo systemctl enable libvirtd
sudo systemctl start libvirtd
sudo systemctl restart libvirtd
sudo virsh net-start default
sudo virsh net-autostart default
The install will ask to replace a tables package just say yes and you are good to go.
Make sure to reboot.
Steps on creating a VM in virtual machine manager
-
Pick Manual install
-
Choose the OS you are installing: Microsoft Windows 10 (win10)
-
RAM: 26624
-
CPUs: 10
-
Create a disk image for the VM: 256GiB (if you have a spare ssd you can pass it here)
-
Tick Customize config before install
-
Select NIC and change Network source to Virtual network 'default' NAT
-
Click add Hardware and add storage select or create custom
and paste in the drive from the /dev/disk/by-id/ dir
in my case /dev/disk/by-id/ata-WDC_WD20EZBX-00AYRA0_WD-WXC2A71C5L58
To find the drive that we want to pass
run this commad
sudo lshw -class disk -class storageand look for the disk to pass
//to identify just look at he product name (so WDC WD20EZBX-00A in my case)
*-disk:1
      description: ATA Disk
      product: WDC WD20EZBX-00A
      vendor: Western Digital
      physical id: 1
      bus info: scsi@2:0.0.0
      logical name: /dev/sdb
      version: 1A01
      serial: WD-WXC2A71C5L58
      size: 1863GiB (2TB)
      capabilities: gpt-1.00 partitioned partitioned:gpt
      configuration: ansiversion=5 guid=e625b1c9-7160-4c36-8d34-e4d258eb02eb logicalsectorsize=512 sectorsize=4096
next oppen your file explorer and navigate to here
/dev/disk/by-id/and look for the drive
in my case
/dev/disk/by-id/ata-WDC_WD20EZBX-00AYRA0_WD-WXC2A71C5L58there will be multiple seperated by parts and you need the one without "part" in its name so in my case
ata-WDC_WD20EZBX-00AYRA0_WD-WXC2A71C5L58next copy its location and paste in into the select or create custom box as mention at the start
next select Device type as Disk device and bus type as sata and click finish
next add a SATA CDROM, click add hardware Select Storage and pick Device type as CDROM device and bus type as SATA and finally click finish
now under source path click browse and then click browse local and pick the windows 10 install media (iso file)
go into boot options and change the boot order with all drives and the cdrom selected
with all that hit apply and click on the monitor icon and click on Power on virtual machine
so the vm is successfully created and the os is ready to be installed so install it normally
i will be getting a spare ssd at some point so i will reinstall windows onto the new ssd and pass it into the vm duh
once it is finished with the install you want to trun it off
next go into overview and click the xml tab
in here do the following
replace
<cpu mode="host-passthrough" check="none" migratable="on"/>
with
<cpu mode="host-passthrough" check="none" migratable="on">
 <topology sockets="1" dies="1" cores="5" threads="2"/>
 <feature policy='disable' name='hypervisor'/>
</cpu>
next find hyperv section
<hyperv mode="custom">
 <relaxed state="on"/>
 <vapic state="on"/>
 <spinlocks state="on" retries="8191"/>
</hyperv>
and replace it with this below
<hyperv mode="custom">
  <relaxed state="on"/>
  <vapic state="on"/>
  <spinlocks state="on" retries="8191"/>
  <vpindex state="on"/>
  <runtime state="on"/>
  <synic state="on"/>
  <stimer state="on"/>
  <reset state="on"/>
  <vendor_id state="on" value="randomid"/>
  <frequencies state="on"/>
</hyperv>
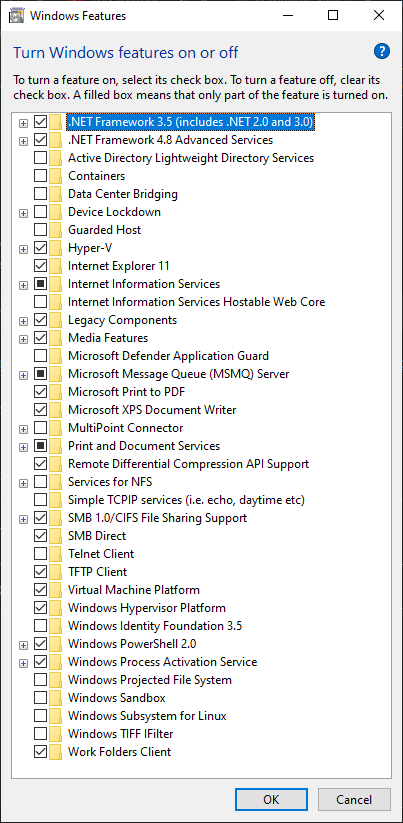
next boot the vm up and let it update and while we are there go to control panel, add or remove programs and click on Turn windows features on or off and you want to tick Hyper-V and enable everything in there and click ok
make sure to apply all the updates by rebooting after it finishes make sure to check cpu stas and then power off
next up iommu grouping
sudo nano /etc/default/grub
find a line that says GRUB_CMDLINE_LINUX_DEFAULT="quiet apparmor=1 security=apparmor resume=..."
and add intel_iommu=on if on intel or amd_iommu=on if on amd and add it between security=apparmor and resume=... so it looks like so
GRUB_CMDLINE_LINUX_DEFAULT="quiet apparmor=1 security=apparmor intel_iommu=on resume=..."
after that do ctrl+s and ctrl+x
next run
sudo grub-mkconfig -o /boot/grub/grub.cfg
and reboot to apply
next identify the gpu
run sudo dmesg | grep -i -e DMAR -e IOMMU
and look for a line looking like this [ 0.052831] DMAR: IOMMU enabled
switch to bash by typing in bash in the terminal
so run this code
#!/bin/bash
shopt -s nullglob
for g in $(find /sys/kernel/iommu_groups/* -maxdepth 0 -type d | sort -V); do
    echo "IOMMU Group ${g##*/}:"
    for d in $g/devices/*; do
        echo -e "\t$(lspci -nns ${d##*/})"
    done;
done;
example output
IOMMU Group 0:
        00:00.0 Host bridge [0600]: Intel Corporation Comet Lake-S 6c Host Bridge/DRAM Controller [8086:9b53] (rev 03)
IOMMU Group 1:
        00:01.0 PCI bridge [0604]: Intel Corporation 6th-10th Gen Core Processor PCIe Controller (x16) [8086:1901] (rev 03)
        01:00.0 VGA compatible controller [0300]: Advanced Micro Devices, Inc. [AMD/ATI] Ellesmere [Radeon RX 470/480/570/570X/580/580X/590] [1002:67df] (rev c7)
        01:00.1 Audio device [0403]: Advanced Micro Devices, Inc. [AMD/ATI] Ellesmere HDMI Audio [Radeon RX 470/480 / 570/580/590] [1002:aaf0]
IOMMU Group 2:
        00:14.0 USB controller [0c03]: Intel Corporation Comet Lake PCH-V USB Controller [8086:a3af]
IOMMU Group 3:
        00:16.0 Communication controller [0780]: Intel Corporation Comet Lake PCH-V HECI Controller [8086:a3ba]
IOMMU Group 4:
        00:17.0 SATA controller [0106]: Intel Corporation 400 Series Chipset Family SATA AHCI Controller [8086:a382]
IOMMU Group 5:
        00:1b.0 PCI bridge [0604]: Intel Corporation Device [8086:a3e9] (rev f0)
IOMMU Group 6:
        00:1c.0 PCI bridge [0604]: Intel Corporation Device [8086:a392] (rev f0)
IOMMU Group 7:
        00:1d.0 PCI bridge [0604]: Intel Corporation Comet Lake PCI Express Root Port 9 [8086:a398] (rev f0)
        04:00.0 Non-Volatile memory controller [0108]: Micron/Crucial Technology P1 NVMe PCIe SSD [c0a9:2263] (rev 03)
IOMMU Group 8:
        00:1f.0 ISA bridge [0601]: Intel Corporation B460 Chipset LPC/eSPI Controller [8086:a3c8]
        00:1f.2 Memory controller [0580]: Intel Corporation Cannon Lake PCH Power Management Controller [8086:a3a1]
        00:1f.3 Audio device [0403]: Intel Corporation Comet Lake PCH-V cAVS [8086:a3f0]
        00:1f.4 SMBus [0c05]: Intel Corporation Comet Lake PCH-V SMBus Host Controller [8086:a3a3]
        00:1f.6 Ethernet controller [0200]: Intel Corporation Ethernet Connection (12) I219-V [8086:0d55]
what we need is here, in my case
01:00.0 VGA compatible controller [0300]: Advanced Micro Devices, Inc. [AMD/ATI] Ellesmere [Radeon RX 470/480/570/570X/580/580X/590] [1002:67df] (rev c7)
01:00.1 Audio device [0403]: Advanced Micro Devices, Inc. [AMD/ATI] Ellesmere HDMI Audio [Radeon RX 470/480 / 570/580/590] [1002:aaf0]
next type in sudo mkdir -p /etc/libvirt/hooks
and run this next
sudo wget 'https://raw.githubusercontent.com/PassthroughPOST/VFIO-Tools/master/libvirt_hooks/qemu' \
     -O /etc/libvirt/hooks/qemu
sudo chmod +x /etc/libvirt/hooks/qemu
and this next sudo systemctl restart libvirtd
next run
sudo mkdir -p /etc/libvirt/hooks/qemu.d/win10/prepare/begin
sudo mkdir -p /etc/libvirt/hooks/qemu.d/win10/release/end
next up scripting
sudo nano /etc/libvirt/hooks/qemu.d/win10/prepare/begin/start.sh
#!/bin/bash
# Helpful to read output when debugging
set -x

# Stop display manager
systemctl stop display-manager.service
## Uncomment the following line if you use GDM
#killall gdm-x-session

# Unbind VTconsoles
echo 0 > /sys/class/vtconsole/vtcon0/bind
echo 0 > /sys/class/vtconsole/vtcon1/bind

# Unbind EFI-Framebuffer
echo efi-framebuffer.0 > /sys/bus/platform/drivers/efi-framebuffer/unbind

# Avoid a Race condition by waiting 2 seconds. This can be calibrated to be shorter or longer if required for your system
sleep 2

# Unbind the GPU from display driver
virsh nodedev-detach pci_0000_0c_00_0
virsh nodedev-detach pci_0000_0c_00_1

# Load VFIO Kernel Module
modprobe vfio-pci
what we need is here, in my case
01:00.0 VGA compatible controller [0300]: Advanced Micro Devices, Inc. [AMD/ATI] Ellesmere [Radeon RX 470/480/570/570X/580/580X/590] [1002:67df] (rev c7)
01:00.1 Audio device [0403]: Advanced Micro Devices, Inc. [AMD/ATI] Ellesmere HDMI Audio [Radeon RX 470/480 / 570/580/590] [1002:aaf0]
so mod these two lines like so based of the id at the start
01:00.0
01:00.1
so kinda like this
virsh nodedev-detach pci_0000_01_00_0
virsh nodedev-detach pci_0000_01_00_1
now run this command in the terminal lspci -v
example output
00:00.0 Host bridge: Intel Corporation Comet Lake-S 6c Host Bridge/DRAM Controller (rev 03)
        DeviceName: Onboard - Other
        Subsystem: ASUSTeK Computer Inc. Device 8694
        Flags: bus master, fast devsel, latency 0, IOMMU group 0
        Capabilities: <access denied>
        Kernel driver in use: skl_uncore

00:01.0 PCI bridge: Intel Corporation 6th-10th Gen Core Processor PCIe Controller (x16) (rev 03) (prog-if 00 [Normal decode])
        Flags: bus master, fast devsel, latency 0, IRQ 121, IOMMU group 1
        Bus: primary=00, secondary=01, subordinate=01, sec-latency=0
        I/O behind bridge: 00003000-00003fff [size=4K]
        Memory behind bridge: 90200000-902fffff [size=1M]
        Prefetchable memory behind bridge: 0000004080000000-00000041ffffffff [size=6G]
        Capabilities: <access denied>
        Kernel driver in use: pcieport

00:14.0 USB controller: Intel Corporation Comet Lake PCH-V USB Controller (prog-if 30 [XHCI])
        DeviceName: Onboard - Other
        Subsystem: ASUSTeK Computer Inc. Device 8694
        Flags: bus master, medium devsel, latency 0, IRQ 139, IOMMU group 2
        Memory at 4010210000 (64-bit, non-prefetchable) [size=64K]
        Capabilities: <access denied>
        Kernel driver in use: xhci_hcd
        Kernel modules: xhci_pci

00:16.0 Communication controller: Intel Corporation Comet Lake PCH-V HECI Controller
        DeviceName: Onboard - Other
        Subsystem: ASUSTeK Computer Inc. Device 8694
        Flags: bus master, fast devsel, latency 0, IRQ 140, IOMMU group 3
        Memory at 4010225000 (64-bit, non-prefetchable) [size=4K]
        Capabilities: <access denied>
        Kernel driver in use: mei_me
        Kernel modules: mei_me

00:17.0 SATA controller: Intel Corporation 400 Series Chipset Family SATA AHCI Controller (prog-if 01 [AHCI 1.0])
        DeviceName: Onboard - SATA
        Subsystem: ASUSTeK Computer Inc. Device 8694
        Flags: bus master, 66MHz, medium devsel, latency 0, IRQ 126, IOMMU group 4
        Memory at 90324000 (32-bit, non-prefetchable) [size=8K]
        Memory at 90327000 (32-bit, non-prefetchable) [size=256]
        I/O ports at 4050 [size=8]
        I/O ports at 4040 [size=4]
        I/O ports at 4020 [size=32]
        Memory at 90326000 (32-bit, non-prefetchable) [size=2K]
        Capabilities: <access denied>
        Kernel driver in use: ahci

00:1b.0 PCI bridge: Intel Corporation Device a3e9 (rev f0) (prog-if 00 [Normal decode])
        Flags: bus master, fast devsel, latency 0, IRQ 122, IOMMU group 5
        Bus: primary=00, secondary=02, subordinate=02, sec-latency=0
        I/O behind bridge: 00005000-00005fff [size=4K]
        Memory behind bridge: 90400000-905fffff [size=2M]
        Prefetchable memory behind bridge: 0000004010300000-00000040104fffff [size=2M]
        Capabilities: <access denied>
        Kernel driver in use: pcieport

00:1c.0 PCI bridge: Intel Corporation Device a392 (rev f0) (prog-if 00 [Normal decode])
        Flags: bus master, fast devsel, latency 0, IRQ 123, IOMMU group 6
        Bus: primary=00, secondary=03, subordinate=03, sec-latency=0
        I/O behind bridge: 00006000-00006fff [size=4K]
        Memory behind bridge: 90600000-907fffff [size=2M]
        Prefetchable memory behind bridge: 0000004010500000-00000040106fffff [size=2M]
        Capabilities: <access denied>
        Kernel driver in use: pcieport

00:1d.0 PCI bridge: Intel Corporation Comet Lake PCI Express Root Port 9 (rev f0) (prog-if 00 [Normal decode])
        Flags: bus master, fast devsel, latency 0, IRQ 124, IOMMU group 7
        Bus: primary=00, secondary=04, subordinate=04, sec-latency=0
        I/O behind bridge: [disabled]
        Memory behind bridge: 90100000-901fffff [size=1M]
        Prefetchable memory behind bridge: [disabled]
        Capabilities: <access denied>
        Kernel driver in use: pcieport

00:1f.0 ISA bridge: Intel Corporation B460 Chipset LPC/eSPI Controller
        DeviceName: Onboard - Other
        Subsystem: ASUSTeK Computer Inc. Device 8694
        Flags: bus master, medium devsel, latency 0, IOMMU group 8

00:1f.2 Memory controller: Intel Corporation Cannon Lake PCH Power Management Controller
        DeviceName: Onboard - Other
        Subsystem: ASUSTeK Computer Inc. Device 8694
        Flags: fast devsel, IOMMU group 8
        Memory at 90320000 (32-bit, non-prefetchable) [disabled] [size=16K]

00:1f.3 Audio device: Intel Corporation Comet Lake PCH-V cAVS
        DeviceName: Onboard - Sound
        Subsystem: ASUSTeK Computer Inc. Device 8796
        Flags: bus master, fast devsel, latency 32, IRQ 142, IOMMU group 8
        Memory at 4010220000 (64-bit, non-prefetchable) [size=16K]
        Memory at 4010200000 (64-bit, non-prefetchable) [size=64K]
        Capabilities: <access denied>
        Kernel driver in use: snd_hda_intel
        Kernel modules: snd_hda_intel, snd_sof_pci_intel_cnl

00:1f.4 SMBus: Intel Corporation Comet Lake PCH-V SMBus Host Controller
        DeviceName: Onboard - Other
        Subsystem: ASUSTeK Computer Inc. Device 8694
        Flags: medium devsel, IRQ 16, IOMMU group 8
        Memory at 4010224000 (64-bit, non-prefetchable) [size=256]
        I/O ports at efa0 [size=32]
        Kernel driver in use: i801_smbus
        Kernel modules: i2c_i801

00:1f.6 Ethernet controller: Intel Corporation Ethernet Connection (12) I219-V
        DeviceName: Onboard - Ethernet
        Subsystem: ASUSTeK Computer Inc. Device 8672
        Flags: bus master, fast devsel, latency 0, IRQ 141, IOMMU group 8
        Memory at 90300000 (32-bit, non-prefetchable) [size=128K]
        Capabilities: <access denied>
        Kernel driver in use: e1000e
        Kernel modules: e1000e

01:00.0 VGA compatible controller: Advanced Micro Devices, Inc. [AMD/ATI] Ellesmere [Radeon RX 470/480/570/570X/580/580X/590] (rev c7) (prog-if 00 [VGA controller])
        Subsystem: PC Partner Limited / Sapphire Technology Radeon RX 470/480
        Flags: bus master, fast devsel, latency 0, IRQ 144, IOMMU group 1
        Memory at 4100000000 (64-bit, prefetchable) [size=4G]
        Memory at 4080000000 (64-bit, prefetchable) [size=2M]
        I/O ports at 3000 [size=256]
        Memory at 90200000 (32-bit, non-prefetchable) [size=256K]
        Expansion ROM at 000c0000 [disabled] [size=128K]
        Capabilities: <access denied>
        Kernel driver in use: amdgpu
        Kernel modules: amdgpu

01:00.1 Audio device: Advanced Micro Devices, Inc. [AMD/ATI] Ellesmere HDMI Audio [Radeon RX 470/480 / 570/580/590]
        Subsystem: PC Partner Limited / Sapphire Technology Device aaf0
        Flags: bus master, fast devsel, latency 0, IRQ 143, IOMMU group 1
        Memory at 90260000 (64-bit, non-prefetchable) [size=16K]
        Capabilities: <access denied>
        Kernel driver in use: snd_hda_intel
        Kernel modules: snd_hda_intel

04:00.0 Non-Volatile memory controller: Micron/Crucial Technology P1 NVMe PCIe SSD (rev 03) (prog-if 02 [NVM Express])
        Subsystem: Micron/Crucial Technology P1 NVMe PCIe SSD
        Flags: bus master, fast devsel, latency 0, IRQ 16, NUMA node 0, IOMMU group 7
        Memory at 90100000 (64-bit, non-prefetchable) [size=16K]
        Capabilities: <access denied>
        Kernel driver in use: nvme
and what we need is the kernel driver in use
so in my case I have to modprobe these
| id | kernel driver |
|---|---|
| 01:00.0 | amdgpu |
so the final version
#!/bin/bash
# Helpful to read output when debugging
set -x

# Stop display manager
systemctl stop sddm.service
systemctl stop display-manager.service
pulse_pid=$(pgrep -u YOURUSERNAME pulseaudio)
pipewire_pid=$(pgrep -u YOURUSERNAME pipewire-media)
kill $pulse_pid
kill $pipewire_pid
# Uncomment the following line if you use GDM
#killall gdm-x-session

# Unbind VTconsoles
echo 0 > /sys/class/vtconsole/vtcon0/bind
echo 0 > /sys/class/vtconsole/vtcon1/bind

# Unbind EFI-Framebuffer
echo efi-framebuffer.0 > /sys/bus/platform/drivers/efi-framebuffer/unbind

# Avoid a Race condition by waiting 10 seconds. This can be calibrated to be shorter or longer if required for your system
sleep 10

# Unload AMD modules
modprobe -r amdgpu
#modprobe -r snd_hda_intel
#modprobe -r xhci_hcd

# Unbind the GPU from display driver
virsh nodedev-detach pci_0000_01_00_0
virsh nodedev-detach pci_0000_01_00_1
#virsh nodedev-detach pci_0000_00_1f_3
#virsh nodedev-detach pci_0000_00_14_0

# Load VFIO Kernel Module
modprobe vfio
modprobe vfio-pci
modprobe vfio_iommu_type1
the stop script will be moded the same way
so final version
sudo nano /etc/libvirt/hooks/qemu.d/win10/release/end/revert.sh
#!/bin/bash
set -x

# unload vfio
modprobe -r vfio-pci
modprobe -r vfio_iommu_type1
modprobe -r vfio

# Re-Bind GPU to AMD Driver
virsh nodedev-reattach pci_0000_01_00_0
virsh nodedev-reattach pci_0000_01_00_1
#virsh nodedev-reattach pci_0000_00_1f_3
#virsh nodedev-reattach pci_0000_00_14_0

# Rebind VT consoles
echo 1 > /sys/class/vtconsole/vtcon0/bind
# Some machines might have more than 1 virtual console. Add a line for each corresponding VTConsole
echo 0 > /sys/class/vtconsole/vtcon1/bind

echo "efi-framebuffer.0" > /sys/bus/platform/drivers/efi-framebuffer/bind

# Reload AMD modules
modprobe amdgpu
#modprobe snd_hda_intel
#modprobe xhci_hcd

# Restart Display Manager
systemctl start sddm.service
systemctl start display-manager.service
save and exit
next make the scripts executable
sudo chmod +x /etc/libvirt/hooks/qemu.d/win10/prepare/begin/start.sh
sudo chmod +x /etc/libvirt/hooks/qemu.d/win10/release/end/revert.sh
so the final tree structure should look like this
sudo tree /etc/libvirt/hooks
/etc/libvirt/hooks
├── qemu
└── qemu.d
    └── win10
        ├── prepare
        │   └── begin
        │       └── start.sh
        └── release
            └── end
                └── revert.sh

6 directories, 3 files
Now after all this add your gpu in VMs config
via Add Hardware and add PCI Host Device and add
01:00.0 VGA compatible controller [0300]: Advanced Micro Devices, Inc. [AMD/ATI] Ellesmere [Radeon RX 470/480/570/570X/580/580X/590] [1002:67df] (rev c7)
01:00.1 Audio device [0403]: Advanced Micro Devices, Inc. [AMD/ATI] Ellesmere HDMI Audio [Radeon RX 470/480 / 570/580/590] [1002:aaf0]
you need to add both of them so you should see 2 PCI devices and now save it
now go into overview and open the xml tab
now find the features section and find
  <features>
    <acpi/>
    <apic/>
    <hyperv mode="custom">
      <relaxed state="on"/>
      <vapic state="on"/>
      <spinlocks state="on" retries="8191"/>
      <vendor_id state="on" value="buttplug"/>
      <vpindex state="on"/>
      <runtime state="on"/>
      <synic state="on"/>
      <stimer state="on"/>
      <reset state="on"/>
      <frequencies state="on"/>
    </hyperv>
    <vmport state="off"/>
  </features>
we moved and updated the vendor_id
hit save a bunch of times and reboot the pc
after all that reboot your pc and then test the VM
only changes made were that i added input devices such as a usb keyboard and usb mouse and add a watchdog and se ti to forcefully power off the guest VM so that if it does not boot it odes give us control back also i passed all the controlers and devices from the pci list
and a final step before you boot the vm up is go here in your file explorer /dev/input/by-id/
and adjust the lines before adding them, this will fix no keyboard inputs and mouse problems
example
///at the top of the file change it to this
<domain xmlns:qemu="http://libvirt.org/schemas/domain/qemu/1.0" type="kvm">
run this command ls -l /dev/input/by-id
take note of the link like so (this is in my case)
total 0
lrwxrwxrwx 1 root root 10  6. dub 16.48 usb-KYE_Systems_Corp._FaceCam_1000X-event-if00 -> ../event21
lrwxrwxrwx 1 root root 10  6. dub 16.48 usb-ShanWan_Controller_XBOX_360_For_Windows-event-joystick -> ../event18
lrwxrwxrwx 1 root root  6  6. dub 16.48 usb-ShanWan_Controller_XBOX_360_For_Windows-joystick -> ../js0
lrwxrwxrwx 1 root root 10  6. dub 16.48 usb-Telink_Wireless_Receiver-event-if00 -> ../event24
lrwxrwxrwx 1 root root 10  6. dub 16.48 usb-Telink_Wireless_Receiver-event-mouse -> ../event22
lrwxrwxrwx 1 root root 10  6. dub 16.48 usb-Telink_Wireless_Receiver-if01-event-kbd -> ../event25
lrwxrwxrwx 1 root root  9  6. dub 16.48 usb-Telink_Wireless_Receiver-mouse -> ../mouse0
Permissions
sudo usermod -a -G libvirt,kvm,libvirt-qemu,input,disk,audio,video <some_user>
in my case
sudo usermod -a -G libvirt,kvm,libvirt-qemu,input,disk,audio,video beangreen247
sudo usermod -a -G libvirt,kvm,libvirt-qemu,input,disk,audio,video root
to check if added run this command and look for your username
getent group
now run this
sudo nano /etc/libvirt/qemu.conf
add this at the end of it, but change the user
vnc_allow_host_audio = 1
nographics_allow_host_audio = 1
user = "beangreen247"
group = "kvm"
cgroup_device_acl = [
    "/dev/input/event0",
    "/dev/input/event1",
    "/dev/input/event2",
    "/dev/input/event3",
    "/dev/input/event4",
    "/dev/input/event5",
    "/dev/input/event22",
    "/dev/input/event25",
    "/dev/input/event18",
    "/dev/input/js0",
    "/dev/input/event21",
    "/dev/input/event24",
    "/dev/input/mouse0",
    "/dev/null", "/dev/full", "/dev/zero",
    "/dev/random", "/dev/urandom",
    "/dev/ptmx", "/dev/kvm", "/dev/kqemu",
    "/dev/rtc","/dev/hpet", "/dev/vfio/vfio"
]
Next restart the service sudo systemctl restart libvirtd
also add your mouse as a usb device to use it in the vm
sudo systemctl restart libvirtd
and reboot just in case
now try to use the VM
once done power off
now we need to edit a file called qemu in hooks sudo nano /etc/libvirt/hooks/qemu
add this at the end of the file
command=$2

if [ "$command" = "started" ]; then
    systemctl set-property --runtime -- system.slice AllowedCPUs=0,6
    systemctl set-property --runtime -- user.slice AllowedCPUs=0,6
    systemctl set-property --runtime -- init.scope AllowedCPUs=0,6
elif [ "$command" = "release" ]; then
    systemctl set-property --runtime -- system.slice AllowedCPUs=0-11
    systemctl set-property --runtime -- user.slice AllowedCPUs=0-11
    systemctl set-property --runtime -- init.scope AllowedCPUs=0-11
fi
and this is what it looks like in the xml
<vcpu placement="static">10</vcpu>
  <iothreads>1</iothreads>
  <cputune>
    <vcpupin vcpu="0" cpuset="1"/>
    <vcpupin vcpu="1" cpuset="2"/>
    <vcpupin vcpu="2" cpuset="3"/>
    <vcpupin vcpu="3" cpuset="4"/>
    <vcpupin vcpu="4" cpuset="5"/>
    <vcpupin vcpu="5" cpuset="7"/>
    <vcpupin vcpu="6" cpuset="8"/>
    <vcpupin vcpu="7" cpuset="9"/>
    <vcpupin vcpu="8" cpuset="10"/>
    <vcpupin vcpu="9" cpuset="11"/>
    <emulatorpin cpuset="0,6"/>
    <iothreadpin iothread="1" cpuset="0,6"/>
  </cputune>
You may need to change the XML based on your topology
now try and test it
sudo nano reassign-cpu.sh
pass="not_gonna_dox_myself"
sleep 3
echo $pass | sudo -S systemctl set-property --runtime -- system.slice AllowedCPUs=0-11
sleep 3
echo $pass | sudo -S systemctl set-property --runtime -- user.slice AllowedCPUs=0-11
sleep 3
echo $pass | sudo -S systemctl set-property --runtime -- init.scope AllowedCPUs=0-11
create an autostart option in Autostart settings menu and add a Login script, navigate to the script that we created and add it, next click on properties and make sure it is executable and that everyone can wiev and execute the script, also in the command section make sure to add bash at the beginning like so
bash /home/beangreen247/reassign-cpu.sh
make sure to change the location of the script based on your setup
the script that we added at startup/on login will reassing cpu cores back to linux
Bluetooth stuff
Install packages
sudo pacman -S pulseaudio-bluetooth pulseaudio-alsa bluez-utils
Enable and start bluetooth
sudo systemctl enable bluetooth.service
sudo systemctl restart bluetooth.service
Setting up auto connection
To make your headset auto connect you need to enable PulseAudio's switch-on-connect module. Do this by adding the following lines to /etc/pulse/default.pa:
### Automatically switch to newly-connected devices
load-module module-switch-on-connect
And add these lines into /etc/bluetooth/main.cf
AutoEnable=true
Next restart bluetooth service
systemctl restart bluetooth
Next run bluetoothctl
Note: Here I am showing how I paired and connected my Sony WF-1000XM3s
Great ones btw.
Agent registered
[LE_WF-1000XM3]# power on
Changing power on succeeded
[LE_WF-1000XM3]# agent on
Agent is already registered
[LE_WF-1000XM3]# default-agent
Default agent request successful
[bluetooth]# scan on
Discovery started
[bluetooth]# pair 14:3F:A6:31:FF:10
Attempting to pair with 14:3F:A6:31:FF:10
[CHG] Device 14:3F:A6:31:FF:10 Name: WF-1000XM3
[CHG] Device 14:3F:A6:31:FF:10 Alias: WF-1000XM3
Pairing successful
[CHG] Device 14:3F:A6:31:FF:10 ServicesResolved: no
[LE_WF-1000XM3]# connect 14:3F:A6:31:FF:10
Attempting to connect to 14:3F:A6:31:FF:10
[CHG] Device 14:3F:A6:31:FF:10 UUIDs: 00000000-deca-fade-deca-deafdecacaff
[CHG] Device 14:3F:A6:31:FF:10 UUIDs: 00000709-0000-1000-8000-00805f9b34fb
[CHG] Device 14:3F:A6:31:FF:10 UUIDs: 00001108-0000-1000-8000-00805f9b34fb
[CHG] Device 14:3F:A6:31:FF:10 UUIDs: 0000110b-0000-1000-8000-00805f9b34fb
[CHG] Device 14:3F:A6:31:FF:10 UUIDs: 0000110c-0000-1000-8000-00805f9b34fb
[CHG] Device 14:3F:A6:31:FF:10 UUIDs: 0000110e-0000-1000-8000-00805f9b34fb
[CHG] Device 14:3F:A6:31:FF:10 UUIDs: 0000111e-0000-1000-8000-00805f9b34fb
[CHG] Device 14:3F:A6:31:FF:10 UUIDs: 00001200-0000-1000-8000-00805f9b34fb
[CHG] Device 14:3F:A6:31:FF:10 UUIDs: 00001800-0000-1000-8000-00805f9b34fb
[CHG] Device 14:3F:A6:31:FF:10 UUIDs: 0000fe03-0000-1000-8000-00805f9b34fb
[CHG] Device 14:3F:A6:31:FF:10 UUIDs: 55f80aef-d89f-41a4-9e36-0ffc88dc81ce
[CHG] Device 14:3F:A6:31:FF:10 UUIDs: 5b833e05-6bc7-4802-8e9a-723ceca4bd8f
[CHG] Device 14:3F:A6:31:FF:10 UUIDs: 5b833e06-6bc7-4802-8e9a-723ceca4bd8f
[CHG] Device 14:3F:A6:31:FF:10 UUIDs: 67a846ad-de3e-451b-a6d8-7b2899ca2370
[CHG] Device 14:3F:A6:31:FF:10 UUIDs: 81c2e72a-0591-443e-a1ff-05f988593351
[CHG] Device 14:3F:A6:31:FF:10 UUIDs: 8901dfa8-5c7e-4d8f-9f0c-c2b70683f5f0
[CHG] Device 14:3F:A6:31:FF:10 UUIDs: 91c10d9c-aaef-42bd-b6d6-8a648c19213d
[CHG] Device 14:3F:A6:31:FF:10 UUIDs: 931c7e8a-540f-4686-b798-e8df0a2ad9f7
[CHG] Device 14:3F:A6:31:FF:10 UUIDs: 96cc203e-5068-46ad-b32d-e316f5e069ba
[CHG] Device 14:3F:A6:31:FF:10 UUIDs: b9b213ce-eeab-49e4-8fd9-aa478ed1b26b
[CHG] Device 14:3F:A6:31:FF:10 UUIDs: dc405470-a351-4a59-97d8-2e2e3b207fbb
[CHG] Device 14:3F:A6:31:FF:10 UUIDs: f8d1fbe4-7966-4334-8024-ff96c9330e15
[CHG] Device 14:3F:A6:31:FF:10 UUIDs: fe59bfa8-7fe3-4a05-9d94-99fadc69faff
[CHG] Device 14:3F:A6:31:FF:10 ServicesResolved: yes
Connection successful
[CHG] Device 14:3F:A6:31:FF:10 ServicesResolved: no
[WF-1000XM3]# trust 14:3F:A6:31:FF:10
Changing 14:3F:A6:31:FF:10 trust succeeded
[WF-1000XM3]# connect 14:3F:A6:31:FF:10
Attempting to connect to 14:3F:A6:31:FF:10
Connection successful
[CHG] Device 14:3F:A6:31:FF:10 ServicesResolved: yes
[WF-1000XM3]# exit
For more information go here https://wiki.archlinux.org/title/bluetooth_headset#Headset_via_Bluez5/PulseAudio
- Search for Command Prompt in the Start menu.
- Right-click the Command Prompt result.
- Choose “Run As Administrator.”
- In Command Prompt window, type the following command:
powercfg -duplicatescheme e9a42b02-d5df-448d-aa00-03f14749eb61 - Press Enter.
Make sure that the following ones are enabled and that they have a checkmark next to them
Next reboot to apply the changes.
The reason is to prevent windows from downloading new drivers, well new old drivers, when the internet is detected
- Search for change device installation settings
- Select No (your device might not work as expected)
Besides disabling fullscreen optimizations via Settings, you can also choose to disable fullscreen optimizations via Registry Editor.
- Press Windows key and R key together to open Run dialog.
- Type regedit in the box and click OK to continue.
- In the Registry Editor window, navigate to the HKEY_CURRENT_USER\System\GameConfigStore folder.
- Then right-click on the right side and choose New > DWORD (32-bit) value to continue.
- Name it as the GameDVR_FSEBehavior.
- Then double-click it to change its value data. Set its value data to 2 to disable fullscreen optimizations feature.
- once you boot it up for the first time make sure to install your gpu drivers to get DX12/11/10.1/10/9/8 and vulkan support and install all redist stuff like visual c++ and stuff like that
- nake sure to install the drivers via .ini files aand go one dir by one in here
C:\AMD\AMD-Software-Adrenalin-Edition-22.4.2-Win10-Win11-April25\Packages\Drivers - make sure to do a driver CLEAN INSTALL from drivers, and reboot the VM to get full speed and DX support
- make sure to reboot the vm
- after all that make a copy of the VM, so that if something goes wrong, you have something to restore from
also make sure you have a spare keyboard and mouse for the VM and pass it as well since the main pair will stay with linux,i use a wireless keyboard and mouse with 2 wireless receivers, one per dev- I should mention that I just recently switched to a wireless keyboard and mouse and it unhooks from linux and rehooks in the VM flawlessly
- also gpu audio work flawlessly
- also passing a usb bluetooth adapter works along with paring with something like headphones or a headset or smartphone
- [4/18/2022] I got s usb sound card that works in both linux and windows, so I just pass it to the VM so I can use my headphones and mic
So to make a summary, well, it took some time to get right, but that is my config, all the apps, scripts and tools that I installed and set up let me use my PC as a Gaming rig or a Workstation power house. However this config may not work for everyone, so make sure to do your own research, just in case. This is meant to be a template, not a final solution, but here might be some things that may end up working for you. I also custom built ffmpeg, but I am not sure if I should include it, in this build. I might at a later date.