SOAPTyping is a novel HLA genotyping tool capable of producing accurate predictions from Sanger sequencing data files of both HLA classes I and II (Table1) by comparison to the IMGT/HLA database.
Table 1 HLA molecules and the respective exon regions that can be analyzed by SOAPTyping
| Locus | exon |
|---|---|
| HLA-A | 1,2,3,4,5,6 |
| HLA-B | 1,2,3,4,5 |
| HLA-C | 1,2,3,4,5,6,7 |
| HLA-DRB1 | 1,2,3,4 |
| HLA-DRB3,4,5 | 2,3 |
| HLA-DQA1 | 1,2,3,4 |
| HLA-DQB1 | 1,2,3,4 |
| HLA-DPB1 | 1,2,3,4 |
| HLA-G | 2,3,4 |
| HLA-DPA1 | 1,2,3,4 |
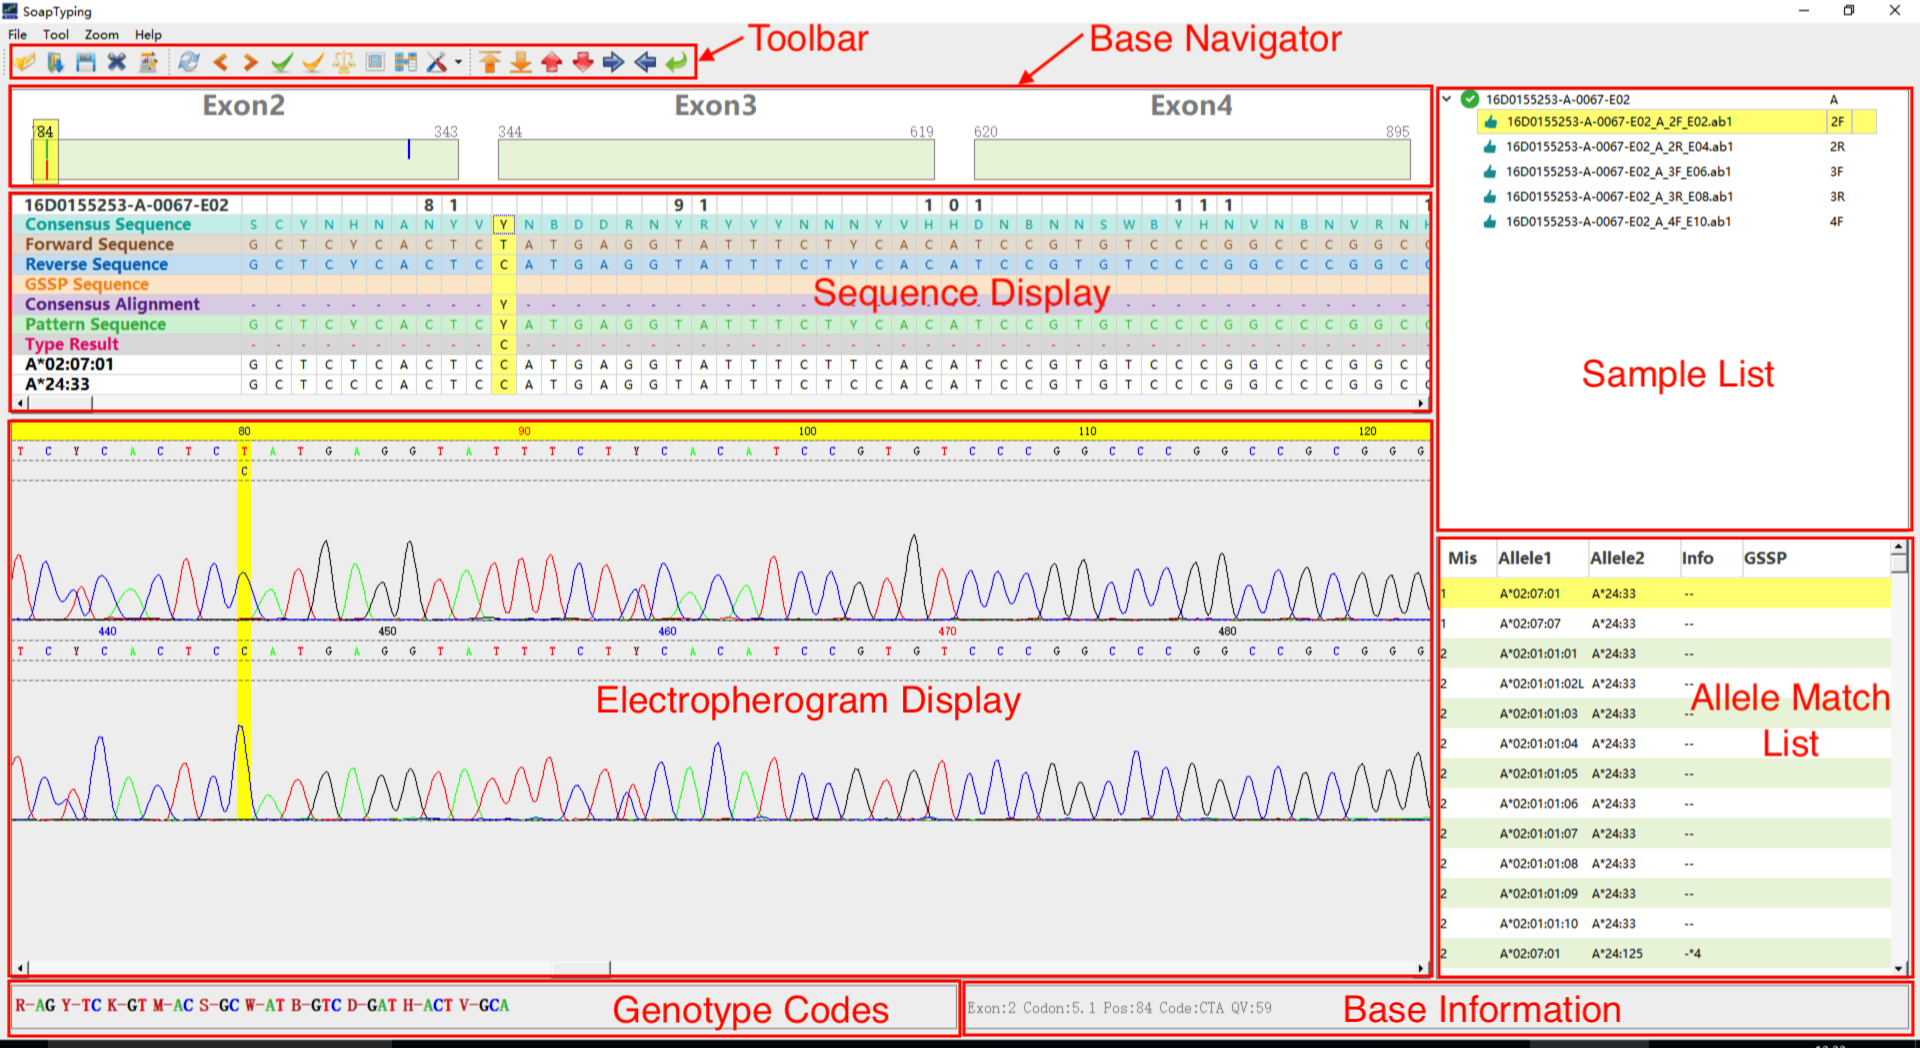
The Figure 1 is a snapshot of SOAPtyping. There are 6 function area:Toolbar, Base Navigator, Sequence display, Sample list display, Allele match list display and Electropherogram. Detail descriptions of each function area can be found at the Section 1.1 of the SOAPTyping supplementary material file in the doc directory of github website.
Figure 1 The SoapTyping application main window.
The outline of the HLA typing workflow using SOAPTyping can be described as follow.
- Sequences derived from the input files are aligned to the consensus sequence and alleles sequence in the database in order to select the eligible allele pairs.
- Then, the candidate allele pairs are sorted according the mismatches they contain and displayed in the allele match list (Fig 1).
- Finaly users should choose a suitable allele pair and edit the mismatched positions (if needed) until all the mismatch sites are eliminated to get the ultimate result.
User can follow the steps in the "Propositional Workflow" to perform the analysis.
Download the installation-free executable program from latest release of github (https://github.com/BGI-flexlab/SOAPTyping/releases)
- Decompress the zipfile and run the soaptyping.exe
- Decompress the gzfile
- Open a shell and enter the target dir
- Run ./soaptyping.sh
- Decompress the zipfile and run ./soaptyping
SOAPTyping is developed by C++ and QT 5.11.1. The old version of SOAPTyping is developed using QT 4.8.7. So, the dependencies you should prepare is QT, QT creator and C++ complier. You can follow the instructions on QT website: https://www.qt.io/ The recommended version of QT and QT creator you should download is :
qt-opensource-windows: http://download.qt.io/archive/qt/5.11/5.11.1/
qt-creator:http://download.qt.io/official_releases/qtcreator/4.7/4.7.0/
notes:
- Don't forget to add the executes and librarys to your compute environment.
- For windows, we recommend install QT with mingw.
- For Linux, you should choose the Desktop gcc-64bit & Tools when you intall the QT.
- For Mac, you should choose the macOS & Tools when you install the QT.
- Download the release or clone the project from github
- Open the project with QT creator
- Configure the C++ complier, debugger and QT complier in build and run section of QT creator.
- Build the project.
- Put the dependencies that you download from github into the execute program directory. Then you can run SoapTyping.
- cd ./src/
- qmake -o Makefile HLA.pro
- make
- cp ./soaptyping ../dependence
- ./soaptyping to run the SoapTyping
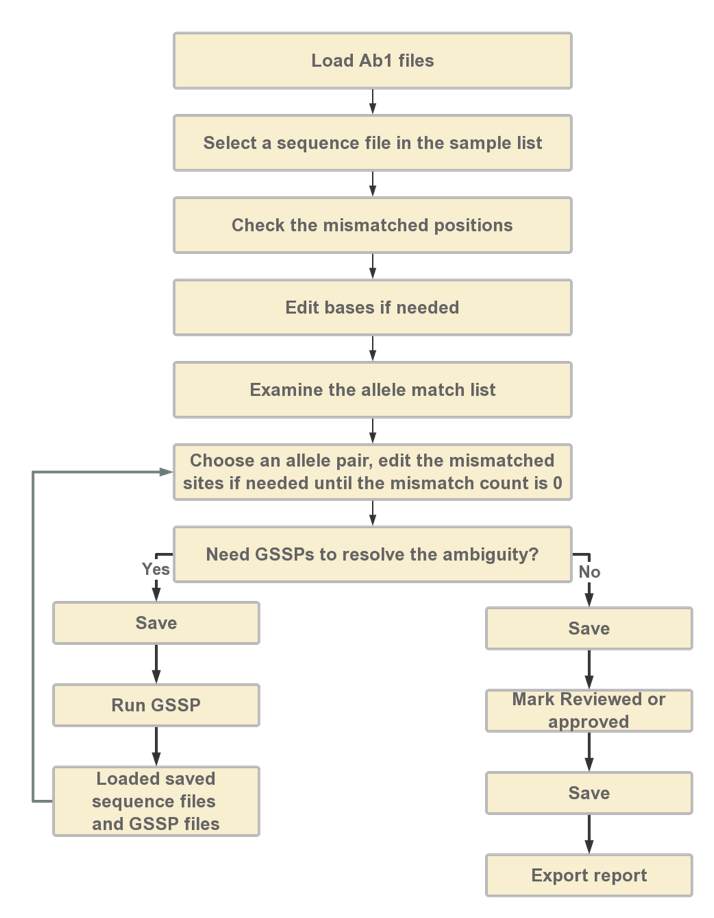
The propositional workflow is demonstrated in Figure 2.
Figure 2 The propositional workflow of SOAPTyping
Users can follow the video (need to be updated) to analyze the input Sanger sequencing files for HLA typing.
PS: We are still in the process of making the video.
Or users can also detail steps described below to perform the analysis.
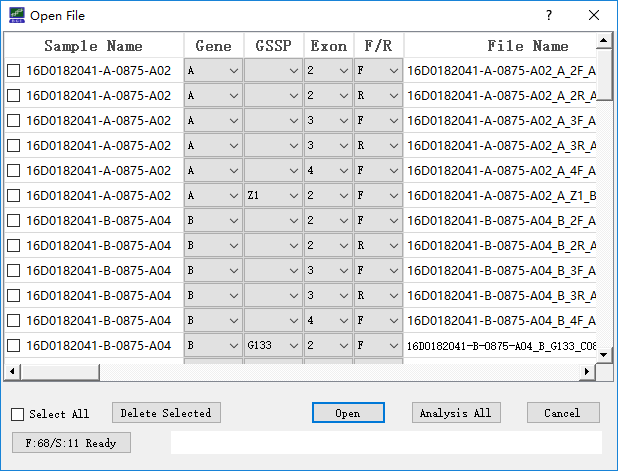
Users can click the “open new file” icon at toolbar to load the input files. During the loading process, information of imported files is shown in the ‘Open File’ window (Figure 3). To utilize the automatic extraction function, the file name should formatted as: [sample name]_[gene]_[exon region and strand direction]_[sequencer ID] (e.g., RB16002353_A_2R_A02 for sample name: RB16002353, gene: A, exon: 2, strand direction: Reverse, sequencer id: A02). For GSSP file, the file name should formatted as: [sample name]_[gene]_[GSSP name]_[sequencer ID]. If ambiguous nominations of input files cause improper information extraction, users can modify names of input files by choosing correct information from the corresponding drop-down list. User can also delete the files by choosing the file in front of file details and click “Delete Chosen” button. After reassuring files information, users can performance the analysis by click the “Analysis” button.
Figure 3 Loading input files
Afterwards, imported sequence files are integrated based on sample name and gene, and displayed in the pane of Sample List. If a sample is selected, sequence information, electropherogram and candidate allele pairs of this sample will be displayed in the corresponding region of the main window.
Two kinds of mismatch, compatible and non-compatible mismatches, are considered in SOAPTyping. For example, ‘R’ (heterozygotes of ‘A’ and ‘G’) and ‘A’ are a compatible mismatches and ‘A’ and ‘G’ are a non-compatible mismatch. Users need first to disambiguate the non-compatible sites in the forward and reverse sequence and then disambiguate the non-compatible sites in pattern sequence and consensus sequence. These mismatched sites are pointed out in the upper area of the pane of Base Navigator. Users can skip to those positions by clicking on the indication bar and edit bases if needed after examining the electropherogram. To edit a base, click on the site on the electropherogram and input the correct base. Once a base is edited, SOAPTyping will reanalyze this sample and update the allele match list and skip to next mismatched position automatically. If users would like to perform analysis after all mismatched bases are edited, choose ‘Edit Multi’ from the ‘Zoom’ list.
By selecting a suitable allele pair in the pane of Allele Match List, the corresponding sequences of this allele pair will be shown in the pane of Sequence Display Region. Mismatched sites between pattern sequence and allele pair sequences are highlighted in red in ‘Type Result’ row and shown in the lower area in the pane of Base Navigator. Usually, there are one or serval allele pairs matched to the pattern sequence without any mismatches. But ~0.5% samples may not have a perfect match between the pattern sequence and allele pair sequences in the HLA databases due to the new types or other reasons. Users should make sure the combination of allele pair sequences are perfect matched to pattern sequence before generating results.
GSSP prediction system is used to resolve ambiguity, in which ambiguity means there are multiple candidate allele pairs that have no mismatches. To use a new GSSP, users need to add it to the database (see Database updates section below), otherwise, SOAPTyping cannot recognize it. Suitable GSSPs are found in SOAPTyping if an allele pair is marked as ‘Yes’ in the ‘GSSP’ column in the pane of the Allele Match List. To check GSSP information, users could right-click on the allele pair and choose ‘Show GSSP Z Code’. After resequencing to obtain ABIF files of GSSPs, users could import corresponding sequence files applied to resolve the ambiguity. SOAPTyping will search the candidate allele pairs for each GSSP file and users need to choose a suitable allele pair and edit bases if mismatched sites exist. Finally, users could click on ‘Combined’ under the sample will show the ultimate HLA typing result after all GSSP files have been examined.
Once sequence files of a sample are imported, SOAPTyping will automatically mark samples status based on sequencing quality of input files and match conditions of pattern sequence and candidate allele pairs. An icon indicating current status is shown before the sample name in the pane of Sample List. Users can also mark the sample as ‘Pending’, ‘Reviewed’ and ‘Approved’ in accordance with the analysis progress. When a defective sample comes up or analysis is not complete, it may be suitable to mark the sample as ‘Pending’ for subsequent analysis. If the typing result is reviewed, such a sample can be marked as ‘Reviewed’. If typing results is affirmed, such a sample can be labeled as ‘Approved’. The status also can be canceled by choosing ‘Unlock’. All samples can be marked as ‘Reviewed’ or ‘Approved’ simultaneously by clicking on the corresponding button in the toolbar while marking ‘Pending’ is only allowed for single sample.
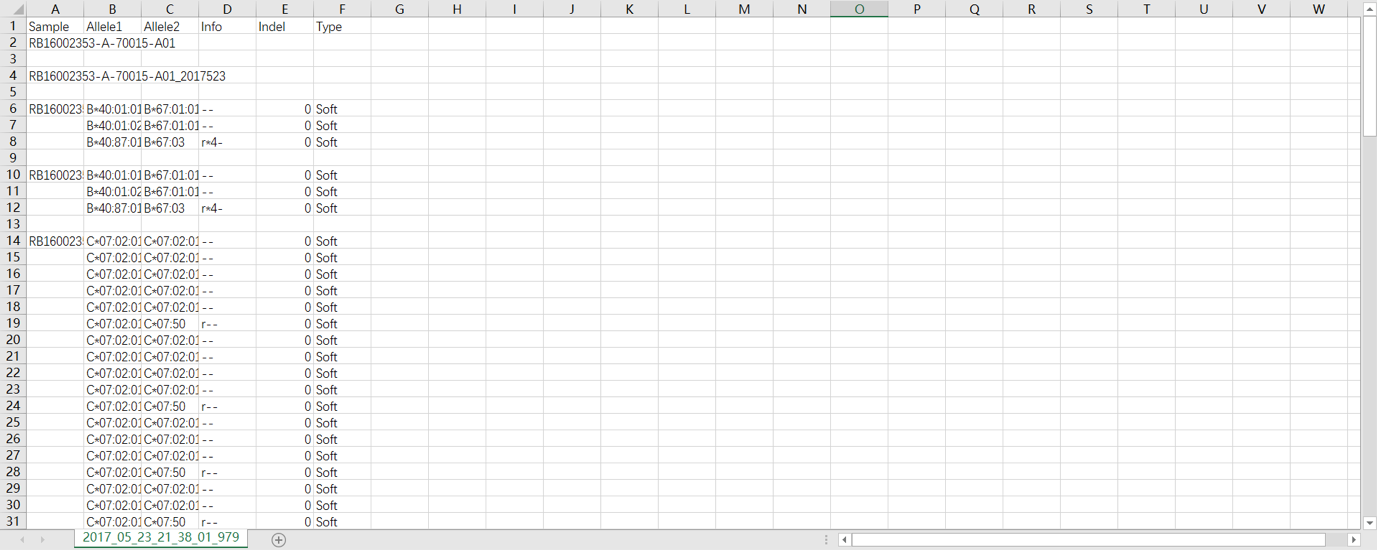
SOAPTyping offers two solutions to save the results. One solution is to save results of an individual sample by a right-click on this sample in the pane of Sample List and then choosing options from “Quick Save”, “Quick Save and Clear” or “Quick Save by Date”. Another solution is clicking on the “Save” button in the toolbar to save the analysis outcome of multiple samples. During the saving process, a “Result” directory will be created in the working directory for the first time. Under the “Result” directory, each sample is assigned a subdirectory to save the original sequence files and intermediate data that are produced during analysis. For subsequent analysis, users can import saved files by clicking on the “Load” button (Figure S3). SOAPTyping will then search all analysis files of the day and import them, in which the search scope also can be determined by date and names of ABIF files.
To export reports, users could click on the corresponding button in the pane of Toolbar and the window of ‘Produce report’ will appear. Users can name reports and the output directory. When ‘Ignore Indel’ is selected, alleles that contain indels would be excluded. The ‘Allele Count’ option is to control numbers of the output alleles, otherwise all alleles without mismatches will be exported by default. A report example is demonstrated in Figure 4.
Figure 4 report demo.
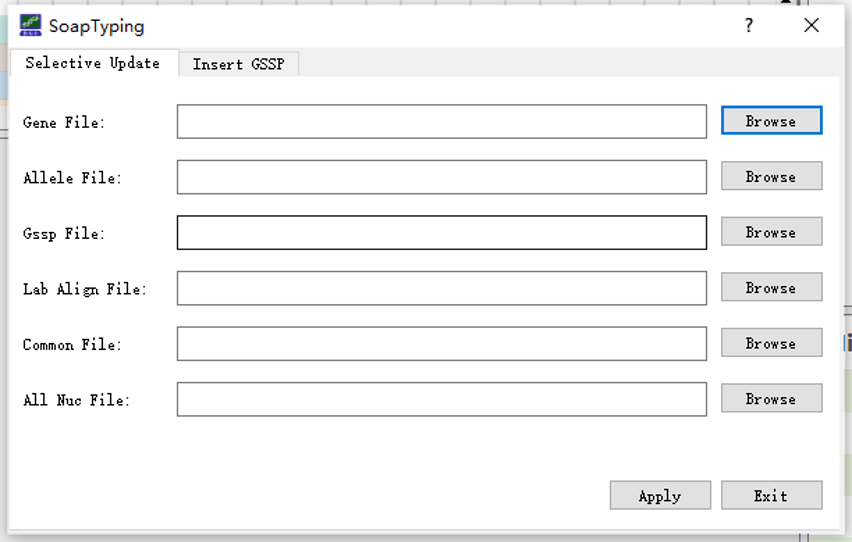
SOAPTyping offers database updates function to cater to the situation of frequent update of HLA alleles. Before updating the database, users could download the latest release of compressed alignments file (‘zip’ format, e.g., Alignments_Rel_3260.zip) of IMGT/HLA database via its FTP directory (ftp://ftp.ebi.ac.uk/pub/databases/ipd/imgt/hla/). After decompressing the downloaded zip files, users can get an ‘alignments’ folder which contains genomics sequence alignments, nucleotide sequence alignments and protein sequence alignments files for each locus. Then users can select the ‘alignments’ folder using ‘Browser’ button on the right of the ‘All Nuc File:’ in the database update window (Figure S5).
Figure 5 Database update.
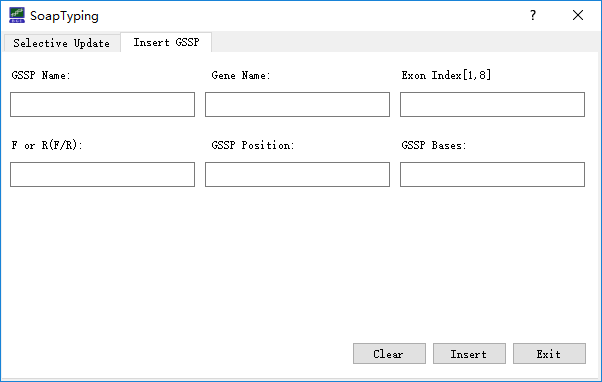
Additionally, if users want to update the GSSP information, text file contains the GSSP information should be prepared manually, examples are illustrated in Figure 6. Another way to update the GSSP information is filling the GSSP information in the corresponding fields in the ‘Insert GSSP’ window (Figure 7).
Figure 6 GSSP update information.
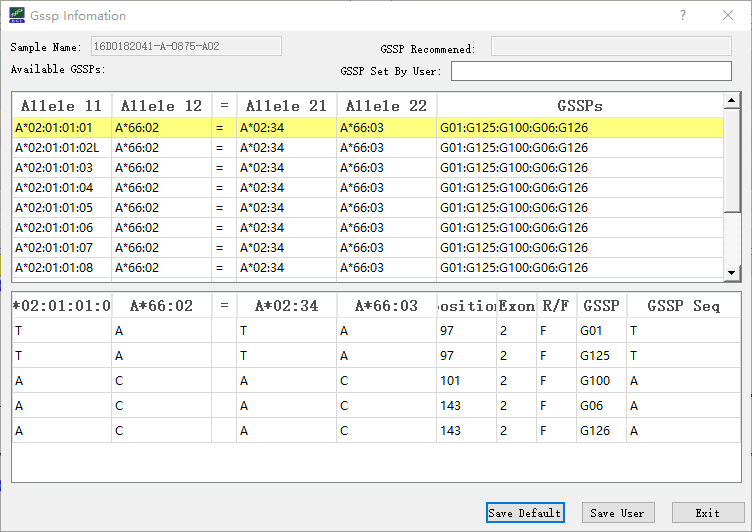
Figure 7 Insert GSSP information.
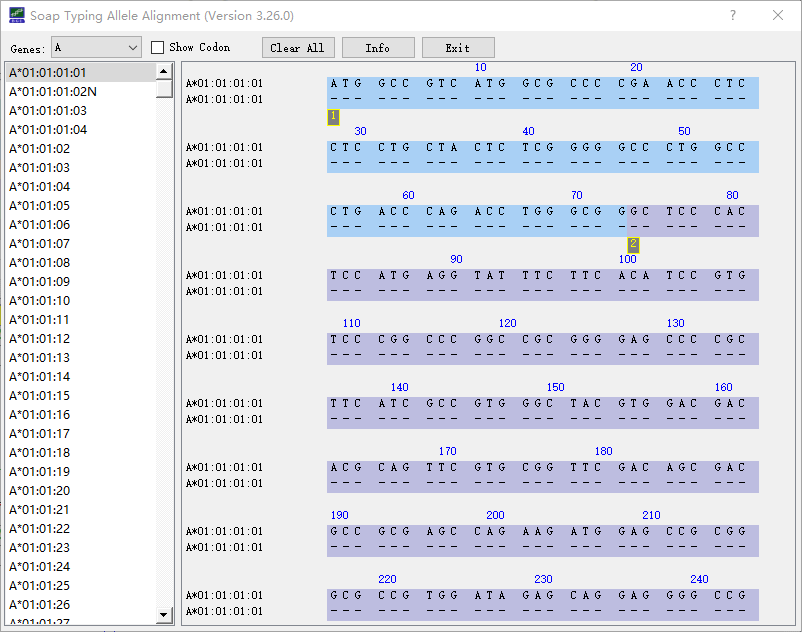
SOAPTyping supplies a set of utilities to assist the analysis. (1) Setting analysis threads. Click on the ‘Setting’ button (Fig S3) and choose ‘Set Thread’ to set a suitable number of threads to accelerate analysis. (2) Customizing the exon region for analysis. Click on the ‘Setting’ button and choose ‘Set Exon Trim’ to excluded the bases of both ends of the exon, excluded parts are not considered in analysis. (3) Alleles alignment. Click on the ‘Allele Alignment’ button (Figure 1) to invoke the alignment tool, users can choose a locus from the ‘Genes’ drop-down list and all the available alleles of this locus will be listed in the panel below. The alignment result will be displayed after the alleles of interest are chosen. (Figure 8)
Figure 8 Allele alignment.