public class first_prog {

	public static void main(String[] args) {

// DATA TYPES BELOW:

		int number = 68; // creating int value


		String text = "lol"; // creating str value


		boolean open = false; // creating bool value


		float fl_num = 6.9f; // creating float value - need to add "f" in the end ( float = float32 )


		double db_num = 6.345345345345345345345723546344656456465f; // double = float64


		char ch_num = 'a'; // creating char


		int num = 68, num1 = 69; // declaring 2 int on the same line

	}

}In computer programming, comments are a portion of the program that are completely ignored by Java compilers. They are mainly used to help programmers to understand the code. For example,
// declare and initialize two variables
int a =1;
int b = 3;

// print the output
System.out.println("This is output");
Here, we have used the following comments,
- declare and initialize two variables
- print the output
In Java, there are two types of comments:
- single-line comment
- multi-line comment
A single-line comment starts and ends in the same line. To write a single-line comment, we can use the // symbol. For example,
// "Hello, World!" program example

class Main {
    public static void main(String[] args) {
        // prints "Hello, World!"
        System.out.println("Hello, World!");
    }
}Output:
Hello, World!
Here, we have used two single-line comments:
- "Hello, World!" program example
- prints "Hello World!"
The Java compiler ignores everything from // to the end of line. Hence, it is also known as End of Line comment.
When we want to write comments in multiple lines, we can use the multi-line comment. To write multi-line comments, we can use the /..../ symbol. For example,
/* This is an example of  multi-line comment.
 * The program prints "Hello, World!" to the standard output.
 */

class HelloWorld {
    public static void main(String[] args) {

        System.out.println("Hello, World!");
    }
}Output:
Hello, World!
Here, we have used the multi-line comment:
/* This is an example of multi-line comment.
* The program prints "Hello, World!" to the standard output.
*/
This type of comment is also known as Traditional Comment. In this type of comment, the Java compiler ignores everything from /* to */.
In Java, you can simply use
System.out.println(); or

System.out.print(); or

System.out.printf();
to send output to standard output (screen).
Here,
Systemis a classoutis apublicstaticfield: it accepts output data.
Let's take an example to output a line.
class AssignmentOperator {
    public static void main(String[] args) {

        System.out.println("Java programming is interesting.");
    }
}Output:
Java programming is interesting.
Here, we have used the println() method to display the string.
print()- It prints string inside the quotes.println()- It prints string inside the quotes similar likeprint()method. Then the cursor moves to the beginning of the next line.printf()- It provides string formatting.
class Output {
    public static void main(String[] args) {

        System.out.println("1. println ");
        System.out.println("2. println ");

        System.out.print("1. print ");
        System.out.print("2. print");
    }
}Output:
1. println
2. println
1. print 2. print
In the above example, we have shown the working of the print() and println()methods. To learn about the printf() method, visit Java printf().
class PrintVariables {
    public static void main(String[] args) {

        Double number = -10.6;

        System.out.println("I am " + "awesome.");
        System.out.println("Number = " + number);
    }
}Output:
I am awesome.
Number = -10.6
Java provides different ways to get input from the user. However, in this tutorial, you will learn to get input from user using the object of Scanner class.
In order to use the object of Scanner, we need to import java.util.Scanner package.
import java.util.Scanner;To learn more about importing packages in Java, visit Java Import Packages.
Then, we need to create an object of the Scanner class. We can use the object to take input from the user.
// create an object of Scanner
Scanner input = new Scanner(System.in);

// take input from the user
int number = input.nextInt();
Similarly, we can use nextLong(), nextFloat(), nextDouble(), and next() methods to get long, float, double, and string input respectively from the user.
import java.util.Scanner;

class Input {
    public static void main(String[] args) {

        Scanner input = new Scanner(System.in);

        System.out.print("Enter an integer: ");

        int number = input.nextInt();

        System.out.println("You entered " + number);

        // closing the scanner object
        input.close();
    }
}Output:
Enter an integer: 23
You entered 23
Note: We have used the close() method to close the object. It is recommended to close the scanner object once the input is taken.
Arithmetic operators are used to perform arithmetic operations on variables and data. For example,
a + b;Here, the + operator is used to add two variables a and b. Similarly, there are various other arithmetic operators in Java.
| Operator | Operation |
|---|---|
| + | Addition |
| - | Subtraction |
| * | Multiplication |
| / | Division |
| % | Modulo Operation (Remainder after division) |
Division Operator ( / )
Note the operation, a / b in our program. The / operator is the division operator.
If we use the division operator with two integers, then the resulting quotient will also be an integer. And, if one of the operands is a floating-point number, we will get the result will also be in floating-point.
In Java,

(9 / 2) is 4
(9.0 / 2) is 4.5
(9 / 2.0) is 4.5
(9.0 / 2.0) is 4.5
Modulo Operator ( % )
The modulo operator % computes the remainder. When a = 7 is divided by b = 4, the remainder is 3.
Note: The % operator is mainly used with integers.
Assignment operators are used in Java to assign values to variables. For example,
int age;
age = 5;
Here, = is the assignment operator. It assigns the value on its right to the variable on its left. That is, 5 is assigned to the variable age.
Let's see some more assignment operators available in Java.
| Operator | Example | Equivalent to |
|---|---|---|
| = | a = b; | a = b; |
| += | a += b; | a = a + b; |
| -= | a -= b; | a = a - b; |
| *= | a *= b; | a = a * b; |
| /= | a /= b; | a = a / b; |
| %= | a %= b; | a = a % b; |
Relational operators are used to check the relationship between two operands. For example,
// check if a is less than b
a < b;
Here, < operator is the relational operator. It checks if a is less than b or not.
It returns either true or false.
| Operator | Description | Example |
|---|---|---|
| == | Is Equal To | 3 == 5 returns false |
| != | Not Equal To | 3 != 5 returns true |
| > | Greater Than | 3 > 5 returns false |
| < | Less Than | 3 < 5 returns true |
| >= | Greater Than or Equal To | 3 >= 5 returns false |
| <= | Less Than or Equal To | 3 <= 5 returns true |
Logical operators are used to check whether an expression is true or false. They are used in decision making.
| Operator | Example | Meaning |
|---|---|---|
| && (Logical AND) | expression1 && expression2 | true only if both expression1 and expression2 are true |
| (Logical OR) | ||
| ! (Logical NOT) | !expression | true if expression is false and vice versa |
class Main {
  public static void main(String[] args) {

    // && operator
    System.out.println((5 > 3) && (8 > 5));  // true
    System.out.println((5 > 3) && (8 < 5));  // false

    // || operator
    System.out.println((5 < 3) || (8 > 5));  // true
    System.out.println((5 > 3) || (8 < 5));  // true
    System.out.println((5 < 3) || (8 < 5));  // false

    // ! operator
    System.out.println(!(5 == 3));  // true
    System.out.println(!(5 > 3));  // false
  }
}Unary operators are used with only one operand. For example, ++ is a unary operator that increases the value of a variable by 1. That is, ++5 will return 6.
Different types of unary operators are:
| Operator | Meaning |
|---|---|
| + | Unary plus: not necessary to use since numbers are positive without using it |
| - | Unary minus: inverts the sign of an expression |
| ++ | Increment operator: increments value by 1 |
| -- | Decrement operator: decrements value by 1 |
| ! | Logical complement operator: inverts the value of a boolean |
Java also provides increment and decrement operators: ++ and -- respectively. ++increases the value of the operand by 1, while -- decrease it by 1. For example,
int num = 5;

// increase num by 1
++num;

// decrease num by 1
--num;The syntax of an if-then statement is:
if (condition) {
  // statements
}
Here, condition is a boolean expression such as age >= 18.
-
if evaluates to
true, statements are executedcondition
-
if evaluates to
false, statements are skippedcondition
class IfStatement {
  public static void main(String[] args) {

    int number = 10;

    // checks if number is less than 0
    if (number < 0) {
      System.out.println("The number is negative.");
    }

    System.out.println("Statement outside if block");
  }
}
Output
Statement outside if block
The if statement executes a certain section of code if the test expression is evaluated to true. However, if the test expression is evaluated to false, it does nothing.
In this case, we can use an optional else block. Statements inside the body of elseblock are executed if the test expression is evaluated to false. This is known as the if-...else statement in Java.
The syntax of the if...else statement is:
if (condition) {
  // codes in if block
}
else {
  // codes in else block
}In Java, we have an if...else...if ladder, that can be used to execute one block of code among multiple other blocks.
if (condition1) {
  // codes
}
else if(condition2) {
  // codes
}
else if (condition3) {
  // codes
}
else {
  // codes
}class Main {
public static void main(String[] args) {
int number = 0;
// checks if number is greater than 0
if (number > 0) {
System.out.println("The number is positive.");
}
// checks if number is less than 0
else if (number < 0) {
System.out.println("The number is negative.");
}
// if both condition is false
else {
System.out.println("The number is 0.");
}
}
}Output
The number is 0.
The switch statement allows us to execute a block of code among many alternatives.
The syntax of the switch statement in Java is:
switch (expression) {

  case value1:
    // code
    break;

  case value2:
    // code
    break;

  default:
    // default statements

}// Java Program to check the size
// using the switch...case statement
class Main {
public static void main(String[] args) {
int number = 44;
String size;
// switch statement to check size
switch (number) {
case 29:
size = "Small";
break;
case 42:
size = "Medium";
break;
// match the value of week
case 44:
size = "Large";
break;
case 48:
size = "Extra Large";
break;
default:
size = "Unknown";
break;
}
System.out.println("Size: " + size);
}
}Output:
Size: Large
In the above example, we have used the switch statement to find the size. Here, we have a variable number. The variable is compared with the value of each case statement.
Since the value matches with 44, the code of case 44 is executed.
size = "Large";
break;Here, the size variable is assigned with the value Large.
Notice that we have been using break in each case block.
 ...
case 29:
  size = "Small";
  break;
...
The break statement is used to terminate the switch-case statement. If break is not used, all the cases after the matching case are also executed. For example,
class Main {
  public static void main(String[] args) {

    int expression = 2;

    // switch statement to check size
    switch (expression) {
      case 1:
        System.out.println("Case 1");

        // matching case
      case 2:
        System.out.println("Case 2");

      case 3:
        System.out.println("Case 3");

      default:
        System.out.println("Default case");
    }
  }
}
Output
Case 2
Case 3
Default case
The switch statement also includes an optional default case. It is executed when the expression doesn't match any of the cases. For example,
class Main {
  public static void main(String[] args) {

    int expression = 9;

    switch(expression) {

      case 2:
        System.out.println("Small Size");
        break;

      case 3:
        System.out.println("Large Size");
        break;

      // default case
      default:
        System.out.println("Unknown Size");
    }
  }
}
Output
Unknown Size
In the above example, we have created a switch-case statement. Here, the value of expression doesn't match with any of the cases.
Hence, the code inside the default case is executed.
default:
System.out.println("Unknown Size);Java while loop is used to run a specific code until a certain condition is met. The syntax of the while loop is:
while (testExpression) {
    // body of loop
}!https://cdn.programiz.com/sites/tutorial2program/files/java-while-loop.png
// Program to display numbers from 1 to 5

class Main {
  public static void main(String[] args) {

    // declare variables
    int i = 1, n = 5;

    // while loop from 1 to 5
    while(i <= n) {
      System.out.println(i);
      i++;
    }
  }
}
Output
1
2
3
4
5
If the condition of a loop is always true, the loop runs for infinite times (until the memory is full). For example,
// infinite while loop
while(true){
    // body of loop
}
In the above programs, the textExpression is always true. Hence, the loop body will run for infinite times.
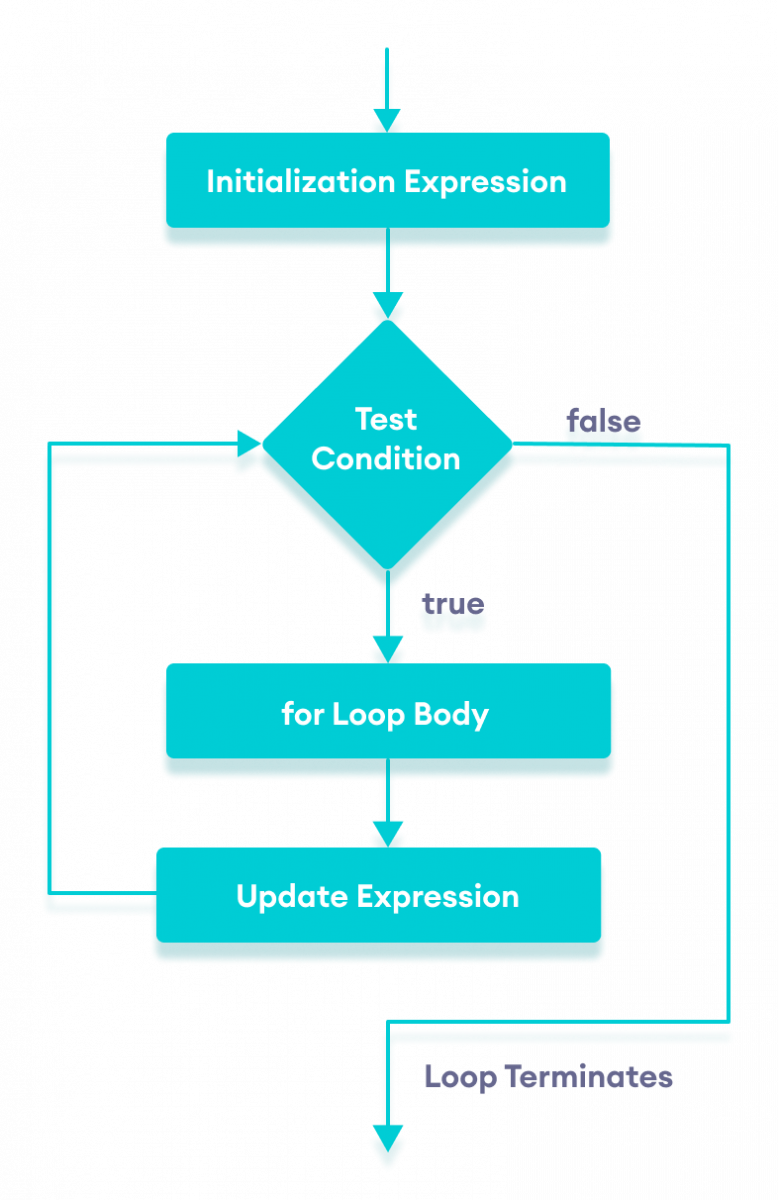
Java for loop is used to run a block of code for a certain number of times. The syntax of for loop is:
for (initialExpression; testExpression; updateExpression) {
    // body of the loop
}!https://cdn.programiz.com/sites/tutorial2program/files/java-for-loop.png
// Program to print a text 5 times

class Main {
  public static void main(String[] args) {

    int n = 5;
    // for loop
    for (int i = 1; i <= n; i++) {
      System.out.println("Java is fun" + i);
    }
  }
}
Output
Java is fun 1
Java is fun 2
Java is fun 3
Java is fun 4
Java is fun 5
The Java for loop has an alternative syntax that makes it easy to iterate through arraysand collections. For example,
// print array elements

class Main {
  public static void main(String[] args) {

    // create an array
    int[] numbers = {3, 7, 5, -5};

    // iterating through the array
    for (int number: numbers) {
       System.out.println(number);
    }
  }
}
Output
3
7
5
-5
If a loop exists inside the body of another loop, it's called a nested loop. Here's an example of the nested for loop.
// outer loop
for (int i = 1; i <= 5; ++i) {
  // codes

  // inner loop
  for(int j = 1; j <=2; ++j) {
    // codes
  }
..
}
Here, we are using a for loop inside another for loop.
We can use the nested loop to iterate through each day of a week for 3 weeks.
In this case, we can create a loop to iterate three times (3 weeks). And, inside the loop, we can create another loop to iterate 7 times (7 days).
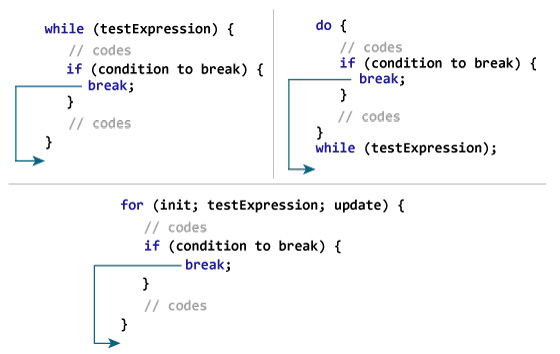
The break statement in Java terminates the loop immediately, and the control of the program moves to the next statement following the loop.
It is almost always used with decision-making statements (Java if...else Statement).
Here is the syntax of the break statement in Java:
break;!https://cdn.programiz.com/sites/tutorial2program/files/java-break-statement-works.jpg
class Test {
    public static void main(String[] args) {

        // for loop
        for (int i = 1; i <= 10; ++i) {

            // if the value of i is 5 the loop terminates
            if (i == 5) {
                break;
            }
            System.out.println(i);
        }
    }
}Output:
1
2
3
4
In the above program, we are using the for loop to print the value of i in each iteration. To know how for loop works, visit the Java for loop. Here, notice the statement,
if (i == 5) {
    break;
}
This means when the value of i is equal to 5, the loop terminates. Hence we get the output with values less than 5 only.
The continue statement skips the current iteration of a loop (for, while, do...while, etc).
After the continue statement, the program moves to the end of the loop. And, test expression is evaluated (update statement is evaluated in case of the for loop).
Here's the syntax of the continue statement.
continue;class Main {
public static void main(String[] args) {
// for loop
for (int i = 1; i <= 10; ++i) {
// if value of i is between 4 and 9
// continue is executed
if (i > 4 && i < 9) {
continue;
}
System.out.println(i);
}
}
}Output:
1
2
3
4
9
10
In the above program, we are using the for loop to print the value of i in each iteration. To know how for loop works, visit Java for loop. Notice the statement,
if (i > 4 && i < 9) {
    continue;
}
Here, the continue statement is executed when the value of i becomes more than 4and less than 9.
It then skips the print statement for those values. Hence, the output skips the values 5, 6, 7, and 8.
An array is a collection of similar types of data.
For example, if we want to store the names of 100 people then we can create an array of the string type that can store 100 names.
String[] array = new String[100];Here, the above array cannot store more than 100 names. The number of values in a Java array is always fixed.
In Java, here is how we can declare an array.
dataType[] arrayName;- dataType - it can be data type like
int,char,double,byte - arrayName - it is an identifier
For example,
double[] data;Here, data is an array that can hold values of type double.
To define the number of elements that an array can hold, we have to allocate memory for the array in Java. For example,
// declare an array
double[] data;

// allocate memory
data = new double[10];
Here, the array can store 10 elements. We can also say that the size or length of the array is 10.
In Java, we can declare and allocate the memory of an array in one single statement. For example,
double[] data = new double[10];In Java, we can initialise arrays during declaration. For example,
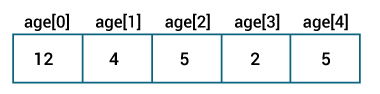
//declare and initialize and array
int[] age = {12, 4, 5, 2, 5};
In the Java array, each memory location is associated with a number. The number is known as an array index. We can also initialise arrays in Java, using the index number. For example,
// declare an array
int[] age = new int[5];

// initialize array
age[0] = 12;
age[1] = 4;
age[2] = 5;
..!https://cdn.programiz.com/sites/tutorial2program/files/initialize-array-during-declaration-java.jpg
We can access the element of an array using the index number. Here is the syntax for accessing elements of an array,
// access array elements
array[index_of_element]In Java, we can also loop through each element of the array. For example,
class Main {
 public static void main(String[] args) {

   // create an array
   int[] age = {12, 4, 5};

   // loop through the array
   // using for loop
   System.out.println("Using for Loop:");
   for(int i = 0; i < age.length; i++) {
     System.out.println(age[i]);
   }
 }
}
Output
Using for Loop:
12
4
5
In the above example, we are using the for Loop in Java to iterate through each element of the array. Notice the expression inside the loop,
age.lengthHere, we are using the length property of the array to get the size of the array.
We can also use the for-each loop to iterate through the elements of an array. For example,
class Main {
 public static void main(String[] args) {

   // create an array
   int[] age = {12, 4, 5};

   // loop through the array
   // using for loop
   System.out.println("Using for-each Loop:");
   for(int a : age) {
     System.out.println(a);
   }
 }
}
Output
Using for-each Loop:
12
4
5
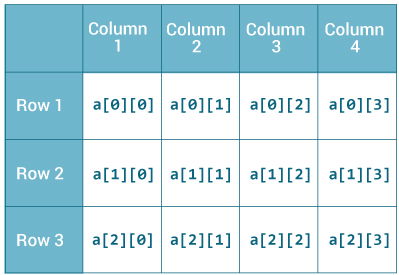
A multidimensional array is an array of arrays. Each element of a multidimensional array is an array itself. For example,
int[][] a = new int[3][4];Here, we have created a multidimensional array named a. It is a 2-dimensional array, that can hold a maximum of 12 elements,
!https://cdn.programiz.com/sites/tutorial2program/files/java-2d-array.jpg
2-dimensional Array
Remember, Java uses zero-based indexing, that is, indexing of arrays in Java starts with 0 and not 1.
Let's take another example of the multidimensional array. This time we will be creating a 3-dimensional array. For example,
String[][][] data = new String[3][4][2];Here, data is a 3d array that can hold a maximum of 24 (342) elements of type String.
Here is how we can initialise a 2-dimensional array in Java.
int[][] a = {
      {1, 2, 3},
      {4, 5, 6, 9},
      {7},
};In Java, we use the ArrayList class to implement the functionality of resizable-arrays.
It implements the List interface of the collections framework.
In Java, we need to declare the size of an array before we can use it. Once the size of an array is declared, it's hard to change it.
To handle this issue, we can use the ArrayList class. It allows us to create resizable arrays.
Unlike arrays, arraylists can automatically adjust their capacity when we add or remove elements from them. Hence, arraylists are also known as dynamic arrays.
Before using ArrayList, we need to import the java.util.ArrayList package first. Here is how we can create arraylists in Java:
ArrayList<Type> NameOfArrayList = new ArrayList<>();Here, Type indicates the type of an arraylist. For example,
// create Integer type arraylist
ArrayList<Integer> arrayList = new ArrayList<>();

// create String type arraylist
ArrayList<String> arrayList = new ArrayList<>();
In the above program, we have used Integer not int. It is because we cannot use primitive types while creating an arraylist. Instead, we have to use the corresponding wrapper classes.
Here, Integer is the corresponding wrapper class of int.
The wrapper classes in Java are used to convert primitive types (int, char, float, etc) into corresponding objects.
Each of the 8 primitive types has corresponding wrapper classes.
| Primitive Type | Wrapper Class |
|---|---|
| byte | Byte |
| boolean | Boolean |
| char | Character |
| double | Double |
| float | Float |
| int | Integer |
| long | Long |
| short | Short |
import java.util.ArrayList;

class Main {
  public static void main(String[] args){

    // create ArrayList
    ArrayList<String> languages = new ArrayList<>();

    // Add elements to ArrayList
    languages.add("Java");
    languages.add("Python");
    languages.add("Swift");
    System.out.println("ArrayList: " + languages);
  }
}
Output
ArrayList: [Java, Python, Swift]
In the above example, we have created an ArrayList named languages.
Here, we have used the add() method to add elements to the arraylist. We will learn more about the add() method later in this tutorial.
The ArrayList class provides various methods to perform different operations on arraylists. We will look at some commonly used arraylist operations in this tutorial:
- Add elements
- Access elements
- Change elements
- Remove elements
To add a single element to the arraylist, we use the add() method of the ArrayList class. For example,
import java.util.ArrayList;

class Main {
  public static void main(String[] args){
    // create ArrayList
    ArrayList<String> languages = new ArrayList<>();

    // add() method without the index parameter
    languages.add("Java");

    languages.add("C");
    languages.add("Python");
    System.out.println("ArrayList: " + languages);
  }
}
Output
ArrayList: [Java, C, Python]
In the above example, we have created an ArrayList named languages. Here, we have used the add() method to add elements to languages.
To access an element from the arraylist, we use the get() method of the ArrayListclass. For example,
import java.util.ArrayList;

class Main {
  public static void main(String[] args) {
    ArrayList<String> animals = new ArrayList<>();

    // add elements in the arraylist
    animals.add("Cat");
    animals.add("Dog");
    animals.add("Cow");
    System.out.println("ArrayList: " + animals);

    // get the element from the arraylist
    String str = animals.get(1);

    System.out.print("Element at index 1: " + str);
  }
}
Output
ArrayList: [Cat, Dog, Cow]
Element at index 1: Dog
In the above example, we have used the get() method with parameter 1. Here, the method returns the element at index 1.
We can also access elements of the ArrayList using the iterator() method.
To change elements of the arraylist, we use the set() method of the ArrayList class. For example,
import java.util.ArrayList;

class Main {
  public static void main(String[] args) {
    ArrayList<String> languages = new ArrayList<>();

    // add elements in the array list
    languages.add("Java");
    languages.add("Kotlin");
    languages.add("C++");
    System.out.println("ArrayList: " + languages);

    // change the element of the array list
    languages.set(2, "JavaScript");

    System.out.println("Modified ArrayList: " + languages);
  }
}
Output
ArrayList: [Java, Kotlin, C++]
Modified ArrayList: [Java, Kotlin, JavaScript]
In the above example, we have created an ArrayList named languages. Notice the line,
language.set(2, "JavaScript");Here, the set() method changes the element at index 2 to JavaScript.
To learn more, visit the Java ArrayList set().
To remove an element from the arraylist, we can use the remove() method of the ArrayList class. For example,
import java.util.ArrayList;

class Main {
  public static void main(String[] args) {
    ArrayList<String> animals = new ArrayList<>();

    // add elements in the array list
    animals.add("Dog");
    animals.add("Cat");
    animals.add("Horse");
    System.out.println("ArrayList: " + animals);

    // remove element from index 2
    String str = animals.remove(2);

    System.out.println("Updated ArrayList: " + animals);
    System.out.println("Removed Element: " + str);
  }
}
Output
ArrayList: [Dog, Cat, Horse]
Updated ArrayList: [Dog, Cat]
Removed Element: Horse
Here, the remove() method takes the index number as the parameter. And, removes the element specified by the index number.
To learn more, visit the Java ArrayList remove().
We can also remove all the elements from the arraylist at once. To learn more, visit
In the previous section, we have learned about the add(), get(), set(), and remove()method of the ArrayList class.
Besides those basic methods, here are some more ArrayList methods that are commonly used.
| Methods | Descriptions |
|---|---|
| https://www.programiz.com/java-programming/library/arraylist/size | Returns the length of the arraylist. |
| https://www.programiz.com/java-programming/library/arraylist/sort | Sort the arraylist elements. |
| https://www.programiz.com/java-programming/library/arraylist/clone | Creates a new arraylist with the same element, size, and capacity. |
| https://www.programiz.com/java-programming/library/arraylist/contains | Searches the arraylist for the specified element and returns a boolean result. |
| https://www.programiz.com/java-programming/library/arraylist/ensurecapacity | Specifies the total element the arraylist can contain. |
| https://www.programiz.com/java-programming/library/arraylist/isempty | Checks if the arraylist is empty. |
| https://www.programiz.com/java-programming/library/arraylist/indexof | Searches a specified element in an arraylist and returns the index of the element. |
If you want to learn about all the different methods of arraylist, visit Java ArrayList methods.
We can use the Java for-each loop to loop through each element of the arraylist. For example,
import java.util.ArrayList;

class Main {
  public static void main(String[] args) {

    // creating an array list
    ArrayList<String> animals = new ArrayList<>();
    animals.add("Cow");
    animals.add("Cat");
    animals.add("Dog");
    System.out.println("ArrayList: " + animals);

    // iterate using for-each loop
    System.out.println("Accessing individual elements:  ");

    for (String language : animals) {
      System.out.print(language);
      System.out.print(", ");
    }

  }
}
Output
ArrayList: [Cow, Cat, Dog]
Accessing individual elements:
Cow, Cat, Dog,
Java is an object-oriented programming language. The core concept of the object-oriented approach is to break complex problems into smaller objects.
An object is any entity that has a state and behavior. For example, a bicycle is an object. It has
- States: idle, first gear, etc
- Behaviors: braking, accelerating, etc.
A class is a blueprint for the object. Before we create an object, we first need to define the class.
We can think of the class as a sketch (prototype) of a house. It contains all the details about the floors, doors, windows, etc. Based on these descriptions we build the house. House is the object.
Since many houses can be made from the same description, we can create many objects from a class.
We can create a class in Java using the class keyword. For example,
class ClassName {
  // fields
  // methods
}
Here, fields (variables) and methods represent the state and behavior of the object respectively.
- fields are used to store data
- methods are used to perform some operations
For our bicycle object, we can create the class as
class Bicycle {

  // state or field
  private int gear = 5;

  // behavior or method
  public void braking() {
    System.out.println("Working of Braking");
  }
}
In the above example, we have created a class named Bicycle. It contains a field named gear and a method named braking().
Here, Bicycle is a prototype. Now, we can create any number of bicycles using the prototype. And, all the bicycles will share the fields and methods of the prototype.
Note: We have used keywords private (visible only in class) and public (visible everywhere) These are known as access modifiers.
An object is called an instance of a class. For example, suppose Bicycle is a class then MountainBicycle, SportsBicycle, TouringBicycle, etc can be considered as objects of the class.
Here is how we can create an object of a class.
className object = new className();

// for Bicycle class
Bicycle sportsBicycle = new Bicycle();

Bicycle touringBicycle = new Bicycle();
We have used the new keyword along with the constructor of the class to create an object. Constructors are similar to methods and have the same name as the class. For example, Bicycle() is the constructor of the Bicycle class. To learn more, visit Java Constructors.
Here, sportsBicycle and touringBicycle are the names of objects. We can use them to access fields and methods of the class.
As you can see, we have created two objects of the class. We can create multiple objects of a single class in Java.
Note: Fields and methods of a class are also called members of the class.
We can use the name of objects along with the . operator to access members of a class. For example,
class Bicycle {

  // field of class
  int gear = 5;

  // method of class
  void braking() {
    ...
  }
}

// create object
Bicycle sportsBicycle = new Bicycle();

// access field and method
sportsBicycle.gear;
sportsBicycle.braking();
In the above example, we have created a class named Bicycle. It includes a field named gear and a method named braking(). Notice the statement,
Bicycle sportsBicycle = new Bicycle();Here, we have created an object of Bicycle named sportsBicycle. We then use the object to access the field and method of the class.
-
sportsBicycle.gear - access the field
gear
-
sportsBicycle.braking() - access the method
braking()
We have mentioned the word method quite a few times. You will learn about Java methods in detail in the next chapter.
Now that we understand what is class and object. Let's see a fully working example.
class Lamp {

  // stores the value for light
  // true if light is on
  // false if light is off
  boolean isOn;

  // method to turn on the light
  void turnOn() {
    isOn = true;
    System.out.println("Light on? " + isOn);

  }

  // method to turnoff the light
  void turnOff() {
    isOn = false;
    System.out.println("Light on? " + isOn);
  }
}

class Main {
  public static void main(String[] args) {

    // create objects led and halogen
    Lamp led = new Lamp();
    Lamp halogen = new Lamp();

    // turn on the light by
    // calling method turnOn()
    led.turnOn();

    // turn off the light by
    // calling method turnOff()
    halogen.turnOff();
  }
}Output:
Light on? true
Light on? false
In the above program, we have created a class named Lamp. It contains a variable: isOnand two methods: turnOn() and turnOff().
Inside the Main class, we have created two objects: led and halogen of the Lamp class. We then used the objects to call the methods of the class.
-
led.turnOn() - It sets the variable to
trueand prints the output.isOn
-
halogen.turnOff() - It sets the variable to
falseand prints the output.isOn
The variable isOn defined inside the class is also called an instance variable. It is because when we create an object of the class, it is called an instance of the class. And, each instance will have its own copy of the variable.
That is, led and halogen objects will have their own copy of the isOn variable.
Note that in the previous example, we have created objects inside another class and accessed the members from that class.
However, we can also create objects inside the same class.
class Lamp {

  // stores the value for light
  // true if light is on
  // false if light is off
  boolean isOn;

  // method to turn on the light
  void turnOn() {
    isOn = true;
    System.out.println("Light on? " + isOn);

  }

  public static void main(String[] args) {

    // create an object of Lamp
    Lamp led = new Lamp();

    // access method using object
    led.turnOn();
  }
}
Output
Light on? true
Here, we are creating the object inside the main() method of the same class.
In Java, this keyword is used to refer to the current object inside a method or a constructor. For example,
class Main {
    int instVar;

    Main(int instVar){
        this.instVar = instVar;
        System.out.println("this reference = " + this);
    }

    public static void main(String[] args) {
        Main obj = new Main(8);
        System.out.println("object reference = " + obj);
    }
}Output:
this reference = Main@23fc625e
object reference = Main@23fc625e
In the above example, we created an object named obj of the class Main. We then print the reference to the object obj and this keyword of the class.
Here, we can see that the reference of both obj and this is the same. It means this is nothing but the reference to the current object.
There are various situations where this keyword is commonly used.
In Java, it is not allowed to declare two or more variables having the same name inside a scope (class scope or method scope). However, instance variables and parameters may have the same name. For example,
class MyClass {
    // instance variable
    int age;

    // parameter
    MyClass(int age){
        age = age;
    }
}
In the above program, the instance variable and the parameter have the same name: age. Here, the Java compiler is confused due to name ambiguity.
In such a situation, we use this keyword. For example,
First, let's see an example without using this keyword:
class Main {

    int age;
    Main(int age){
        age = age;
    }

    public static void main(String[] args) {
        Main obj = new Main(8);
        System.out.println("obj.age = " + obj.age);
    }
}Output:
obj.age = 0
In the above example, we have passed 8 as a value to the constructor. However, we are getting 0 as an output. This is because the Java compiler gets confused because of the ambiguity in names between instance the variable and the parameter.
Now, let's rewrite the above code using this keyword.
class Main {

    int age;
    Main(int age){
        this.age = age;
    }

    public static void main(String[] args) {
        Main obj = new Main(8);
        System.out.println("obj.age = " + obj.age);
    }
}Output:
obj.age = 8
Now, we are getting the expected output. It is because when the constructor is called, this inside the constructor is replaced by the object obj that has called the constructor. Hence the age variable is assigned value 8.
Also, if the name of the parameter and instance variable is different, the compiler automatically appends this keyword. For example, the code:
class Main {
    int age;

    Main(int i) {
        age = i;
    }
}
is equivalent to:
class Main {
    int age;

    Main(int i) {
        this.age = i;
    }
}Another common use of this keyword is in setters and getters methods of a class. For example:
class Main {
   String name;

   // setter method
   void setName( String name ) {
       this.name = name;
   }

   // getter method
   String getName(){
       return this.name;
   }

   public static void main( String[] args ) {
       Main obj = new Main();

       // calling the setter and the getter method
       obj.setName("Toshiba");
       System.out.println("obj.name: "+obj.getName());
   }
}Output:
obj.name: Toshiba
Here, we have used this keyword:
- to assign value inside the setter method
- to access value inside the getter method
While working with constructor overloading, we might have to invoke one constructor from another constructor. In such a case, we cannot call the constructor explicitly. Instead, we have to use this keyword.
Here, we use a different form of this keyword. That is, this(). Let's take an example,
class Complex {

    private int a, b;

    // constructor with 2 parameters
    private Complex( int i, int j ){
        this.a = i;
        this.b = j;
    }

    // constructor with single parameter
    private Complex(int i){
        // invokes the constructor with 2 parameters
        this(i, i);
    }

    // constructor with no parameter
    private Complex(){
        // invokes the constructor with single parameter
        this(0);
    }

    @Override
    public String toString(){
        return this.a + " + " + this.b + "i";
    }

    public static void main( String[] args ) {

        // creating object of Complex class
        // calls the constructor with 2 parameters
        Complex c1 = new Complex(2, 3);

        // calls the constructor with a single parameter
        Complex c2 = new Complex(3);

        // calls the constructor with no parameters
        Complex c3 = new Complex();

        // print objects
        System.out.println(c1);
        System.out.println(c2);
        System.out.println(c3);
    }
}Output:
2 + 3i
3 + 3i
0 + 0i
In the above example, we have used this keyword,
- to call the constructor
Complex(int i, int j)from the constructorComplex(int i) - to call the constructor
Complex(int i)from the constructorComplex()
Notice the line,
System.out.println(c1);Here, when we print the object c1, the object is converted into a string. In this process, the toString() is called. Since we override the toString() method inside our class, we get the output according to that method.
One of the huge advantages of this() is to reduce the amount of duplicate code. However, we should be always careful while using this().
This is because calling constructor from another constructor adds overhead and it is a slow process. Another huge advantage of using this() is to reduce the amount of duplicate code.
Note: Invoking one constructor from another constructor is called explicit constructor invocation.
We can use this keyword to pass the current object as an argument to a method. For example,
class ThisExample {
    // declare variables
    int x;
    int y;

    ThisExample(int x, int y) {
       // assign values of variables inside constructor
        this.x = x;
        this.y = y;

        // value of x and y before calling add()
        System.out.println("Before passing this to addTwo() method:");
        System.out.println("x = " + this.x + ", y = " + this.y);

        // call the add() method passing this as argument
        add(this);

        // value of x and y after calling add()
        System.out.println("After passing this to addTwo() method:");
        System.out.println("x = " + this.x + ", y = " + this.y);
    }

    void add(ThisExample o){
        o.x += 2;
        o.y += 2;
    }
}

class Main {
    public static void main( String[] args ) {
        ThisExample obj = new ThisExample(1, -2);
    }
}Output:
Before passing this to addTwo() method:
x = 1, y = -2
After passing this to addTwo() method:
x = 3, y = 0
In the above example, inside the constructor ThisExample(), notice the line,
add(this);Here, we are calling the add() method by passing this as an argument. Since this keyword contains the reference to the object obj of the class, we can change the value of x and y inside the add() method.
A constructor in Java is similar to a method that is invoked when an object of the class is created.
Unlike Java methods, a constructor has the same name as that of the class and does not have any return type. For example,
class Test {
  Test() {
    // constructor body
  }
}
Here, Test() is a constructor. It has the same name as that of the class and doesn't have a return type.
Recommended Reading: Why do constructors not return values
class Main {
  private String name;

  // constructor
  Main() {
    System.out.println("Constructor Called:");
    name = "Programiz";
  }

  public static void main(String[] args) {

    // constructor is invoked while
    // creating an object of the Main class
    Main obj = new Main();
    System.out.println("The name is " + obj.name);
  }
}Output:
Constructor Called:
The name is Programiz
In the above example, we have created a constructor named Main(). Inside the constructor, we are initializing the value of the name variable.
Notice the statement of creating an object of the Main class.
Main obj = new Main();Here, when the object is created, the Main() constructor is called. And, the value of the name variable is initialized.
Hence, the program prints the value of the name variables as Programiz.
In Java, constructors can be divided into 3 types:
- No-Arg Constructor
- Parameterized Constructor
- Default Constructor
Similar to methods, a Java constructor may or may not have any parameters (arguments).
If a constructor does not accept any parameters, it is known as a no-argument constructor. For example,
private Constructor() {
   // body of the constructor
}class Main {
int i;
// constructor with no parameter
private Main() {
i = 5;
System.out.println("Constructor is called");
}
public static void main(String[] args) {
// calling the constructor without any parameter
Main obj = new Main();
System.out.println("Value of i: " + obj.i);
}
}Output:
Constructor is called
Value of i: 5
In the above example, we have created a constructor Main(). Here, the constructor does not accept any parameters. Hence, it is known as a no-arg constructor.
Notice that we have declared the constructor as private.
Once a constructor is declared private, it cannot be accessed from outside the class. So, creating objects from outside the class is prohibited using the private constructor.
Here, we are creating the object inside the same class. Hence, the program is able to access the constructor. To learn more, visit Java Implement Private Constructor.
However, if we want to create objects outside the class, then we need to declare the constructor as public.
class Company {
  String name;

  // public constructor
  public Company() {
    name = "Programiz";
  }
}

class Main {
  public static void main(String[] args) {

    // object is created in another class
    Company obj = new Company();
    System.out.println("Company name = " + obj.name);
  }
}Output:
Company name = Programiz
A Java constructor can also accept one or more parameters. Such constructors are known as parameterized constructors (constructor with parameters).
class Main {

  String languages;

  // constructor accepting single value
  Main(String lang) {
    languages = lang;
    System.out.println(languages + " Programming Language");
  }

  public static void main(String[] args) {

    // call constructor by passing a single value
    Main obj1 = new Main("Java");
    Main obj2 = new Main("Python");
    Main obj3 = new Main("C");
  }
}Output:
Java Programming Language
Python Programming Language
C Programming Language
In the above example, we have created a constructor named Main(). Here, the constructor takes a single parameter. Notice the expression,
Main obj1 = new Main("Java");Here, we are passing the single value to the constructor. Based on the argument passed, the language variable is initialized inside the constructor.
If we do not create any constructor, the Java compiler automatically create a no-arg constructor during the execution of the program. This constructor is called default constructor.
class Main {

  int a;
  boolean b;

  public static void main(String[] args) {

    // A default constructor is called
    Main obj = new Main();

    System.out.println("Default Value:");
    System.out.println("a = " + obj.a);
    System.out.println("b = " + obj.b);
  }
}Output:
Default Value:
a = 0
b = false
Here, we haven't created any constructors. Hence, the Java compiler automatically creates the default constructor.
The default constructor initializes any uninitialized instance variables with default values.
| Type | Default Value |
|---|---|
| boolean | false |
| byte | 0 |
| short | 0 |
| int | 0 |
| long | 0L |
| char | \u0000 |
| float | 0.0f |
| double | 0.0d |
| object | Reference null |
In the above program, the variables a and b are initialized with default value 0 and false respectively.
The above program is equivalent to:
class Main {

  int a;
  boolean b;

   Main() {
    a = 0;
    b = false;
  }

  public static void main(String[] args) {
    // call the constructor
    Main obj = new Main();

    System.out.println("Default Value:");
    System.out.println("a = " + obj.a);
    System.out.println("b = " + obj.b);
  }
}
The output of the program is the same as Example 5.
- Constructors are invoked implicitly when you instantiate objects.
- The two rules for creating a constructor are:The name of the constructor should be the same as the class.A Java constructor must not have a return type.
- If a class doesn't have a constructor, the Java compiler automatically creates a default constructor during run-time. The default constructor initializes instance variables with default values. For example, the
intvariable will be initialized to0 - Constructor types:No-Arg Constructor - a constructor that does not accept any argumentsParameterized constructor - a constructor that accepts argumentsDefault Constructor - a constructor that is automatically created by the Java compiler if it is not explicitly defined.
- A constructor cannot be
abstractorstaticorfinal. - A constructor can be overloaded but can not be overridden.
Similar to Java method overloading, we can also create two or more constructors with different parameters. This is called constructors overloading.
class Main {

  String language;

  // constructor with no parameter
  Main() {
    this.language = "Java";
  }

  // constructor with a single parameter
  Main(String language) {
    this.language = language;
  }

  public void getName() {
    System.out.println("Programming Langauage: " + this.language);
  }

  public static void main(String[] args) {

    // call constructor with no parameter
    Main obj1 = new Main();

    // call constructor with a single parameter
    Main obj2 = new Main("Python");

    obj1.getName();
    obj2.getName();
  }
}Output:
Programming Language: Java
Programming Language: Python
In the above example, we have two constructors: Main() and Main(String language). Here, both the constructor initialize the value of the variable language with different values.
Based on the parameter passed during object creation, different constructors are called and different values are assigned.
It is also possible to call one constructor from another constructor. To learn more, visit Java Call One Constructor from Another.
Note: We have used this keyword to specify the variable of the class. To know more about this keyword, visit Java this keyword.
In Java, access modifiers are used to set the accessibility (visibility) of classes, interfaces, variables, methods, constructors, data members, and the setter methods. For example,
class Animal {
    public void method1() {...}

    private void method2() {...}
}
In the above example, we have declared 2 methods: method1() and method2(). Here,
- method1 is
public- This means it can be accessed by other classes. - method2 is
private- This means it can not be accessed by other classes.
Note the keyword public and private. These are access modifiers in Java. They are also known as visibility modifiers.
Note: You cannot set the access modifier of getters methods.
Before you learn about types of access modifiers, make sure you know about Java Packages.
There are four access modifiers keywords in Java and they are:
| Modifier | Description |
|---|---|
| Default | declarations are visible only within the package (package private) |
| Private | declarations are visible within the class only |
| Protected | declarations are visible within the package or all subclasses |
| Public | declarations are visible everywhere |
A method is a block of code that performs a specific task.
Suppose you need to create a program to create a circle and color it. You can create two methods to solve this problem:
- a method to draw the circle
- a method to color the circle
Dividing a complex problem into smaller chunks makes your program easy to understand and reusable.
In Java, there are two types of methods:
- User-defined Methods: We can create our own method based on our requirements.
- Standard Library Methods: These are built-in methods in Java that are available to use.
Let's first learn about user-defined methods.
The syntax to declare a method is:
returnType methodName() {
  // method body
}
Here,
- returnType - It specifies what type of value a method returns For example if a method has an
intreturn type then it returns an integer value.If the method does not return a value, its return type isvoid. - methodName - It is an identifier that is used to refer to the particular method in a program.
- method body - It includes the programming statements that are used to perform some tasks. The method body is enclosed inside the curly braces
{ }.
For example,
int addNumbers() {
// code
}
In the above example, the name of the method is adddNumbers(). And, the return type is int. We will learn more about return types later in this tutorial.
This is the simple syntax of declaring a method. However, the complete syntax of declaring a method is
modifier static returnType nameOfMethod (parameter1, parameter2, ...) {
  // method body
}
Here,
- modifier - It defines access types whether the method is public, private, and so on. To learn more, visit Java Access Specifier.
- static - If we use the
statickeyword, it can be accessed without creating objects.For example, thesqrt()method of standard Math class is static. Hence, we can directly callMath.sqrt()without creating an instance ofMathclass. - parameter1/parameter2 - These are values passed to a method. We can pass any number of arguments to a method.
In the above example, we have declared a method named addNumbers(). Now, to use the method, we need to call it.
Here's is how we can call the addNumbers() method.
// calls the method
addNumbers();!https://cdn.programiz.com/sites/tutorial2program/files/java-method-call.png
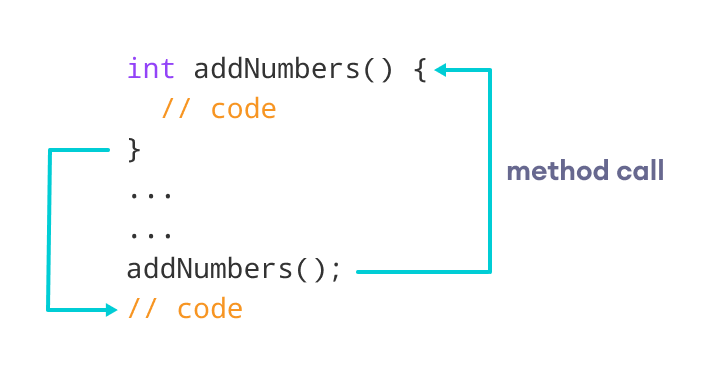
Working of Java Method Call
class Main {

  // create a method
  public int addNumbers(int a, int b) {
    int sum = a + b;
    // return value
    return sum;
  }

  public static void main(String[] args) {

    int num1 = 25;
    int num2 = 15;

    // create an object of Main
    Main obj = new Main();
    // calling method
    int result = obj.addNumbers(num1, num2);
    System.out.println("Sum is: " + result);
  }
}
Output
Sum is: 40
In the above example, we have created a method named addNumbers(). The method takes two parameters a and b. Notice the line,
int result = obj.addNumbers(num1, num2);Here, we have called the method by passing two arguments num1 and num2. Since the method is returning some value, we have stored the value in the result variable.
Note: The method is not static. Hence, we are calling the method using the object of the class.
A Java method may or may not return a value to the function call. We use the return statement to return any value. For example,
int addNumbers() {
...
return sum;
}
Here, we are returning the variable sum. Since the return type of the function is int. The sum variable should be of int type. Otherwise, it will generate an error.
class Main {
// create a method
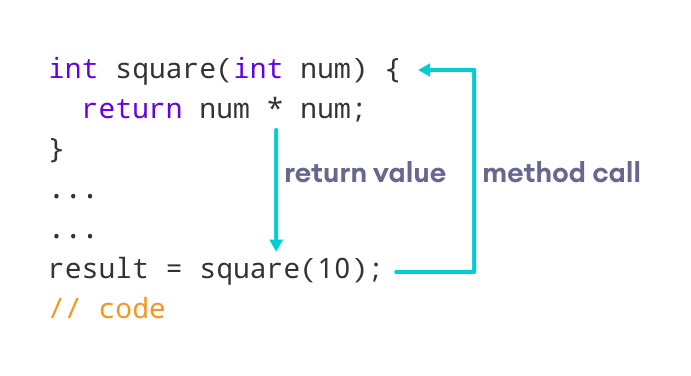
public static int square(int num) {
// return statement
return num * num;
}
public static void main(String[] args) {
int result;
// call the method
// store returned value to result
result = square(10);
System.out.println("Squared value of 10 is: " + result);
}
}Output:
Squared value of 10 is: 100
In the above program, we have created a method named square(). The method takes a number as its parameter and returns the square of the number.
Here, we have mentioned the return type of the method as int. Hence, the method should always return an integer value.
!https://cdn.programiz.com/sites/tutorial2program/files/java-method-return-value.png
Representation of the Java method returning a value
Note: If the method does not return any value, we use the void keyword as the return type of the method. For example,
public void square(int a) {
  int square = a * a;
  System.out.println("Square is: " + square);
}A method parameter is a value accepted by the method. As mentioned earlier, a method can also have any number of parameters. For example,
// method with two parameters
int addNumbers(int a, int b) {
  // code
}

// method with no parameter
int addNumbers(){
  // code
}
If a method is created with parameters, we need to pass the corresponding values while calling the method. For example,
// calling the method with two parameters
addNumbers(25, 15);

// calling the method with no parameters
addNumbers()class Main {
// method with no parameter
public void display1() {
System.out.println("Method without parameter");
}
// method with single parameter
public void display2(int a) {
System.out.println("Method with a single parameter: " + a);
}
public static void main(String[] args) {
// create an object of Main
Main obj = new Main();
// calling method with no parameter
obj.display1();
// calling method with the single parameter
obj.display2(24);
}
}Output
Method without parameter
Method with a single parameter: 24
Here, the parameter of the method is int. Hence, if we pass any other data type instead of int, the compiler will throw an error. It is because Java is a strongly typed language.
Note: The argument 24 passed to the display2() method during the method call is called the actual argument.
The parameter num accepted by the method definition is known as a formal argument. We need to specify the type of formal arguments. And, the type of actual arguments and formal arguments should always match.
The standard library methods are built-in methods in Java that are readily available for use. These standard libraries come along with the Java Class Library (JCL) in a Java archive (*.jar) file with JVM and JRE.
For example,
print()is a method ofjava.io.PrintSteam. Theprint("...")method prints the string inside quotation marks.sqrt()is a method ofMathclass. It returns the square root of a number.
Here's a working example:
public class Main {
  public static void main(String[] args) {

    // using the sqrt() method
    System.out.print("Square root of 4 is: " + Math.sqrt(4));
  }
}Output:
Square root of 4 is: 2.0
To learn more about standard library methods, visit Java Library Methods.
1. The main advantage is code reusability. We can write a method once, and use it multiple times. We do not have to rewrite the entire code each time. Think of it as, "write once, reuse multiple times".
public class Main {

  // method defined
  private static int getSquare(int x){
    return x * x;
  }

  public static void main(String[] args) {
    for (int i = 1; i <= 5; i++) {

      // method call
      int result = getSquare(i);
      System.out.println("Square of " + i + " is: " + result);
    }
  }
}Output:
Square of 1 is: 1
Square of 2 is: 4
Square of 3 is: 9
Square of 4 is: 16
Square of 5 is: 25
In the above program, we have created the method named getSquare() to calculate the square of a number. Here, the method is used to calculate the square of numbers less than 6.
Hence, the same method is used again and again.
2. Methods make code more readable and easier to debug. Here, the getSquare()method keeps the code to compute the square in a block. Hence, makes it more readable.