A comprehensive and easy to understand guide for Javascript advanced concepts with examples and details. Information is structured and gathered from different resources, mentioned in the Reference part of the book.
Here are the main Topics:
- ROMISES AND ASYNCHRONOUS PROGRAMMING
- PROXIES AND THE REFLECTION API
- STRINGS AND REGULAR EXPRESSIONS
- FUNCTIONS
- EXPANDED OBJECT FUNCTIONALITY
- DESTRUCTURING FOR EASIER DATA ACCESS
- SYMBOLS AND SYMBOL PROPERTIES
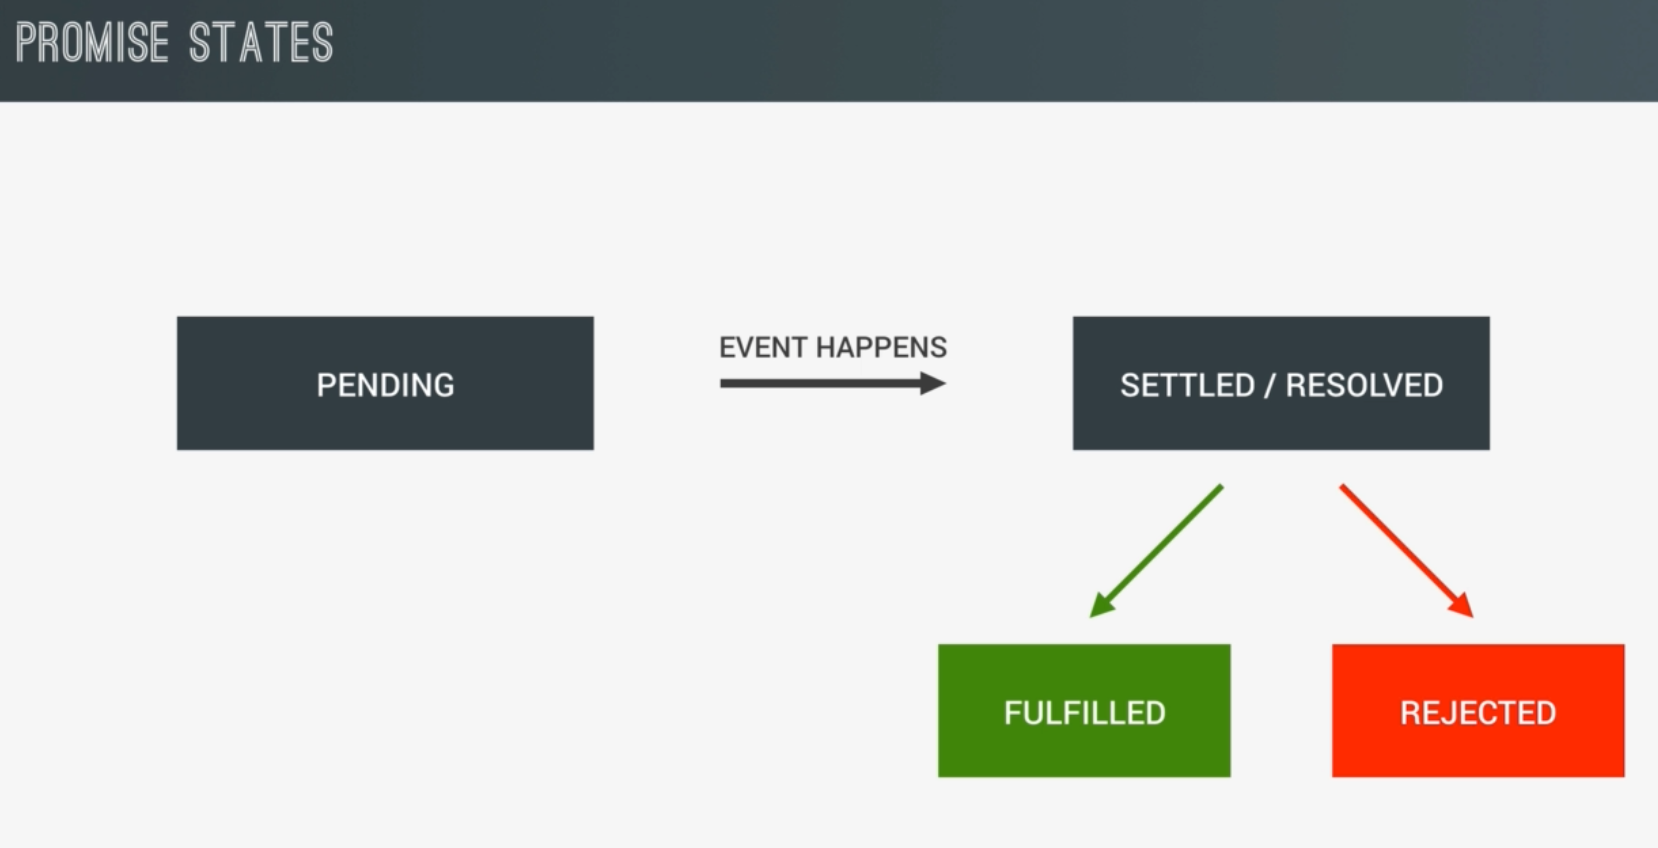
A promise is an Object that keeps track whether a certain event has happened already or not and determines what happens after the event ends. A Promise implements the concept of a future value that we’re expecting. “It’s saying - hey get me some data from the server in the background and it promises that it will get that data”; In a PROMISE we are dealing with time sensitive code thus a PROMISE can have different states:
- Pending - before the event has happening, the Promise is pending,
- Settled, Resolved - after the event has happen;
- Fulfilled - when the promise what settled, resolved successful;
- Rejected - if there was an error;
In more practical terms we can Produce and Consume Promises; so when we produce a Promise we create a new Promise and send the result using that Promise, than when we consume it, we can use callback functions for fulfillment or rejection of that promises.
JavaScript engines are built on the concept of a single-threaded event loop. Single-threaded means that only one piece of code is executed at a time. JavaScript engines can execute only one piece of code at a time, so they need to keep track of code that is meant to run. That code is kept in a job queue. Whenever a piece of code is ready to be executed, it is added to the job queue. When the JavaScript engine is finished executing code, the event loop executes the next job in the queue. The event loop is a process inside the JavaScript engine that monitors code execution and manages the job queue. Keep in mind that as a queue, job execution runs from the first job in the queue to the last.
One of the most powerful aspects of JavaScript is how easily it handles Asynchronous Programming. As a language created for the web, JavaScript needed to be able to respond to Asynchronous user interactions, such as clicks and key presses, from the beginning. But as more programs started using asynchronous programming, events and callbacks weren’t powerful enough to support everything developers wanted to do. Promises are the solution to this problem.
JavaScript engines are built on the concept of a Single-threaded event loop. Single-threaded means that only one piece of code is executed at a time. Maintaining and protecting state when multiple pieces of code can access and change that state is a difficult problem and a frequent source of bugs in thread-based software.
JavaScript engines can execute only one piece of code at a time, so they need to keep track of code that is meant to run. That code is kept in a job queue. Whenever a piece of code is ready to be executed, it is added to the job queue. When the JavaScript engine is finished executing code, the event loop executes the next job in the queue. The event loop is a process inside the JavaScript engine that monitors code execution and manages the job queue. Keep in mind that as a queue, job execution runs from the first job in the queue to the last.
When a user clicks a button or presses a key on the keyboard, an event like onclick is triggered. That event might respond to the interaction by adding a new job to the back of the job queue. This is JavaScript’s most basic form of Asynchronous Programming. The event handler code doesn’t execute until the event fires, and when it does execute, it has the appropriate context. For example:
let button = document.getElementById("my-btn");
button.onclick = function(event) {
    console.log("Clicked");
};
In this code, console.log("Clicked") will not be executed until button is clicked. When button is clicked, the function assigned to onclick is added to the back of the job queue and will be executed when all other jobs ahead of it are complete. Events work well for simple interactions, but chaining multiple separate asynchronous calls together is more complicated because you must keep track of the event target (button in this example) for each event. Additionally, you need to ensure that all appropriate event handlers are added before the first time an event occurs. For instance, if button is clicked before onclick is assigned, nothing will happen. So although events are useful for responding to user interactions and similar infrequent functionality, they aren’t very flexible for more complex needs.
The callback pattern is more flexible than events because chaining multiple calls together is easier with callbacks. Here’s an example:
readFile("example.txt", function(err, contents) {
if(err){
  throw err;
}
writeFile( 'info.text', if(err) {
  throw err;
})
console.log('File was writtten!');
  )};
)};
The above pattern works fairly well, but you can quickly find yourself in callback hell. Callback hell occurs when you nest too many callbacks, like this:
method1(function(err, result) {

    if (err) {
        throw err;
    }

    method2(function(err, result) {

        if (err) {
            throw err;
        }

        method3(function(err, result) {

            if (err) {
                throw err;
            }

            method4(function(err, result) {

                if (err) {
                    throw err;
                }

                method5(result);
            });

        });

    });

});
Nesting multiple method calls, as this example does, creates a tangled web of code that is difficult to understand and debug. Callbacks also present problems when you want to implement more complex functionality. - What if you want two asynchronous operations to run in parallel and notify you when they’re both complete? - What if you want to start two asynchronous operations at the same time but only take the result of the first one to complete? In these cases, you’d need to track multiple callbacks and cleanup operations, and promises greatly improve such situations.
The Event Model When a user clicks a button or presses a key on the keyboard, an event like onclick is triggered. That event might respond to the interaction by adding a new job to the back of the job queue. This is JavaScript’s most basic form of asynchronous programming. The event handler code doesn’t execute until the event fires, and when it does execute, it has the appropriate context. For example:
 console.log("Clicked");
};
In this code, console.log("Clicked") will not be executed until button is clicked. When button is clicked, the function assigned to onclick is added to the back of the job queue and will be executed when all other jobs ahead of it are complete. Although events are useful for responding to user interactions and similar infrequent functionality, they aren’t very flexible for more complex needs.
The Callback Pattern The callback pattern is more flexible than events because chaining multiple calls together is easier with callbacks. Here’s an example:
readFile("example.txt", function(err, contents) {
    if (err) {
        throw err;
    }

    writeFile("example.txt", function(err) {
        if (err) {
            throw err;
        }

        console.log("File was written!");
    });
});
This pattern works fairly well, but you can quickly find yourself in callback hell. Callback hell occurs when you nest too many callbacks, like this:
method1(function(err, result) {

    if (err) {
        throw err;
    }

    method2(function(err, result) {

        if (err) {
            throw err;
        }

        method3(function(err, result) {

            if (err) {
                throw err;
            }

            method4(function(err, result) {

                if (err) {
                    throw err;
                }

                method5(result);
            });

        });

    });

});
Callbacks also present problems when you want to implement more complex functionality. What if you want two asynchronous operations to run in parallel and notify you when they’re both complete? What if you want to start two asynchronous operations at the same time but only take the result of the first one to complete? In these cases, you’d need to track multiple callbacks and cleanup operations, and promises greatly improve such situations.
Promise Basics A promise is a placeholder for the result of an asynchronous operation. Instead of subscribing to an event or passing a callback to a function, the function can return a promise, as shown here:
// readFile promises to complete at some point in the future
let promise = readFile("example.txt");
In this code, readFile() doesn’t start reading the file immediately: that will happen later. Instead, the function returns a promise object representing the asynchronous read operation so you can work with it in the future. Exactly when you’ll be able to work with that result depends entirely on how the promise’s life cycle concludes.
Anatomy of a PROMISE - Promise Life Cycle Each promise goes through a short life cycle starting in the pending state, which indicates that the asynchronous operation hasn’t completed yet.
How can we check a state of a Promise? - An internal [[PromiseState]] property is set to "pending", "fulfilled", or "rejected" to reflect the promise’s state. This property isn’t exposed on promise objects, so you can’t determine which state the promise is in programmatically. But you can take a specific action when a promise changes state by using the then() method.
then() Method - The then() method is present on all promises and takes two arguments.
- The first argument is a function to call when the promise is fulfilled.
- The second argument is a function to call when the promise is rejected.
let promise = readFile("example.txt");

promise.then(function(contents) {
    // fulfillment
    console.log(contents);
}, function(err) {
    // rejection
    console.error(err.message);
});

promise.then(function(contents) {
    // fulfillment
    console.log(contents);
});

promise.then(null, function(err) {
    // rejection
    console.error(err.message);
});
The then() and catch() methods are intended to be used in combination to properly handle the result of asynchronous operations. Events tend not to fire when there’s an error, and in callbacks you must always remember to check the error argument. Just know that if you don’t attach a rejection handler to a promise, all failures will happen silently. Always attach a rejection handler, even if the handler just logs the failure.
IMPORTANT
- Any object that implements the then() method as described in the preceding paragraph is called a thenable. All promises are thenables, but all thenables are not promises.
- Each call to then() or catch() creates a new job to be executed when the promise is resolved. But these jobs end up in a separate job queue that is reserved strictly for promises
The 3 states of a Promise are:
- Unsettled - which is a pending Promise. The promise in the previous example is in the pending state as soon as the readFile() function returns it.
How do we create an Unsettled PROMISE? New promises are created using the Promise Constructor. This constructor accepts a single argument: a function called the Executor, which contains the code to initialize the Promise. Two functions are passed as arguments to the Executor - resolve() and reject(). - resolve() function is called when the executor has finished successfully to signal that the promise is ready to be resolved, - reject() function indicates that the executor has failed.
 // Node.js example

let fs = require("fs");

function readFile(filename) {
    return new Promise(function(resolve, reject) {

        // trigger the asynchronous operation
        fs.readFile(filename, { encoding: "utf8" }, function(err, contents) {

            // check for errors
            if (err) {
                reject(err);
                return;
                }

            // the read succeeded
            resolve(contents);

        });
    });
}

  let promise = readFile("example.txt");

  // listen for both fulfillment and rejection
  promise.then(function(contents) {
      // fulfillment
      console.log(contents);
  }, function(err) {
      // rejection
      console.error(err.message);
  });
When either resolve() or reject() is called inside the executor, a job is added to the job queue to resolve the promise. This is called job scheduling, and if you’ve ever used the setTimeout() or setInterval() functions, you’re already familiar with it. In job scheduling, you add a new job to the job queue to say, “Don’t execute this right now, but execute it later.”
For instance, the setTimeout() function lets you specify a delay before a job is added to the queue:
// add this function to the job queue after 500 ms have passed
//This code schedules a job to be added to the job queue after 500 ms.
setTimeout(function() {
    console.log("Timeout");
}, 500)

console.log("Hi!");
Promises work similarly. The promise executor executes immediately, before anything that appears after it in the source code. For instance:
let promise = new Promise(function(resolve, reject) {
    console.log("Promise");
    resolve();
});
console.log("Hi!");
Calling resolve() triggers an asynchronous operation. Functions passed to then() and catch() are executed asynchronously, because these are also added to the job queue. Here’s an example:
let promise = new Promise(function(resolve, reject) {
    console.log("Promise");
    resolve();
});

promise.then(function() {
    console.log("Resolved.");
});

console.log("Hi!");
Creating Settled Promises How do we create Settled Promises? - The Promise constructor is the best way to create unsettled promises due to the dynamic nature of what the promise executor does. But if you want a promise to represent just a single known value doesn’t make sense to schedule a job that simply passes a value to the resolve() function. Instead, you can use either of two methods that create settled promises given a specific value.
Using Promise.resolve() - The Promise.resolve() method accepts a single argument and returns a promise in the fulfilled state.
let promise = Promise.resolve(42);
promise.then(function(value) {
    console.log(value);         // 42
});
Using Promise.reject() - The Promise.resolve() except the created promise is in the rejected state, as follows:
let promise = Promise.reject(42);
promise.then(function(value) {
    console.log(value);         // 42
});If you pass a promise to either the Promise.resolve() or Promise.reject() method, the promise is returned without modification.
*Non-Promise Thenables Both Promise.resolve() and Promise.reject() also accept non-promise thenables as arguments. When passed a non-promise thenable, these methods create a new promise that is called after the then() function. A non-promise thenable is created when an object has a then() method that accepts a resolve and a reject argument, like this:
let thenable = {
    then: function(resolve, reject) {
        resolve(42);
    }
};
Once the asynchronous operation completes, the promise is considered settled and enters one of two possible states:
-
Fulfilled - The promise’s asynchronous operation has completed successfully.
-
Rejected - The promise’s asynchronous operation didn’t complete successfully due to either an error or some other cause. One of the most controversial aspects of promises is the silent failure that occurs when a promise is rejected without a rejection handler. Some consider this the biggest flaw in the specification because it’s the only part of the JavaScript language that doesn’t make errors apparent. You can call then() or catch() at any point and have them work correctly regardless of whether the promise is settled or not, making it difficult to know precisely when a promise will be handled. Although it’s possible that a future version of ECMAScript will address this problem, both Node.js and browsers have implemented changes to address this developer pain point. They aren’t part of the ECMAScript 6 specification but are valuable tools when you’re using promises.
Node.js emits two events on the process object that are related to promise rejection handling:
- unhandledRejection - Emitted when a promise is rejected and no rejection handler is called within one turn of the event loop.
let rejected;

process.on("unhandledRejection", function(reason, promise) {
   console.log(reason.message);            // "Explosion!"
   console.log(rejected === promise);      // true
});

rejected = Promise.reject(new Error("Explosion!"));- rejectionHandled - Emitted when a promise is rejected and a rejection handler is called after one turn of the event loop.
let rejected;

process.on("unhandledRejection", function(reason, promise) {
  console.log(reason.message);            // "Explosion!"
  console.log(rejected === promise);      // true
});

rejected = Promise.reject(new Error("Explosion!"));
These events are designed to work together to help identify promises that are rejected and not handled.
Browsers also emit two events to help identify unhandled rejections. These events are emitted by the window object and are effectively the same as their Node.js equivalents:
- unhandledrejection - Emitted when a promise is rejected and no rejection handler is called within one turn of the event loop.
- rejectionhandled - Emitted when a promise is rejected and a rejection handler is called after one turn of the event loop.
Each call to then() or catch() actually creates and returns another promise. This second promise is resolved only when the first has been fulfilled or rejected. Consider the example below:
let p1 = new Promise(function(resolve, reject) {
    resolve(42);
});
//The call to p1.then() returns a second promise on which then() is called. The second then() fulfillment handler is only called after the first promise has been resolved.
p1.then(function(value) {
    console.log(value);
}).then(function() {
    console.log("Finished");
});Another important aspect of promise chains is the ability to pass data from one promise to the next.
let p1 = new Promise(function(resolve, reject) {
    resolve(42);
});

p1.then(function(value) {
    console.log(value);         // "42"
    return value + 1;
//The fulfillment handler for p1 returns value + 1 when executed. Because value is 42 (from the executor),
//    the fulfillment handler returns 43.
}).then(function(value) {
    console.log(value);         // "43"
});
Returning primitive values from fulfillment and rejection handlers allows for the passing of data between promises, but what if you return an object? If the object is a promise, there’s an extra step that’s taken to determine how to proceed. Consider the following example:
let p1 = new Promise(function(resolve, reject) {
    resolve(42);
});

let p2 = new Promise(function(resolve, reject) {
    resolve(43);
});

p1.then(function(value) {
    // p1 schedules a job that resolves to 42.
    // first fulfillment handler
    console.log(value);     // 42
    // The fulfillment handler for p1 returns p2, a promise already in the resolved state.
    return p2;
}).then(function(value) {
    // second fulfillment handler
    // The second fulfillment handler is called because p2 has been fulfilled.
    // If p2 were rejected, a rejection handler (if present) would be called instead of the second fulfillment handler.
    // The important thing to recognize about this pattern is that the second fulfillment handler is not added to p2 but rather to a third promise.
    console.log(value);     // 43
});Each example in this chapter so far has dealt with responding to one promise at a time. But sometimes you’ll want to monitor the progress of multiple promises to determine the next action. ECMAScript 6 provides two methods that monitor multiple promises: Promise.all() and Promise.race().
Accepts a single argument, which is an iterable (such as an array) of promises to monitor, and returns a promise that is resolved only when every promise in the iterable is resolved. The returned promise is fulfilled when every promise in the iterable is fulfilled, as in this example:
let p1 = new Promise(function(resolve, reject) {
    resolve(42);
});

let p2 = new Promise(function(resolve, reject) {
    resolve(43);
});

let p3 = new Promise(function(resolve, reject) {
    resolve(44);
});

let p4 = Promise.all([p1, p2, p3]);

p4.then(function(value) {
    console.log(Array.isArray(value));  // true
    console.log(value[0]);              // 42
    console.log(value[1]);              // 43
    console.log(value[2]);              // 44
});Provides a slightly different take on monitoring multiple promises. This method also accepts an iterable of promises to monitor and returns a promise, but the returned promise is settled as soon as the first promise is settled. Instead of waiting for all promises to be fulfilled, like the Promise.all() method, the Promise.race() method returns an appropriate promise as soon as any promise in the array is fulfilled. For example:
let p1 = Promise.resolve(42);

let p2 = new Promise(function(resolve, reject) {
    resolve(43);
});

let p3 = new Promise(function(resolve, reject) {
    resolve(44);
});

let p4 = Promise.race([p1, p2, p3]);

p4.then(function(value) {
    console.log(value);     // 42
});Just like other built-in types, you can use a promise as the base for a derived class. This allows you to define your own variation of promises to extend what built-in promises can do. For instance, suppose you want to create a promise that can use methods named success() and failure() in addition to the usual then() and catch() methods. You could create that promise type as follows:
class MyPromise extends Promise {

    // use default constructor

    success(resolve, reject) {
        return this.then(resolve, reject);
    }

    failure(reject) {
        return this.catch(reject);
    }

}

// MyPromise is derived from Promise and has two additional methods.
// The success() method mimics resolve() and failure() mimics the reject() method.
let promise = new MyPromise(function(resolve, reject) {
    resolve(42);
});

promise.success(function(value) {
    console.log(value);             // 42
}).failure(function(value) {
    console.log(value);
});
Promise chaining allows you to catch errors that may occur in a fulfillment or rejection handler from a previous promise. For example:
let p1 = new Promise(function(resolve, reject) {
    resolve(42);
});

p1.then(function(value) {
    throw new Error("Boom!");
// In this code, the fulfillment handler for p1 throws an error.
// The chained call to the catch() method, which is on a second promise, is able to receive that error through its rejection handler.
}).catch(function(error) {
    console.log(error.message);     // "Boom!"
});
Always make sure to have a rejection handler at the end of a promise chain to ensure that you can properly handle any errors that may occur.
Bringing a simpler syntax to asynchronous task running in JavaScript is under way. For instance, an await syntax is in progress. The basic idea is to use a function marked with async instead of a generator and use await instead of yield when calling a function, such as:
(async function() {
    let contents = await readFile("config.json");
    doSomethingWith(contents);
    console.log("Done");
});
The async keyword before function indicates that the function is meant to run in an asynchronous manner. The await keyword signals that the function call to readFile("config.json") should return a promise, and if it doesn’t, the response should be wrapped in a promise. The await syntax is expected to be finalized in ECMAScript 2017 (ECMAScript 8).
- Promises are designed to improve asynchronous programming in JavaScript by giving you more control and composability over asynchronous operations than events and callbacks can.
- Promises schedule jobs to be added to the JavaScript engine’s job queue for future execution, and a second job queue tracks promise fulfillment and rejection handlers to ensure proper execution.
- Promises have three states: pending, fulfilled, and rejected. A promise starts in a pending state and becomes fulfilled on a successful execution or rejected on a failure. In either case, you can add handlers to indicate when a promise is settled. The then() method allows you to assign a fulfillment and rejection handler, and the catch() method allows you to assign only a rejection handler.
- You can chain promises together in a variety of ways and pass information between them. Each call to then() creates and returns a new promise that is resolved when the previous one is resolved. Such chains can be used to trigger responses to a series of asynchronous events. You can also use Promise.race() and Promise.all() to monitor the progress of multiple promises and respond accordingly.
- Asynchronous task running is easier when you combine generators and promises, because promises provide a common interface that asynchronous operations can return.
- Most new web APIs are being built on top of promises, and you can expect many more to follow suit in the future.
Proxies were introduced in ECMAScript 6 and allows developers to create built-in objects.
What are Proxies?
- Proxies are wrappers that can intercept and alter low-level JavaScript engine operations.
What can you do with a Proxy?
- Proxies allow you to intercept low-level object operations on the target that are otherwise internal to the JavaScript Engine.
- Calling new Proxy() creates a proxy to use in place of another object (called the target). The proxy virtualizes the target so the proxy and the target appear to be functionally the same.
- These low-level operations are intercepted using a Trap, which is a function that responds to a specific operation.
- For each Proxy Trap there is a Reflect method attached. Each trap overrides some built-in behavior of JavaScript objects, allowing you to intercept and modify the behavior. If you still need to use the built-in behavior, you can use the corresponding reflection API method.
- Is represented by the Reflect object and it is a collection of methods that provide the default behavior for the same low-level operations that proxies can override.
| Proxy trap | Overrides the behavior |
|---|---|
| get | Reading a prop value |
| set | Writing a prop value |
| has | The in operator |
| deleteProperty | The delete property |
| getPrototypeOf | Object.getPrototypeOf() |
| setPrototypeOf | Object.setPrototypeOf() |
| isExtensible | Object.isExtensible() |
| preventExtensions | Object.preventExtensions |
| getOwnPropertyDescriptor | Object.getOwnPropertyDescriptor() |
| defineProperty | Object.defineProperty() |
| ownKeys | Object.keys(), Object.getOwnPropertyNames(), and Object.getOwnPropertySym |
- The nonstandard behavior of numeric properties and the length property is why arrays are considered exotic objects in ECMAScript 6.
- The original ECMAScript 6 specification had an additional trap called enumerate that was designed to alter how for-in and Object.keys() enumerated properties on an object. However, the enumerate trap was removed in ECMAScript 7 (also called ECMAScript 2016) because difficulties were discovered during implementation. The enumerate trap no longer exists in any JavaScript environment.
When you use the Proxy constructor to make a proxy, you’ll pass it two arguments: the target and a handler. What is a handler? - A handler is an object that defines one or more traps. To create a simple forwarding proxy, you can use a handler with no traps, like this:
let target = {};

let proxy = new Proxy(target, {});
proxy.name = "proxy";

console.log(proxy.name);        // "proxy"
console.log(target.name);       // "proxy"

//  Proxy forwards all operations directly to target.
//  When "proxy" is assigned to the proxy.name property, name is created on target.
//  The proxy is not storing this property; it’s simply forwarding the operation to target.
//  Similarly, the values of proxy.name and target.name are the same because they are both references to target.name.
//  That also means setting target.name to a new value causes proxy.name to reflect the same change.
target.name = "target";
console.log(proxy.name);        // "target"
console.log(target.name);       // "target"
Of course, proxies without traps aren’t very interesting, so what happens when you define a trap? Suppose you want to create an object whose property values must be numbers. That means every new property added to the object must be validated, and an error must be thrown if the value isn’t a number. To accomplish this task, you could define a set trap that overrides the default behavior of setting a value. The set trap receives four arguments:
**trapTarget** -  The object that will receive the property (the proxy’s target)
**key** - The property key (string or symbol) to write to
**value** - The value being written to the property
**receiver** - The object on which the operation took place (usually the proxy)
Reflect.set() - is the set trap’s corresponding reflection method, and it’s the default behavior for this operation. The Reflect.set() method accepts the same four arguments as the set proxy trap, making the method easy to use inside the trap. The trap should return true if the property was set or false if not. (The Reflect.set() method returns the correct value based on whether the operation succeeded.) Here’s an example:
let target = {
    name: "target"
};

let proxy = new Proxy(target, {
    set(trapTarget, key, value, receiver) {

        // ignore existing properties so as not to affect them
        if (!trapTarget.hasOwnProperty(key)) {
            if (isNaN(value)) {
                throw new TypeError("Property must be a number.");
            }
        }

        // add the property
        return Reflect.set(trapTarget, key, value, receiver);
    }
    });

// adding a new property
proxy.count = 1;
console.log(proxy.count);       // 1
console.log(target.count);      // 1

// you can assign to name because it exists on target already
proxy.name = "proxy";
console.log(proxy.name);        // "proxy"
console.log(target.name);       // "proxy"

// throws an error
proxy.anotherName = "proxy";
Code explained:
The trapTarget value is equal to target, key is count, value is 1, and receiver (not used in this example) is proxy. There is no existing property named count in target, so the proxy validates value by passing it to isNaN(). If the result is NaN, the property value is not numeric and an error is thrown. Because this code sets count to 1, the proxy calls Reflect.set() with the same four arguments that were passed to the trap to add the new property.
Reflect.get() - Object Shape Validation Using the get Trap. An object shape is the collection of properties and methods available on the object. JavaScript engines use object shapes to optimize code, often creating classes to represent the objects.
Here’s an example:
let target = {};
//since it was not defined return undefined
console.log(target.name);    // undefined
In most other languages, attempting to read target.name throws an error because the property doesn’t exist. But JavaScript just uses undefined for the value of the target.name property.
Because property validation only has to happen when a property is read, you would use the get trap. The get trap is called when a property is read, even if that property doesn’t exist on the object, and it takes three arguments:
**trapTarget** -  The object from which the property is read (the proxy’s target)
**key** - The property key (a string or symbol) to read.
**value** - The value being written to the property
**receiver** - The object on which the operation took place (usually the proxy)
These arguments mirror the set trap’s arguments but with one noticeable difference. There’s no value argument because get traps don’t write values. The Reflect.get() method accepts the same three arguments as the get trap() and returns the property’s default value. You can use the get trap and Reflect.get() to throw an error when a property doesn’t exist on the target, as follows:
let proxy = new Proxy({}, {
    get(trapTarget, key, receiver) {
        if (!(key in receiver)) {
            throw new TypeError("Property " + key + " doesn't exist.");
        }

        return Reflect.get(trapTarget, key, receiver);
    }
});

// adding a property still works
proxy.name = "proxy";
console.log(proxy.name);            // "proxy"

// nonexistent properties throw an error
console.log(proxy.nme);             // throws an error
The in Operator - or how to detect if an object has a certain property
The in operator determines whether a property exists on a given object and returns true if an own property or a prototype property matches the name or symbol. For example:
let target = {
    value: 42;
}

console.log("value" in target);     // true
console.log("toString" in target);  // true
Both value and toString exist on object, so in both cases the in operator returns true. The value property is an own property, whereas toString is a prototype property (inherited from Object). Proxies allow you to intercept this operation and return a different value for in with the has trap. The has trap is called whenever the in Operator is used. When called, two arguments are passed to the has trap:
trapTarget -  The object the property is read from (the proxy’s target)
key - The property key (string or symbol) to check
Reflect.has() Method Reflect.has() method accepts these same arguments and returns the default response for the in Operator. Using the has trap and Reflect.has() allows you to alter the behavior of in for some properties while reverting to the default behavior for others. For instance, you could hide the value property from the previous example like this:
let target = {
    name: "target",
    value: 42
};

let proxy = new Proxy(target, {
    has(trapTarget, key) {

        if (key === "value") {
            return false;
        } else {
            return Reflect.has(trapTarget, key);
        }
    }
});
console.log("value" in proxy);      // false
console.log("name" in proxy);       // true
console.log("toString" in proxy); // trueThe delete operator removes a property from an object and returns true when it’s successful and false when it’s unsuccessful. In strict mode, delete throws an error when you attempt to delete a nonconfigurable property; in non-strict mode, delete simply returns false. Here’s an example:
let target = {
    name: "target",
    value: 42
};
Object.defineProperty(target, "name", { configurable: false });

console.log("value" in target);     // true

let result1 = delete target.value;
console.log(result1);               // true

console.log("value" in target);     // false

// note: the following line throws an error in strict mode
let result2 = delete target.name;
console.log(result2);               // false

console.log("name" in target); // trueIn ECMAScript 6 strings and regular expressions are improved, by adding new capabilities and long-missing functionality.
In ECMAScript 5, all string operations work on 16-bit code units, meaning that you can get unexpected results from UTF-16 encoded strings containing surrogate pairs, as in this example:
let text = "𠮷";

console.log(text.length);           // 2
console.log(/^.$/.test(text));      // false
console.log(text.charAt(0));        // ""
console.log(text.charAt(1));        // ""
console.log(text.charCodeAt(0));    // 55362
console.log(text.charCodeAt(1));    // 57271
The single Unicode character "𠮷" is represented using surrogate pairs, and as such, the JavaScript string operations in this example treat the string as having two 16-bit characters. That means: • The length of text is 2 when it should be 1. • A regular expression trying to match a single character fails because it thinks there are two characters. • The charAt() method is unable to return a valid character string because neither set of 16 bits corresponds to a printable character. • The charCodeAt() method also can’t identify the character properly. It returns the appropriate 16-bit number for each code unit, but that is the closest you could get to the real value of text in ECMAScript 5.
ECMAScript 6 enforces UTF-16 string encoding to address problems like those mentioned above. Standardizing string operations based on this character encoding means that JavaScript can support functionality designed to work specifically with surrogate pairs.
ECMASCRIPT6 Methods added to fully support UTF-16 are:
- codePointAt() - retrieves the Unicode code point that maps to a given position in a string. This method accepts the code unit position rather than the character position and returns an integer value.
let text = "𠮷a";

console.log(text.charCodeAt(0));    // 55362
console.log(text.charCodeAt(1));    // 57271
console.log(text.charCodeAt(2));    // 97

console.log(text.codePointAt(0));   // 134071
console.log(text.codePointAt(1));   // 57271
console.log(text.codePointAt(2));   // 97
Calling the codePointAt() method on a character is the easiest way to determine whether that character is represented by one or two code points.
  function is32Bit(c) {
    return c.codePointAt(0) > 0xFFFF;
}

console.log(is32Bit("𠮷"));          // true
console.log(is32Bit("a")); // false- fromCodePoint() - retrieve the code point for a character in a string, whereas String.fromCodePoint() produces a single-character string from a given code point.
console.log(String.fromCodePoint(134071)); // "𠮷"- normalize() - optionally accepts a single string parameter that indicates that one of the following Unicode normalization forms should be applied: • Normalization Form Canonical Composition ("NFC"), the default • Normalization Form Canonical Decomposition ("NFD") • Normalization Form Compatibility Composition ("NFKC") • Normalization Form Compatibility Decomposition ("NFKD")
If you ever work on an internationalized application, you’ll definitely find the normalize() method helpful. Keep in mind that when you’re comparing strings, both strings must be normalized to the same form. For example:
let normalized = values.map(function(text) {
    return text.normalize();
});

normalized.sort(function(first, second) {
    if (first < second) {
    return -1;
    } else if (first === second) {
        return 0;
    } else {
        return 1;
    }
});
New methods aren’t the only improvements that ECMAScript 6 provides for working with Unicode strings. ECMAScript 6 also introduces the regular expression u flag and other changes to strings and regular expressions.
Regular expressions assume 16-bit code units, where each represents a single character. To address this problem, ECMAScript 6 defines a u flag (which stands for Unicode) for use in regular expressions.
The u Flag in Action When a regular expression has the u flag set, it switches modes to work on characters, not code units. That means the regular expression should no longer treat surrogate pairs as separate characters in strings and should behave as expected. For example, consider this code:
let text = "𠮷";

console.log(text.length);           // 2
console.log(/^.$/.test(text));      // false
console.log(/^.$/u.test(text));     // true
The regular expression /^.$/ matches any input string with a single character. When it’s used without the u flag, this regular expression matches on code units, so the Japanese character (which is represented by two code units) doesn’t match the regular expression. When it’s used with the u flag, the regular expression compares characters instead of code units, so the Japanese character matches.
Developers have used the indexOf() method to identify strings inside other strings since JavaScript was first introduced. ECMAScript 6 includes the following 3 new methods, which are designed to identify strings inside other strings:
- includes() - returns true if the given text is found anywhere within the string. It returns false if not.
- startsWith() - returns true if the given text is found at the beginning of the string. It returns false if not.
- endsWith() - returns true if the given text is found at the end of the string. It returns false if not. Each method accepts two arguments: the text to search for and an optional index from which to start the search. When the second argument is provided, includes() and startsWith() start the match from that index, and endsWith() starts the match from the length of the string minus the second argument; When the second argument is omitted, includes() and startsWith() search from the beginning of the string, and endsWith() starts from the end. Here are some examples showing these three methods in action:
let msg = "Hello world!";

console.log(msg.startsWith("Hello"));      // true
console.log(msg.endsWith("!"));            // true
console.log(msg.includes("o"));            // true

console.log(msg.startsWith("o"));          // false
console.log(msg.endsWith("world!"));       // true
console.log(msg.includes("x"));            // false

console.log(msg.startsWith("o", 4));       // true
console.log(msg.endsWith("o", 8));         // true
console.log(msg.includes("o", 8));         // false
NOTE: The startsWith(), endsWith(), and includes() methods will throw an error if you pass a regular expression instead of a string. In contrast, indexOf() and lastIndexOf() convert a regular expression argument into a string and then search for that string.
ECMAScript 6 also adds a repeat() method to strings, which accepts the number of times to repeat the string as an argument. It returns a new string containing the original string repeated the specified number of times. For example:
console.log("x".repeat(3));        // "xxx"
console.log("hello".repeat(2));    // "hellohello"
console.log("abc".repeat(4)); // "abcabcabcabc"ECMAScript 6’s answer to the following features that JavaScript lacked in ECMAScript 5 and in earlier versions:
- Multiline strings A formal concept of multiline strings;
- Basic string formatting The ability to substitute parts of the string for values contained in variables;
- HTML escaping The ability to transform a string so it is safe to insert into HTML;
At their simplest, template literals act like regular strings delimited by backticks instead of double or single quotes. For example, consider the following:
let message = `\`Hello\` world!`;

console.log(message);             // "`Hello` world!"
console.log(typeof message);      // "string"
console.log(message.length);      // 14
Also ECMAScript 6’s template literals make multiline strings easy because there’s no special syntax. Just include a newline where you want, and it appears in the result, like so:
//In this code, all whitespace before the second line of the template literal is considered part of the string.
let message = `Multiline
               string`;

console.log(message);           // "Multiline
                                //                  string"
console.log(message.length);    // 31
The real difference between template literals and normal versions of JavaScript strings are Substitutions. Substitutions allow you to embed any valid JavaScript expression inside a template literal and output the result as part of the string. They are delimited by an opening ${ and a closing } that can have any JavaScript expression inside. The simplest substitutions let you embed local variables directly into a resulting string, like this:
let name = "Nicholas",
    message = `Hello, ${name}.`;

console.log(message);       // "Hello, Nicholas."
Because all substitutions are JavaScript expressions, you can substitute more than just simple variable names. You can easily embed calculations, function calls, and more. For example:
let count = 10,
    price = 0.25,
    message = `${count} items cost $${(count * price).toFixed(2)}.`;

console.log(message);       // "10 items cost $2.50."
Also you can place a template literal inside another template literal, as in this example:
let name = "John Doe",
    message = `Hello, ${
        `my name is ${ name }`
    }.`;

console.log(message);        // "Hello, my name is John Doe.""
NOTE: A template literal can access any variable accessible in the scope in which it is defined. Attempting to use an undeclared variable in > a template literal throws an error in strict and non-strict modes.
The real power of template literals is represented by TAGGED TEMPLATES. Tagged templates - allow you to parse template literals with a function. The first argument of a tag function contains an array of string values. The remaining arguments are related to the expressions. In the end, your function can return your manipulated string (or it can return something completely different as described in the next example). The name of the function used for the tag can be whatever you want.
var person = 'Mike';
var age = 28;

function myTag(strings, personExp, ageExp) {
  var str0 = strings[0]; // "That "
  var str1 = strings[1]; // " is a "

  // There is technically a string after
  // the final expression (in our example),
  // but it is empty (""), so disregard.
  // var str2 = strings[2];

  var ageStr;
  if (ageExp > 99){
    ageStr = 'centenarian';
  } else {
    ageStr = 'youngster';
  }

  // We can even return a string built using a template literal
  return `${str0}${personExp}${str1}${ageStr}`;
}

var output = myTag`That ${ person } is a ${ age }`;

console.log(output);
// That Mike is a youngster- The special raw property, available on the first argument to the tag function, allows you to access the raw strings as they were entered, without processing escape sequences:
function tag(strings) {
 console.log(strings.raw[0]);
}

tag`string text line 1 \n string text line 2`;
// logs "string text line 1 \n string text line 2" ,
// including the two characters '\' and 'n'ECMAScript 6 functions make a big leap forward, taking into account years of complaints and requests from JavaScript developers.
1. Default Parameter Values in ECMAScript 6 ECMAScript 6 makes it easier to provide default values for parameters by supplying initializations that are used when the parameter isn’t formally passed. For example:
// This function expects only the first parameter to always be passed.
// The other two parameters have default values, which makes the body of the function much smaller because you don’t need to add any code to check for a missing value.
function makeRequest(url, timeout = 2000, callback = function() {}) {

    // the rest of the function
}
// When makeRequest() is called with all three parameters, the defaults are not used. For example:

 // uses default timeout and callback
  makeRequest("/foo");

  // uses default callback
  makeRequest("/foo", 500);

  // doesn't use defaults
  makeRequest("/foo", 500, function(body) {
      doSomething(body);
  });
Perhaps the most interesting feature of default parameter values is that the default value is not resticted to be a primitive value. You can, for example, execute a function to retrieve the default parameter value, like this:
function getValue() {
    return 5;
}

function add(first, second = getValue()) {
    return first + second;
}

console.log(add(1, 1));     // 2
console.log(add(1));        // 6
Note: Be careful when using function calls as default parameter values. If you forget the parentheses, such as second = getValue in > this example, you are passing a reference to the function rather than the result of the function call.
This behavior introduces another useful capability. You can use a previous parameter as the default for a later parameter. Here’s an example:
function add(first, second = first) {
    return first + second;
}

console.log(add(1, 1));              // 2
console.log(add(1));                 // 2
2. Rest Parameters Rest parameters were designed to replace arguments in JavaScript. Originally, ECMAScript 4 eliminated arguments and added rest parameters to allow an unlimited number of arguments to be passed to functions. ECMAScript 4 was never standardized, but this idea was retained and reintroduced in ECMAScript 6, despite arguments not being removed from the language. A rest parameter is indicated by three dots (...) preceding a named parameter. That named parameter becomes an Array containing the rest of the parameters passed to the function, which is where the name rest parameters originates. For example:
function pick(object, ...keys) {
    let result = Object.create(null);
for (let i = 0, len = keys.length; i < len; i++) {
        result[keys[i]] = object[keys[i]];
    }

    return result;
}
Code explanation:
- In the code above, keys is a rest parameter that contains all parameters passed after object (unlike arguments, which contains all parameters including the first one). That means you can iterate over keys from beginning to end without worry. As a bonus, you can tell by looking at the function that it’s capable of handling any number of parameters.
Rest parameters have two restrictions :
- The first restriction is that there can be only one rest parameter, and the rest parameter must be last. For example, this code won’t work:
        // Syntax error: Can't have a named parameter after rest parameters
        function pick(object, ...keys, last) {
            let result = Object.create(null);

            for (let i = 0, len = keys.length; i < len; i++) {
                result[keys[i]] = object[keys[i]];
            }

            return result;
        }
- The second restriction is that rest parameters cannot be used in an object literal setter. For example, this code won’t work:
    let object = {

      // Syntax error: Can't use rest param in setter
      set name(...value) {
          // do something
      }
  };
2. Spread Operator
Spread operator - allows an iterable such as an array expression or string to be expanded in places where zero or more arguments (for function calls) or elements (for array literals) are expected, or an object expression to be expanded in places where zero or more key-value pairs (for object literals) are expected.
function sum(x, y, z) {
  return x + y + z;
}

const numbers = [1, 2, 3];

console.log(sum(...numbers));
// expected output: 6

console.log(sum.apply(null, numbers));
// expected output: 6*Syntax:
For function calls:
myFunction(...iterableObj);
For array literals or strings:
[...iterableObj, '4', 'five', 6];
For object literals (new in ECMAScript 2018):
let objClone = { ...obj }; myFunction(...iterableObj);
Difference between Rest and Spread?
When using Rest arguments, you are collapsing all remaining arguments of a function into one array Rest: quite literally the rest of the data. It will always collect the data in an array, so:
    function sum( first, ...others ) {
        for ( var i = 0; i < others.length; i++ )
            first += others[i];
        return first;
    }
    console.log(sum(1,2,3,4))// sum(1, 2, 3, 4) == 10;
When using Spread, you are expanding a single variable into more. Spread: literally spread the data over the input. Will be an iterable in some form (array, object, string etc…) so:
    var abc = ['a', 'b', 'c'];
    var def = ['d', 'e', 'f'];
    var alpha = [ ...abc, ...def ];
    console.log(alpha)// alpha == ['a', 'b', 'c', 'd', 'e', 'f'];
      ]
      // [1, 2, 3, 4, 5, 6]

      const toSpread = { key: 'value' }
      const objectSpread = {
         ...toSpread,
        secondKey: 'secondValue'
      }
3. Block-Level Functions
Block-level functions are similar to let function expressions in that the function definition is removed once execution flows out of the block in which it’s defined. The key difference is that block-level functions are hoisted to the top of the containing block.
Function expressions that use let are not hoisted, as this example illustrates:
  "use strict";

  if (true) {

      console.log(typeof doSomething);      // throws an error

      let doSomething = function () {
          // empty
      }

      doSomething();
  }

  console.log(typeof doSomething);
ECMAScript 6 also allows block-level functions in non-strict mode, but the behavior is slightly different. Instead of hoisting these declarations to the top of the block, they are hoisted all the way to the containing function or global environment:
    // ECMAScript 6 behavior
    if (true) {

        console.log(typeof doSomething);      // "function"

        function doSomething() {
            // empty
      }

          doSomething();
      }

      console.log(typeof doSomething);          // "function"
Also ECMAScript 6 also introduced a completely new way to declare functions via Arrow Functions.
4. Arrow Functions
One of the most interesting new parts of ECMAScript 6 is the arrow function. Arrow functions are, as the name suggests, functions defined with a new syntax that uses an arrow (=>). But arrow functions behave differently than traditional JavaScript functions in a number of important ways:
-
No keywords this, super, arguments, and new.target bindings. The values of this, super, arguments, and new.target inside the function are defined by the closest containing non-arrow function.
-
Cannot be called with new because Arrow functions do not have a [[Construct]] method and therefore cannot be used as constructors. Arrow functions throw an error when used with new.
-
No Prototype because you can’t use new on an arrow function, there’s no need for a prototype. The prototype property of an arrow function doesn’t exist.
-
Can’t change this - The value of this inside the function can’t be changed. It remains the same throughout the entire life cycle of the function.
-
No Arguments object because arrow functions have no arguments binding, you must rely on named and rest parameters to access function arguments.
-
No duplicate named Parameters - Arrow functions cannot have duplicate named parameters in strict or non-strict mode, as opposed to non-arrow functions, which cannot have duplicate named parameters only in strict mode.
There are a few reasons for these differences. First and foremost, this binding is a common source of error in JavaScript. It’s very easy to lose track of the this value inside a function, which can result in unintended program behavior, and arrow functions eliminate this confusion. Second, by limiting arrow functions to simply executing code with a single this value, JavaScript engines can more easily optimize these operations. By doing so, JavaScript engines are better able to optimize arrow function execution.
NOTE: Arrow functions also have a name property that follows the same rule as other functions.
The syntax for arrow functions comes in many flavors depending on what you’re trying to accomplish. All variations begin with function arguments, followed by the arrow, followed by the body of the function.
1 - No Arguments
- If there are no arguments to the function, you must include an empty set of parentheses in the declaration, as follows:
    let getName = () => "Nicholas";

    // effectively equivalent to:

    let getName = function() {
        return "Nicholas";
    };
2 - Passing one Argument
- The arguments and the body can take different forms depending on usage. For example, the following arrow function takes a single argument and simply returns it:
    let reflect = value => value;

    // effectively equivalent to:

    let reflect = function(value) {
        return value  ;
    };
3 - Passing Multiple Arguments
- If you are passing in more than one argument, you must include parentheses around those arguments, like this: in more than one argument, you must include parentheses around those arguments, like this:
    let sum = (num1, num2) => num1 + num2;

    // effectively equivalent to:

    let sum = function(num1, num2) {
        return num1 + num2;
    };
4 - Immediately Invoked Function Expressions using Arrow Functions
One popular use of functions in JavaScript is creating immediately invoked function expressions (IIFEs). IIFEs allow you to define an anonymous function and call it immediately without saving a reference. This pattern comes in handy when you want to create a scope that is shielded from the rest of a program. For example:
let person = ((name) => {

    return {
        getName: function() {
            return name;
        }
    };

})("John");

console.log(person.getName());      // "John"
Arrow functions have no this binding, which means the value of this inside an arrow function can only be determined by looking up the scope chain. If the arrow function is contained within a non-arrow function, this will be the same as the containing function; otherwise, this is undefined. Here’s one way you could write this code using an arrow function:
    let PageHandler = {

        id: "123456",

        init: function() {
            document.addEventListener("click",
                    event => this.doSomething(event.type), false);
        },

        doSomething: function(type) {
            console.log("Handling " + type  + " for " + this.id);
             }
};The concise syntax for arrow functions makes them ideal for use with array processing, too. The array methods that accept callback functions, such as sort(), map(), and reduce(), can all benefit from simpler arrow function syntax, which changes seemingly complex processes into simpler code.
let result = values.sort((a, b) => a - b);
Despite their different syntax, arrow functions are still functions and are identified as such. Consider the following code:
    var comparator = (a, b) => a - b;
    //The console.log() output reveals that both typeof and instanceof
    // behave the same with arrow functions as they do with other functions.
    console.log(typeof comparator);                 // "function"
    console.log(comparator instanceof Function);    // true
Also like other functions, you can still use call(), apply(), and bind() on arrow functions, although the this binding of the function will not be affected. Here are some examples:
   var sum = (num1, num2) => num1 + num2;

    console.log(sum.call(null, 1, 2));     // 3
    console.log(sum.apply(null, [1, 2]));  // 3

    var boundSum = sum.bind(null, 1, 2);

console.log(boundSum()); // 3What is a Tail Call? - A tail call is when a function is called as the last statement in another function. Perhaps the most interesting change to functions in ECMAScript 6 is an engine optimization that changes the tail call system:
How Tail Calls Are Different in ECMAScript 6 ? - ECMAScript 6 reduces the size of the call stack for certain tail calls in strict mode (non-strict mode tail calls are left untouched). With this optimization, instead of creating a new stack frame for a tail call, the current stack frame is cleared and reused as long as the following conditions are met:
- The tail call does not require access to variables in the current stack frame (meaning the function is not a closure).
- The function making the tail call has no further work to do after the tail call returns.
- The result of the tail call is returned as the function value.
  "use strict";
// This function makes a tail call to doSomethingElse(), returns the result immediately, and
//      doesn’t access any variables in the local scope.
   doSomething() {
        // optimized
        return doSomethingElse();
    }
In practice, tail call optimization happens behind the scenes, so you don’t need to think about it unless you’re trying to optimize a function. The primary use case for tail call optimization is in recursive functions, because that is where the optimization has the greatest effect. Consider this function, which computes factorials:
    function factorial(n) {
        if (n <= 1) {
            return 1;
        } else {

            // not optimized - must multiply after returning
            return n * factorial(n - 1);
        }
    }
Think about tail call optimization whenever you’re writing a recursive function, because it can provide a significant performance improvement, especially when applied in a computationally expensive function.
Summary for FUNCTIONS:
-
Functions haven’t undergone a huge change in ECMAScript 6 but rather a series of incremental changes that make them easier to work with.
-
Default function parameters allow you to easily specify what value to use when a particular argument isn’t passed. Prior to ECMAScript 6, this would require some extra code inside the function to check for the presence of arguments and assign a different value.
-
Rest parameters allow you to specify an array into which all remaining parameters should be placed. Using a real array and letting you indicate which parameters to include makes rest parameters a much more flexible solution than arguments.
-
The spread operator is a companion to rest parameters, allowing you to deconstruct an array into separate parameters when calling a function.
-
The biggest change to functions in ECMAScript 6 was the addition of arrow functions. Arrow functions are designed to be used in place of anonymous function expressions. Arrow functions have a more concise syntax, lexical this binding, and no arguments object. Additionally, arrow functions can’t change their this binding and therefore can’t be used as constructors.
-
Tail call optimization allows some function calls to be optimized to maintain a smaller call stack, use less memory, and prevent stack overflow errors. This optimization is applied by the engine automatically when it is safe to do so; however, you might decide to rewrite recursive functions to take advantage of this optimization.
ECMAScript 6 focuses heavily on making objects more useful, which makes sense because nearly every value in JavaScript is some type of Object. The number of Objects developers use in an average JavaScript program continues to increase as the complexity of JavaScript applications increases. With more objects in a program, it has become necessary to use them more effectively. ECMAScript 6 improves the use of objects in a number of ways, from simple syntax extensions to options for manipulating and interacting with them, and this chapter covers those improvements in detail.
The ECMAScript 6 specification has clear definitions for each object category. It’s essential to understand this terminology to grasp the language as a whole. The object categories are:
- Ordinary objects - Have all the default internal behaviors for objects in JavaScript.
- Exotic Objects - Have internal behavior that differs from the default in some way.
- Standard Objects - Defined by ECMAScript 6, such as Array, Date, and so on. Standard objects can be ordinary or exotic.
- Built-in Objects - Present in a JavaScript execution environment when a script begins to execute. All standard objects are built-in objects.
The Object literal is one of the most popular patterns in JavaScript. JSON is built on its syntax, and it’s in nearly every JavaScript file on the Internet. The object literal popularity is due to its succinct syntax for creating objects that would otherwise take several lines of code to create. Fortunately for developers, ECMAScript 6 makes object literals more powerful and even more succinct by extending the syntax in several ways.
function createPerson(name, age) {
    return {
        name,
        age
    };
}
ECMAScript 6 also improves the syntax for assigning methods to object literals and the syntax is made more concise by eliminating the colon and the function keyword:
let person = {
    name: "John",
    sayName() {
        console.log(this.name);
    }
};
In ECMAScript 6, computed property names are part of the object literal syntax, and they use the same square bracket notation that has been used to reference computed property names in object instances. For example:
    let lastName = "last name";

    let person = {
        "first name": "John",
    //The square brackets inside the object literal indicate that the property name is computed,
   //     so its contents are evaluated as a string.
        [lastName]: "Doe"
    };

    console.log(person["first name"]);      // "John"
    console.log(person[lastName]);          // "Doe"
Since the square brackets inside the object literal indicates that the property name is computed, you can also include expressions, such as the following:
    var suffix = " name";

    var person = {

    //These properties evaluate to "first name" and "last name", and you can
    //      use them to reference the properties later.
    // Anything you would put inside square brackets while using bracket notation
    //          on object instances will also work for computed property names inside object literals.
        ["first" + suffix]: "John",
        ["last" + suffix]: "Doe"
    };

    console.log(person["first name"]);      // "John"
    console.log(person["last name"]);       // "Doe"
ECMAScript 6 introduces a couple of new methods on the Object global that are designed to make certain tasks easier.
(1) - Object.is() Method
When you want to compare two values in JavaScript, you’re probably used to using either the equals operator (==) or the identically equals operator (===). But even the identically equals operator isn’t entirely accurate. For example, NaN === NaN returns false, which necessitates using isNaN() to detect NaN properly.
Thus to remedy the remaining inaccuracies of the identically equals operator, ECMAScript 6 introduces the Object.is() method. This method accepts two arguments and returns true if the values are equivalent. Two values are considered equivalent when they’re the same type and have the same value. Here are some examples:
  console.log(+0 == -0);              // true
  console.log(+0 === -0);             // true
  console.log(Object.is(+0, -0));     // false

  console.log(NaN == NaN);            // false
  console.log(NaN === NaN);           // false
  console.log(Object.is(NaN, NaN));   // true

  console.log(5 == 5);                // true
  console.log(5 == "5");              // true
  console.log(5 === 5);               // true
  console.log(5 === "5");             // false
  console.log(Object.is(5, 5));       // true
  console.log(Object.is(5, "5"));     // false
NOTE: In many cases, Object.is() works the same as the === operator. The only differences are that +0 and -0 are considered not equivalent, and NaN is considered equivalent to NaN.
Choose whether to use Object.is() or === based on how those special cases affect your code.
(2) - Object.assign() Method
Mixins are among the most popular patterns for object composition in JavaScript. In a mixin, one object receives properties and methods from another object. Many JavaScript libraries have a mixin method similar to this:
//The mixin() function iterates over the own properties of supplier and copies them onto receiver.
//This allows the receiver to gain new properties without inheritance:
  function mixin(receiver, supplier) {
      Object.keys(supplier).forEach(function(key) {
          receiver[key] = supplier[key];
           });

      return receiver;
  }
This mixin pattern became popular enough that ECMAScript 6 added the Object.assign() method, which behaves the same way, accepting a receiver and any number of suppliers and then returning the receiver. The name change from mixin() to assign() which reflects the actual operation that occurs.
    function EventTarget() { /*...*/ }
    EventTarget.prototype = {
        constructor: EventTarget,
        emit: function() { /*...*/ },
        on: function() { /*...*/ }
    }

    var myObject = {}
    Object.assign(myObject, EventTarget.prototype);

    myObject.emit("somethingChanged");
NOTE: The Object.assign() method isn’t a significant addition to ECMAScript 6, but it does formalize a common function found in many JavaScript libraries. Keep in mind that Object.assign() doesn’t create accessor properties on the receiver when a supplier has accessor properties. Because Object.assign() uses the assignment operator, an accessor property on a supplier will become a data property on the receiver.
For example:
  ar receiver = {},
      supplier = {
          get name() {
              return "file.js"
          }
      };

  Object.assign(receiver, supplier);

  var descriptor = Object.getOwnPropertyDescriptor(receiver, "name");

  console.log(descriptor.value);      // "file.js"
console.log(descriptor.get); // undefinedIn ECMAScript 5 strict mode introduced a check for duplicate object literal properties that would throw an error if a duplicate was found. For example, this code was problematic:
  "use strict";

  var person = {
      name: "Nicholas",
      //When running in ECMAScript 5 strict mode, the second name property causes a syntax error.
      name: "Greg"        // syntax error in ES5 strict mode
  };
But in ECMAScript 6, the duplicate property check was removed. Strict and non-strict mode code no longer check for duplicate properties. Instead, the last property of the given name becomes the property’s actual value, as shown here:
    "use strict";

    var person = {
        name: "Nicholas",
        name: "Greg"        // no error in ES6 strict mode};

    //In this example, the value of person.name is "Greg" because
    //   that’s the last value assigned to the property.
console.log(person.name); // "Greg"ECMAScript 5 didn’t define the enumeration order of object properties. However, ECMAScript 6 strictly defines the order in which own properties must be returned when they’re enumerated. This affects how properties are returned using Object.getOwnPropertyNames() and Reflect.ownKeys. It also affects the order in which properties are processed by Object.assign().
The basic order for own property enumeration is:
(1) - All numeric keys in ascending order; (2) - All string keys in the order in which they were added to the object; (3) - All symbol keys in the order in which they were added to the object;
Here’s an example:
    var obj = {
        a: 1,
        0: 1,
        c: 1,
        2: 1,
        b: 1,
        1: 1
    };

    obj.d = 1;

    console.log(Object.getOwnPropertyNames(obj).join(""));     // "012acbd"
NOTE: The for-in loop still has an unspecified enumeration order because not all JavaScript engines implement it the same way. The Object.keys() method and JSON.stringify() are both specified to use the same (unspecified) enumeration order as for-in.
Although enumeration order is a subtle change to how JavaScript works, it’s not uncommon to find programs that rely on a specific enumeration order to work correctly. ECMAScript 6, by defining the enumeration order, ensures that JavaScript code relying on enumeration will work correctly regardless of where it is executed.
Prototypes are the foundation of inheritance in JavaScript, and ECMAScript 6 continues to make prototypes more useful. Early versions of JavaScript severely limited what you could do with prototypes. However, as the language matured and developers became more familiar with how prototypes work, it became clear that developers wanted more control over prototypes and easier ways to work with them. As a result, ECMAScript 6 introduced some improvements to prototypes.
(1) - Object.setPrototypeOf()
ECMAScript 6 adds the Object.setPrototypeOf() method, which allows you to change the prototype of any given object.
    let person = {
        getGreeting() {
        return "Hello";
        }
    };

    let dog = {
        getGreeting() {
            return "Woof";
        }
    };

    // prototype is person
    let friend = Object.create(person);
    console.log(friend.getGreeting());                      // "Hello"
    console.log(Object.getPrototypeOf(friend) === person);  // true

    // set prototype to dog
    Object.setPrototypeOf(friend, dog);
    console.log(friend.getGreeting());                      // "Woof"
    console.log(Object.getPrototypeOf(friend) === dog);     // true
(2) - Super references
Another improvement is the introduction of super references, which make accessing functionality on an object’s prototype easier. At its simplest, super is a pointer to the current object’s prototype, effectively the Object.getPrototypeOf(this) value. Knowing that, you can simplify the getGreeting() method as follows:
  let friend = {
      getGreeting() {

          // Object.getPrototypeOf(this).getGreeting.call(this)
          return super.getGreeting() + ", hi!";
      }
  };
Attempting to use super outside of concise methods results in a syntax error, as in this example:
let friend = {
    //This example uses a named property with a function, and the call to super.getGreeting()
    //     results in a syntax error because super is invalid in this context.
    getGreeting: function() {
        // syntax error
        return super.getGreeting() + ", hi!";
    }
};
The super reference is really helpful when you have multiple levels of inheritance, because in that case, Object.getPrototypeOf() no longer works in all circumstances. For example:
  let person = {
      getGreeting() {
          return "Hello";
      }
  };

  // prototype is person
    let friend = {
    getGreeting() {
          return Object.getPrototypeOf(this).getGreeting.call(this) + ", hi!";
      }
    };
    Object.setPrototypeOf(friend, person);


    // prototype is friend
    let relative = Object.create(friend);

    console.log(person.getGreeting());                  // "Hello"
    console.log(friend.getGreeting());                  // "Hello, hi!"
console.log(relative.getGreeting()); // error!- Objects are the center of JavaScript programming, and ECMAScript 6 makes some helpful changes to objects that make them easier to work with and more flexible. ECMAScript 6 makes several changes to object literals. Shorthand property definitions make assigning properties with the same names as in-scope variables simpler. Computed property names allow you to specify non-literal values as property names, which you’ve been able to do in other areas of the language. Shorthand methods let you type far fewer characters to define methods on object literals by completely omitting the colon and function keyword. ECMAScript 6 loosens the strict mode check for duplicate object literal property names as well, meaning two properties with the same name can be in a single object literal without throwing an error.
- The Object.assign() method makes it easier to change multiple properties on a single object at once and is very useful when you use the mixin pattern. The Object.is() method performs strict equality on any value, effectively becoming a safer version of === when you’re working with special JavaScript values.
- ECMAScript 6 clearly defines enumeration order for own properties. Numeric keys always come first in ascending order followed by string keys in insertion order and symbol keys in insertion order.
- It’s now possible to modify an object’s prototype after it’s been created thanks to ECMAScript 6’s Object.setPrototypeOf() method.
- In addition, you can use the super keyword to call methods on an object’s prototype. The this binding inside a method invoked using super is set up to automatically work with the current value of this.
Why Is Destructuring Useful? - Because it prevents the situation of code duplication, for example when trying to fetch information from objects and arrays. Here is an example:
//Example of fetching information in ES5 from an Object
    let options = {
        repeat: true,
        save: false
    };

    // extract data from the object
    let repeat = options.repeat,
        save = options.save;
ECMASCRIPT 6 is solving this problem of data fetching from different object by adding Destructuring for OBJECTS and ARRAYS. When you break down a data structure into smaller parts, getting the information you need from it becomes much easier.
Object destructuring syntax uses an object literal on the left side of an assignment operation. For example:
      let node = {
          type: "Identifier",
          name: "foo"
      };

      //The identifiers type and name are both declarations of local variables
      //   and the properties to read the value from on the node object.
      let { type, name } = node;

      console.log(type);      // "Identifier"
      console.log(name);      // "foo"
NOTES:
(1) DON’T FORGET THE INITIALIZER - When you’re using destructuring to declare variables using var, let, or const, you must supply an initializer (the value after the equal sign).
The following lines of code will all throw syntax errors due to a missing initializer:
    // syntax error!
    var { type, name };

    // syntax error!
    let { type, name };

    // syntax error!
    const { type, name };
(2) However, it’s also possible to use destructuring in assignments and its a MUST to put parentheses around a destructuring assignment statement. The reason is that an opening curly brace is expected to be a block statement, and a block statement cannot appear on the left side of an assignment. The parentheses signal that the next curly brace is not a block statement and should be interpreted as an expression, allowing the assignment to complete.
For instance, you might decide to change the values of variables after they’re defined, as follows:
      let node = {
          type: "Identifier",
          name: "foo"
      },

      //declaring variables
      type = "Literal",
      name = 5;

      // assign different values to the variables type and name using destructuring
      ({ type, name } = node);

      console.log(type);      // "Identifier"
      console.log(name);      // "foo"
(3) - An error is thrown when the right side of the destructuring assignment expression (the expression after =) evaluates to null or undefined. This happens because any attempt to read a property of null or undefined results in a runtime error.
(4) - When you use a destructuring assignment statement and you specify a local variable with a property name that doesn’t exist on the object, that local variable is assigned a value of undefined. For example:
    let node = {
        type: "Identifier",
        name: "foo"
    };

    let { type, name, value } = node;

    console.log(type);      // "Identifier"
    console.log(name);      // "foo"
    console.log(value);     // undefined
(5) - You can optionally define a default value to use when a specified property doesn’t exist. To do so, insert an equal sign (=) after the property name and specify the default value, like this:
    let node = {
        type: "Identifier",
        name: "foo"
    };

    let { type, name, value = true } = node;

    console.log(type);      // "Identifier"
    console.log(name);      // "foo"
    // the variable value is given true as a default value.
    // The default value is only used if the property is missing on node or has a value of undefined.
    //     Because no node.value property exists, the variable value uses the default value.
    console.log(value);     // true
(6) - ECMAScript 6 has an extended syntax that allows you to assign to a local variable with a different name, and that syntax looks like the object literal non-shorthand property initializer syntax. Here’s an example:
    let node = {
        type: "Identifier",
        name: "foo"
    };

    let { type: localType, name: localName } = node;

    //This code uses destructuring assignments to declare the localType and localName variables,
    //     which contain the values from the node.type and node.name properties, respectively.
    console.log(localType);     // "Identifier"
    console.log(localName);     // "foo"
(7) - You can add default values when you’re using a different variable name, as well. The equal sign and default value are still placed after the local variable name. For example:
      let node = {
          type: "Identifier"
      };

      let { type: localType, name: localName = "bar" } = node;

      console.log(localType);     // "Identifier"
      console.log(localName);     // "bar"
(8) - By using syntax similar to that of object literals, you can navigate into a nested object structure to retrieve just the information you want. Here’s an example:
        let node = {
            type: "Identifier",
            name: "foo",
            loc: {
                start: {
                    line: 1,
                    column: 1
                },
                end: {
                    line: 1,
                    column: 4
                }
            }
        };

       // The destructuring pattern in this example uses curly braces to indicate that the pattern
      //  should descend into the property named loc on node and look for the start property.
     //A curly brace after the colon indicates that the destination is nested another level into the object.
        let { loc: { start }} = node;

        console.log(start.line);        // 1
console.log(start.column); // 1Array destructuring syntax is very similar to object destructuring: it just uses array literal syntax instead of object literal syntax. The destructuring operates on positions within an array rather than the named properties that are available in objects. For example:
      let colors = [ "red", "green", "blue" ];

      let [ firstColor, secondColor ] = colors;

      console.log(firstColor);        // "red"
      console.log(secondColor);       // "green"
NOTES:
(1) You can also omit items in the destructuring pattern and only provide variable names for the items you’re interested in. If, for example, you just want the third value of an array, you don’t need to supply variable names for the first and second items. Here’s how that works:
    let colors = [ "red", "green", "blue" ];

    let [ , , thirdColor ] = colors;

    console.log(thirdColor);        // "blue"
(2) You can use array destructuring in the context of an assignment, but unlike object destructuring, there is no need to wrap the expression in parentheses. Consider the following example.
      let colors = [ "red", "green", "blue" ],
          firstColor = "black",
          secondColor = "purple";

      [ firstColor, secondColor ] = colors;

      console.log(firstColor);        // "red"
      console.log(secondColor);       // "green"
(3) For Default Values - Array destructuring assignment allows you to specify a default value for any position in the array, too. The default value is used when the property at the given position either doesn’t exist or has the value undefined. For example:
    let colors = [ "red" ];

    let [ firstColor, secondColor = "green" ] = colors;

    console.log(firstColor);        // "red"
    console.log(secondColor);       // "green"
(4) For Nested Array Destructuring - You can destructure nested arrays in a manner similar to destructuring nested objects. By inserting another array pattern into the overall pattern, the destructuring will descend into a nested array, like this:
    let colors = [ "red", [ "green", "lightgreen" ], "blue" ];

    // later

    let [ firstColor, [ secondColor ] ] = colors;

    console.log(firstColor);        // "red"
    console.log(secondColor);       // "green"
(5) For Rest Items - array destructuring has a similar concept called rest items. Rest items use the ... syntax to assign the remaining items in an array to a particular variable. Take a look at the following example.
    let colors = [ "red", "green", "blue" ];

    let [ firstColor, ...restColors ] = colors;

    console.log(firstColor);        // "red"
    console.log(restColors.length); // 2
    console.log(restColors[0]);     // "green"
    console.log(restColors[1]);     // "blue"
(6) Clonig arrays using rest items - A glaring omission from JavaScript arrays is the ability to easily create a clone. In ECMAScript 5, developers frequently used the concat() method as an easy way to clone an array. For example:
    // cloning an array in ECMAScript 5
    var colors = [ "red", "green", "blue" ];
    var clonedColors = colors.concat();
    console.log(clonedColors);      // "[red,green,blue]"
Although the concat() method is intended to concatenate two arrays, calling it without an argument returns a clone of the array. In ECMAScript 6, you can use rest items to achieve the same task through syntax intended to function that way. It works like this:
    // cloning an array in ECMAScript 6
    let colors = [ "red", "green", "blue" ];
    let [ ...clonedColors ] = colors;

    console.log(clonedColors);      // "[red,green,blue]"
NOTE:
- Rest items must be the last entry in the destructured array and cannot be followed by a comma. Including a comma after rest items is a syntax error.
(7) Mixed Destructuring - You can use object and array destructuring together to create more complex expressions. By doing so, you’re able to extract just the pieces of information you want from any mixture of objects and arrays. Consider the following example:
    let node = {
        type: "Identifier",
        name: "foo",
        loc: {
            start: {
                line: 1,
                column: 1
            },
            end: {
                line: 1,
                column: 4
            }
        },
        range: [0, 3]
    };

    let { loc: { start }, range: [ startIndex ] } = node;

    console.log(start.line);      // 1
    console.log(start.column);    // 1
console.log(startIndex); // 0- Destructuring makes working with objects and arrays in JavaScript easier. Using the familiar object literal and array literal syntax, you can dissect data structures to get at the information you’re interested in.
- Both object and array destructuring can specify default values for any property or item that is undefined, and both throw errors when the right side of an assignment evaluates to null or undefined.
- Destructuring declarations use var, let, or const to create variables and must always have an initializer.
- Destructuring assignments are used in place of other assignments and allow you to destructure into object properties and already existing variables.
- Destructured parameters use the destructuring syntax to make options objects more transparent when used as function parameters.
- Destructured parameters can be array patterns, object patterns, or a mixture, and you can use all the features of destructuring.
ECMAScript 6 introduces SYMBOLS as a primitive type (The language already had five primitive types: Strings, Numbers, Booleans, Null, and Undefined). SYMBOLS began as a way to create private object members, a feature JavaScript developers wanted for a long time.
What do I mean by Private names feature? - private names feature is meant to let developers create non-string property names which evolved into ECMAScript 6 into SYMBOLS.
SYMBOLS are unique among JavaScript primitives in that they don’t have a literal form, like true for Booleans or 42 for numbers. You can create a symbol using the global Symbol function, as in this example:
  let fullName = Symbol();
  let person = {};

  //Here, the symbol firstName is created and used to assign a new property on the person object.
  person[fullName] = "John Doe";
console.log(person[fullName]); // "John Doe"Because symbols are primitive values, calling new Symbol() throws an error. You can create an instance of Symbol via new Object(yourSymbol) as well, but it’s unclear when this capability would be useful.
The Symbol function also accepts a description of the symbol as an optional argument. You cannot use the description to access the property. For example:
    let firstName = Symbol("first name");
    let person = {};

    person[firstName] = "John";

    console.log("first name" in person);      // false
    console.log(person[firstName]);           // "John"
    console.log(firstName);                   // "Symbol(first name)"
A symbol’s description is stored internally in the [[Description]] property. This property is read whenever the symbol’s toString() method is called either explicitly or implicitly. The firstName symbol’s toString() method is called implicitly by console.log() in this example, so the description is printed to the log. It is not otherwise possible to access [[Description]] directly from code.
Because symbols are primitive values, you can use the typeof operator to determine whether a variable contains a symbol. ECMAScript 6 extends typeof to return "symbol" when used on a symbol. For example:
  let symbol = Symbol("test symbol");
  console.log(typeof symbol);         // "symbol"