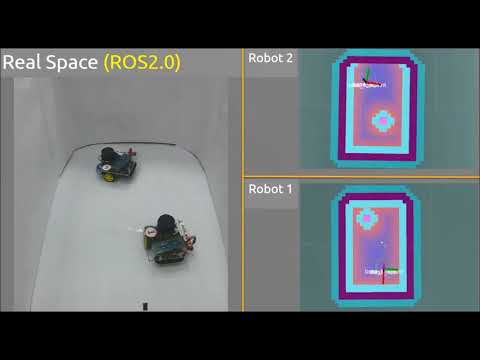
Swarm robots using Opensplice DDS with ROS 1&2
[Official Slides] https://github.com/Adlink-ROS/adlink_ddsbot/blob/release-1.0/document/Next-Gen_Smart_Manufacturing.pdf
[Youtube Video] https://www.youtube.com/watch?v=7ZIDkLKD4Y8
HaoChih Lin (haochih.lin@adlinktech.com)
Chester Tseng (chester.tseng@adlinktech.com)
Erik Boasson (erik.boasson@adlinktech.com)
Ryan Chen (ryanjb.chen@adlinktech.com)
ADLINK Technology, Inc
Advanced Robotic Platform Group
Apache 2.0
Copyright 2017 ADLINK Technology, Inc.


Build your own low-cost ddsbot (~250USD)
[Assembling PDF] adlink_ddsbot/document/hardware/adlink_ddsbot_hardware.pdf
[Arduino firmware]
For UNO (motor control): adlink_ddsbot/document/arduino/motor_control/motor_control.ino
For Nano (GY85 IMU): adlink_ddsbot/document/arduino/Razor_AHRS/Razor_AHRS.ino
[Desktop]
- ROS 1 (Kinetic: http://wiki.ros.org/kinetic/Installation/Ubuntu)
- ROS 2 (tested on Ardent)
- create your own catkin_ws (http://wiki.ros.org/ROS/Tutorials/InstallingandConfiguringROSEnvironment)
- Install required dependencies:
$ sudo apt-get install git ros-kinetic-navigation ros-kinetic-geographic-msgs ros-kinetic-slam-gmapping ros-kinetic-mrpt-slam ros-kinetic-mrpt-icp-slam-2d ros-kinetic-robot-localization ros-kinetic-stage* -y git clone adlink_ddsbot to your catkin_ws/src and compile
- Check the hostname (should be unique in the network)
- Check the system time synchronization ($ sudo ntpdate IP_TARGET)
- Open a terminal (remember to source ros2 & ros1 setup.bash)
$ export HOSTNAME$ roslaunch adlink_ddsbot Swarm_Sim_Stage.launch$ ros2 run ros1_bridge parameter_bridge- Repeat the same steps on another computer/robot (both should be in the same network)
- Then, each robot can be aware of all the others shown on the rviz.
[Image files]
Download pre-built image for Pi3 (ubuntu mate 16.04, ros 1&2, 13GB)
link: https://drive.google.com/open?id=0BxI3PXhTd_3HWmh2c2VSbWFNRHM
Extract the file from .gz file:
$ gunzip -c ADLINK_DDSBot_Pi3_20171002.img.gz > ADLINK_DDSBot_Pi3_20171002.img
Burn image file to SD card
[Setup steps]
- Connect Pi3 with your desktop by either ethernet cable or debug cable
- Power-on and login: (passward is: adlinkros)
- hdmi display: you can see the ADLink logo on the desktop
- ethernet: the default id address of provided image is 10.0.0.1 (
$ ssh pi@10.0.0.1) - debug cable: enter the password
- Change robot's hostname and connect to local network
- Synchronize the system time through AP server/specific computer
(
$ sudo ntpdate IP_ADDRESS) - Change the ROS 1 multi-machines variables in .bashrc (for each robot, it has own roscore)
- For Single robot test:
$ roslaunch adlink_ddsbot Adlink_DDSBot_Nav_Single.launch - For Swarm robots demo:
$ roslaunch adlink_ddsbot Adlink_DDSBot_Nav_Swarm.launch$ ros2 run ros1_bridge parameter_bridge
- Using remote computer to initial & set goal for the ddsbot through RVIZ
- Do the same thing on another ddsbots (in the same network), once the ros1_bridge has been executed, all others ddsbots can be visualized on RVIZ.
[Node Graph]
