5 June 2024
SwiftUI is a collection of opinionated magical invocations that you need to learn and put in the right order to get work done. SwiftUI isn't C, isn't Swift, isn't imperative. If you know another programming language, or if you are used to another UI framework, it tells nothing about whether or not you will be able to get work done with SwiftUI. SwiftUI is its own thing.
Here is a code example that gets you the size of a view once it is rendered:
GeometryReader { geoProxy in
    SpriteView(scene: myScene)
    .ignoresSafeArea()
    .onChange(of: geoProxy.size) {
        print("New size is \(geoProxy.size)")
    }
}
You have to know that you need to use something like onChange or onAppear in order to execute code inside them, and therefore access the information you seek. You can not just write commands on any line. The following code isn't valid SwiftUI:
GeometryReader { geoProxy in
    print(geoProxy) // you can not use print like this
    SpriteView(scene: myScene)
    .ignoresSafeArea()
}
However, you can write this:
GeometryReader { geoProxy in
    let proxy = geoProxy // assigning the geometry proxy to a constant is ok
    SpriteView(scene: myScene)
    .ignoresSafeArea()
    .onChange(of: proxy.size) {
        print("New size is \(proxy.size)") // access the constant here
    }
}
You can not write this:
GeometryReader { geoProxy in
    SpriteView(scene: myScene)
    .ignoresSafeArea()
    .onChange(of: geoProxy) { // you can not listen to changes of the geometry proxy itself
        print(geoProxy) // not valid
    }
}
You have to use one of the properties of the geometry proxy, such as size or safeAreaInsets.
30 May 2024
In the Apple programming world, the delegation pattern is a common pattern that allows one object to make another object execute something. For example:
/// A framework to use for this example
import SpriteKit

/// Define a protocol
/// Any object that conforms to this protocol must implement the methods defined here
protocol ButtonDelegate: AnyObject {
    func buttonTouched(touch: UITouch)
}

/// Object A, the delegator
class MyButton: SKSpriteNode {
    weak var delegate: ButtonDelegate?

    override func touchesBegan(_ touches: Set<UITouch>, with event: UIEvent?) {
        for touch in touches {
            delegate?.buttonTouched(touch: touch)
        }
    }
}

/// Object B, the delegate
class MyScene: SKScene, ButtonDelegate {
    override func didMove(to view: SKView) {
        let myButton = MyButton(color: .red, size: CGSize(width: 150, height: 150))
        myButton.delegate = self
        addChild(myButton)
    }

    /// Conform to the protocol by implementing its methods
    func buttonTouched(touch: UITouch) {
        /// Whenever myButton is touched, this function is called
        print("Button was touched!")
    }
}
The delegation pattern is one way amongst many to implement messaging between objects. Other ways include using the Notification Center. This post compares the performance of delegation vs notification center.
15 April 2024
A basic setup to add a tap recognizer to a view (a SpriteKit view in this case)
override func didMove(to view: SKView) {
	setupGestureRecognizers(in: view)
}

func setupGestureRecognizers(in view: SKView) {
    let tapGesture = UITapGestureRecognizer(target: self, action: #selector(handleTap(gesture:)))
    tapGesture.numberOfTapsRequired = 2
    tapGesture.numberOfTouchesRequired = 1
    view.addGestureRecognizer(tapGesture)
}

@objc func handleTap(gesture: UIGestureRecognizer) {
    // do something on double tap
}9 April 2024
Xcode provides various helpful ways to comment and organize your code documentation. Here are some:
// regular comment

/// comment written in regular characters, not monospace characters

/// a comment with `inlineCode`

// MARK: A title that will show up in the mini map

// MARK: - A title that will show up with a line separator

/**

 # A documentation comment block

 Document the parameters of a function:
 - Parameter name: description of the parameter

*/8 April 2024
Copy this extension somewhere, or create a file for it in your Xcode project:
//  Created by Kyle Bashour on 10/24/20.

import UIKit

extension UIScreen {
    private static let cornerRadiusKey: String = {
        let components = ["Radius", "Corner", "display", "_"]
        return components.reversed().joined()
    }()

    /// The corner radius of the display. Uses a private property of `UIScreen`,
    /// and may report 0 if the API changes.
    public var displayCornerRadius: CGFloat {
        guard let cornerRadius = self.value(forKey: Self.cornerRadiusKey) as? CGFloat else {
            assertionFailure("Failed to detect screen corner radius")
            return 0
        }

        return cornerRadius
    }
}
Then, in your code, you can access it if you have access to UIScreen.main. For example, inside a SpriteKit scene class:
override func didMove(to view: SKView) {
    let displayCornerRadius = UIScreen.main.displayCornerRadius
    // do something with the corner radius value
}8 April 2024
Core Animation has been developed by a single Apple engineer, John Harper. Source: here and here.
Is SpriteKit a wrapper around Core Animation? Are SpriteKit nodes CALayer objects? This comment says that SpriteKit is a wrapper around Core Animation. Google Gemini says that each SKNode is backed by a CALayer.
I tried accessing Core Animation objects through an SKNode, or define a Core Animation animation on a SpriteKit node, without success. Here's the code I tried, suggested by Google Gemini:
let sprite = SKSpriteNode(color: .systemRed, size: CGSize(width: 60, height: 60))
addChild(sprite)

let anim = CABasicAnimation(keyPath: "position")
anim.fromValue = sprite.position
anim.toValue = CGPoint(x: sprite.position.x + 100, y: sprite.position.y)
anim.duration = 1.0
anim.timingFunction = CAMediaTimingFunction(name: .easeIn)

let layer = view.layer(for: sprite)
layer?.add(anim, forKey: "customMoveAnimation")
In UIKit, views have a layer property that gives access to the CALayer handling the view. But I can not access a layer property on an SKNode.
8 April 2024
Core Animation backs many if not all animations on iOS. You can access the Core Animation object that holds your view with view.layer. For example, we can add a border to the view by defining it on its CALayer parent:
view.layer.borderWidth = 5
view.layer.borderColor = .red22 March 2024
// Float
let myFloat: CGFloat = 1.23456
// round to 1 decimal place
let myValue = round(myFloat * 10) / 1021 March 2024
This Core Graphics program creates a grid and saves it as a PNG image. You can copy paste the code into a new file in Xcode, run the SwiftUI live preview, press the one button in the view, and get the image file path from the Xcode console.
import SwiftUI

/// SwiftUI view
struct GenerateGridImageUI: View {
    var body: some View {
        Button(action: {
            generatePNG()
        }, label: {
            Text("Generate Grid")
                .font(.title2)
        })
        .buttonStyle(.borderedProminent)
        Text("The file path of the generated image will be printed in the console.")
            .padding(20)
            .multilineTextAlignment(.center)
    }
}

/// this will run the live preview in Xcode
#Preview {
    GenerateGridImageUI()
}

/**

 Configure your grid here:
 - Parameter cellSize: the width, in points, of a square in the grid
 - Parameter rows: the number of horizontal squares in the grid
 - Parameter columns: the number of vertical squares in the grid

 The actual size of the image in pixels depends on the device you are running on.
 If the device runs at 3x scalling like most recent iPhones, then a 1 point = 3 pixels
 If the device is a retina Mac, then 1 point = 2 pixels

 */
func generatePNG() {
    if let pngData = generateGrid(cellSize: 50, rows: 10, cols: 10) {
        let paths = FileManager.default.urls(for: .documentDirectory, in: .userDomainMask)
        let filePath = paths[0].appendingPathComponent("grid.png")

        do {
            try pngData.write(to: filePath)
            print("Saved grid image at: \(filePath)")
        } catch {
            print("Failed to save image: \(error)")
        }
    }
}

/// The Core Graphics function
func generateGrid(cellSize: CGFloat, rows: Int, cols: Int) -> Data? {
    let size = CGSize(width: CGFloat(cols) * cellSize + 1, height: CGFloat(rows) * cellSize + 1)

    let renderer = UIGraphicsImageRenderer(size: size)
    let image = renderer.image { ctx in
        let bezierPath = UIBezierPath()
        let offset: CGFloat = 0.5
        for i in 0...cols {
            let x = CGFloat(i) * cellSize + offset
            bezierPath.move(to: CGPoint(x: x, y: 0))
            bezierPath.addLine(to: CGPoint(x: x, y: size.height))
        }
        for i in 0...rows {
            let y = CGFloat(i) * cellSize + offset
            bezierPath.move(to: CGPoint(x: 0, y: y))
            bezierPath.addLine(to: CGPoint(x: size.width, y: y))
        }

        /// the color of the strokes
        UIColor(white: 0, alpha: 1).setStroke()

        /// the thickness of the strokes
        bezierPath.lineWidth = 1

        bezierPath.stroke()
    }

    return image.pngData()
}
Many times I needed to generate such a pattern in Figma or Pixelmator. Generating large repetitive visual patterns is not trivial to do in 2D drawing software. 3D programs like Cinema 4D do a better job at generating visual patterns, but the setup is heavier and exporting is cumbersome.
20 March 2024
Consider this code:
override func touchesMoved(_ touches: Set<UITouch>, with event: UIEvent?) {
    for touch in touches {
        guard let label = touchLabels[touch] else { continue } // the important bit
        let touchLocation = touch.location(in: self)
        label.position = CGPoint(x: touchLocation.x, y: touchLocation.y + 60)
        label.text = pointToString(touchLocation)
    }
}
I find the "continue" keyword in the line using guard very confusing. In fact, continue doesn't mean that the code continues executing. It means that the immediately following code will NOT be executed, and the next iteration will be evaluated instead. In this case, the next iteration is the next touch in touches.
continue should be "skip" or "next". It skips any code below the guard statement and within the scope. Note that the compiler will allow continue only inside a loop.
20 March 2024
In 2023, Apple started requiring reasons for using some APIs in apps published on the AppStore. Here are some of these APIs:
In UIKit, UITouch objects have a timeStamp property. The timeStamp property is the time in seconds, since system startup, when the touch originated or was last changed. It inherits from the systemUptime property, which requires a declaration and usage justification to Apple.
Discussion: SpriteKit's game loop—a core function of any game engine—provides a currentTime value which is the system time, expressed in terms of seconds since system startup. Do we have to declare usage of a game loop in an app? How does that work?
This Apple documentation page "explains" how required reason API work. APIs that require a reason to use have preset justifications that the developer must declare they follow. For example, in the case of touch event timestamps, one of the preset justification is:
35F9.1 Declare this reason to access the system boot time in order to measure the amount of time that has elapsed between events that occurred within the app or to perform calculations to enable timers. Information accessed for this reason, or any derived information, may not be sent off-device. There is an exception for information about the amount of time that has elapsed between events that occurred within the app, which may be sent off-device.
17 March 2024
Throughout Apple documentation and references, you'll see specific ways of mentioning code that doesn't quite look like the code you actually write. Things like init(ciFilter:duration:). Here's some examples to start you off:
Actual code:
let someObject = SomeObject(ciFilter: myFilter, duration: 1.0)SomeObject is the class that has that method. someObject is an instance of that class. myFilter and 1.0 are user defined values that are of the type expected by that method's parameters.
The doc signature (x:y:) means that x and y are parameter names, and that the parameter names must be included when calling that API. If the doc signature was (_:_:), then the API would still expect two parameters, but without explicitly naming them. See "The underscore _" note about that.
Actual code:
physicsWorld.enumerateBodies(at: touchLocation) { body, stop in
	// code for each body
	// optionally, set stop to true to stop enumeration
}5 March 2024
If you need to implement some quick sound effects in your app, you can use this old framework. AudioToolBox is fast and requires no advanced setup. It includes the system sounds you are used to on iOS, like the swoosh (Mail) sound or the keyboards clicks.
// import the framework
import AudioToolbox

// anywhere in your code, call this method by passing a decimal
// see the system sounds list below
AudioServicesPlaySystemSound(1306)
Credits to WaliD on StackOverflow for mentioning this framework. For a list of available sounds and their code, check this page from the iPhone Development Wiki. As a note for myself, I like these clicking sounds: 1057, 1103, 1104, 1105, 1107, 1257, 1306.
1 march 2024
Optionals are annoying when you start writing Swift code. The compiler will often be shouting about "unwrapping optionals". One way of understanding optionals goes like this:
Swift has opinions. It claims that computer programs crash because they expect data that is not there. Programs expect data that is not there because programmers told them to. But in practice, the data may or may not have been fetched or created yet. Therefore Swift thinks that programmers need discipline on how they declare data holders.
In your code, when you declare a variable, Swift expects that you either give it an initial value, or declare it as an optional. An optional is nil by default—until specified otherwise. When you want to use an optional variable in your code later on, the explicit declaration of that variable as an optional means that you need to write special code to handle the optional. That's what safe unwrapping is.
class MyClass {
    // variable with initial value. No issue
    var number = 1
    // variable without an intial value
    // the type must be declared, plus the optional `?` nature
    var aNumber: Int?

    // later on

    // safe unwrapping
    if let aNumber = aNumber {
        // safely unwrapped `aNumber`
    }
}
You could declare an uninitialized variable as non optional using a ! like this:
class MyClass {
    var someNumber: Int!
}
That would mean that you are sure that by the time you'll use someNumber in your code, it will have a value that is not nil. Use carefully.
Throughout your code, you'll notice that the auto-complete will automatically add an ? after a method or variable while you type. That means that the compiler isn't sure that these values are indeed defined at that point. Maybe the code that is responsible for creating them could return an error, or maybe they rely on an asynchronous I/O call, of which we can not guarantee a definite result at a specific time. So Swift adds these optional, nudging you to handle cases where values are not what they are expected to be.
28 February 2024
You'll see the init keyword very often in Swift. What is it?
Init stands for initialization. It's how you create an instance of a class. For example:
class MyClass {
    var name: String

    init(name: String) {
        self.name = name
    }
}
That boilerplate code allows you to create an instance of MyClass anywhere by writing:
var myInstance = MyClass(name: "Achraf")So init is the method that you implicitly call whenever you write MyClass(), with or without parameters inside () depending on what the class expects. You define whether or not the class expects parameters with the init function signature inside the class definition.
You can have multiple initializers for the same class, each with a different signature. This feature allows you to create instances of a class in different ways, depending on the context or the specific needs of your code. For example:
class MyClass {
    // Note the optional type of the properties
    var name: String?
    var location: String?
    // This adjustment is necessary because each initializer sets only one of these properties
    // In Swift, all properties of a class must be initialized during instantiation,
    // either with a non-nil value or as nil for optionals

    init(name: String) {
        self.name = name
    }

    init(location: String) {
        self.location = location
    }
}
That way, you can create an instance by writing var myInstance = MyClass(name: "Achraf"), or var myInstance = MyClass(location: "Tangier"). In practice, this is how you get APIs that create objects in different ways. For example, in SpriteKit you could create a sprite node by calling mySpriteNode = SKSpriteNode(texture: myTexture) or mySpriteNode = SKSpriteNode(imageNamed: myImageName). Each of those correspond to different initializers inside the SKSpriteNode class.
27 February 2024
Suppose you have a finite list of states for an object. You want to define a specific behavior for each state. How would you implement that?
One way is to use enum. An enumeration is a type safe way to tell the compiler that this object has these different cases. Then, when you want to write code for each case, you'll switch through the cases, and the compiler will make sure that you've captured all of them, or at least provided a default fallback behavior. Example:
enum Direction {
    case left
    case up
    case right
    case down
}

func move(direction: Direction) {
    switch direction {
    case .left:
        // do something
    case .up:
        // do something
    case .right:
        // do something
    case .down:
        // do something
    }
}
Whenever you'll write a piece of code that expects data of type Direction, the auto-complete will show you all the applicable options from the Direction enum. If you start writing move(.), auto-complete will show you .left, .up, .right, .down right after you type . inside the function's arguments.
Note that in Swift, the case statements are aligned with the switch keyword, instead of being indented further. I find it counter-intuitive, but that is the convention in Swift. You can change that behavior in Xcode Settings, to suit your preference:

26 February 2024
If you need to start a web server on your Mac, so you can open HTML pages and test some links and code, you don’t need to download or install anything. You can:
- Command + right-click the folder where you want to start a web server
- Paste
python3 -m http.server 9000in the command line, where9000is your desired port. - Open your browser and go to address
localhost:9000
23 February 2024
Suppose you have a class with a method inside:
class MyClass {
    func myMethod() {}
}
If you write MyClass.myMethod() somewhere, calling your method on the class itself, the compiler wouldn’t auto-complete, and the call wouldn't work anyways. Calling that method would only work on instances of your class:
var myClass = MyClass() // by convention, an instance name start with a lowercase
myClass.myMethod() // this works
If you want a method that you can call on the class type itself, you need to prefix that function with static:
class MyClass {
    static func typeMethod() {} // belongs to the type itself
}

MyClass.typeMethod() // now this works
This is a case where the technical keyword (static) isn't intuitive.
Update 2 march 2024: it's called static because subclasses (not instances!) of the class can not override a method or property prefixed with static. You can however define type properties that can be overridden by subclasses if you use the keyword class instead of static. For example:
class MyClass {
    class var typeVariable: String {
        return "Welcome!"
    }
}

class MySubclass: MyClass {
    override class var typeVariable: String {
        return "Welcome to MySubclass!"
    }
}

print(MyClass.typeVariable) // Prints "Welcome!"
print(MySubclass.typeVariable) // Prints "Welcome to MySubclass!"22 February 2024
When you write struct MyStruct: Codable {} or class MyScene: SKScene {}, the location after the :, usually where you specify the type or super class of an object, is called "inheritance list". Types, custom types, or protocols are all added to the inheritance list.
21 February 2024
If you need to store something on disk, share data from your code to somewhere else, or recover your state from a previous session, the Codable protocol is key.
Codable is a protocol in Swift that enables you to encode and decode your data types (like structs, enums, and classes) into and from external representations such as JSON, XML, plist, or custom binary formats. It's essentially about transforming your data into a format that can be stored or transmitted and then reconstructed later. The Codable protocol is a type alias for the Encodable and Decodable protocols, allowing both encoding and decoding capabilities to be implemented in a single conformance.
Some types such as String or Int conform to Codable out of the box (intuitive! We can store them as is in JSON or another exchange format). But other custom or framework dependent types such as Range, CGSize, or CGAffineTransform, require additional work to make them encodable and decodable.
Another key concepts linked to storing and restoring data are "serialization" and "deserialization". These processes refer to converting structured data into a format suitable for storage or transmission (serialization) and converting it back into usable data after retrieval or receipt (deserialization).
If your object has to conform to Codable but its content isn't Codable out of the box, you need to implement custom logic using two functions:
struct ObjectDescription: Codable {
    // CGSize is not Codable by default
    var size: CGSize

    // When you conform a custom type to Codable, Swift looks for an enum
    // that conforms to CodingKey. You can use these to define custom key names
    // in your external representation. If this enum doesn't exist, Swift uses
    // the property names as they are.
    enum CodingKeys: String, CodingKey {
        // the external representation will key `width` as "storedWidth"
        case width = "storedWidth"
        case height = "storedHeight"
    }

    // serialization
    func encode(to encoder: Encoder) throws {
        // we use .self to pass the type of CodingKeys as parameter to keyedBy
        // because keyedBy expect a type as a value
        var container = encoder.container(keyedBy: CodingKeys.self)
        try container.encode(size.width, forKey: .width)
        try container.encode(size.height, forKey: .height)
    }

    // deserialization
    init(from decoder: Decoder) throws {
        let container = try decoder.container(keyedBy: CodingKeys.self)
        let storedWidth = try container.decode(CGFloat.self, forKey: .width)
        let storedHeight = try container.decode(CGFloat.self, forKey: .height)
        self.size = CGSize(width: storedWidth, height: storedHeight)
    }
}
The encode(to:) and init(from:) functions are the functions that you need to implement for objects that do not conform to Codable out of the box. These functions can also serve other use cases :
- You can use them to do selective encoding and decoding. Any properties not explicitly handled in these methods will not be encoded and decoded.
- You can use them to apply data transformation, which can be useful for partial updates, securing sensitive information, or dealing with version compatibility.
Related notes:
- Protocols
14 May 2024
var myDictionary: [KeyType: ValueType] = [:]

// this code reads and then deletes the specific entry in the dictionary
if let entry = myDictionary.removeValue(forKey: key) {
    // do something with the retrieved entry
}

// the following line is no longer needed to clear the dictionary entry
myDictionary[key] = nil21 February 2024
You may have data in the form of several key: value, i.e. a collection of key/value pairs, aka a dictionary. You may need to do some operations on the key/value pairs, like looping through the keys. Such operations require your data to be presented in a form that the operation understands unequivocally. Typically you'd need to make an array out of a dictionary, given some requirements:
let myDictionary = ["b": 2, "a": 1, "c": 3]

// produce an array out of a dictionary, by ordering the keys
let sortedArray = myDictionary.sorted { $0.key < $1.key }
print(sortedArray) // [("a", 1), ("b", 2), ("c", 3)]

// you can also sort the value instead of the keys
let sortedValues = myDictionary.sorted { $0.value < $1.value }
print(sortedValues) // [("a", 1), ("b", 2), ("c", 3)]
Sorting a dictionary is useful in scenarios where the unordered nature of dictionaries doesn't suit your needs, such as when generating user interface elements that list content in a sorted manner.
Started 17 February 2024
- Control + I : auto-indent code
- Control + M : format objects into multiple lines. Useful for function signatures or hierarchical data structures
- Control + 6 : search your methods and symbols
- Command + 0 : show/hide the file navigator
- Command + Option + Enter : show/hide the live preview
- Command + Option + [ : move a line up
- Command + Option + ] : move a line down
12 February 2024
With iOS Swift development, there are many methods that return an optional value. That means that the method may or may not return an object of the expected type. Dealing with optional values is called "unwrapping", and you'll see that word coming up in the compiler very often.
One way to deal with that is "force unwrapping", where we add a ! at the end of the method chain to tell the compiler "I am sure the return I expect will in fact be returned." But that is not safe, and it is better to "safely unwrap" the optional.
Here are different ways of dealing with optional returns:
// Optional Binding
if let result = myMethod.result? {
    // do something with result
} else {
    // handle case
}

// Optional Chaining with Default Value
// The default value is provided using `??`, the nil coalescing operator
// The default value must be of the some type as the expected return type
let result = myMethod.result? ?? "Default Value or Message"
// do something with result4 February 2024
// find the first element in an array
let filterName = list.first(where: { $0.name == filter })

// Find the index, i.e. position of an element
let index = existingFilters.firstIndex(where: { $0.filter.name == filter })1 February 2024
We can use the Swift keyword is to check the type of an object.
let someValue: Any = 42

if someValue is Int {
    print("It's an integer!")
} else {
    print("It's not an integer.")
}
Now imagine a dictionary (an array of key/value pairs) where some keys have a nested dictionary as their value. If we wanted to list only the keys that have a dictionary as a value, we could write:
let myDictionary: [String: Any] = // an existing dictionary

let nestedDictionaries = myDictionary.filter { $0.value is [String: Any] } // returns a dictionary with the keys that have themselves a dictionary as a value1 February 2024
I caught myself in an act of code bloat.
I needed a custom API to apply Core Image filters in SpriteKit and SwiftUI. One of the functionalities I wanted is to define default values and ranges for a curated list of filters. That means coming up with a data structure that stores each chosen filter with its associated meta data such as its keys, the type of value they take, the typical range of the values, and a default value.
While exploring Core Image API, I found that Core Image itself has methods such as filter.attributes, which returns a dictionary of information about the filter. Here are the attributes of the CIZoomBlur filter:
"inputCenter": {
    CIAttributeClass = CIVector;
    CIAttributeDefault = "[150 150]";
    CIAttributeDescription = "The center of the effect as x and y pixel coordinates.";
    CIAttributeDisplayName = Center;
    CIAttributeType = CIAttributeTypePosition;
},
"CIAttributeFilterAvailable_Mac": 10.4,
"CIAttributeFilterDisplayName": Zoom Blur,
"CIAttributeReferenceDocumentation": http://developer.apple.com/library/ios/documentation/GraphicsImaging/Reference/CoreImageFilterReference/index.html#//apple_ref/doc/filter/ci/CIZoomBlur,
"CIAttributeFilterName": CIZoomBlur,
"CIAttributeFilterAvailable_iOS": 8.3,
"CIAttributeFilterCategories": <__NSArrayI_Transfer 0x60000029f820>(
    CICategoryBlur,
    CICategoryStillImage,
    CICategoryVideo,
    CICategoryBuiltIn,
    CICategoryHighDynamicRange
),
"inputAmount": {
    CIAttributeClass = NSNumber;
    CIAttributeDefault = 20;
    CIAttributeDescription = "The zoom-in amount. Larger values result in more zooming in.";
    CIAttributeDisplayName = Amount;
    CIAttributeIdentity = 0;
    CIAttributeSliderMax = 200;
    CIAttributeSliderMin = "-200";
    CIAttributeType = CIAttributeTypeDistance;
},
"inputImage": {
    CIAttributeClass = CIImage;
    CIAttributeDescription = "The image to use as an input for the effect.";
    CIAttributeDisplayName = Image;
    CIAttributeType = CIAttributeTypeImage;
}
And here is the work in progress data structure I was writing myself:
struct FilterItem {
    let filter: CIFilter
    let displayName: String
    let parameterRanges: [String: ClosedRange<Double>]? /// an optional dictionary
    let parameterDefaults: [String: Any]? /// an optional dictionary

    init(
        filter: CIFilter,
        displayName: String,
        parameterRanges: [String: ClosedRange<Double>]? = nil,
        parameterDefaults: [String: Any]? = nil
    ) {
        self.filter = filter
        self.displayName = displayName
        self.parameterRanges = parameterRanges
        self.parameterDefaults = parameterDefaults
    }
}

let filtersList: [FilterItem] = [
    FilterItem(
        filter: CIFilter(name: "CIZoomBlur")!,
        displayName: "Zoom Blur",
        parameterRanges: ["inputAmount": -50...50],
        parameterDefaults: ["inputCenter": CIVector(x: 150, y: 150), "inputAmount": 20]
    )
]
Before finding the Core Image attribute method, I had to search on the web, try many commands and functions in SpriteKit, see how filters behave, learn by trial and error, in order to find the applicable values of a filter. Notice how I was "reinventing" some of the meta data of a filter, such as displayName, which would be used in SwiftUI as a label.
I was effectively trying to write my own data structure for a structure that already existed in iOS. But, and this is the interesting part, I had to do it myself in order to understand it and get an intuition for how a filter works. Just using the Core Image filter attribute wouldn't have helped me that much if I didn't go through the trouble of writing my own wrapper around a filter.
It is the very act of understanding and self-appropriating a code structure that I found myself writing an abstraction layer on top of an abstraction layer. That code bloat would probably introduce additional compute time, and possibly errors if my data and the native data drift away from each other. But still, I needed to write my own wrapper that fits my work in progress mental model!
1 February 2024
Consider a data structure like this:
let parameterValues: ["inputRadius": 60, "inputAmount": 10, "inputIntensity": 100]That's a dictionary. If you have a command that must apply values of that dictionary to their corresponding keys, you'd loop through the dictionary like this:
for (key, value) in parameterValues {
    // a command that takes a pair of key/value
    myCommand.setValue(value, forKey: key)
}
I used this pattern with Core Image. In Core Image, you can change the value of a filter's key by using a command like filter.setValue(0.9, forKey: kCIInputIntensityKey).
31 January 2024
Suppose you have an array like this:
let myArray = [
    [
        "name" : "achraf",
        "occupation" : "please clarify"
    ],
    [
        "name" : "missing",
        "occupation" : "10x programmer"
    ],
]
How do you get the second item of the array? How do you select a specific item in an array? You can write this:
func findItemInArray() {
    if let arrayItem = myArray.first(where: { $0["name"] == "achraf"}) {
        print(arrayItem)
    } else {
        print("array item not found.")
    }
}
You can make the search more safe by using type casting:
if let arrayItem = myArray.first(where: { $0["name"] as? String == "achraf"}) {Notice how we use as? String. This tells the search pattern to check if the value of key "name" is of type String.
20 January 2024
Swift has keywords that tell the access level of a class, method, property, or other entity.
Access control is a way to cognitively organize your code. It invites you to clarify–and lets you know when reading your code later on–the intended scope of visibility of your entities. This makes it clearer how parts of your code may or may not communicate across files and modules. Here's a list of interesting access level modifiers:
// can be read (get) from the outside the scope,
// but can be written (set) only from within the scope
private(set) var myVariable

// entities outside the defining module of this class can subclass and override
// members of this class. The most permissive access level in Swift
open class MyClass {}

/// internal is the default access control
/// if no access control is specified, internal is implicitely applied
class MyClass {}
	internal func myMethod(){}
}
See also this interesting link with static and dynamic linking in Swift:
Swift’s
fileprivate,internal, andpubliccorrespond, ish, to access levels supported by [libraries] linkers: “only available in this file”, “only available in this library”, and “available to clients”.
Source: https://belkadan.com/blog/2022/02/Dynamic-Linking-and-Static-Linking/
15 January 2024
This is an interesting loop constructor in Swift: for in stride(). We can use the stride loop to run over a range of numbers using an increment. For example:
for i in stride(from: 0, to: 10, by: 2) { // excludes upper bound 10 from the loop
    print(i)
}

for i in stride(from: 0, through: 10, by: 2) { // includes the upper bound 0.5 in the loop
    print(i)
}16 March 2024
Core Image has its own data types usually prefixed with CI such as CIVector and CIColor. Data types that expect spatial data, such as origin and dimensions, are expressed in physical pixels instead of points. For example, consider a Core Image filter with an inputCenter parameter:
let zoomBlurFilter = CIFilter(name: "CIZoomBlur", parameters: ['inputCenter': CIVector(x: 300, y: 300)])First, notice how Core Image uses an old API built with key/values dictionaries, usually of type String: Any. Second, the CIVector in this case expects values in pixels, not in points. If you want to pass the actual center point of the screen to the filter, you need to know the physical resolution of the screen. An iPhone 13 has a physical resolution of 1170x2536. Therefore, its horizontal center is 1170/2 = 585. It is up to the user to derive the right pixel values given the device they are running.
15 January 2024
- 📕 CIFilter.io, by Noah Gilmore
- 📝 Core Image: using filters, Medium article
- A list of CI Filters, GitHub
- Core Image Filter Reference, Apple
18 December 2023
"Expanding a type" is a programmer's way to say: adding methods, properties, or other mechanisms to an object that you have created. For example, when you create a class and name it "myClass", "myClass" becomes a type that you have defined.
Therefore expanding a type means elaborating on custom created objects. Swift has some feature that automates expansions of types, in order to make them do more that what the author wrote them to do explicitly. Macros are an example of such a feature. The following code "expands" on the class FoodTruckModel through the use of the @Observable macro:
@Observable class FoodTruckModel {
    var orders: [Order] = []
    var donuts = Donut.all
}16 December 2023
I run this code from: https://www.hackingwithswift.com/books/ios-swiftui/animating-gestures
struct ContentView: View {
    let letters = Array("Hello SwiftUI")
    @State private var enabled = false
    @State private var dragAmount = CGSize.zero

    var body: some View {
        HStack(spacing: 0) {
            ForEach(0..<letters.count, id: \.self) { num in
                Text(String(letters[num]))
                    .padding(5)
                    .font(.title)
                    .background(enabled ? .blue : .red)
                    .offset(dragAmount)
                    .animation(.linear.delay(Double(num) / 20), value: dragAmount)
            }
        }
        .gesture(
            DragGesture()
                .onChanged { dragAmount = $0.translation }
                .onEnded { _ in
                    dragAmount = .zero
                    enabled.toggle()
                }
        )
    }
}
At some point while playing with the live preview, I started making swift and short up and down motions with the mouse (see "Accidental shader" video screen recording). The resulting behavior looked like wind blowing on a flag. The combination of the SwiftUI setup and a particular user input pattern generated a behavior that looked like a recognizable natural phenomenon.
13 December 2023
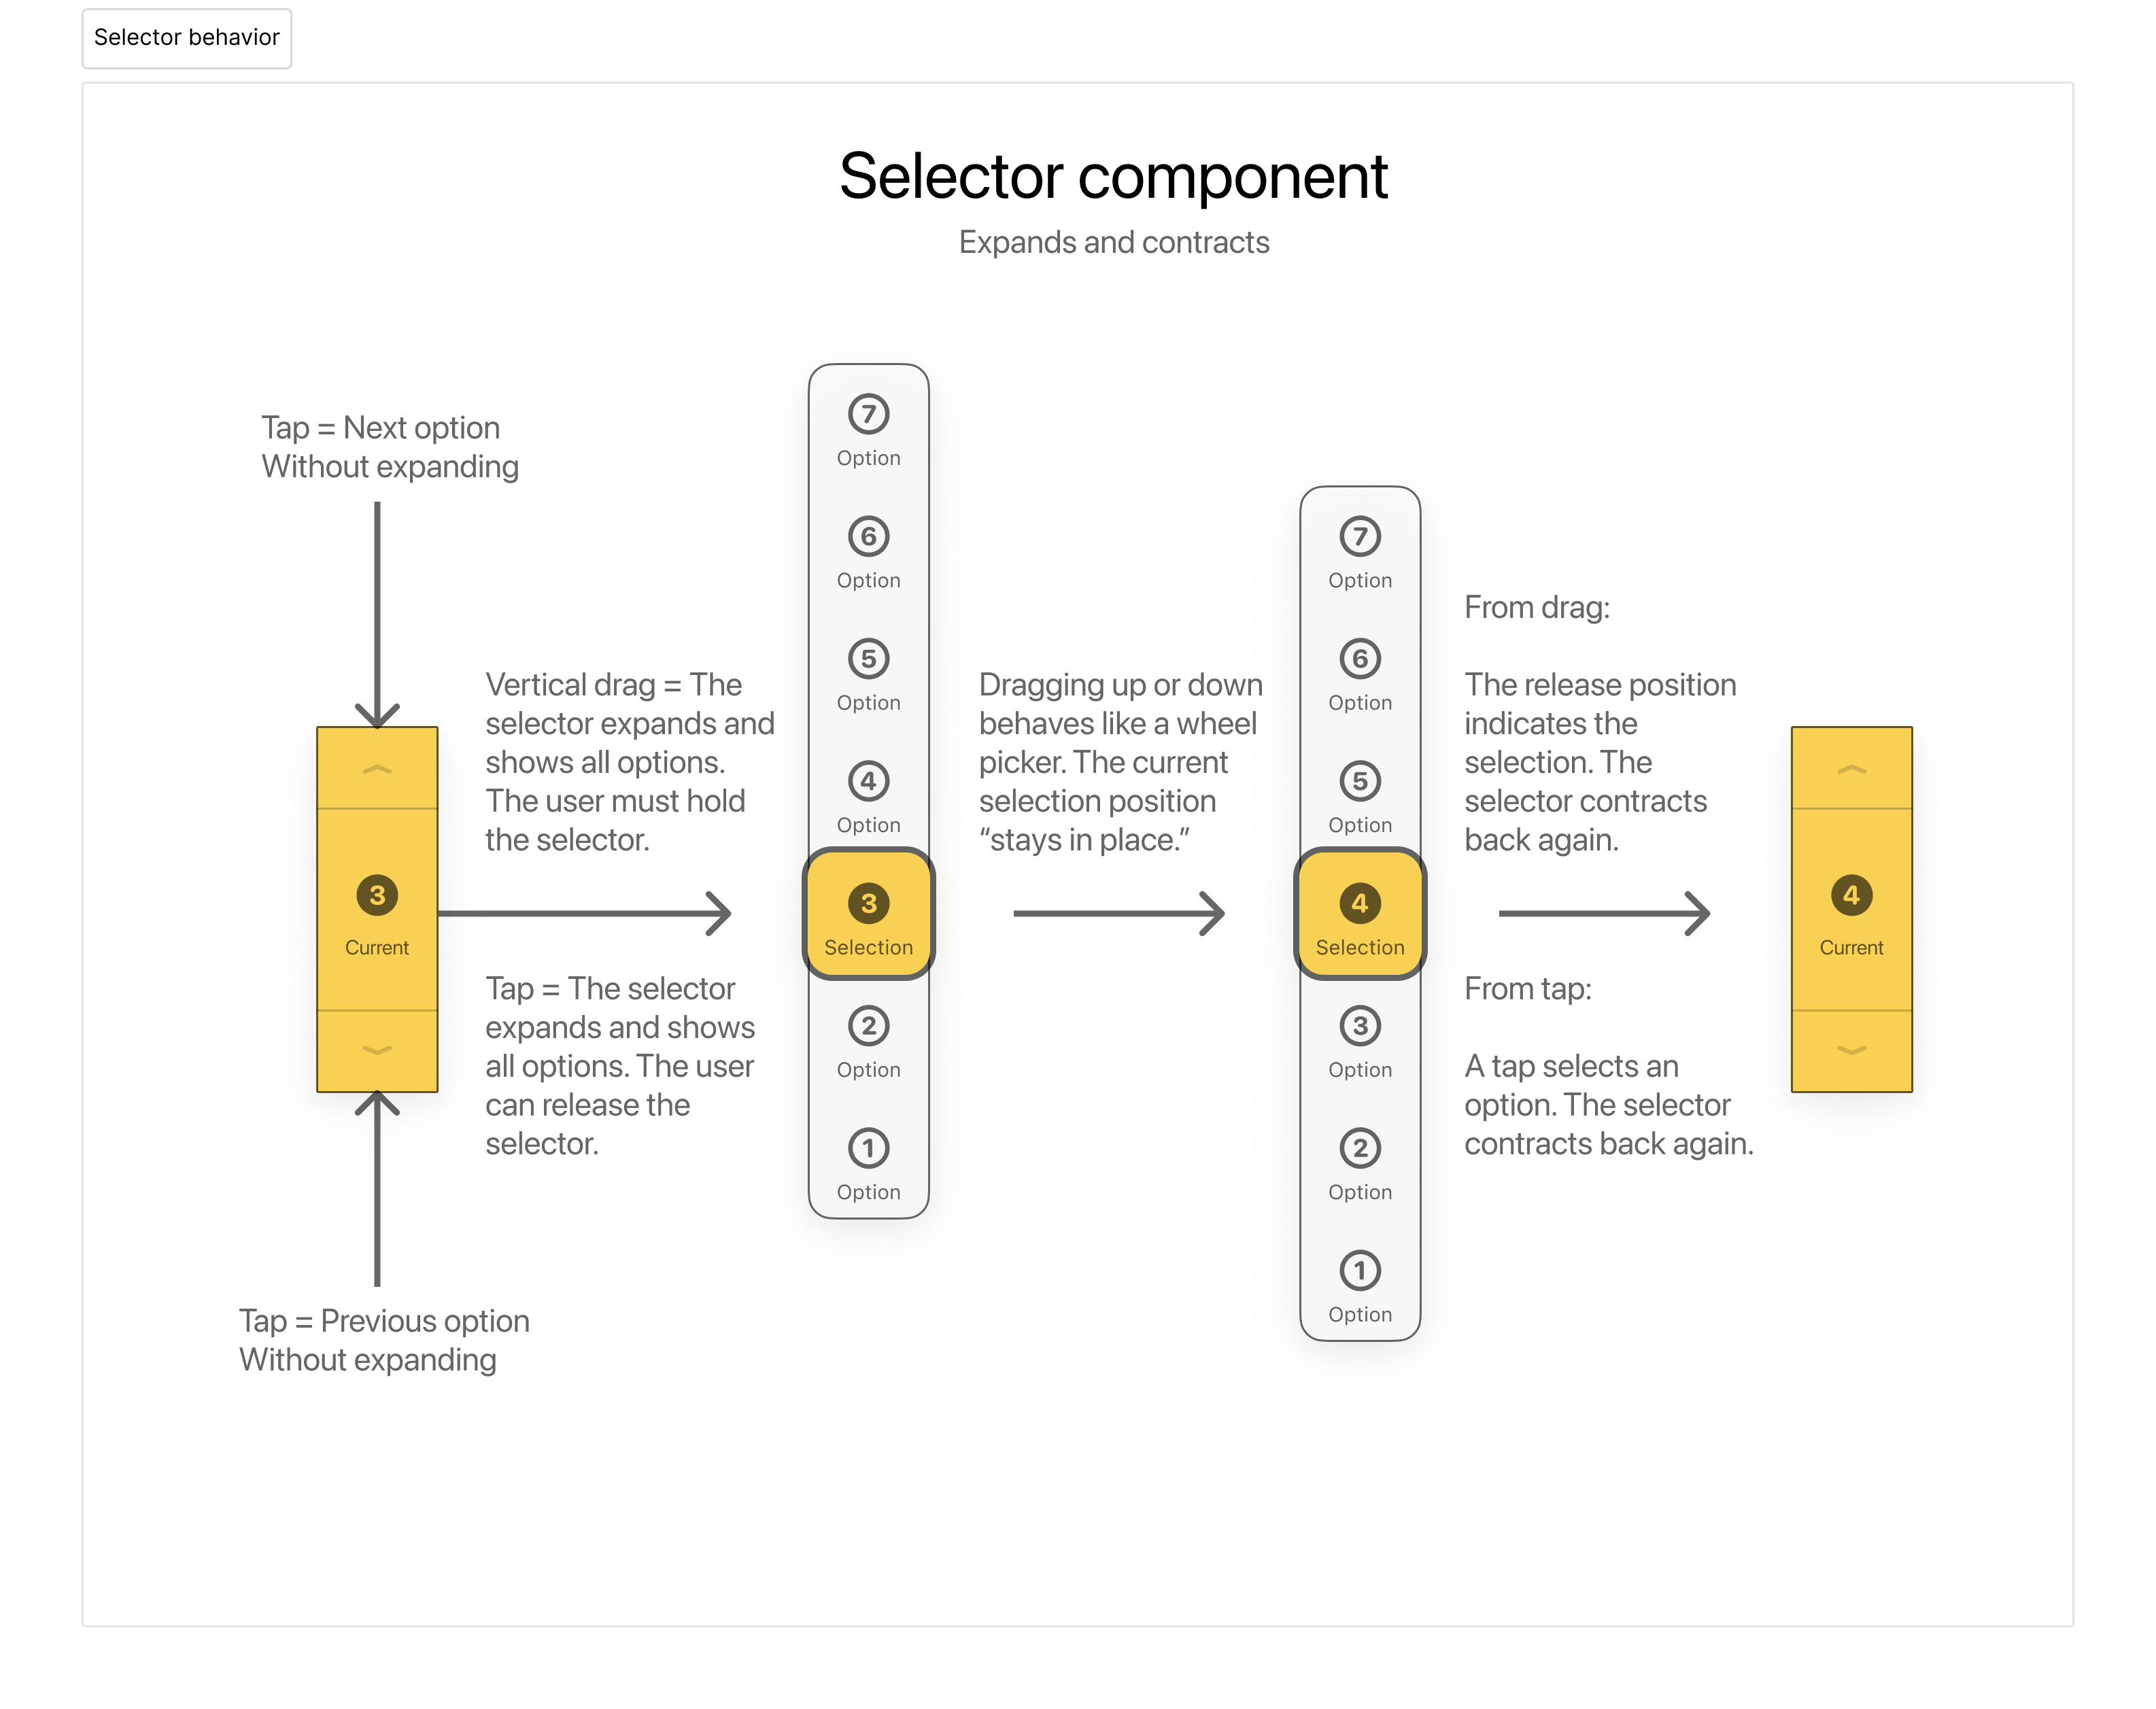
I want to implement this multi-touch UI control. For that, I need to build a sufficient mental map of the available SwiftUI building blocks, how they assemble together, and what are the recommended practices.
27 November 2023
That's the biggest number that can be stored in an integer variable in Swift.
var number = Int.max
print(number) // outputs 922337203685477580719 November 2023
String interpolation is the way you inject a value of some type into a placeholder that expects a string type. It's the fancy name for this common operation:
var myVariable: Int = 10
Text("\(myVariable)") // in SwiftUI, displays "10"
Note that string interpolation requires to write the value inside a "", which is called a string literal.
18 November 2023
This is not a typo. inout not input. Consider the following two blocks of code:
var A: Int = 3
var B: Int = 4

func add(term1: Int, term2: Int) {
    A = term1 + term2
}

add(term1: A, term2: B)
print(A) // Output: 7
var A: Int = 3
var B: Int = 4
// Notice the use of `inout`
func addInPlace(term1: inout Int, term2: Int) {
term1 = term1 + term2
}
// Notice the use of `&`
addInPlace(term1: &A, term2: B)
print(A) // Output: 7The two blocks give the same output. The difference is the usage of inout and & in the second block.
inout tells Swift to modify the value of the passed parameter itself. & is the way to make sure the user is aware that the function they are calling uses inout, therefore changing the value of the original variable.
inout allows the modification of a value, without copying it, and without using a reference or a global variable inside the function's closure.
8 November 2023
In Swift, we can define a function using 2 different names for the same parameter:
- One name used externally when calling a function
- One name used internally in the definition of the function
For example:
func myFunction(A B: Int) -> Int {
    var myValue = B + 2
    return myValue
}
// A is the external name of B
// B is the internal name used within the function definition
// A and B are both the same parameter

myFunction(A: 5)
// I call the function using the external name
// Returns 7
This feature is used extensively in Apple frameworks. For example here in UIKit:
override func didMove(to view: SKView) {
    // do something with the view parameter
}
The to is the external parameter's name, while view is the internal one.
8 November 2023
Many times in Swift code, I find this ugly symbol in function signatures:
func greet(_ name: String) {
    print("Hello, \(name)")
}
What is the underscore for? Its purpose is to pass a value to a function without specifically naming the parameter.
Technically, if a function has a signature in the form of func greet(name: String), then calling the function necessarily requires to specify the name of the parameter, like greet(name: "Achraf"). But if you add _ before the name of the parameter, then we can call the function without naming that parameter, as in greet("Achraf").
The underscore is also used to name internal variables in a function. It's a Swift common pattern, not a mandatory rule. It's a way of telling yourself and other people that the variable is for internal use only, and does not belong in another context.
Example:
func greet(_ name: String) {
    var _name = name.lowercased()
    print("Hello, \(_name)")
}

greet("ACHRAF")3 November 2023
I'd like to ask these app makers and some programmers in general about their experiences and knowledge.
People I've talked to about iOS programming:
- John Knowles (started end of October 2023)
People I'd like to talk to:
- UIBuzz podcaster, about SpriteKit and game development on iOS (7 November 2023)
- Makers of Medly, the music app (3 November 2023)
2 November 2023
A computed property is a variable whose value isn't fixed, but instead computed whenever it is called. We use braces {} to define it instead of equal = .
var center: CGPoint {
    CGPoint(x: size.width / 2.0, y: size.height / 2.0)
}
// the computed property is "center"
// its type is "CGPoint"
// its value is dynamically generated whenever it's called
A computer property is also called an accessor. Source: https://developer.apple.com/tutorials/developinswifttutorials/custom-views
4 September 2023
Swift has a specific syntactical construction for functions that call a block of code (a closure) as an argument.
func travel(action: () -> Void) {
    print("step 1")
    action()
    print("step 2")
}

travel {
    print("in betwen step")
}
Notice:
- The definition of
traveltells the order of execution of code - The call of
travelis a shorthand syntax made without()and immediately trailed by a closure{} - The closure is the piece of code that was passed as an argument in the function signature
In Swift, when the last (or only) argument to a function is a closure, we can use the shorthand syntax. The shorthand syntax is used in SwiftUI such as:
VStack {

}
// is equivalent to
VStack() {

}

// sometimes the function is called with parameters in the initialiser such as
VStack(.leading) {

}3 September 2023
import SwiftUI

@main
struct MyAppName: App {
    var body: some Scene {
        WindowGroup {
            ContentView()
        }
    }
}

struct ContentView: View {
    var body: some View {
        Text("Hello")
            .padding()
    }
}

struct ContentView_Previews: PreviewProvider {
    static var previews: some View {
        ContentView()
    }
}23 August 2023
In Swift, since it is a strongly typed language, the expected type of a function parameter effectively discriminates that function. We can have functions with the same name, but different expected type as argument. This allows to execute a different code with the same function signature depending on the type of the passed on parameter.
Example:
extension MyClass {
    // For String
    func displayMessage(_ message: String) {
        displayLogMessage(message)
    }
    // For CGPoint
    func displayMessage(_ point: CGPoint) {
        let formattedMessage = "CGPoint(x: \(point.x), y: \(point.y))"
        displayLogMessage(formattedMessage)
    }
    // For CGFloat
    func displayMessage(_ value: CGFloat) {
        let formattedMessage = "CGFloat: \(value)"
        displayLogMessage(formattedMessage)
    }

    private func displayLogMessage(_ message: String) {
        // generic code
    }
}

// Usage:
displayMessage(/* typed information */)17 August 2023
I got this runtime error while trying to output a 18000*18000 image to disk using SpriteKit:
-[MTLTextureDescriptorInternal validateWithDevice:]:1344: failed assertion `Texture Descriptor Validation
MTLTextureDescriptor has width (18000) greater than the maximum allowed size of 8192.
MTLTextureDescriptor has height (18000) greater than the maximum allowed size of 8192.
'
I have reached Metal texture size limitations! Woohoo!
15 August 2023
Declaring a function as static inside a class is another way of organizing code. It's another cognitive and complexity management tool. A static method does not hold specific values for each instance of the class. Instead, it is a general method of the class itself. So static may be used to make sure that the method does not access or expect particular values from different instances.
14 August 2023
static let myNotification = "myNotification"

// run this to broadcast a notification
NotificationCenter.default.post(
    Notification(
        name: NSNotification.Name(myNotification),
        object: nil)
)

// add an oberver for the notification elsewhere
NotificationCenter.default.addObserver(
    self,
    selector: #selector(callToExecute),
    name: Notification.Name(myNotification),
    object: nil
)

// run this when the observer receives notification
@objc func callToExecute() {

}13 August 2023
Variables and properties can be declared. Each variable should be initialized to a value, or declared without a value provided a type is declared. Moreover, after the type, a "!" or "?" are required.
var myVariable1 = 0
var myVariable2: Type! // This variable is expected to have a value by the time you use it, but could be nil initially.
var myVariable3: Type? // This variable might or might not ever get a value.11 August 2023
Protocols are one way to structure your code. You can create a protocol, define a method inside that protocol, and specify that a class or object conform to that protocol. Then, Swift compiler will alert you if the class does not conform to the protocol, i.e. that you haven't implemented all the methods that the class needs in order to conform to the requirement.
// define a protocol
protocol MyProtocol {
    func interact()
}

// conform to a protocol
class myClass: MyProtocol {
    func interact() {
    }
}
When they are user defined, protocols are cognitive and organizational tools. They help you manage your code. Other protocols come built-in with Swift, such as Comparable.
An object conforms to Comparable if its content can be compared with relational operators such as > or >=. Comparable itself builds upon another protocol, Equatable, which requires the implementation of the == operator, i.e. a way to define the concept of equality between objects.
7 August 2023
Throughout iOS and Apple frameworks, you'll see code like:
class MyScene: SKScene {
    override func didMove(to view: SKView) { /* code */ }
}
Notice the override. A framework would come with predefined classes, such as SKScene here, a SpriteKit class, which you can "subclass" to create your own. Inside your subclass, you get access to predefined methods inherited from the parent class, such as didMove. And typically, you "override" them in order to write your own custom setup.
Here is another override to handle touch events inside a SpriteKit scene:
class MyScene: SKScene {
	override func touchesBegan(_ touches: Set<UITouch>, with event: UIEvent?) { /* code */ }
}
A SpriteKit SKScene is of type SKNode, itself of type UIResponder. According to Apple documentation:
Responder objects — instances of UIResponder — constitute the event-handling backbone of a UIKit app. [...] As events occur, UIKit dispatches them to your app’s responder objects for handling.
There are several kinds of events, including touch events, motion events, remote-control events, and press events. To handle a specific type of event, a responder must override the corresponding methods. For example, to handle touch events, a responder implements the touchesBegan(_:with:)
Class inheritances and polymorphism!
7 August 2023
It's interesting to see low-level computing optimization scoop up in a high-level programming API. For example, in SpriteKit, we can define different categories inside a physics simulation, in order to tell which body can collide with which.
By convention, these categories are given names that are bitwise operations friendly. Such as
struct PhysicsCategory {
    static let None:  UInt32 = 0 // 00000000
    static let Cat:   UInt32 = 0b1 // 00000001
    static let Block: UInt32 = 0b10 // 00000010
    static let Bed:   UInt32 = 0b100 // 00000100
}
Notice the binary equivalent for each category name. These expressions allow for efficient, low power bitwise operation: https://en.wikipedia.org/wiki/Bitwise_operation. It also provides handy operations in code:
This is very handy and allows you to easily combine categories. For example, when you want to specify that the cat should collide with all block bodies and the bed, you can say the collision bit mask for the cat is PhysicsCategory.Block | PhysicsCategory.Bed (read this as “block OR bed”), which produces the logical OR of the two values
2D Apple Games by Tutorials (2017), p. 228
5 August 2023
To disable the ton of OS level messages Xcode displays on the console:
Product > Scheme > Edit Scheme... > Run > Arguments
In the "Environment Variables", add this item:
- Name: OS_ACTIVITY_MODE
- Value: disable
5 August 2023
Can be useful to understand and use for The Tool.
https://developer.apple.com/swift/blog/?id=10
Started 18 July 2023
// π, aka 3.14....
.pi18 July 2023
// Haptic feedback
let generator = UIImpactFeedbackGenerator(style: .light)
generator.impactOccurred()13 July 2023
Confusing programming word of the day:
Present a view
On iOS using UIKit, we say "present a view" to mean that the view has appeared on screen.
9 July 2023
In "2D Apple games by Tutorials", page 68, we can implement an interaction method with both touchesBegan / touchesMoved, and UITapGestureRecognizer. They both work, but the behavior is noticeably different.
With single touches, we can tap the screen repeatedly and quickly, and the method will be triggered. Whereas with a gesture recognizer, it seems that quickly and repeatedly tapping the screen doesn't always trigger the method. This is likely because the gesture recognizer is working to discriminate between double taps and other composed touches, and so repeatedly tapping the screen may be interpreted as a double tap, therefore not triggering the method, since that method except a single tap.
9 July 2023
While learning SpriteKit, I was writing a method that checks if an element has reached or crossed over the edges of the screen:
func checkElementBoundaries() {}
    let bottomLeft = CGPoint.zero
    let topRight = CGPoint(x: size.width, y: size.height)

    if element.position.x <= bottomLeft.x {
        element.position.x = bottomLeft.x
        velocity.x = -velocity.x
    }
}
Notice the line element.position.x = bottomLeft.x. Why do we set the element x position to the edge of the screen? We do so as a safety/stability measure. Maybe the element has crossed the edge of the screen at that time. So we move it back to a safe position. This is called clamping.
Links:
- Learned from "2D Apple games by Tutorials", page 69
- Full code sample in project "Clamping - Sample code"
- In other areas, "clamping" means "securing in place."
7 July 2023
In UIKit, in order to create a view (for more about "views", search for "MVC Model"), we create a function of type "UIViewController". That function is a subclass of the superclass "UIViewController".
For example:
import UIKit

class myViewController: UIViewController {
  // Code for my view
}
In that subclass, it is customary to:
- Override the method
viewDidLoad()of the superclass, and put the view setup code there - But still call
viewDidLoad()from inside that override, in caseUIViewControlleris doing something important there, that does require the view to load indeed.
So we would have this code:
import UIKit

class myViewController: UIViewController {
    override func viewDidLoad() {
        super.viewDidLoad()
    }
}
// The "super" means we call a method from the superclass of this subclass- https://stackoverflow.com/questions/40151723/why-when-do-we-have-to-call-super-viewdidload
- Book: 2D Apple Games by Tutorials, Page 37
6 July 2023
In Swift, in order to insert a string of text + a programmatic element, you do this:
Text("Text")
Text("\(myProgrammaticElement) example")
Text("\(Image(systemName: "clock")) clock")5 July 2023
You know the chevrons next to a navigable button or link? They are called "Disclosure indicators".
29 June 2023
A preview on the live canvas can be added to any file.
The preview code is of the shape of:
// PreviewProvider is the protocol this struct must conforms to
struct TheCodeToPreview_Previews: PreviewProvider {
    // a declaration for of the view
    static var previews: some View {
        // a reference to the function to preview
        // or an inline sample code to preview like below
        Button("Sleep", action: { })
        	.buttonStyle(TheCodeToPreview())
        	.previewLayout(.sizeThatFits)
        	.padding()
    }
}29 June 2023
In order to style buttons and labels, we use ButtonStyle and LabelStyle and pick from one of the OS choices.
If we want to customize buttons and labels accross a project, we can create a struct inside a dedicated file conventionally named {style-name}ButtonStyle.swift, and then we use the makeBody method inside that struct
Addendum: one benefit of creating a dedicated file is that we can add a dedicated Preview code at the bottom of the file, so we can check our modification on the live canvas.
Links:
- https://betterprogramming.pub/create-custom-button-styles-in-swiftui-f3778f695266
- https://www.hackingwithswift.com/quick-start/swiftui/customizing-button-with-buttonstyle
7 may 2022
How to rename a function? You right-click on the name of the function and you choose "Refactor > Rename"!
One of the first thing I intuitively tried in front of a ContentView.swift file was to rename all "ContentView" references to something else, like "ContentViewer", including the file in the finder. That didn't go well. I lost some time recreating the file and figuring how to place it again in the project.
So how do I rename a function or a block of code that's referenced elsewhere? Apparently, I "right-click>refactor>rename" it!
Thoughts:
- Is this syntax tree editing? Does this mean that Xcode operates at a higher level of abstraction than pure text characters on a text editor?
Links:
- 📝 Total programming in Swift, accessed 31 May 2024
- Extensive list of WWDC video with download links
- 🔈 Amazing podcast with one of Core Graphics Apple engineers
- WWDC Sessions Archive
- 🎬 Miguel de Icaza talks about Swift in general, and advocates for using Swift for The Godot game engine. 2023.
- 💻 You can use this online Swift compiler to run some code.
- 🎬 Good basic tutorial on how to present a SpriteKit scene in a SwiftUI view, by Daniel Budd. 2023.