This demo environment was created for use with the Cisco ISE with Meraki Webinar on October 5, 2021. Watch the recording of the Cisco ISE with Meraki Webinar in the Cisco ISE YouTube Channel:

You will need at least one additional Meraki MX or Z network to act as a VPN hub to terminate the other side of the VPN connection. You should have your hub MX working before you run the Ansible playbook because it will attempt to connect the vMX to an existing Lab VPN hub. You may edit the vars/main.yaml file to customize your VPN hub network name. I chose to have the vMX network in AWS be a VPN spoke because I do not want AWS to charge me for all of my network traffic flowing through AWS to the Internet!
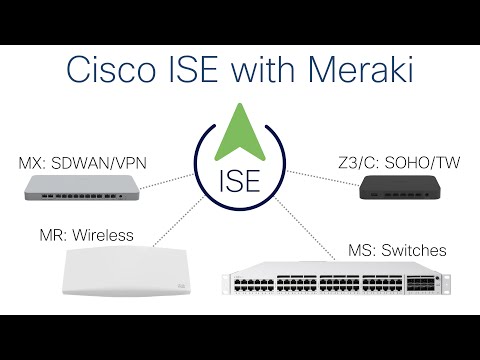
Running ansible-playbook ise_in_aws.yaml will create :
- AWS VPC, subnets, route tables, internet gateway. For the gory details, see Manual Configuration in AWS Console and Meraki Dashboard below.
- ISE 3.1 or later instance
- Meraki vMX instance to secure RADIUS traffic from network devices to ISE
- Linux VM instance to ping while ISE boots so you will feel confident that the VPN is going to work! You could also turn this into a web server for testing URL redirections or as an internal site that you block.
-
Clone this repository:
git clone https://github.com/1homas/ISE_with_Meraki_in_AWS.git cd ISE_with_Meraki_in_AWS -
Create your Python environment and install Ansible with other Python packages for AWS and ISE :
pip install --upgrade pip
pip install pipenv
pipenv install --python 3.11
pipenv install ansible boto3 botocore ciscoisesdk jmespath paramiko
pipenv shell
If you have any problems installing Python or Ansible, see Installing Ansible.
-
Export your various keys, tokens, and credentials for ISE, Meraki, and AWS APIs into your shell environment. You can store these in one or more
*.envthen load them with thesourcecommand.# AWS IAM API Keys export AWS_REGION='us-west-1' export AWS_ACCESS_KEY='AKIAIOSF/EXAMPLE+KEY' export AWS_SECRET_KEY='wJalrXUtnFEMI/K7MDENG/bPxRfi/EXAMPLE+KEY'
# Meraki API Authentication Key
export MERAKI_KEY='EXAMPLE_KEYc320e12ee407159487a4cabc41abb'
# ISE REST API Credentials
export ISE_USERNAME=admin
export ISE_PASSWORD=ISEisC00L
export ISE_VERIFY=false
export ISE_DEBUG=false
export ISE_INIT_PASSWORD=C1sco12345
# Secrets
export ISE_RADIUS_SECRET=ISEisC00L
export ISE_TACACS_SECRET=ISEisC00L
export ISE_SNMP_SECRET=ISEisC00L
# Repository & Backups
export ISE_REPOSITORY=ftp.trust0.net
export ISE_REPOSITORY_PROTOCOL=FTP
export ISE_REPOSITORY_PATH=/
export ISE_REPOSITORY_USERNAME=ise
export ISE_REPOSITORY_PASSWORD=ISEisC00L
export ISE_BACKUP_ENCRYPTION_KEY=ISEisC00L
Alternatively, keep your environment variables in files in a
.secretsor similar folder in your home directory and usesource {filename}to load environment variables from the files:source ~/.secrets/aws.sh source ~/.secrets/ise.sh source ~/.secrets/ise_repo.sh source ~/.secrets/meraki.sh
-
Review the
vars/*.yamlconfiguration files and un/comment or edit them to suit your environment. You must edit thevars/main.yamland change themeraki_org_nameto your respective Meraki org. You will want to review the other settings and change them to match your environment:- your desired
project_name - the AMI identifiers for your respective AWS region if not
us-west-1 - your desired network CIDR ranges
- your desired VM instance types
- your Meraki vMX instance type and license (S/M/L)
- your default password(s) or pre-shared keys
- your desired
-
Run the Ansible playbook:
ansible-playbook ise_in_aws.yaml
-
Due to a Meraki VPN API error, you will need to manually add the vMX Local Network definition in the Meraki Dashboard to advertise the VPC subnet:
- In the Meraki Dashboard, view your
ISE_Meraki_AWSnetwork - Choose
Security & SD-WAN > Configure > Site-to-Site VPNand for the Local Networks, Add a Local Network:Network VPN mode Subnet ISE_Meraki_AWS Enabled 172.31.0.0/16
⚠ If you cannot ping or SSH to the
PingLinux VM this is probably the reason! - In the Meraki Dashboard, view your
-
When ISE is up, you may configure it using the additional playbook :
ansible-playbook ise.configuration.yaml
-
When you are done, terminate the instances and delete all resources to prevent surprise AWS bills:
ansible-playbook ise_in_aws.terminate.yaml
In case you wondered exactly what these Ansible playbooks are doing ... here is how to do it the hard way! If you want to do it the old-fashioned way or just understand what the time spent on automation is saving you from!
Your AWS instance(s) will have a public IP address so anyone can - and will - eventually find it and try to login and use it. For this reason, AWS does not allow the use of normal passwords. Instead, they use a private/public cryptographic key pair which is much stronger than a password.
-
Login to the Amazon Web Services (AWS) Console as a root user (not IAM user) of your account
-
Verify or choose your Region in the drop-down menu next to your account name
-
Open the Services menu and choose Compute > EC2
-
From the left menu, choose Network & Security > Key Pairs
-
Click Create Key Pair, fill in the attributes below, and click Create Key Pair
- Name:
ISEinAWS - Key pair type: RSA
- Private key file format: .pem
- Name:
-
When prompted, save the
ISEinAWS.pemprivate key file to your home directory in a folder named.ssh(~/.ssh/ISEinAWS.pem) -
If you are using macOS, Linux, or WSL, change the file permissions so it cannot be viewed by others or accidentally overwritten or deleted by you:
chmod 400 ~/.ssh/ISEinAWS.pem🛑 Do not lose this private key file! You will not be able to login to your AWS EC2 instances configured with the corresponding public key!
When you create instances in AWS, you may choose to put the matching public key into your VMs to authorize your SSH login. To use your key with AWS EC2 instances, you will connect using SSH and authenticate with the -i identity file option which is your ISEinAWS.pem private key :
ssh -i ~/.ssh/ISEinAWS.pem admin@{hostname | IP}- In the AWS Console, go to Services > Networking & Content Delivery > VPC
- Choose your region:
us-west1 - Select
Create VPC- Name:
ISEinAWS - IPv4 CIDR:
172.31.0.0/16 - Tenancy:
Default - Add Tag:
Project : ISEinAWSClickCreate VPC
- Name:
- From the left menu, select
Virtual Private Cloud > Subnets - Click
Create Subnet - Create your Public subnet for the Meraki vMX:
- VPC ID:
ISEinAWS - Subnet name:
Public-Subnet - Availability Zone:
No preferenceor choose your desired AZ - CIDR:
172.31.1.0/24
- VPC ID:
- Select
Add a New Subnetfor the Private subnet with ISE- VPC ID:
ISEinAWS - Subnet name:
Private-Subnet - Availability Zone:
No preferenceor choose your desired AZ - CIDR:
172.31.2.0/24
- VPC ID:
- Select
Create Subnet - Check ✅
Public-Subnet, chooseActions > Modify auto-assign IP settings, check ✅Enable auto-assign public IPv4 addressand clickSave
- From the left menu, select
Virtual Private Cloud > Internet Gateways - Click
Create Internet Gateway- Name:
vMX-IGClickCreate Internet Gateway
- Name:
- Associate the Internet Gateway to the VPC by selecting
Actions > Attach to VPC>ISEinAWSand clickAttach Internet Gateway
- From the left menu, select
Virtual Private Cloud > Route Tables - Click
Create Route Table - Create the Public Route Table
- Name:
Public-RT - VPC:
ISEinAWSClickCreate Route Table
- Name:
- From the left menu, select
Virtual Private Cloud > Route Tables - Create the Private Route Table
- Name:
Private-RT - VPC:
ISEinAWSClickCreate Route Table
- Name:
- Associate the respective route tables and subnets:
- Check ✅
Public-RTand select theSubnet Assocationstab below - Click
Edit Subnet Associations, check ✅Public-Subnetand clickSave Associations - Check ✅
Private-RTand select theSubnet Assocationstab below - Click
Edit Subnet Associations, check ✅Private-Subnetand clickSave Associations
- Check ✅
- Check ✅
Public-RT, select theRoutestab below, and clickEdit Routes - Click
Add Routeand add a0.0.0.0/0default route to the target typeInternet Gateway>igw-*then clickSave Changes - Your Public Route Table should now look like this:
Destination Target 172.31.0.0/16local 0.0.0.0/0igw-0ed2b71a84a9588ac
- Login to the Meraki Dashboard
- From the network menu, choose
Create a New Network- Network name:
ISEinAWS - Network type:
Security Appliance - Network Configuration:
Default Meraki configuration - Check ✅ the vMX Serial Number you want to use
Click
Create Network
- Network name:
- Scroll down and select
Generate Authentication Tokenand copy the text for use in theUser Dataof the vMX instance in the next section.
- In the AWS Search Box at the top of the page, search for "Meraki vMX" and open the link to Cisco Meraki vMX
- Click
Continue to Subscribe - Click
Continue to Configuration - Choose your region (
us-west) and clickContinue to Launch- ami-09db17cd0ae68ce37
- For Choose Action, choose
Launch Through EC2then clickLaunch - Choose the appropriate Instance Type,
c5.largeand clickNext: Configure Instance Details - For Configure Instance Details use the settings:
- Network:
vpc-* | ISEinAWS - Subnet:
subnet-* | Public-Subnet - Auto-assign Public IP :
Enable - User data:
As Text, paste the vMX Authentication Token from the Meraki Dashboard
- Network:
- Click
Next: Add Storage - Click
Next: Add Tags - Click
Add Tagand use a key:value ofName:vMX - Click
Next: Configure Security Group - For the Security Group, use the settings:
- Assign a security group :
⦿ Create a new security group - Security group name:
vMX-SG - Description:
vMX-SG - Change the existing rule to be:
- Type :
All Traffic - Description:
Allow All
- Type :
- Assign a security group :
- Click
Review and Launch - Click
Launch - Select your Key Pair
ISEinAWS.pem, acknowledge that you have the private key file and clickLaunch Instances - After launching, select
View Instancesand you should see your instance running! - Check ✅ your vMX, choose
Actions > Networking > Change Source / destination check, ✅StopSource / destination checking and clickSave
-
In the AWS Console, go to
Services > EC2 -
Click
Launch Instances -
Find a free tier Linux AMI such as the
Amazon Linux 2 AMI (HVM)and click it'sSelectbutton -
Choose the
t2.microinstance type and clickNext: Configure Instance Details -
For Configure Instance Details use the settings:
- Network:
vpc-* | ISEinAWS - Subnet:
subnet-* | Private-Subnet - Auto-assign Public IP :
Enable)
- Network:
-
Click
Next: Add Storage -
Click
Next: Add Tags -
Click
Add Tagand use a key:value ofName:Ping -
Click
Next: Configure Security Group -
For the Security Group, use the settings:
- Assign a security group :
⦿ Create a new security group - Security group name:
SSH+Ping - Description:
SSH+Ping - Click
Add Ruleand choose :- Type:
All ICMP-IPv4 - Source:
0.0.0.0/0
- Type:
- Assign a security group :
-
Click
Review and Launch -
Click
Launch -
Select your Key Pair
ISEinAWS.pem, acknowledge that you have the private key file and clickLaunch Instances -
Click
View Instancesand you should see your instance running! -
Login to your Linux VM is you need to do any troubleshooting or add software:
ssh -i "~/.ssh/ISEinAWS.pem" ec2-user@{ hostname | IP }
- In the Meraki Dashboard, view your
ISEinAWSnetwork - Choose
Security & SD-WAN > Configure > Site-to-Site VPN - For the Site-to-Site VPN settings, use:
- Type:
Spoke - Local network:
Network VPN mode Subnet Private-Subnet Enabled 172.31.2.0/24 - NAT traversal :
⦿ Automatic
- Type:
- Click
Save Changes - Choose
Security & SD-WAN > Appliance Statusand you should now see the vMX public WAN address and it should be Active!
Now you will connect your other MX in the mesh to the vMX
- Choose your Meraki
Labnetwork for your physical, on-premise MX - Choose
Security & SD-WAN > Configure > Site to Site VPN - For the Site-to-Site VPN settings, use:
- Type:
Hub (Mesh) - Local Networks :
💡 you may use a Single LAN or VLANs - I used a Single LAN to keep it simple | Network | VPN mode | Subnet | |-------------|----------|--------| | Main Subnet | Enabled |
192.168.101.0/24 - NAT traversal :
⦿ Automatic - If you have alreaady configured a Meraki MX has a hub, you should see
ISEinAWSunder Remote VPN participants!
- Type:
- Click
Save Changes
You will need to update the Private-RT to the Lab MX
- In the AWS Console, go to
Services > VPCand select theRoute Tables - Check ✅
Private-RTand select theRoutestab below - Click
Edit Routes - Select
Add Route- Destination:
192.168.0.0/16 - Target:
Instance>i-* | vMXClickSave Changes
- Destination:
- Select
Add Route- Destination:
0.0.0.0/0 - Target:
Internet Gateway>igw-*ClickSave Changes
- Destination:
- Your Private Route Table should now look like this:
Destination Target 172.31.0.0/16local 192.168.0.0/16i-* / vMX 0.0.0.0/0igw-* - You can now try to ping through your site-to-site VPN to the Linux instance
-
In the AWS Console, go to
Services > EC2and -
Select the
PingLinux VM instance and locate it'sPrivate IPv4 addresses -
SSH to the instance:
ssh -i ~/.ssh/ISEinAWS.pem ec2-user@172.31.2.35
- In the AWS Search Box at the top of the page, search for "Cisco ISE" and open the link to Cisco Identity Services Engine (ISE)
- Click
Continue to Subscribe - Click
Continue to Configuration - For Configure This Software, choose:
- Delivery Method:
Cloud Formation Templatethen choose the normal or GovCloud version ofCisco Identity Services Engine (ISE) - Software Version:
3.1 - Region:
us-westClickContinue to Launch
- Delivery Method:
- For Launch this Software, choose:
Launch CloudFormationthen clickLaunch - Choose
Upload a template file, choose your file (files/ISE-3-1-518.CFT.yaml) and clickNext - Verify and complete the ISE CloudFormation Parameters then click
Next- Stack Name:
ISE-3-1-518 - AMIid:
ami-00a1a68f5519aa150# ISE in us-west-1 - Hostname:
ise - KeyName / Instance Key Pair:
ISEinAWS - Management Security Group:
ISE - Management Network:
Private-Subnet - TimeZone:
America/Los_Angeles - ISEInstanceType:
c5.4xlarge - EBS Encryption :
false - Volume Size / StorageSize:
300 - DNSDomain:
aws.local - NameServer:
208.67.222.222 - NTPServer:
time.nist.gov - ERS:
yes - OpenAPI:
yes - pxGrid:
no - pxGridCloud:
no - ERS:
yes - password:
C1sco12345 - ConfirmPwd:
C1sco12345ClickNext
- Stack Name:
- Review the Stack Options then click
Next - Do a final review of the parameters then click
Creat Stack
To create another instance:
- In the AWS Console, navigate to CloudFormation > Stacks
- Select
ISE-3-1-518 - Choose Create Stack > With New Resources (standard)
- For Create Stack, choose
Upload a template file, choose your file (ISE-3-1-518.CFT.yaml) and clickNext - choose a unique Stack Name (
ISE-3-1-518)
SSH to the ISE console
ssh -i "~/.ssh/ISEinAWS.pem" admin@{ hostname | IP }- Installing Ansible for all platforms
- Documentation for Ansible collections:
- Cisco Meraki vMX en AWS - YouTube video for vMX in AWS (Spanish)
- AWS re:Invent 2019: AWS Networking Fundamentals (NET201-R2) provides an excellent overview of the networking elements that are automatically created when using the Launch Instance wizard
- Best practices for managing AWS access keys
This repository is licensed under the MIT License.