This repo is no longer maintained. Please refer to my IOTConnect repo for a replacement and more reliable version.


Extract OBDII data for Hyundai Ioniq EV - 28kWh, as well as the GPS location (using an external USB device) and publishes it to MQTT broker using a Raspberry Pi Zero W.
If you test it and it works with Hybrid and PlugIn Hybrid versions (it should!) let me know.
I have a smart home running Home Assistant on a Raspberry Pi 4 4GB. This software can be easily plugged to a MQTT broker so it's pretty straight forward to extract and show the data or even configure automations.
Here you have an screenshot of one of the tabs that I've configured for the car:
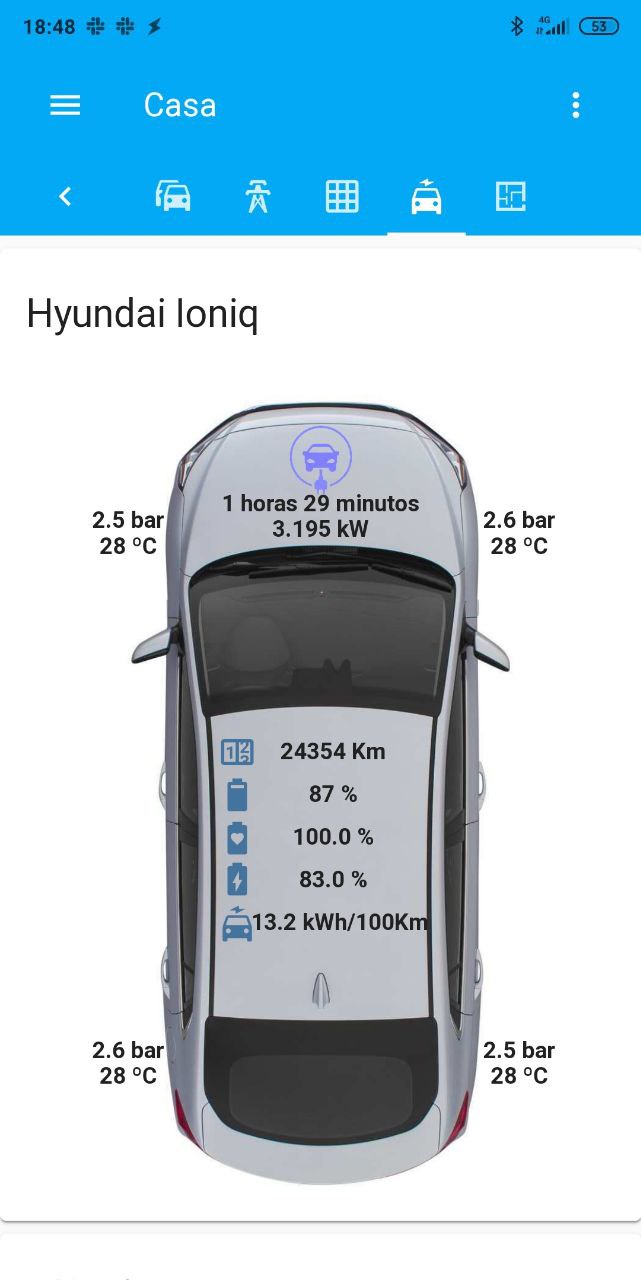
You can check my Home Assistant Configuration to get more details.
- Raspberry Pi Zero W
- LTE Stick Huawei E3372
- ELM327 Bluetooth scanner
- USB car charger
- USB GPS receiver GlobalSat BU-353-S4
- USB cable extender
- USB to Micro USB adapter
- USB OTG cable
- Raspberry Pi Zero case
- Velcro stickers
See the Amazon wishlist.
If you are new to Raspberry Pi, you should get some information about it here.
If you are already familiar with the Raspberry Pi, you can start.
The scripts and the following procedure has been designed and tested to use the Raspberry Pi OS (previously called Raspbian).
Use Raspberry Pi Imager for an easy way to install Raspberry Pi OS (and other operating systems) to an SD card.
Once you have Raspberry Pi Imager installed open it and:
- Under
Choose OSoption selectRaspberry Pi OS (other)and then chooseRaspberry Pi OS Lite (32-bit) - Choose your SD card
- and Write it
Before you can put the SD card into the Pi and boot it, you should enable SSH connections and configure the WLAN.
To enable ssh create an empty file called ssh in the root of your SD card
To configure WLAN create a file “wpa_supplicant.conf” with the following content and copy it in the root of your SD card.
I recommend to configure your Home and Car WiFi in this step
country=ES
ctrl_interface=DIR=/var/run/wpa_supplicant GROUP=netdev
update_config=1
network={
    ssid="<YOUR HOME WLAN SSID HERE>"
    psk="<YOUR HOME WLAN PASSWORD HERE>"
    priority=20
    key_mgmt=WPA-PSK
    id_str="home"
}

network={
    ssid="<YOUR CAR WLAN SSID HERE>"
    psk="<YOUR CAR WLAN PASSWORD HERE>"
    priority=1
    key_mgmt=WPA-PSK
    id_str="car"
}
I recommend that you set up your home router to set a static address to the Raspberry Pi. As the procedure is different for every router, please google for some information on how to do it on your router.
Once you have set up your IP address, turn on your Raspberry Pi and use any SSH client to connect to it.
The default username is pi the password raspberry
Change the default password by typing: passwd
Run raspi-config to Enable wait for network a boot (you may also want to change other settings such as Locale, Time Zone,...).
To do so type: sudo raspi-config
Scroll down to 3 Boot Options and press enter.
Scroll down to B2 Wait for Network at Boot and press enter.
Select YES
This tells the Raspberry Pi to start wait for a network during the booting process
Save and exit the raspi-config file by selecting OK and then Finish. Then, reboot your Pi and your Pi should wait for a network before completely booting! BTW: Yes, this works with WiFi.
First of all we need to get the latest updates from the OS (this may take a while, so relax and enjoy looking at the progress...)
sudo apt-get update
sudo apt-get upgrade
Reboot if needed.
sudo reboot
Then install needed packages for the scripts to run:
sudo apt-get install bluetooth bluez-tools blueman python3-pip git
IMPORTANT Following requirements need to be met to pair the OBDII bluetooth with the Raspberry Pi:
- OBDII dongle is plugged into the OBDII port of your car
- Raspberry Pi is within the range of the OBDII bluetooth dongle (<5m)
- Raspberry Pi is connected to the Wi-Fi. I use a powerbank to give power the Raspberry Pi when its close to the car. In my case using the USB car charger makes the RaspberryPi to be out of WiFi range.
- The vehicle is switched on
I'm lucky and meeting all those requirements is easy for me!!!. If are not so lucky, you will need to find an alternative way pair the OBDII with the Raspberry Pi.
Once those requirements are fulfilled you can start with the pairing process:
sudo bluetoothctl
Then when the [bluetooth]# promt is shown, type:
agent on
scan on
You will get a list of all Bluetooth devices in range.
Here should also appear your OBDII dongle.
You will also see the device address (Format: XX: XX: XX: XX: XX: XX). Note down this address because it's important for the next steps!.
Please replace XX:XX:XX:XX:XX:XX with the address of your OBDII dongle for next steps.
Once identified your OBDII device on the list type :
pair XX:XX:XX:XX:XX:XX
Now you have to enter the device code. Usually it's 1234 or 0000, see your OBDII instructions manual to find yours.
If that worked, you still have to trust the device, so you don't need to pair the device every time:
trust XX:XX:XX:XX:XX:XX
To be able to access the OBDII dongle, it must be integrated as a serial device. This needs to be done after each restart.
To create your OBDII dongle as a serial device, add the following line to the file /etc/rc.local:
sudo rfcomm bind hci0 XX:XX:XX:XX:XX:XX 1
Then reboot the Raspberry Pi
sudo reboot
Do this step ONLY if you plan to use the USB GPS device to publish your car's location.
Install needed packages:
sudo apt-get install gpsd gpsd-clients ntp
Now configure the gpsd daemon:
sudo nano /etc/default/gpsd
The file should look something like (I only needed to change the DEVICES property):
# Default settings for the gpsd init script and the hotplug wrapper.

# Start the gpsd daemon automatically at boot time
START_DAEMON="true"

# Use USB hotplugging to add new USB devices automatically to the daemon
USBAUTO="true"

# Devices gpsd should collect to at boot time.
# They need to be read/writeable, either by user gpsd or the group dialout.
DEVICES="/dev/ttyUSB0"

# Other options you want to pass to gpsd
GPSD_OPTIONS=""
And then restart the service.
sudo systemctl restart gpsd
For testing that GPS is working, make sure you have the GPS USB plugged in in your Raspberry Pi port (you will need the USB to micro USB adapter) and try to run cgps utility.
cgps
You should see something like:
lqqqqqqqqqqqqqqqqqqqqqqqqqqqqqqqqqqqqqqqqqqqklqqqqqqqqqqqqqqqqqqqqqqqqqqqqqqqqqk
x    Time:       2020-07-01T17:03:30.000Z   xxPRN:   Elev:  Azim:  SNR:  Used: x
x    Latitude:    x.xxxxxxxxx N             xx   1    67    078    47      Y   x
x    Longitude:    y.yyyyyyyy E             xx   3    74    321    32      Y   x
x    Altitude:   124.967 m                  xx   4    37    183    19      Y   x
x    Speed:      0.00 kph                   xx   8    12    165    24      Y   x
x    Heading:    0.0 deg (true)             xx  11    43    138    44      Y   x
x    Climb:      0.00 m/min                 xx  14    24    045    40      Y   x
x    Status:     3D DIFF FIX (6 secs)       xx  17    34    309    26      Y   x
x    Longitude Err:   +/- 10 m              xx  19    15    319    27      Y   x
x    Latitude Err:    +/- 4 m               xx  22    66    034    39      Y   x
x    Altitude Err:    +/- 19 m              xx  28    13    264    22      Y   x
x    Course Err:      n/a                   xx  31    10    079    27      Y   x
x    Speed Err:       +/- 72 kph            xx 123    35    138    43      Y   x
x    Time offset:     1.264                 xx                                 x
x    Grid Square:     JM19ip                xx                                 x
mqqqqqqqqqqqqqqqqqqqqqqqqqqqqqqqqqqqqqqqqqqqjmqqqqqqqqqqqqqqqqqqqqqqqqqqqqqqqqqj
#precedence ::ffff:0:0/96  100

#
# scopev4  <mask>  <value>
#    Add another rule to the RFC 6724 scope table for IPv4 addresses.
#    By default the scope IDs described in section 3.2 in RFC 6724 are
#    used.  Changing these defaults should hardly ever be necessary.
#    The defaults are equivalent to:
#
#scopev4 ::ffff:169.254.0.0/112  2
#scopev4 ::ffff:127.0.0.0/104    2
#scopev4 ::ffff:0.0.0.0/96       14
Mobility Support for IPv6 [RFC3775]
udplite 136     UDPLite         # UDP-Lite [RFC3828]
mpls-in-ip 137  MPLS-in-IP      # MPLS-in-IP [RFC4023]
manet   138                     # MANET Protocols [RFC5498]
hip     139     HIP             # Host Identity Protocol
shim6   140     Shim6           # Shim6 Protocol [RFC5533]
wesp    141     WESP            # Wrapped Encapsulating Security Payload
rohc    142     ROHC            # Robust Header Compression

H.10- 04/25/2019 115","activated":"2020-07-01T17:03:24.423Z","flags":1,"native":1,"bps":4800,"parity":"N","stopbits":1,"cycle":1.00}]}
{"class":"WATCH","enable":true,"json":true,"nmea":false,"raw":0,"scaled":false,"timing":false,"split24":false,"pps":false}
{"class":"TPV","device":"/dev/ttyUSB0","status":2,"mode":3,"time":"2020-07-01T17:03:24.000Z","ept":0.005,"lat":x.xxxxxxxxxxx,"lon":y.yyyyyyyyyyyy,"alt":124.967,"epx":10.106,"epy":4.597,"epv":19.127,"track":0.0000,"speed":0.000,"climb":0.000,
"eps":20.21,"epc":38.25}
If you are not getting GPS coordinates something may be wrong. Please google for some troubleshooting.
- ELM327 Bluetooth scanner should be plugged into the OBDII port of your car.
- USB car charger should be plugged into the 12V plug of your car.
- LTE Stick Huawei E3372 should be plugged into the USB car charger (you may want to use the USB cable extender to hide a bit the stick).
- Raspberry Pi Zero W should be plugged into the USB car charger using the USB to Micro USB adapter.
- [Optional] USB GPS receiver GlobalSat BU-353-S4 should be plugged to the Raspberry Pi using the USB OTG cable.
Now that we can stablish connection with OBDII dongle and the GPS is working we can install the scripts that will do all the magic!
Clone the Github repo:
sudo git clone https://github.com/hokus15/pioniq.git /opt/pioniq
Make pi user the owner of /opt/pioniq folder:
sudo chown -R pi /opt/pioniq
Install dependencies:
cd /opt/pioniq
pip install -r requirements.txt
Config files are JSON files and should be created to run the scripts. You have a template file for each of the scripts:
obdii_data.config.json file format:
{
    mqtt: {               object  MQTT configuration section.
        broker :          string  String representing the MQTTS broker host name. i.e: test.mosquitto.org
        port :            integer MQTTS port. i.e: 8883
        user :            string  MQTTS broker user name.
        password :        string  MQTTS broker password.
        topic_prefix :    string  Topic prefix to use for publishing MQTT messages. i.e: car/sensor/ioniq/
    },
    serial: {             object  OBDII serial configuration section.
        port :            string  Serial port assigned to you OBDII dongle. i.e: /dev/rfcomm0
        baudrate :        integer Baud rate for OBDII dongle connection. i.e: 9600
    },
    vehicle: {            object  Vehicle configuration
        battery_capacity: integer Vehicle battery capacity in kWh.
    }
}
gps_data.config.json file format:
{
    mqtt: {               object. MQTT configuration section.
        broker :          string. String representing the MQTTS broker host name. i.e: test.mosquitto.org
        port :            int. MQTTS port. i.e: 8883
        user :            string. MQTTS broker user name.
        password :        string. MQTTS broker password.
        topic_prefix :    string. Topic prefix to use for publishing MQTT messages. i.e: car/sensor/ioniq/
    },
    service: {            object. Service configuration section.
        sleep:            int. Seconds to wait beween gps data gathering. i.e: 15
        min_accuracy:     int. Min accuracy allowed to publish location in meters. Any location with and accuracy in meters higher than this value won't be published to MQTT. i.e: 30
    }
}
Make sure you are in /opt/pioniq folder.
Copy config files from template.
cp obdii/obdii_data.config.template.json obdii/obdii_data.config.json
cp gps/gps_data.config.template.json gps/gps_data.config.json
Adapt them to your needs.
To test that everything works, execute the first script:
- Make sure all the wiring is properly done (see Wiring section above).
- The vehicle is switched on
- The Raspberry Pi has been connected to the car WiFi
Run the command:
python3 /opt/pioniq/obdii/obdii_data.py
This should publish obdii information to the configured MQTT server.
If this works congratulations you are almost done!
To run the obdii_data.py script automatically every minute, we need to set up a cron job, to do so:
crontab -e
And configure the following cron job:
* * * * * python3 /opt/pioniq/obdii/obdii_data.py& PID=$!; sleep 55; kill $PID >/dev/null 2>&1
Do this step ONLY if you plan to use the USB GPS device to publish your car's location.
To run the gps_data.py script automatically we need to set it up as a service, to do so:
Enable the service like this:
sudo systemctl link /opt/pioniq/gps/gps_data.service
sudo systemctl enable gps_data.service
sudo systemctl daemon-reload
To have WiFi in the car, I use a UBS powered stick that as soon as it get some power it startup and connects to the 4G LTE network and operates as a WiFi router. In my case I use the Huawei E3372 LTE stick. Please refer to your specific stick instructions on how to configure it.
The information is published in MQTT in different topics as a JSON objects.
Those are the MQTT topics and format used for each one:
This information may be useful to know that the script is running and last time it ran. State topic is published from obdii_data.py script in the config['mqtt']['topic_prefix']state i.e.: car/sensor/ioniq/state as a JSON object with the following format:
{
   timestamp integer Linux Epoch time.
   state     string  Constant string with the "running" value
}
Sample:
{
    "timestamp": 1597091185,
    "state": "running"
}
BMS (Battery Management System) information is published from obdii_data.py script in the config['mqtt']['topic_prefix']battery i.e.: car/sensor/ioniq/battery as a JSON object with the following format:
{
   timestamp                       integer         Linux Epoch time.
   socBms                          float (0-100)   Battery status of charge in % (as seen by Battery Management System).
   socDisplay                      integer (0-100) Battery status of charge in % (as seen as in car display).
   soh                             float (0-100)   Battery status of health in %.
   bmsIgnition                     0 or 1          Car ignition. 0: false, 1: true.
   bmsMainRelay                    0 or 1          BMS main relay. 0: false, 1: true.
   auxBatteryVoltage               float           Aux battery voltage in V.
   charging                        0 or 1          Is the car charging ? 0: false, 1: true.
   normalChargePort                0 or 1          Is charging using normal charge port? 0: false, 1: true.
   rapidChargePort                 0 or 1          Is charging using rapid charge port? 0: false, 1: true.
   minsToCompleteCharge            integer         Minutes to complete 100% battery charge. Estimation based on current charge speed. 0 if not charging.
   fanStatus                       integer (0-9)   Cooling fan speed. 0 means stopped. 1 to 9 lower to higher speed.
   fanFeedback                     integer         Fan feedback signal in Hz.
   cumulativeEnergyCharged         float           Cumulative energy charged in kWh.
   cumulativeEnergyDischarged      float           Cumulative energy discharged in kWh.
   cumulativeChargeCurrent         float           Cumulative current charged in A.
   cumulativeDischargeCurrent      float           Cumulative current discharged in A.
   availableChargePower            float           Available charge power kW. In Ioniq EV max value is 98kW.
   availableDischargePower         float           Available discharge power in kW. In Ioniq EV max value is 98kW.
   dcBatteryCellVoltageDeviation   integer         DC battery cell voltage deviation in V.
   dcBatteryHeater1Temperature     float           DC battery heater1 temperature in ºC.
   dcBatteryHeater2Temperature     float           DC battery heater2 temperature in ºC.
   dcBatteryInletTemperature       integer         DC battery inlet temperature in ºC.
   dcBatteryMaxTemperature         integer         DC battery maximum cell temperature in ºC.
   dcBatteryMinTemperature         integer         DC battery minimum cell temperature in ºC.
   dcBatteryAvgTemperature         integer         DC battery average cells temperature in ºC.
   dcBatteryCellMaxVoltage         float           DC battery maximum voltage in V.
   dcBatteryCellNoMaxVoltage       integer (1-96)  DC battery maximum voltage cell number.
   dcBatteryCellMaxDeterioration   float (0-100)   DC battery maximum deterioration cell in %.
   dcBatteryCellNoMaxDeterioration integer (1-96)  DC battery maximium deterioration cell number.
   dcBatteryCellMinVoltage         float           DC battery minimum voltage in V.
   dcBatteryCellNoMinVoltage       integer (1-96)  DC battery minimum voltage cell number.
   dcBatteryCellMinDeterioration   float (0-100)   DC battery minimum deterioration cell in %.
   dcBatteryCellNoMinDeterioration integer (1-96)  DC battery minimum deterioration cell number.
   dcBatteryCurrent                float           DC battery instant current in A.
   dcBatteryPower                  float           DC battery instant power in kW.
   dcBatteryVoltage                float           DC battery instant  voltage in V.
   dcBatteryModuleTempxx           float           DC battery module temperature in ºC. Where xx goes from 01 to 12.
   dcBatteryCellVoltagexx          float           DC battery cell voltage in V. Where xx goes from 01 to 96.
   driveMotorSpeed                 integer         Motor speed in RPM.
}
Sample:
{
   "timestamp":1594794497,
   "socBms":45.0,
   "socDisplay":46,
   "soh":100.0,
   "bmsIgnition": 1,
   "bmsMainRelay": 1,
   "auxBatteryVoltage":14.5,
   "charging":0,
   "normalChargePort":0,
   "rapidChargePort":0,
   "minsToCompleteCharge": 0,
   "fanStatus":0,
   "fanFeedback":0,
   "cumulativeEnergyCharged":3029.8,
   "cumulativeEnergyDischarged":2952.3,
   "cumulativeChargeCurrent":8400.0,
   "cumulativeDischargeCurrent":8372.3,
   "availableChargePower":98.0,
   "availableDischargePower":98.0,
   "dcBatteryCellVoltageDeviation": 0,
   "dcBatteryHeater2Temperature": 0.0,
   "dcBatteryHeater1Temperature": 0.0,
   "dcBatteryInletTemperature":27,
   "dcBatteryMaxTemperature":28,
   "dcBatteryMinTemperature":26,
   "dcBatteryAvgTemperature":27,
   "dcBatteryCellMaxDeterioration": 0,
   "dcBatteryCellNoMaxDeterioration": 2,
   "dcBatteryCellMinDeterioration": 100.0,
   "dcBatteryCellNoMinDeterioration": 10,
   "dcBatteryCurrent":1.7,
   "dcBatteryPower":0.5924499999999999,
   "dcBatteryVoltage":348.5,
   "dcBatteryModuleTemp01":27.0,
   "dcBatteryModuleTemp02":27.0,
   "dcBatteryModuleTemp03":26.0,
   "dcBatteryModuleTemp04":27.0,
   "dcBatteryModuleTemp05":27.0,
   "dcBatteryModuleTemp06":27.0,
   "dcBatteryModuleTemp07":27.0,
   "dcBatteryModuleTemp08":28.0,
   "dcBatteryModuleTemp09":27.0,
   "dcBatteryModuleTemp10":27.0,
   "dcBatteryModuleTemp11":27.0,
   "dcBatteryModuleTemp12":27.0,
   "dcBatteryCellVoltage01":3.62,
   "dcBatteryCellVoltage02":3.62,
   "dcBatteryCellVoltage03":3.62,
   "dcBatteryCellVoltage04":3.62,
   "dcBatteryCellVoltage05":3.62,
   "dcBatteryCellVoltage06":3.62,
   "dcBatteryCellVoltage07":3.62,
   "dcBatteryCellVoltage08":3.62,
   "dcBatteryCellVoltage09":3.62,
   "dcBatteryCellVoltage10":3.6,
   "dcBatteryCellVoltage11":3.62,
   "dcBatteryCellVoltage12":3.62,
   "dcBatteryCellVoltage13":3.62,
   "dcBatteryCellVoltage14":3.62,
   "dcBatteryCellVoltage15":3.62,
   "dcBatteryCellVoltage16":3.62,
   "dcBatteryCellVoltage17":3.62,
   "dcBatteryCellVoltage18":3.62,
   "dcBatteryCellVoltage19":3.62,
   "dcBatteryCellVoltage20":3.62,
   "dcBatteryCellVoltage21":3.62,
   "dcBatteryCellVoltage22":3.62,
   "dcBatteryCellVoltage23":3.62,
   "dcBatteryCellVoltage24":3.62,
   "dcBatteryCellVoltage25":3.62,
   "dcBatteryCellVoltage26":3.62,
   "dcBatteryCellVoltage27":3.62,
   "dcBatteryCellVoltage28":3.62,
   "dcBatteryCellVoltage29":3.62,
   "dcBatteryCellVoltage30":3.62,
   "dcBatteryCellVoltage31":3.62,
   "dcBatteryCellVoltage32":3.62,
   "dcBatteryCellVoltage33":3.6,
   "dcBatteryCellVoltage34":3.6,
   "dcBatteryCellVoltage35":3.6,
   "dcBatteryCellVoltage36":3.6,
   "dcBatteryCellVoltage37":3.6,
   "dcBatteryCellVoltage38":3.6,
   "dcBatteryCellVoltage39":3.6,
   "dcBatteryCellVoltage40":3.6,
   "dcBatteryCellVoltage41":3.6,
   "dcBatteryCellVoltage42":3.6,
   "dcBatteryCellVoltage43":3.6,
   "dcBatteryCellVoltage44":3.6,
   "dcBatteryCellVoltage45":3.6,
   "dcBatteryCellVoltage46":3.6,
   "dcBatteryCellVoltage47":3.6,
   "dcBatteryCellVoltage48":3.6,
   "dcBatteryCellVoltage49":3.6,
   "dcBatteryCellVoltage50":3.6,
   "dcBatteryCellVoltage51":3.6,
   "dcBatteryCellVoltage52":3.6,
   "dcBatteryCellVoltage53":3.6,
   "dcBatteryCellVoltage54":3.6,
   "dcBatteryCellVoltage55":3.6,
   "dcBatteryCellVoltage56":3.6,
   "dcBatteryCellVoltage57":3.6,
   "dcBatteryCellVoltage58":3.6,
   "dcBatteryCellVoltage59":3.6,
   "dcBatteryCellVoltage60":3.6,
   "dcBatteryCellVoltage61":3.6,
   "dcBatteryCellVoltage62":3.6,
   "dcBatteryCellVoltage63":3.6,
   "dcBatteryCellVoltage64":3.6,
   "dcBatteryCellVoltage65":3.6,
   "dcBatteryCellVoltage66":3.6,
   "dcBatteryCellVoltage67":3.6,
   "dcBatteryCellVoltage68":3.6,
   "dcBatteryCellVoltage69":3.6,
   "dcBatteryCellVoltage70":3.6,
   "dcBatteryCellVoltage71":3.6,
   "dcBatteryCellVoltage72":3.6,
   "dcBatteryCellVoltage73":3.6,
   "dcBatteryCellVoltage74":3.6,
   "dcBatteryCellVoltage75":3.6,
   "dcBatteryCellVoltage76":3.6,
   "dcBatteryCellVoltage77":3.6,
   "dcBatteryCellVoltage78":3.6,
   "dcBatteryCellVoltage79":3.6,
   "dcBatteryCellVoltage80":3.6,
   "dcBatteryCellVoltage81":3.6,
   "dcBatteryCellVoltage82":3.6,
   "dcBatteryCellVoltage83":3.6,
   "dcBatteryCellVoltage84":3.6,
   "dcBatteryCellVoltage85":3.6,
   "dcBatteryCellVoltage86":3.6,
   "dcBatteryCellVoltage87":3.6,
   "dcBatteryCellVoltage88":3.6,
   "dcBatteryCellVoltage89":3.6,
   "dcBatteryCellVoltage90":3.6,
   "dcBatteryCellVoltage91":3.6,
   "dcBatteryCellVoltage92":3.6,
   "dcBatteryCellVoltage93":3.6,
   "dcBatteryCellVoltage94":3.6,
   "dcBatteryCellVoltage95":3.6,
   "dcBatteryCellVoltage96":3.6,
   "driveMotorSpeed":4200
}
Odometer information is published from obdii_data.py script in the config['mqtt']['topic_prefix']odometer i.e.: car/sensor/ioniq/odometer as a json object with the following format:
{
   timestamp integer Linux Epoch time.
   odometer  integer Odometer value in Km.
}
Sample:
{
    "timestamp": 1596316222,
    "odometer": 23100
}
Vehicle Motor Control Unit information is published from obdii_data.py script in the config['mqtt']['topic_prefix']vmcu i.e.: car/sensor/ioniq/vmcu as a json object with the following format:
{
   timestamp         integer Linux Epoch time.
   vin               string  Vehicle Identification Number, also called a chassis number (or número de bastidor in spanish).
   gear              string  Gear stick position. P = Park, N = Neutral, D = Drive or R = Rear.
   speed             float   Vehicle speed in kmh.
   accel_pedal_depth integer Accelerator pedal depth in %.
   brake_lamp        0 or 1  0 brake lamp is off, 1 brake lamp is on.
   brakes_on         0 or 1  0 brakes are off, 1 brakes are on.
}
Sample:
{
   "timestamp":1594994497,
   "vin":"XXXXXXXXXXXXXXXXXX",
   "gear": "D",
   "speed": 67.0,
   "accel_pedal_depth": 28,
   "brake_lamp": 0,
   "brakes_on": 0
}
Tire Pressure Monitor System information is published from obdii_data.py script in the config['mqtt']['topic_prefix']tpms i.e.: car/sensor/ioniq/tpms as a json object with the following format:
{
   timestamp           integer Linux Epoch time.
   tire_fl_pressure    float   Front left tire pressure in bar.
   tire_fl_temperature integer Front left tire temperature in ºC.
   tire_fr_pressure    float   Front right tire pressure in bar.
   tire_fr_temperature integer Front right tire temperature in ºC.
   tire_bl_pressure    float   Back left tire pressure in bar.
   tire_bl_temperature integer Back left tire temperature in ºC.
   tire_br_pressure    float   Back right tire pressure in bar.
   tire_br_temperature integer Back right tire temperature in ºC.
}
Sample:
{
   "timestamp":1596146085,
   "tire_fl_pressure":2.7,
   "tire_fl_temperature":28,
   "tire_fr_pressure":2.6
   "tire_fr_temperature":28,
   "tire_bl_pressure":2.6,
   "tire_bl_temperature":33,
   "tire_br_pressure":2.5,
   "tire_br_temperature":33
}
External temperature information is published from obdii_data.py script in the config['mqtt']['topic_prefix']ext_temp i.e.: car/sensor/ioniq/ext_temp as a json object with the following format:
{
   timestamp            integer Linux Epoch time.
   external_temperature float   External temperature in ºC.
}
Sample:
{
    "timestamp": 1596316222,
    "external_temperature": 29.5
}
Location information is published from gps_data.py script in the config['mqtt']['topic_prefix']location i.e.: car/sensor/ioniq/location as a JSON object with the following format:
{
    latitude     float Latitude.
    longitude    float Longitude.
    last_update  float Linux Epoch time.
    gps_accuracy float Max of latitude or longitude estimated error.
    platitude    float Latitude fixed on last iteration.
    plongitude   float Longitude fixed on last iteration.
    track        float Course over ground in degrees from True North.
    speed        float Speed in m/s.
    epx          float Estimated longitude error.
    epy          float Estimated latitude error.
    epv          float Estimated altitude error.
    ept          float Estimated time error.
    eps          float Estimated Speed error.
    mode         float NMEA mode; values are: 0 - NA, 1 - No Fix, 2D and 3D.
    climb        float Climb (Positive) or Sink (Negative) rate in m/s of upwards or downwards movement.
}
Sample:
{
   "track":326.4788,
   "platitude":19.634422362,
   "speed":0.216,
   "epx":9.772,
   "epy":15.465,
   "epv":30.186,
   "ept":0.005,
   "eps":30.93,
   "longitude":23.23253151,
   "last_update":1593980780,
   "gps_accuracy":15.465,
   "mode":3,
   "latitude":19.644422362,
   "climb":-0.021,
   "plongitude":23.24253151
}
One of the caveats of using the existing 12V plugs is that those are only powered when the car engine is on, meaning that it's not possible to monitor the status of the battery while the car is charging.
To be able to monitor the battery while the car is charging and not drain the 12V battery I've added a new 12V plug that takes the power from the fuse box that it's ONLY active when the car engine is on or the car is charging.
You can use the following fuse (IG3 2) to achieve this:
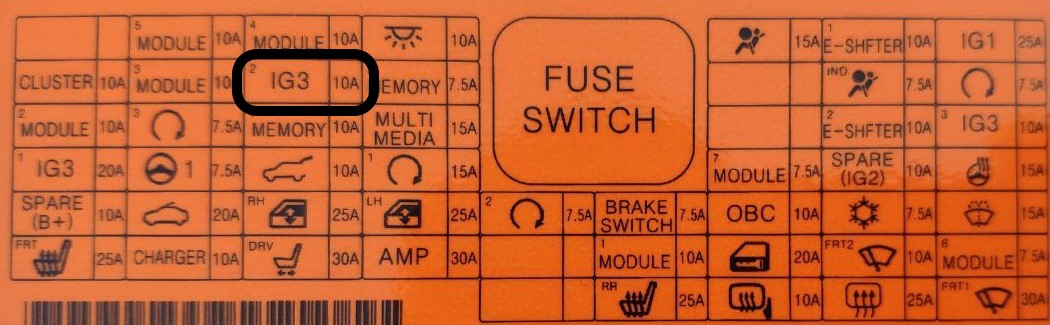
In order to make it easy to take the power from the fuse box I've used the following adaptor.
As the Raspberry Pi will usually run in your car's WiFi it is going to be complex for you to debug problems or even look at the log files. For that I'm using a Log Management tool in the cloud that offers a free tier that is more than enough for the purpose of this project (200 MB/day and 7 days log retention).
Just create a free account in Loggly and follow instructions on how to Linux Log File Monitoring.
All this work has been possible by putting together different pieces like:
- How To Article from sochack.eu
- Ingesting GPS Data From Raspberry PI Zero Wireless With a USB GPS Device
- python-OBD
- EVNotiPi
- OBD-PIDs-for-HKMC-EVs
- SoulEVSpy
- Open Vehicles
- and of course lot of patience and Google
Before you download and use this software consider this: Any car is a possibly lethal piece of machinery and you might hurt or kill yourself or others using it, or even paying attention to the displays instead of watching the road. Be extremely prudent!
By even downloading this software, or the source code provided on GitHub, you agree to have completely understood this.
This is my first python programming experience and I'm not a Linux expert so I'm pretty sure that the scripts may be far from efficient so don't be too hard with me when you find that I'm not following best practices neither doing things in the most optimal way. If you find that the scripts may be improved (I'm sure they are), just raise a PR with your improvements or contact me.
PIONIQ (“THE SOFTWARE”) IS PROVIDED AS IS. USE THE SOFTWARE AT YOUR OWN RISK. THE AUTHOR MAKE NO WARRANTIES AS TO PERFORMANCE OR FITNESS FOR A PARTICULAR PURPOSE, OR ANY OTHER WARRANTIES WHETHER EXPRESSED OR IMPLIED. NO ORAL OR WRITTEN COMMUNICATION FROM OR INFORMATION PROVIDED BY THE AUTHORS SHALL CREATE A WARRANTY. UNDER NO CIRCUMSTANCES SHALL THE AUTHORS BE LIABLE FOR DIRECT, INDIRECT, SPECIAL, INCIDENTAL, OR CONSEQUENTIAL DAMAGES RESULTING FROM THE USE, MISUSE, OR INABILITY TO USE THE SOFTWARE, EVEN IF THE AUTHOR HAS BEEN ADVISED OF THE POSSIBILITY OF SUCH DAMAGES. THESE EXCLUSIONS AND LIMITATIONS MAY NOT APPLY IN ALL JURISDICTIONS. YOU MAY HAVE ADDITIONAL RIGHTS AND SOME OF THESE LIMITATIONS MAY NOT APPLY TO YOU. THIS SOFTWARE IS ONLY INTENDED FOR SCIENTIFIC USAGE.