Home
OMA Lightweight M2M (LWM2M) is a resource constrained device management protocol relies on CoAP. And CoAP is an application layer protocol that allows devices to communicate with each other RESTfully over the Internet.
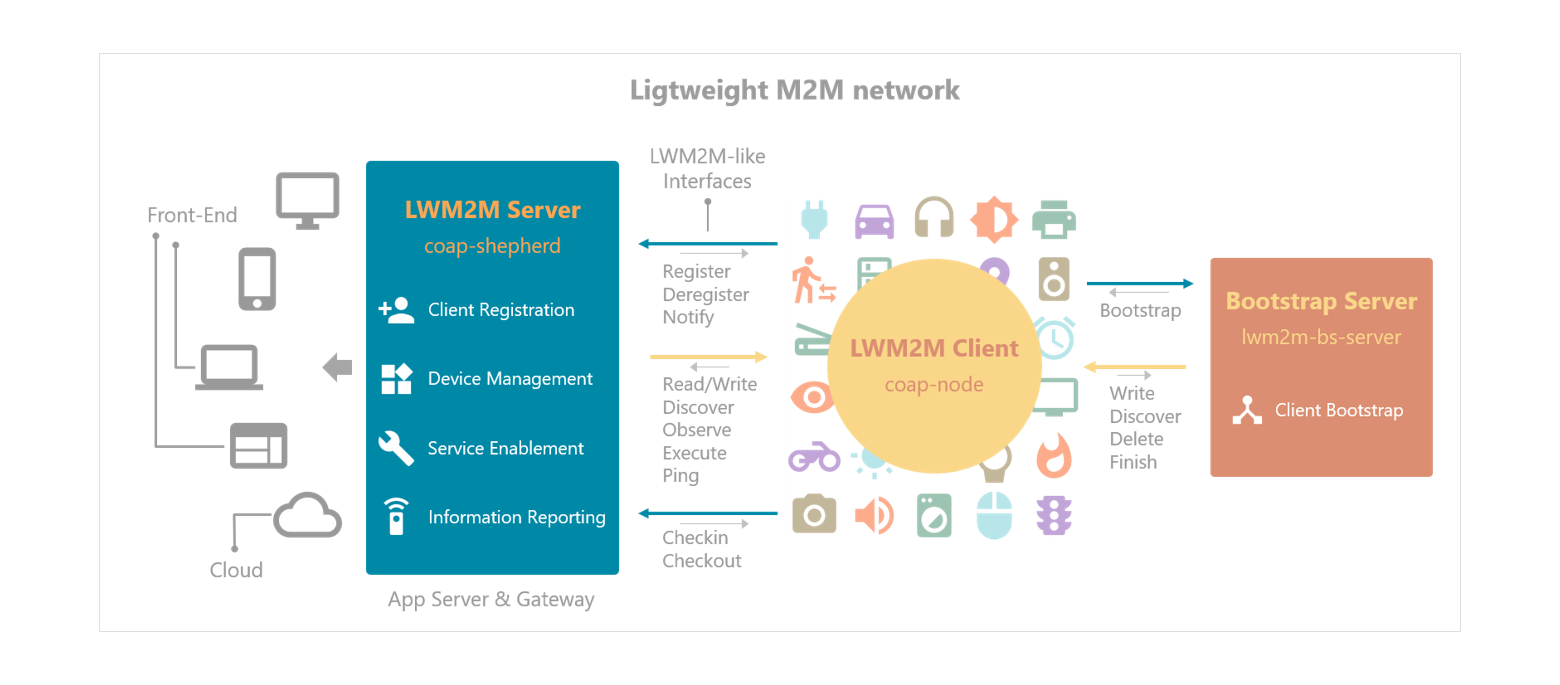
coap-shepherd, coap-node and lwm2m-bs-server modules aim to provide a simple way to build and manage a LWM2M machine network.
- It is an implementation of LWM2M Client managed by a coap-shepherd Server.
- It follows most parts of LWM2M specification to meet the requirements of a machine network and devices management.
- It works well with Leshan.
- Support mulitple servers, factory bootstrap and client initiated bootstrap.
- It uses smartobject as its fundamental of resource organizing on devices. smartobject can help you create smart objects with IPSO data model, and it also provides a scheme to help you abstract your hardware into smart objects. You may like to use smartobject to create many plugins for your own hardware or modules, i.e., temperature sensor, humidity sensor, light control. Here is a tutorual of how to plan resources with smartobject.
- Server: LWM2M Server (server running with coap-shepherd)
- Client or Client Device: LWM2M Client (machine running with coap-node)
- Bootstrap Server: LWM2M Bootstrap Server (bootstrap server running with lwm2m-bs-server)
- cnode: instance of CoapNode Class
- Constrained Application Protocol (CoAP)
- Based on node-coap, a node.js CoAP client/server library
- CoAP services at machine node is off-the-shelf
- Hierarchical data model in Smart-Object-style (IPSO) let you easily create Resources on the Client Device
- Client/server interaction through LWM2M-defined interfaces
$ npm install coap-node --save
Client-side example (the following example is how you use coap-node on a machine node):
- Step 1: Resources initialzation.
var SmartObject = require('smartobject');

// initialize Resources that follow IPSO definition
var so = new SmartObject();

// initialize your Resources
// oid = 'temperature', iid = 0
so.init('temperature', 0, {
    sensorValue: 21,
    units: 'C'
});

// oid = 'lightCtrl', iid = 0
so.init('lightCtrl', 0, {
    onOff: false
});- Step 2: Client device initialzation.
var CoapNode = require('coap-node');

// Instantiate a machine node with a client name and your smart object
var cnode = new CoapNode('my_first_node', so);

cnode.on('registered', function () {
    // If the registration procedure completes successfully, 'registered' will be fired

    // after registered, start your application
});

// register to a Server with its ip and port
cnode.register('192.168.0.77', 5683, function (err, rsp) {
    console.log(rsp);      // { status: '2.05' }
});
Server-side example (please go to coap-shepherd document for details):
var cnode = cserver.find('my_first_node');

cnode.read('/temperature/0/sensorValue', function (err, rsp) {
    console.log(rsp);      // { status: '2.05', data: 21 }
});

cnode.write('/lightCtrl/0/onOff', true, function (err, rsp) {
    console.log(rsp);      // { status: '2.04' }
});The Bootstrap Interface is used to provision essential information into the LwM2M Client to enable the LwM2M Client to register with one or more LwM2M Servers.
There are two bootstrap modes supported by the coap-node:
Factory Bootstrap is to configure the servers information by coapNode.configure(). When the coap-node start, it has been configured with the necessary Bootstrap Information.
- Step 1: Server configuration initialzation.
// Suppose your smartobject has been initialized
var cnode = new CoapNode('my_first_node', so);

// configure server who you want to register
coapNode.configure('leshan.eclipse.org', 5683, {
    lifetime: 300
});

coapNode.configure('127.0.0.1', 5683, {
    lifetime: 600,
    pmax: 30,
    pmin: 1
});- Step 2: Client device registration.
cnode.on('registered', function () {
    // If the registration procedure completes successfully, 'registered' will be fired

    // after registered, start your application
});

// register to a Server with its ip and port
coapNode.registerAllCfg(function (err, rsp) {
    console.log(rsp);   // {  status: '2.01', data:
                        //     [ { shortServerId: 2, status: '2.01' }
                        //       { shortServerId: 3, status: '2.01' } ]
                        // }
});
Client Initiated Bootstrap is to configure the servers information by The Bootstrap Server. When coap-node sends Bootstrap request to The Bootstrap Server. The LwM2M Bootstrap-Server will configures the coap-node with the Bootstrap Information using the 'Write' and/or 'Delete' operation. (This means that is possible to delete the existing configuration.)
You can use lwm2m-bs-server or Leshan bootstrap server to implement your Bootstrap Server.
If the Bootstrap Server is exist, you can bootstrap to it:
cnode.on('bootstrapped', function () {
    // If the bootstrap procedure completes successfully, 'bootstrapped' will be fired

    // after bootstrapped, you can register to all the servers that have been configured by Bootstrap Server
    coapNode.registerAllCfg(function (err, rsp) {
        console.log(rsp);   // { status: '2.01', data:
                            //     [ { shortServerId: 2, status: '2.01' }
                            //       { shortServerId: 3, status: '2.01' } ]
                            // }
    });
});

cnode.on('registered', function () {
    // If the registration procedure completes successfully, 'registered' will be fired

    // after registered, start your application
});

// bootstrap to a Bootstrap Server with its ip and port
coapNode.bootstrap('192.198.1.107', 5783, function (err, rsp) {
    console.log(rsp);   // { status: '2.04' }
});Exposed by require('coap-node').
- An instance of this class is denoted as cnode in this document. Configurations of connection are read from the
config.jsfile in thelibfolder of the module.
Create a new instance of CoapNode class.
Arguments:
-
clientName(String): Name of the Client Device, it should be unique in the network. -
so(Object): An smart object that holds all Resources on the device. This object should be an instance of the SmartObject class. -
devAttrs(Object): Attributes of the Device. The following table shows the details of each property within devAttrs.Property Type Required Description lifetime Number optional Registration will be removed by the server if a new registration or update from cnode is not received within lifetimeseconds. Default is 86400 (seconds)version String optional Minimum supported LWM2M version manuf String optional Manufacturer name model String optional Model name serial String optional Serial Number devType String optional Type of the device firmware String optional Current firmware version of the device hwVer String optional Current hardware version of the device swVer String optional Current software version of the device availPwrSrc Number optional Power source. (0: DC power; 1: Internal Battery; 2: External Battery; 4: Power over Ethernet; 5: USB; 6: AC power; 7: Solar pwrSrcVoltage Number optional Present voltage for Available Power Sources
Returns:
- (Object): cnode.
Examples:
var CoapNode = require('coap-node'),
    SmartObject = require('smartobject');

var so = new SmartObject();

so.init('temperature', 0, {
    sensorValue: 21,
    units: 'C'
});

var cnode = new CoapNode('foo_name', so, {
    lifetime: 60000,
    version: 'v1.0.0'
});Get SmartObject on the cnode. You can access its Resources with read/write/exec methods provided by SmartObject class.
Arguments:
- none
Returns:
- (Object): SmartObject.
Examples:
var so = cnode.getSmartObject();

so.read('temperature', 0, 'sensorValue', function (err, data) {
    if (!err)
        console.log(data);  // 21
});

so.write('humidity', 1, 'sensorValue', 15.4, function (err, data) {
    if (!err)
        console.log(data);  // 15.4
});Add LwM2M Server configuration to SmartObject lwm2mSecurity Object and lwm2mSecurity Object.
Arguments:
-
ip(String): Server ip address. -
port(String | Number): Server port. -
opts(Object): Server configuration options. The options with possible properties given in the following table.
| Property | Type | Description |
|---|---|---|
| 'lifetime' | Number | Specify the lifetime of the registration in seconds. |
| 'pmax' | Number | The default value the LwM2M Client should use for the Maximum Period of an Observation in the absence of this parameter being included in an Observation. |
| 'pmin' | Number | The default value the LwM2M Client should use for the Minimum Period of an Observation in the absence of this parameter being included in an Observation. |
Returns:
- (Number): Short Server Id.
Examples:
cnode.configure('192.168.1.113', 5683, {
    lifetime: 600,
    pmax: 30,
    pmin: 1
});

var so = cnode.getSmartObject();

so.read('lwm2mSecurity', function (err, data) {
    if (!err)
        console.log(data);  // { '0':
                            //   { lwm2mServerURI: 'coap://192.168.1.113:5783',
                            //     bootstrapServer: false,
                            //     securityMode: 3,
                            //     pubKeyId: '',
                            //     serverPubKeyId: '',
                            //     secretKey: '',
                            //     shortServerId: 1 },
});

so.read('lwm2mSecurity', function (err, data) {
    if (!err)
        console.log(data);  // { '0':
                            //   { shortServerId: 1,
                            //     lifetime: 600,
                            //     notificationStoring: true,
                            //     binding: 'U',
                            //     defaultMinPeriod: 10,
                            //     defaultMaxPeriod: 300 },
});Send a Bootstrap request to the Bootstrap Server. The Bootstrap Server will configure some Resources of the Bootstrap Information. When finished, cnode will fire a bootstrapped event. After successfully bootstrapped, cnode can use registerAllCfg() to register the configured Servers.
Arguments:
-
ip(String): Bootstrap Server ip address. -
port(String | Number): Bootstrap Server port. -
callback(Function):function (err, rsp) { }, whererspis the response object with a status code to tell whether this request is successful.-
rsp.status(String): Status code of the response. Possible status code is '2.04', '4.00' and '4.08'.
-
Returns:
- (none)
Examples:
cnode.on('bootstrapped', function () {
    console.log('cnode bootstrap finished');
});

cnode.bootstrap('leshan.eclipse.org', 5783, function (err, rsp) {
    console.log(rsp);   // { status: '2.04' }
});Send a register request to Servers that has been added in SmartObject lwm2mSecurity Object and lwm2mSecurity Object by configure() or the Bootstrap Server. When succeeds, cnode will fire a registered event and a login event. After successfully register, cnode will select a free UDP port to communicate with the Server.
Arguments:
-
callback(Function):function (err, rsp) { }, whererspis the response object with a status code to tell whether this request is successful.-
rsp.status(String): Status code of the response. Possible status code is '2.01', '2.04', '4.00', '4.04', '4.05', '4.08' and '5.00'. -
rsp.data(Array): The details of each server response.
-
Returns:
- (none)
Examples:
cnode.on('registered', function () {
    console.log('cnode registered to the Server');
});

cnode.registerAllCfg(function (err, rsp) {
    console.log(rsp);   // { status: '2.01', data:
                        //     [ { shortServerId: 2, status: '2.01' }
                        //       { shortServerId: 3, status: '2.01' } ]
                        // }
});Send a register request to the Server. When succeeds, cnode will fire a registered event and a login event. After successfully register, cnode will select a free UDP port to communicate with the Server.
Arguments:
-
ip(String): Server ip address. -
port(String | Number): Server port. -
callback(Function):function (err, rsp) { }, whererspis the response object with a status code to tell whether this request is successful.-
rsp.status(String): Status code of the response. Possible status code is '2.01', '2.04', '4.00', '4.04', '4.05', '4.08' and '5.00'.
-
Returns:
- (none)
Examples:
cnode.on('registered', function () {
    console.log('cnode registered to the Server');
});

cnode.register('127.0.0.1', 5683, function (err, rsp) {
    console.log(rsp);   // { status: '2.01' }
});Send a deregister request to the Server. The Server will remove the cnode from the registry. When succeeds, cnode will fire a deregistered event and a logout event.
Arguments:
-
callback(Function):function (err, rsp) { }, whererspis the response object with a status code to tell whether this request is successful.-
rsp.status(String): Status code of the response. Possible status code is '2.02', '4.04', '4.08' and '5.00'. -
rsp.data(Array): The details of each server response.
-
Returns:
- (none)
Examples:
cnode.on('deregistered', function () {
    console.log('cnode deregistered form the Server');
});

cnode.deregister(function (err, rsp) {
    console.log(rsp);   // { status: '2.02', data:
                        //     [ { shortServerId: 2, status: '2.02' }
                        //       { shortServerId: 3, status: '2.02' } ]
                        // }
});Set device attributes of the cnode and send an update request to the Server. After each successfully update, cnode will change the Client UDP port that communicate with the Server.
Arguments:
-
attrs(Object): Device attributes.Property Type Required lifetime Number optional version String optional -
callback(Function):function (err, rsp) { }. Get called after the Server accomplishes the update.rspis the response object with a status code to tell whether this operation is successful.-
rsp.status(String): Status code of the response. Possible status code is '2.00', '2.04', '4.00', '4.04', '4.08' and '5.00'. -
rsp.data(Array): The details of each server response.
-
Returns:
- (none)
Examples:
cnode.update({ lifetime: 12000 }, function (err, rsp) {
    console.log(rsp);   // { status: '2.04', data:
                        //     [ { shortServerId: 2, status: '2.04' }
                        //       { shortServerId: 3, status: '2.04' } ]
                        // }
});Send a checkout request to inform the Server that this cnode is going to sleep. When succeeds, cnode will fire a logout event.
- After received a successful acknowledgement, device can use power saving mode, or even power off.
- If cnode checks out with a given duration, for example 300 seconds, the Server knows this cnode is going to sleep and expects that this cnode will wake up and check in at 300 seconds later. If cnode does not check in, the Server will take it as an offline Client.
- If cnode checks out without the duration, the Server knows this cnode is going to sleep but has no idea about when it will wake up and check in again. The Server will always take it as a sleeping Client, until cnode check in.
- Note: After successfully checkout, cnode will not only stop reporting but also clear all the report settings. The Server should re-issue the observeReq(), when the Client goes online again, if needed.
Arguments:
-
duration(Number): How many seconds from now that this cnode will check in again. -
callback(Function):function (err, rsp) { }, whererspis the response object with a status code to tell whether this request is successful.-
rsp.status(String): Status code of the response. Possible status code is '2.04', '4.04', '4.08' and '5.00'. -
rsp.data(Array): The details of each server response.
-
Returns:
- (none)
Examples:
cnode.on('logout', function () {
    console.log('cnode has logged out from the network.');
});

cnode.checkout(30, function (err, rsp) {
    console.log(rsp);   // { status: '2.04', data:
                        //     [ { shortServerId: 2, status: '2.04' }
                        //       { shortServerId: 3, status: '2.04' } ]
                        // }
});Send a checkin request to inform the Server that this cnode wake up from sleep. When succeeds, cnode will fire a login event.
Arguments:
-
callback(Function):function (err, rsp) { }, whererspis the response object with a status code to tell whether this request is successful.-
rsp.status(String): Status code of the response. Possible status code is '2.04', '4.04', '4.08' and '5.00'. -
rsp.data(Array): The details of each server response.
-
Returns:
- (none)
Examples:
cnode.on('login', function () {
    console.log('cnode has logged in the network.');
});

cnode.checkin(function (err, rsp) {
    console.log(rsp);   // { status: '2.04', data:
                        //     [ { shortServerId: 2, status: '2.04' }
                        //       { shortServerId: 3, status: '2.04' } ]
                        // }
});function () { }
Fired when the cnode successfully bootstraps to the Bootstrap Server.
function () { }
Fired when the cnode successfully registers to the Server.
function () { }
Fired when the cnode successfully deregisters from the Server.
function () { }
Fired when the cnode connects and login to the Server successfully.
function () { }
Fired when the cnode disconnects and logout from the Server successfully.
function () { }
Fired when the cnode loses its connection to the Server.
function () { }
Fired when the cnode starts to reconnect to the Server..
function (msg) { }
Fired when there is an announce from the Server.
- msg (String): the announce messages.
function (err) { }
Fired when there is an error occurred.
| Code | Status | Description |
|---|---|---|
| '2.00' | OK | Everything is fine |
| '2.01' | Created | The Server accepted this creating request successfully |
| '2.02' | Deleted | The Server accepted this deleting request successfully |
| '2.04' | Changed | The Server accepted this writing request successfully |
| '4.00' | Bad Request | There is an unrecognized attribute/parameter within the request message |
| '4.04' | Not Found | This cnode has not register on the Server |
| '4.05' | Method Not Allowed | If the Server not allowed for registration, then you will get this response |
| '4.08' | Timeout | Request timeout |
| '5.00' | Internal Server Error | The Server has some trouble |