A simple AC switch using an ESP8266 with Blynk mobile app interface.
You could use this to control ANY AC or DC load up to the rated value of your relay.
I have it controlling my garden lights, and even have my DIY ESP8266 Gate Counter and Logger triggering the lights when the gate is opened so you can see where you're going at night.
You could use it to turn on a coffee maker (soo cliche), turn on the TV when you're not home, or use it to turn off and on lights. Anything really!
I hacked it in to a 4way power board so I could turn on and off everything plugged in to it at once (again, good for mulitple sets of garden lights).
Feel free to make pull requests if you wish to help develop it.
There is also a support thread on the Blynk community forums: http://community.blynk.cc/t/mini-esp8266-relay-controlled-ac-power-strip-sonoff-duplicate/9549

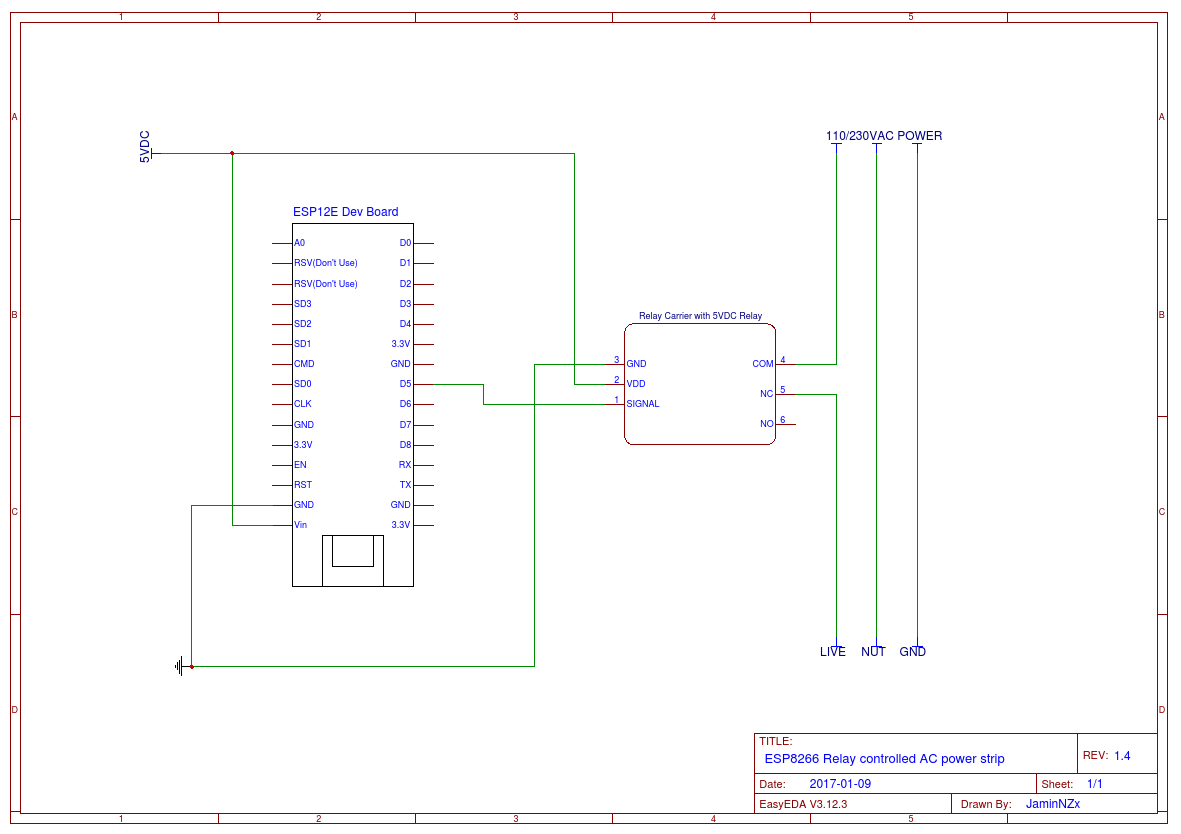
- ESP8266 Mini Dev Board (WeMos clone or other)
- 5VDC Relay Module (with 3.3V level shifter)
- Small project case
- Blynk Library
- ArduinoOTA
- SimpleTimer
- Open the Blynk mobile app and create a new project by scanning the following QR code

- Send yourself the generated auth code
- Paste your auth code in to the sketch
char auth[] = "xxxxx";- Enter your wifi SSID and PASS
char ssid[] = "xxxxx";
char pass[] = "xxxxx";- Upload the sketch to your ESP8266
- Load the Blynk project and hit the PLAY button
The dash consists of a few buttons, LED, timer and a slider.
You have manual control via the MANUAL button. ON and OFF state.
You can also trigger the device using the TRIGGER TIMEOUT button. It will activate the relay, then deactivate it after the period set by the slider.
The LED just shows the real time state of the relay.
There is also a timer widget which you can use to have the relay turn on/off at a certain time.
If you're just using this with manual control, then you can easily remove parts of the sketch as well as the dash widgets from the Blynk app.
If you wish to toggle the relay from another ESP or hardware, then you will need to set up a Blynk Bridge between the two hardwares and make the call to V0.
bridge.virtualWrite(0,HIGH); Using the new multi-device features of the app, you could use the single Blynk dash to control as many remote switches around your home. This is great because as you can see in the first image, I have set it up to control mulitple zones around my house all from the same dash.
If you run out of room, you could just add the TABS widget and build on another app page.


