
Bubble layout change at will;
Dialog according to click View position display;
| version | update description | screenshot |
|---|---|---|
| 1.2.6 | fix position in list view #43 | |
| 1.2.5 | fix position vertical offset #36 | |
| 1.2.4 | fix status bar height fetch#31 | |
| 1.2.3 | fix bubbles within the margin problem | |
| 1.2.2 | New Features "Set Bubble Border and Border Color"#23 |  |
| 1.2.1 | New Features "Set Bubble Background" |  |
| 1.2.0 | feat: arrow radius custom | |
| 1.1.9 | fix init position offset; feat: show dialog by clicked position | |
| 1.1.8 | fix status light mode when call 'setTransParentBackground' | |
| 1.1.7 | fix position error, fix autoPosition invalid ... #13 #11 #10 |
|
| 1.1.6 | feat position priority: #9 | |
| 1.1.5 | fix: #8 | |
| 1.1.4 | ①New method setLayout(int width, int height, int margin),width(set the width of the bubble)、height(set the height of the bubble)、margin(set the distance from the screen edge, only valid if you set width or height to MATCH_PARENT).② autoPosition(true)method is ready to be deprecated (and can be used now), using the new method autoPosition(Auto).If both are used, autoPosition(Auto) is used directly. Please refer to the "Method Reference Table" below. |
|
| 1.1.3 | ①By calling setClickedView can be directly updated the current location of the dialog. ②Add a new setRelativeOffset (int) method that sets the offset of the dialog relative to the view being clicked (Negative value: Offset to the center of the view being clicked; Positive value: Offset to the outside of the view being clicked). ③Test page:SetClickedViewTestActivity.java |
 |
| 1.1.2 | Fix default values does not adaptation screen. | |
| 1.1.1 | Repair the size of the change, there is no response to change the location; repair contact offset the top of the problem; | |
| 1.1.0 | ① Dialog interactive events passed to the Activity to achieve not without closing the dialog box,can opreate Activity. ② Add automatically according to click the distance from the edge of the screen to determine the location of the dialog box. ③Added "autoPosition" and "setThroughEvent" methods, please refer to "BubbleDialog method reference table" |
 |
| 1.0.3 | Continue to optimize the click outside the bubble will be dismiss; fix some Dialog around Dialog can not dismiss; | |
| 1.0.2 | Fix click on the dialog edge can not be canceled. |
| Todo |
|---|
 |
Add HappyBubble dependency into your build.gradle
repositories {
  mavenCentral()
}

dependencies {
  implementation 'com.github.xujiaji:happy-bubble:1.2.6'
}Method reference table For details, please refer to the case code and attrs.xml
| Method | Param | Description |
|---|---|---|
| addContentView | View | Fill content view |
| setClickedView | View | Clicked view |
| setPosition | enum ... BubbleDialog.Position:LEFT, TOP, RIGHT, BOTTOM | BubbleDialog relative to the location of the view being clicked. If you pass in multiple locations, the higher the priority of the front position |
| setOffsetX | int | If you are not satisfied with the x position, you need to adjust. |
| setOffsetY | int | If you are not satisfied with the y position, you need to adjust. |
| setBubbleLayout | BubbleLayout | Custom BubbleLayout |
| setTransParentBackground | - | Transparent background |
| softShowUp | - | When EditText gets the focus, you want it to move up. |
| show | - | display |
| autoPosition | enum (Auto:AROUND,UP_AND_DOWN,LEFT_AND_RIGHT) |
The position function is automatically determined to show the maximum space at the edge of the screen when the View is clicked.When turned on, the “setPosition” function is disabled. AROUND:Clicked around the View; UP_AND_DOWN:Clicked View is displayed above and below; LEFT_AND_RIGHT:Clicked around the View to display; |
| setThroughEvent | boolean, boolean | The first parameter, "isThroughEvent", sets whether or not to penetrate the Dialog gesture interaction. The second argument, "cancelable", clicks whether the blank can cancel Dialog, only valid if "isThroughEvent = false". |
| setRelativeOffset | int | Set the dialog relative to the offset of the View being clicked (negative: Offset to the center of the view being clicked; Positive: Offset to the outside of the clicked view). This setting directly affects the setOffsetX and setOffsetY methods. |
| setLayout | int,int,int | Set the width and height of the bubble and the distance from the edge of the screen. The first parameter: width (set the width of the bubble); The second parameter: height (set the height of the bubble); he third parameter: margin (sets the distance from the edge of the screen, only if you set width or height to MATCH_PARENT). Width Height is px or MATCH_PARENT |
 |
 |
new BubbleDialog(this)
        .addContentView(LayoutInflater.from(this).inflate(R.layout.dialog_view3, null))
        .setClickedView(mButton)
        .show();
new BubbleDialog(this)
        .addContentView(LayoutInflater.from(this).inflate(R.layout.dialog_view3, null))
        .setClickedView(mButton4)
        .setPosition(mPosition)
        .setOffsetY(8)
        .show();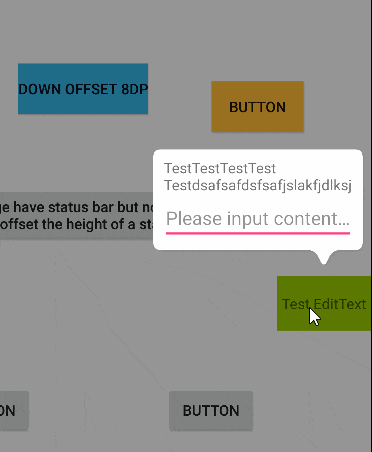
new BubbleDialog(this)
        .addContentView(LayoutInflater.from(this).inflate(R.layout.dialog_view, null))
        .setClickedView(mButton12)
        .setPosition(mPosition)
        .softShowUp()
        .show();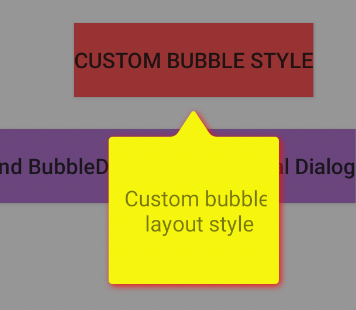
BubbleLayout bl = new BubbleLayout(this);
bl.setBubbleColor(Color.YELLOW);
bl.setShadowColor(Color.RED);
bl.setLookLength(Util.dpToPx(this, 18));
bl.setLookWidth(Util.dpToPx(this, 24));
bl.setBubbleRadius(Util.dpToPx(this, 3));
new BubbleDialog(this)
        .addContentView(LayoutInflater.from(this).inflate(R.layout.dialog_view5, null))
        .setClickedView(mButton8)
        .setPosition(mPosition)
        .setBubbleLayout(bl)
        .show();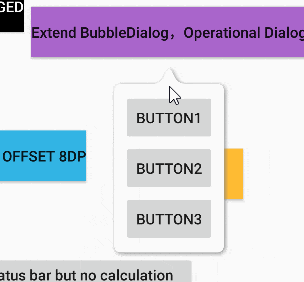
1.layout
<?xml version="1.0" encoding="utf-8"?>
<LinearLayout xmlns:android="http://schemas.android.com/apk/res/android"
    android:layout_width="160dp"
    android:layout_height="match_parent"
    android:orientation="vertical">

    <Button
        android:id="@+id/button13"
        android:layout_width="match_parent"
        android:layout_height="wrap_content"
        android:text="Button1" />

    <Button
        android:id="@+id/button14"
        android:layout_width="match_parent"
        android:layout_height="wrap_content"
        android:text="Button2" />

    <Button
        android:id="@+id/button15"
        android:layout_width="match_parent"
        android:layout_height="wrap_content"
        android:text="Button3" />

</LinearLayout>
2.Custom BubbleDialog
/**
 * 自定义可操作性dialog
 * Created by JiajiXu on 17-12-11.
 */

public class CustomOperateDialog extends BubbleDialog implements View.OnClickListener
{
    private ViewHolder mViewHolder;
    private OnClickCustomButtonListener mListener;

    public CustomOperateDialog(Context context)
    {
        super(context);
        setTransParentBackground();
        setPosition(Position.TOP);
        View rootView = LayoutInflater.from(context).inflate(R.layout.dialog_view4, null);
        mViewHolder = new ViewHolder(rootView);
        addContentView(rootView);
        mViewHolder.btn13.setOnClickListener(this);
        mViewHolder.btn14.setOnClickListener(this);
        mViewHolder.btn15.setOnClickListener(this);
    }

    @Override
    public void onClick(View v)
    {
        if (mListener != null)
        {
            mListener.onClick(((Button)v).getText().toString());
        }
    }

    private static class ViewHolder
    {
        Button btn13, btn14, btn15;
        public ViewHolder(View rootView)
        {
            btn13 = rootView.findViewById(R.id.button13);
            btn14 = rootView.findViewById(R.id.button14);
            btn15 = rootView.findViewById(R.id.button15);
        }
    }

    public void setClickListener(OnClickCustomButtonListener l)
    {
        this.mListener = l;
    }

    public interface OnClickCustomButtonListener
    {
        void onClick(String str);
    }
}
3.display
CustomOperateDialog codDialog = new CustomOperateDialog(this)
        .setPosition(mPosition)
        .setClickedView(mButton10);
codDialog.setClickListener(new CustomOperateDialog.OnClickCustomButtonListener()
{
    @Override
    public void onClick(String str)
    {
        mButton10.setText("点击了:" + str);
    }
});
codDialog.show();According to @hm the friend in the article feedback, multiple clicks Show BubbleDialog, the location is not correct problem. Due to multiple settings BappyDialog lead, it is recommended that the following wording. (Of course, if you need to set a different clicked control to repeatedly call the setClickedView () method to update the location, you need to write it out.)
if(mBubbleDialog == null)
{
    mBubbleDialog = new BubbleDialog(this)
        .addContentView(LayoutInflater.from(this).inflate(R.layout.dialog_view3, null))
        .setClickedView(mButton4)
        .setPosition(mPosition)
        .setOffsetY(8);
}
mBubbleDialog.show();Attributes reference table
| Attrs | Value | Description |
|---|---|---|
| lookAt | left, top, right, bottom | Arrow pointing |
| lookLength | dimension | Arrow length |
| lookPosition | dimension | Arrow relative x or y axis position |
| lookWidth | dimension | Arrow width |
| bubbleColor | color | Bubble color |
| bubbleRadius | dimension | Bubble arc |
| bubblePadding | dimension | Bubble border to 'BubbleLayout' border distance |
| shadowRadius | dimension | Shadow radius |
| shadowX | dimension | Shading offset in the x-axis |
| shadowY | dimension | Shading offset in the y-axis |
| shadowColor | color | Shades of color |
xml example
    <com.xujiaji.happybubble.BubbleLayout
        xmlns:app="http://schemas.android.com/apk/res-auto"
        android:id="@+id/bubbleLayout"
        android:layout_width="match_parent"
        android:layout_height="200dp"
        android:layout_margin="16dp"
        app:lookAt="left"
        app:lookLength="16dp"
        app:lookPosition="20dp"
app:lookWidth="16dp" />BubbleLayout by calling the 'set + Attr' method and invalidate method.As follows.
mBubbleLayout.setLook(BubbleLayout.Look.LEFT);See more

   Copyright 2016 XuJiaji

   Licensed under the Apache License, Version 2.0 (the "License");
   you may not use this file except in compliance with the License.
   You may obtain a copy of the License at

       http://www.apache.org/licenses/LICENSE-2.0

   Unless required by applicable law or agreed to in writing, software
   distributed under the License is distributed on an "AS IS" BASIS,
   WITHOUT WARRANTIES OR CONDITIONS OF ANY KIND, either express or implied.
   See the License for the specific language governing permissions and
   limitations under the License.