#Kane QuNeo Mixxx Preset
Version 1.1.x
###Featuring a Live Demo and an Intro Tutorial!
- This repository contains all the components necessary to link a QuNeo to Mixxx with my customized set of controls and LEDs.
- Here are several quick-reference guides for the The Controls.
- This script is driven by 2 core principles:
- Controls' effects and layout should reflect actual DJ needs.
- Proper abstractions create intuitive and powerful controls, freeing the mind and body of the DJ for more complex expression.
- Every button (every corner of every pad) and every LED is mapped to useful functionality.
- For any questions, suggestions, or bug reports, I encourage you to either Submit An Issue or Contact Me!
####NOTE: The guide assumes the user has Mixxx v1.11 installed. Mixxx v1.11 download:
####1. Download the preset as a zip archive.
####2. Copy contents of mixxx-controls to the mixxx preset folder
######These two files must be copied separately (not as a folder).
mixxx-controls/KANE_QuNeo.xml.midi
mixxx-controls/KANE_QuNeo_scripts.js
######The location of the preset folder depends upon your operating system, amongst other things. Here are a few examples:
- Windows:
- C:\Program Files\Mixxx\controllers
- Linux:
- /usr/share/mixxx/controllers (or /usr/local/share/mixxx/controllers)
- Tested on Debian v3.2.32-1 x86 64bit
- OS X:
- Assuming Mixxx has been installed to your Applications folder:
-
- Go to Applications/
-
- Control-click Mixxx, select "Show Package Contents"
-
- Copy the above files to the folder Applications/Mixxx.app/Content/Resources/controllers/
- Tested on Mac OSX v10.6.8 32bit
####3. Update your QuNeo's midi output preset
- NOTE: following this section of instructions will change all the presets on your QuNeo.
- MORE ADVANCED: If you have a preset you do not want to change, or would like to change any or all of the mode numbers of this script's modes, then you can do so by importing any of the kane-quneo-mixxx/QuNeo Editor/presets/KANE_QuNeo_*.quneopreset files into a QuNeo Editor run from a different folder. This is because the QuNeo Editor program loads presets based upon data in the folder in which it is run. This method allows you to import the kane preset's .quneopreset files one at a time into preset numbers of your choosing (but don't forget to update the presets).
######Plug in your QuNeo Via usb, this should be trivial. The QuNeo's LED's will go from left to right upon a successful connection. ######Run QuNeo Editor/QuNeo Editor.exe It is important that you run the editor in the above folder so that the correct presets are loaded.
- Note for Mac users: I haven't included the mac executable (see relevant issue here), but if you're adventurous you can use the tip from more advanced (see above) to load the presets from your own downloaded copy of the quneo editor. Just make sure to import the presets as follows: DJ mode into 13, cueLeft into 14, cueRight into 15, library into 16, and visualizer into 5.
- Note for Linux users: KMI does not currently offer Linux support. However, this is the only step where it matters: Update the QuNeo once in either Mac or Windows, and it will be done until next update. Wine unfortunately also does not work.
######Click "Update All Presets" Note for ALL users: For some reason, Update All Presets can result in a crash at ~68%. If this happens, then go individually to each of the presets 5, 13, 14, 15, 16 and click "Update Preset". The corresponding pads on the QuNeo should flash in response to each update. ######Switch QuNeo's mode to DJ Mode
- Press the mode button,
- Then select the upper left pad.
####4. Start Mixxx, select the preset While running Mixxx, do the following: ######Options > Preferences > MIDI Controllers > QUNEO MIDI 1 > Load Preset (If the QuNeo is not listed, refer to Mixxx's Midi Controller documentation) ######Select, from the drop down menu, the preset KANE QuNeo Mixxx Preset Click ok for success!
#####1. diagrams Here are all the quick-reference .png images of this preset's control mappings #####2. mixxx-controls This folder contains the two files (xml and js) necessary for mapping midi notes into Mixxx's controls. #####3. QuNeo Editor This folder has the factory presets for the QuNeo mappings, where I have modified several presets to output midi notes consistent with my settings for Mixxx controls. This folder also contains the windows executable "QuNeo Editor.exe", which is necessary for updating a given QuNeo's presets.
###I) Information on Modes
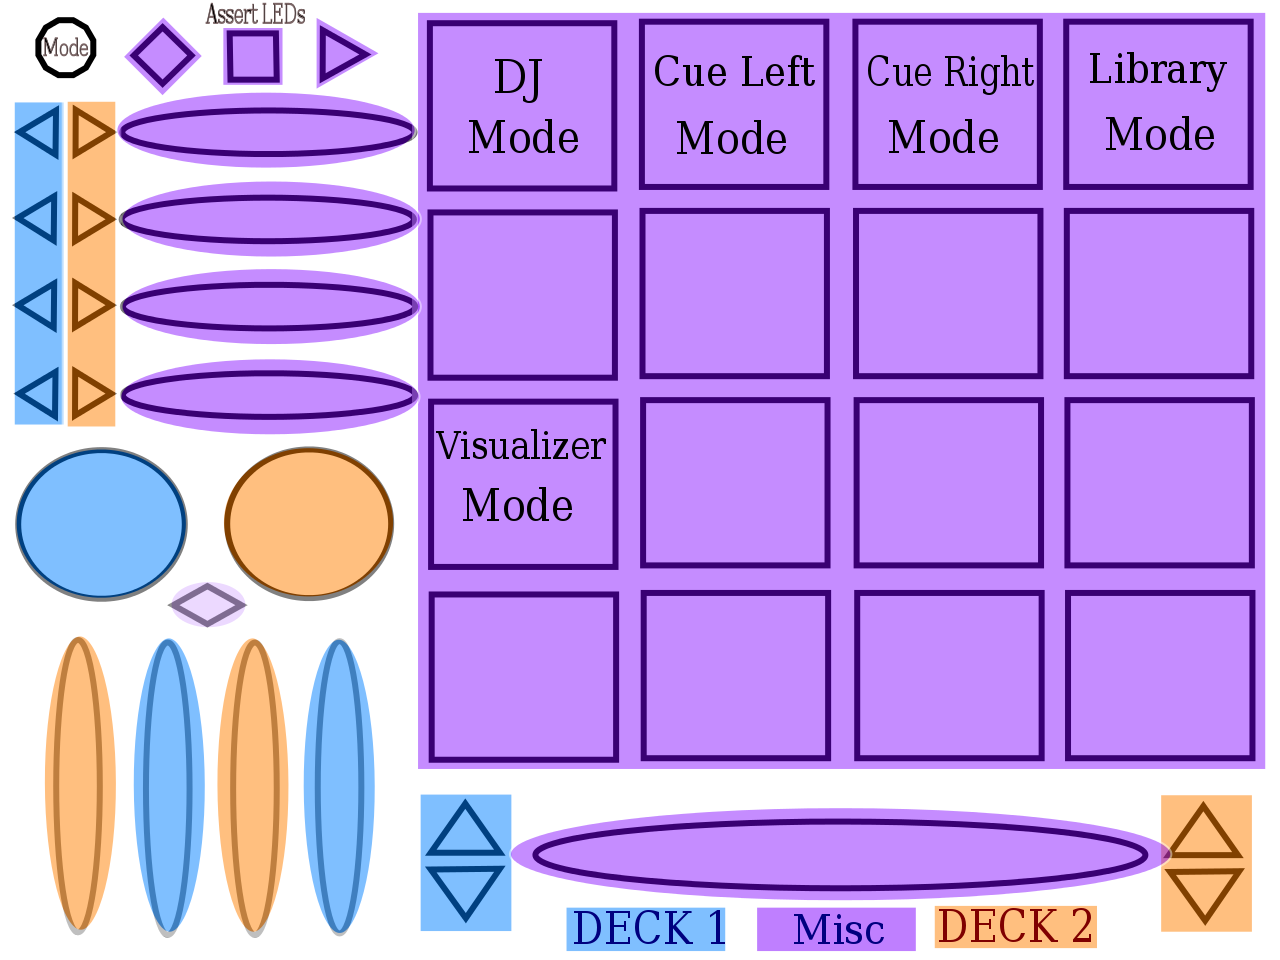
- The KANE_QuNeo preset utilizes many of the QuNeo's modes to allow more complete control over Mixxx.
- To switch modes:
- First press the mode button.
- Then the pad of the mode you want to select (see above diagram).
- Finally, press the assertLEDs button to tell the the KANE_QuNeo script that you've changed modes.
- WARNING: If you do not assert the LEDs, BEHAVIOR IS UNDEFINED.
- If the LEDs are messed up, you can simply change into the mode you're already in and reassert LEDs to clear garbage values.
- The mode you're currently in is usually clear from the LEDs that are present, but if you are unsure, you can always press the mode button and the pad of the mode you're in will highlight. Pressing either the mode button again or the pad will return you to your original mode.
- Many of the controls map directly to Mixxx.
- These are indicated by (Group, Control), and further details of them can be found here.
- The core functionality mode, it is assumed that the QuNeo is in this mode when turning on Mixxx.
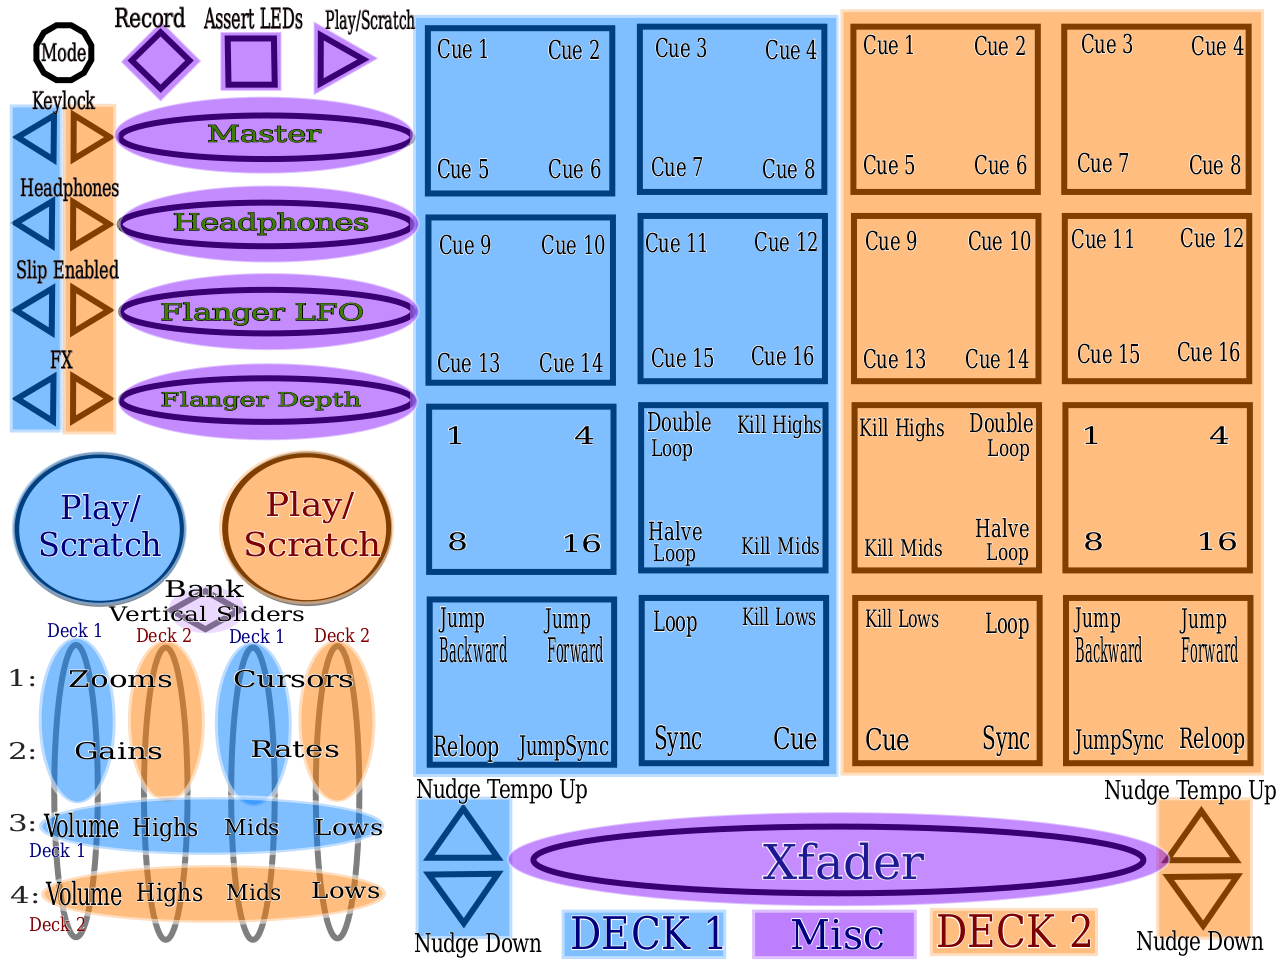
#####1) Horizontal Sliders The horizontal sliders each manipulate one control in Mixxx.
- Slider 1: Master Volume (Master, volume), but the LEDs correspond to the Master VuMeter (Master, VuMeter)
- Slider 2: Headphone Volume (Master, headVolume)
- Slider 3: Flanger Period (Flanger, lfoPeriod)
- Slider 4: Flanger Depth (Flanger, lfoDepth)
#####2) Horizontal Arrows The horizontal arrows correspond to on/off toggles for controls for each deck. When the left arrow is on, the control is enabled for the left deck. Symmetrically, hen the right arrow is on, the control is enabled for the right deck. The controls are as follows:
- Topmost: Keylock (ChannelN, keylock)
- Middle Top: Send deck to headphones (ChannelN, pfl)
- Middle Bottom: Slip Enabled (ChannelN, slip_enabled)
- Bottom: Flanger (ChannelN, flanger)
#####3) Rotaries / Playscratch The rotaries, in dj mode, serve one of two functions:
- If playscratch is enabled (the play transport button is green), then the left and right rotaries are play buttons on release (stutter) for the left and right decks respectively.
- Pressing the playscratch button toggles playscratch off (the play transport button is dark), which turns the rotaries into turntables for scratching. You can customize the scratch speed.
- Playscratch defaults to on unless otherwise specified.
#####4) Vertical Sliders / Rhombus The rhombus serves as a bank to the vertical sliders. This means that pressing the rhombus will cycle through different vertical slider modes, with unique functionality offered by each mode. The modes are denoted by rhombus color:
- Off == 1, Green == 2, Red == 3, and Orange == 4.
- Refer to the diagrams to see which modes correspond with which functionality.
- NOTE: many of the modes support a double tap to reset the value to its default. You can customize the maximum time between taps which constitutes a double tap. Default window: 400ms.
Vertical Slider Mode 1 (Rhombus Off) Deck 1's zoom and cursor are on the left, deck 2's zoom and cursor are on the right (in that order).
- Zoom: zooms the waveform in and out with 6 discrete steps.
- Cursor: transforms the slider into a 0..1 position indicator for the deck. For example, if deck 1 is at the start of the loaded song, then the slider will be empty. As deck 1 progresses through the song, the slider LEDs will creep upwards linearly until the slider is full, indicating that the corresponding deck ng is at the end. ouching the slider will jump the song to the place you press; however, be forewarned that the limited range of slider values (0..127) lends the cursor to imprecision.
Vertical Slider Mode 2 (Rhombus Green) Deck 1's volume and rate are on the left, deck 2's volume and rate are on the right (in that order).
- Deck Volume (ChannelN, volume), but the LEDs correspond to the Deck VuMeter (ChannelN, VuMeter) unless the deck is paused (then the LEDs represent volume)
- double tap to reset volume to 100%
- Rate (ChannelN, rate)
- double tap to reset rate to 50%
Vertical Slider Mode 3 (Rhombus Red) This mode controls these parameters (in slider order from left to right) for deck 1.
- Gain (ChannelN, gain)
- double tap to reset gain to 50%
- FilterHighs (ChannelN, filterHigh)
- double tap to reset highs to 50%
- FilterMids (ChannelN, filterMid)
- double tap to reset mids to 50%
- FilterLows (ChannelN, filterLow)
- double tap to reset lows to 50%
Vertical Slider Mode 4 (Rhombus Orange) This mode controls these parameters (in slider order from left to right) for deck 2.
- Gain (ChannelN, gain)
- double tap to reset gain to 50%
- FilterHighs (ChannelN, filterHigh)
- double tap to reset highs to 50%
- FilterMids (ChannelN, filterMid)
- double tap to reset mids to 50%
- FilterLows (ChannelN, filterLow)
- double tap to reset lows to 50%
#####5) Rate Nudging / Crossfader
- The Crossfader (Master, crossfader) works however your Mixxx settings dictate (default: left for left deck full volume, middle for both decks full volume, right for right deck full volume).
- A single press given to the vertical arrows will Rate Nudge (ChannelN, rate_perm_X_small) the appropriate deck in the pressed direction.
- Auto Rate Nudge: pressing and holding any of the vertical arrows for more than the customized time (default: 500ms) will activate auto nudge in the direction of the pressed arrow. Auto nudge, indicated by the vertical arrow LEDs in the direction chosen, will proceed to nudge all decks and samplers at the customized rate (default: 800ms between nudges) until one of two things happen: 1) pressing any vertical arrow will stop auto nudge, or 2) the deck corresponding to the vertical arrow press nears its natural (file) bpm (0% rate adjustment). The 2nd option is sugar to allow the DJ to, for example, unnoticably nudge down during the outtro of a 132 BPM song to reach 125 BPM for the next song with a single button press (thereby freeing the DJ to perform more complex transitions).
#####6) Hotcues
- Hotcues (ChannelN, hotcue_X_activate) do many things.
- if the pressed hotcue is not set, then a hotcue will be set
- if the deck of the pressed hotcue is playing and the hotcue is set, then the hotcue will act like a stutter button (activate on release)
- if the deck of the pressed hotcue is not playing and the hotcue is set, then the deck will play from the hotcue's position until release. After release, the track will stop playing and jump back to the location of the pressed hotcue.
- Additionally, hotcue LEDs convey information about the loaded track:
- A Set hotcue is Red if the track has passed it,
- Orange if it's the next hotcue to be passed,
- and Green if it's yet to be passed.
- Unset hotcues are off.
#####7) Kills These buttons toggle bands from the deck's frequency spectrum on/off. The size of the bands is determined by preferences in Mixxx.
- Kill Highs (ChannelN, filterHighKill).
- Kill Mids (ChannelN, filterMidKill).
- Kill Lows (ChannelN, filterLowKill).
#####8) Sync / Cue / Jumpsync / Beat Counters
- Sync syncs the deck's phase and tempo (ChannelN, beatsync).
- Cue defaults to CDJ behaviour (ChannelN, cue_default).
- Jumpsync toggles jumpsync on/off. Jumpsync will trigger a sync for the activated deck when one of two things happens:
-
- If the play button is pressed, the track will play and immediately sync to the other track.
-
- If the deck position changes in any way other than moving forward by playing (ie the deck jumps to a pressed hotcue), and jumpsync is active for that deck, the jumping deck will be synced to the other deck. Note, this sync is in terms of phase and not tempo.
- NOTE: Jumpsync will not sync unless the other deck is playing. This is to prevent glitchy jumpsync loops.
-
- Beat Counters: these are effectively hexidecimal counters which keep track of which beat (1 through 16) each deck is
on. For a given deck, the LED on the cue button corresponds to X4^0, whereas the LED on the sync button corresponds
to X4^1. X is 1 when the LED is off, 2 when the LED is green, 3 when the LED is red, and 4 when the LED is orange.
- NOTE: The beat counters aren't always correct, due to the wide variety of music and the difficulty associated with reading waveforms. The counter can be manually reset to 1 using the reset beat button in visualizer mode.
- Specifics on Beat Counter algorithm: currently, a given deck's beat counter changes only under1 of 3 conditions. 1, the regular situation wherein a playing deck moving to the next beat increments the beat counter. 2, it will add or subtract the number of beats when beat jumping. 3, it will reset to beat 1 whenever any other kind of jump occurs in the deck (including hotcues). The idea is that jumps will be to hotcues, and hotcues generally lie on the beginning of a sixteen beat loop.
#####9) Jumping / Looping / Scheduling Loops
- When in Looping mode (looping button LED orange), you can set a loop by selecting the desired length from {1,4,8,16}. The LED corresponding to the length of a present, activate loop lights up orange.
- When a loop is present, it can be doubled or halved by pressing Double Loop (ChannelN loop_double) or Halve Loop (ChannelN, loop_halve)
- Reloop (ChannelN, reloop_exit) will toggle a set loop on or off.
- When Jumping Mode is on (either forward or backward LED red), you can jump a number of beats by pressing the
desired distance {1,4,8,16}. The track will jump either forwards or backwards appropriately. If the track's metadata
contains the correct BPM information, jump will jump exactly on the beatgrid.
If the pressed jump button is held, the deck will continue jumping in discrete steps of a number of beats equal to the number held until the button is released.
- NOTE: Both the hold time and jump speed resulting from a jump button hold can be customized.
- NOTE: Activating jumping mode will automatically toggle off looping mode, whereas deactivating jumping mode will automatically toggle on looping mode. These behaviours are for ease of use while DJing.
- NOTE: While a deck is playing, jumping triggers on button release instead of press.
- JumpLoop Mode (looping LED orange and either forward or backward LED red) can be achieved by toggling looping mode while already in jumping mode. While in jumploop mode, pressing {1,4,8,16} will jump the deck that number of beats forward or backward depending upon which jump is on, and then loop over that many beats. This is incredibly useful if, while mixing two songs, you miss a looping point and need to smoothly recover.
- Loop Scheduling Mode (looping LED green and both jump LEDs off) is achieved by toggling off looping mode while in looping mode. Pressing {1,4,8,16} in this mode will light the LED corresponding to that number red, indicating that a loop of that length is scheduled for that deck's next jump. A jump is defined as the deck position changing in any way other than moving forward by playing or jumping forward one beat. A loop may be unscheduled if it is reselected while in loop scheduling mode.
#####10) Autoloop
- Autoloop requires an active loop and can be activated by holding Halve Loop for a customizable amount of time (default: 600ms).
- Autoloop, activated on button release, first performs the loop multiplication (in this case, halves the loop), and then begins a timer to automagically continue halving loops.
The loop halve button will remain orange for the duration of Autoloop, and Autoloop can be canceled by a press of either loop double or loop halve. In addition, Autoloop terminates
itself when it has run its course.
- If Autoloop is activated while a loop of 2 is active (wherein the button release to activate Autoloop brings the current loop to a loop of 1), Autoloop will halve loops such that the track is ready for a drop 16 beats after release.
- If Autoloop is activated while a loop of either 4 or 8 is active (wherein the button release to activate Autoloop brings the current loop to a loop of 2 or 4 respectively), Autoloop will halve loops such that the track is ready for a drop 32 beats after release. NOTE: Autoloop halves at different times depending upon a starting loop of 4 or 8. I recommend playing with it to get a feel for how it works.
####Cueleft Mode (14) / Cueright Mode (15)
- These modes are used for cueing, as they provide cue deletes for the left and right decks respectively.
- Unless otherwise specified, all controls default to the functionality specified in DJ Mode (13)
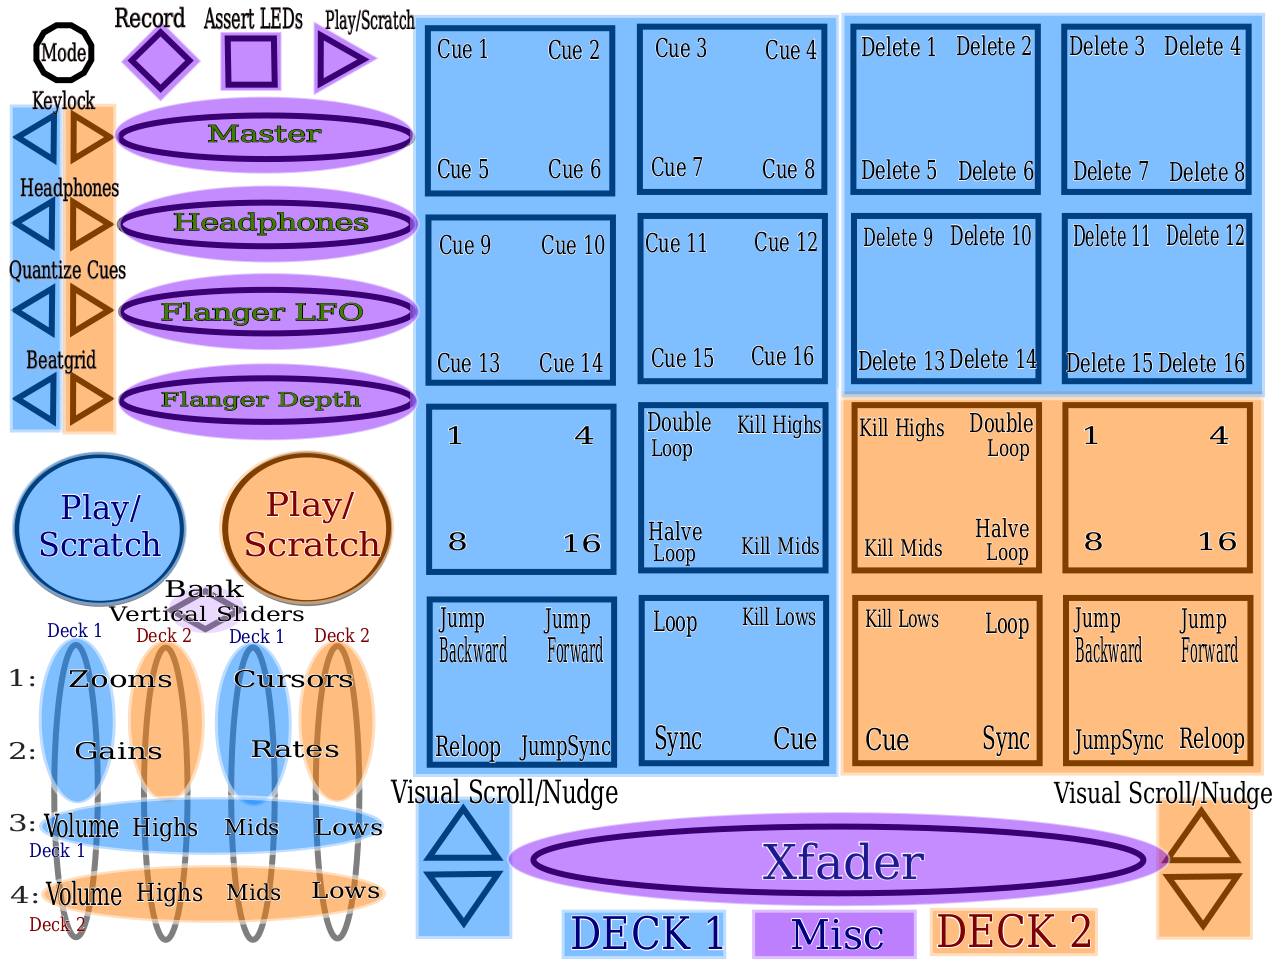
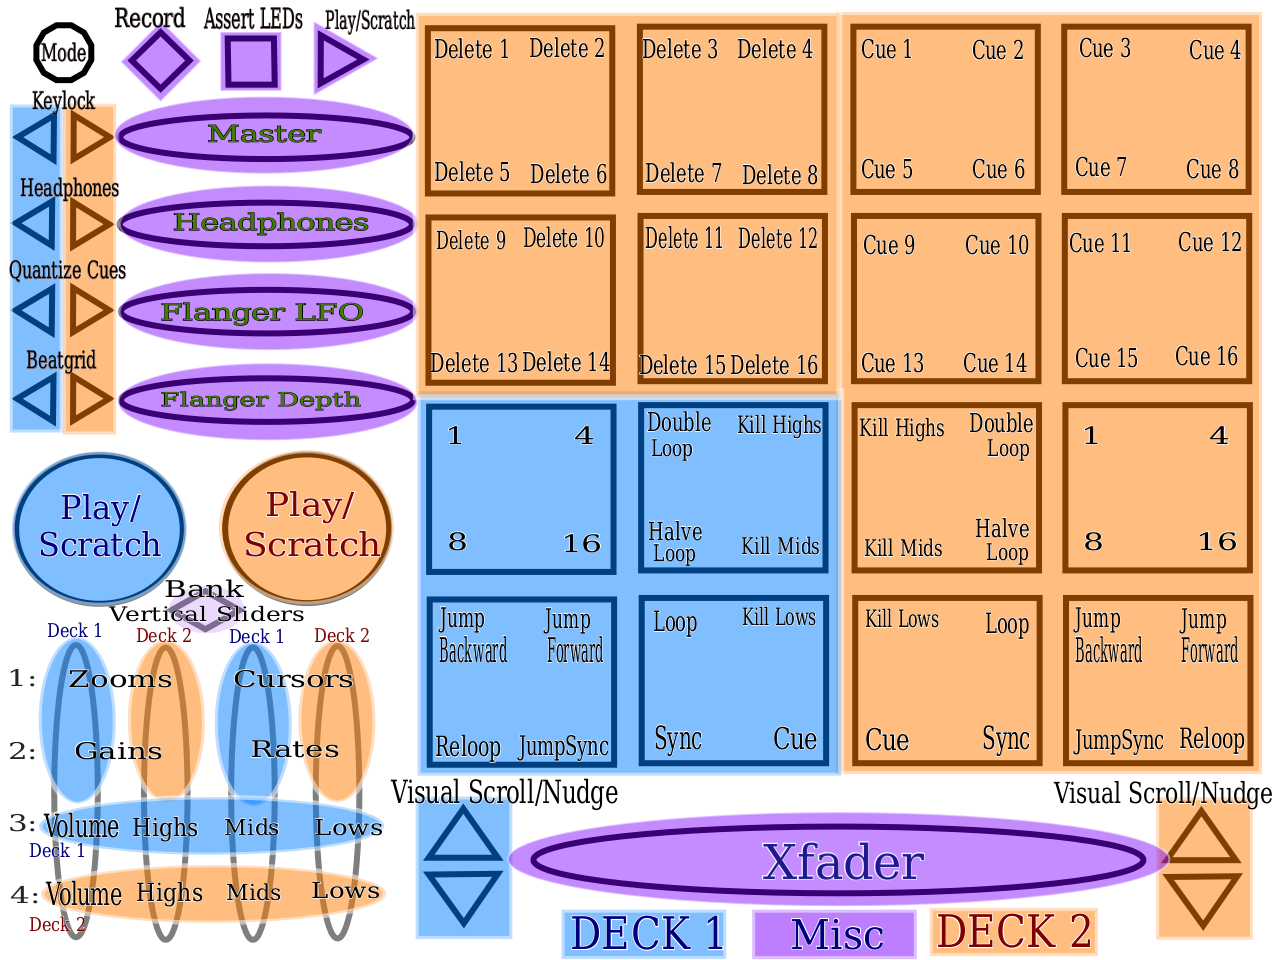
#####1) Hotcue Deletes
- Deletes the hotcue (ChannelN, hotcue_X_delete)
#####2) Quantize Cues
- Snaps all currently set hotcues in the calling deck to the nearest beat with respect to the current play position.
- Useful when fixing the beatgrid of a song fully saturated with cues: set the new beatgrid, snap to a beat, then press Quantize Cues.
#####3) Beatgrid
- Sets the beatgrid of the corresponding deck to its current visual playposition (ChannelN, beats_translate_curpos)
#####4) Visual Nudge / Visual Scroll
- Visual Nudge: each vertical arrow press nudges the corresponding deck's visual play position in the direction of the press (up => forward, down => backward). This is incredibly useful for setting precise beatgrids; the distance nudged can be customized.
- Visual Scroll: when a visual nudge arrow is held for greater than a customizable amount of time (default: 500ms), the corresponding deck will continuously nudge (at a customizable speed) in the pressed direction until button release.
####Library Mode (16)
- This mode is for selecting and loading songs from your playlists into your decks and samplers.
- Includes pleasant LED visualizers where cues would normally go in DJ Mode (13)!
- Unless otherwise specified, all controls default to the functionality specified in DJ Mode (13)
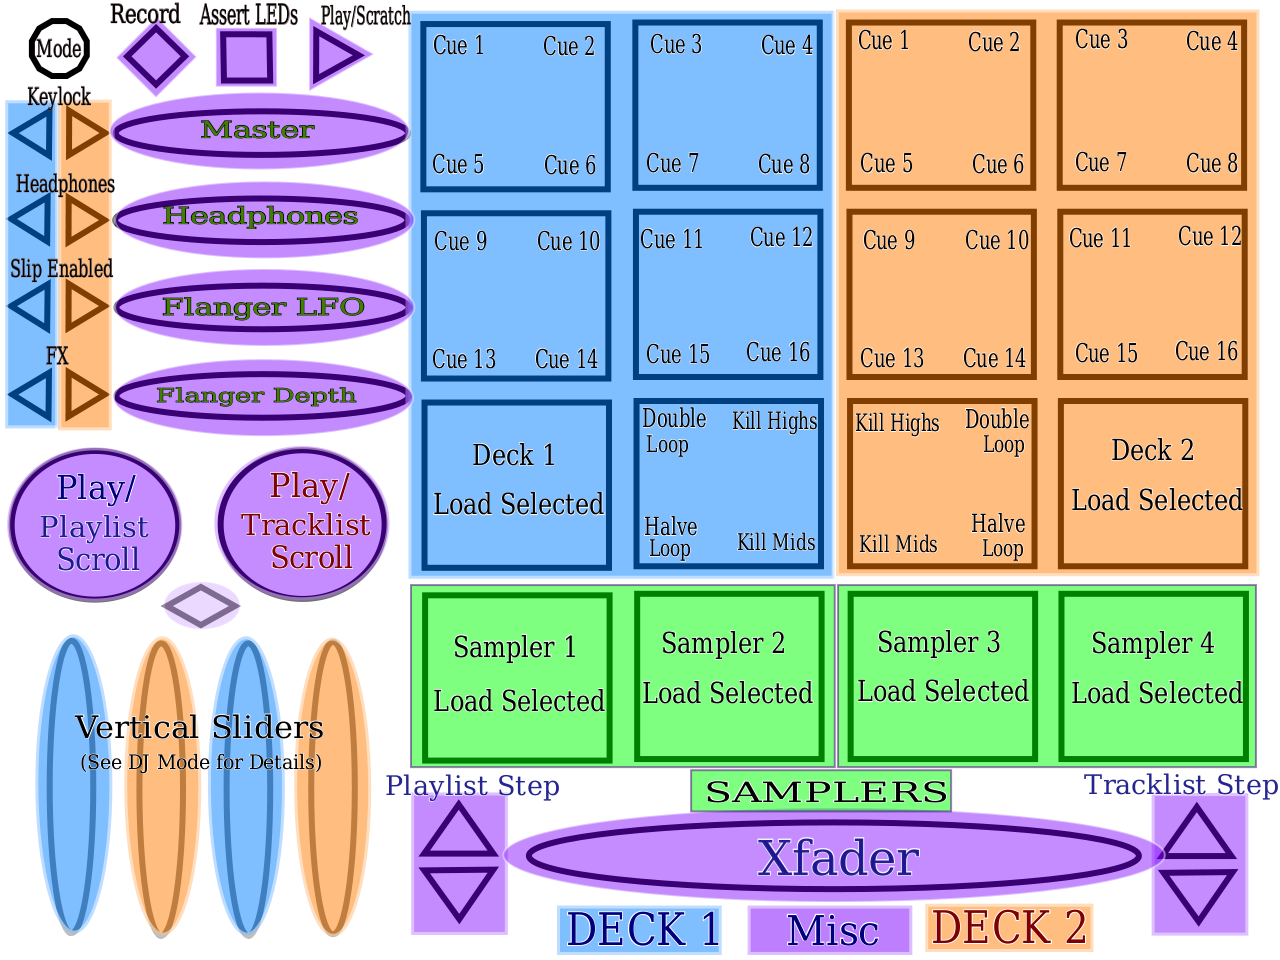
#####1) Load Buttons
- Loads the highlighted track into the selected deck or sampler iff the selected deck or sampler is not playing. (ChannelN, LoadSelectedTrack) or (SamplerN, LoadSelectedTrack).
- The color of the load LED corresponds to the play status of the deck or sampler. Red means the deck or sampler is playing and therefore will not accept a load command; vice versa for green.
#####2) Playlist Scroll / Tracklist Scroll / Playscratch
- Playscratch retains similar functionality, except that now it toggles the rotaries between play and scroll. NOTE: Activating library mode defaults playscratch to off.
- Playlist Scroll allows for quick, coarse scrolling through playlists.
- Tracklist Scroll allows for quick, coarse scrolling through tracks.
#####3) Playlist Step / Tracklist Step
- Playlist Step scrolls up/down through playlists, one at a time (Playlist, Select****Playlist)
- Tracklist Step scrolls up/down through tracks, one at a time (Playlist, Select****Track)
####Visualizer Mode (16)
- This mode basically unbinds most functionality and replaces it with LED visualizations.
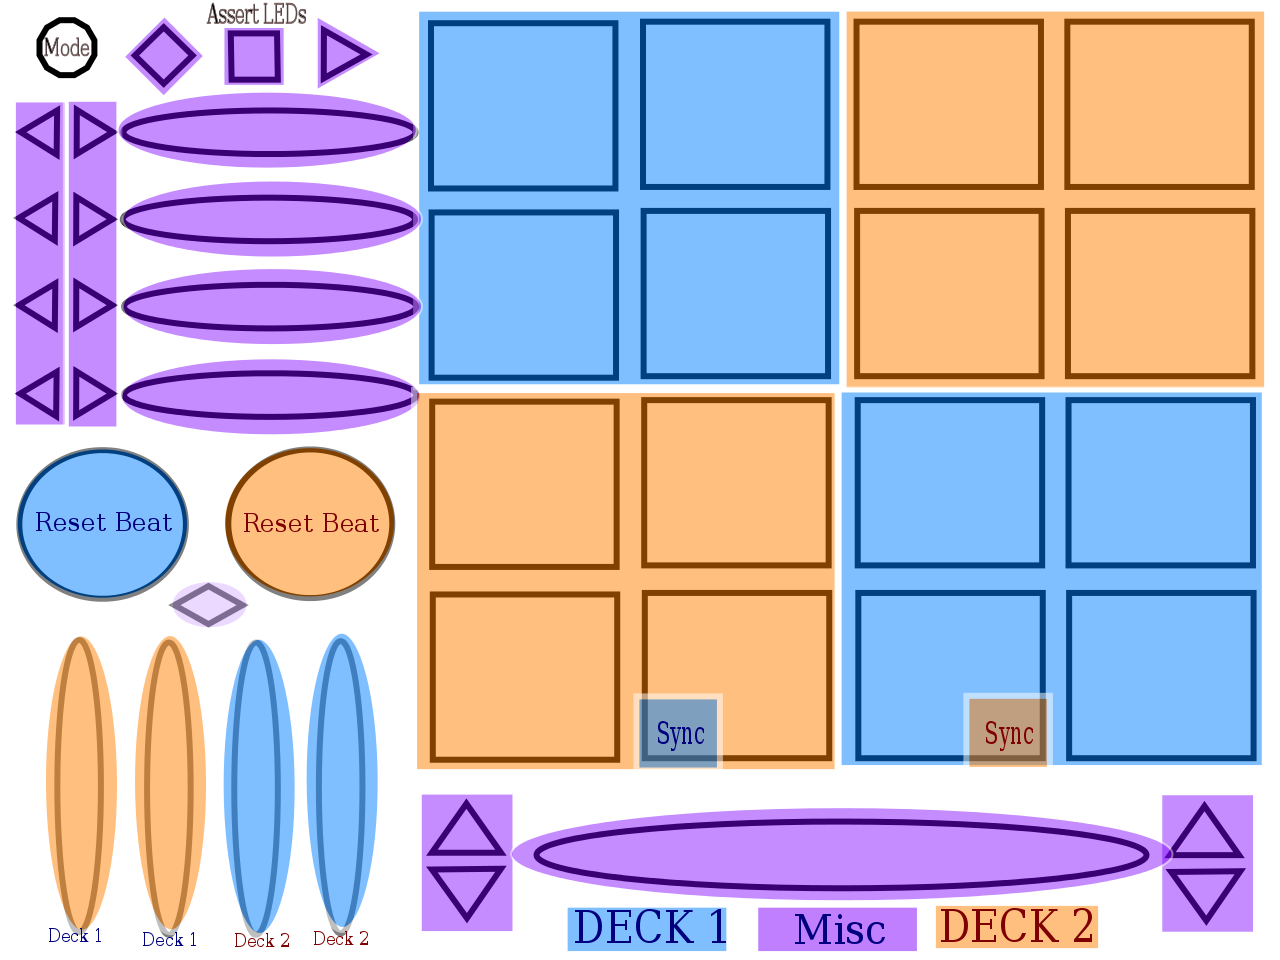
#####1) Reset Beat
- Reset Beat sets the beat count (internal to the KANE_QuNeo script) of the corresponding deck to 1.
- Useful for lining up the LEDs while enjoying visualizer mode.
#####2) Sync
- The sync button (described in DJ Mode (13)) is still active so that visualizers between decks may be synced.
- I've incorporated some tweakable parameters, but of course you can hack on any part of the preset!
- Look for the (GV) Global Variables in your instance of kane-quneo-preset/mixxx-controls/KANE_QuNeo_scripts.js for a list of available parameters and their descriptions.
- EXAMPLE: The sensitivity of the scratches can be modified by changing the KANE_QuNeo.scratchSpeed variable (make sure Mixxx rereads the preset after modifying!).
- You can also customize visualizer LEDs.
- Check out the the comments and code for the functions KANE_QuNeo.playerSequence and KANE_QuNeo.visualize in kane-quneo-preset/mixxx-controls/KANE_QuNeo_scripts.js - they're also in (GV) Global Variables, just below the tweakable parameters.
#####1. LEDs out of whack: You can simply reselect whatever mode you happen to be in, and reassert the LEDs. Doing this should simultaneously clear any garbage LED values and assert the proper values.
#####2. Anything to the effect "the midi script function 'KANE_QuNeo.[function]' was not found in loaded scripts.'": This might be due to the incorrect Mixxx version for the kane preset. Refer to the note at the top of the page for more information.
#####3. Any other troubles or bugs: Feel free to Submit An Issue or Contact Me!
There've been a few requests for me to explain how I use 16 cues, so here it is. I think a good cuing system is invaluable to a DJ - the less time you spend finding a spot in a track, the more time you have to mix that track.
- Cue 1 is usually right at the start of the song, and always 0 mod 16 beats, and either 16 or 32 beats from the first transition section
- Cue 2 is either 8 or 16 beats before one of the first transition sections
- Cue 3 is always 0 mod 32 beats, and usually 32 beats before the track should really be alone
- Cue 4 is either 8 or 16 beats before the second transition section
Cues 5 and 6 are for the first rise and drop, while cues 7 and 8 are for the second rise and drop
- Cues 5/7 are the starts of the rises, often but not always 0 mod 32 beats
- Cues 6/8 are always 0 mod 16 beats, and 16 beats before the drop
Cues 9 and 10 mark the breakdowns in the song (ie huge washout / bass dropoff), whereas cues 11 and 12 are spares for miscenallious usage
- Cues 9/10 are (almost) always 0 mod 32 beats
- Cue 13 is almost always 0 mod 32 beats, and marks either the last important phrases of the song or the first outtro phrases of the song
- Cue 14 is always 8 beats before the first significant outtro transition section
- Cue 15 is 0 mod 32 beats and is where the track has basically completed
- Cue 16 is always 8 beats before the last beat of the song
#####One of four ways:
- post to this preset's Mixxx Forum Thread
- post to this preset's KMI Forums Thread
- check out our music group beatfn
- email me: wolfbiter--at--gmail.com