The project has four types of tests:
-
Unit tests: the arch-independent part of the kernel (most of it) is built as a static library for the host architecture and linked together with all the C and C++ files in
tests/unitand the googletest library. -
System tests: classic system tests using the syscall interface. Their source is located in
tests/system. All those files are linked together as part of thedevshelluser application. -
Kernel self-tests: a special type of tests built as part of the kernel itself, runnable through a special Tilck syscall. They are located in the
tests/selfdirectory. -
Interactive tests: a special type of tests that simulate real user input via a virtual PS/2 keyboard (through QEMU's monitor) and parse the actual graphical output of Tilck's framebuffer console, comparing it to an expected text screen. Have something in common with output comparison testing (see below for more).
Unit tests are a must for each software project. They offer a simple way to test portable code in a controlled environment, completely outside of the real project. That's super convenient because there's no kernel involved: just a simple Linux binary. The downside of unit tests is that they cannot test low-level code, requiring real (or virtual) hardware. Mock-ups help to overcome most of those limitations and are used in this project but still, unit tests cannot replace other kinds of testing. Said that, most of the code can and shall be be tested this way.
As mentioned above, Tilck's unit tests are compiled by linking together a static
library made by compiling kernel's arch-independent code for the host
architecture, plus the files in tests/unit. It is important to remark what
building for the host architecture means: the kernel code and the tests must
build on any architecture, even if Tilck has no support it, simply because
they are made by portable code. For example, while currently Tilck has no
ARM support, its unit tests build and run just fine on any ARM machine running
Linux.
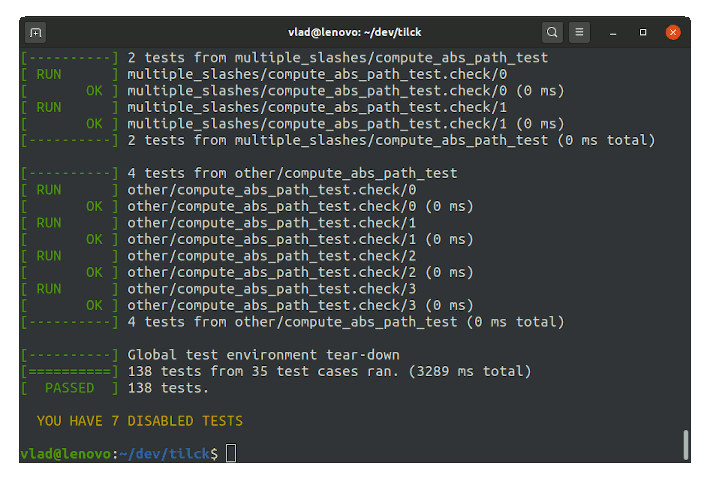
The testing framework used is googletest and all the tests are written in C++11. That's because C++'s abstractions are very convenient for writing tests in a shorter and more expressive way compared to C. Also, the overhead of having temporary C++ objects created, copied, and destroyed (even quite often) is insignificant compared to the overhead of starting a VM for running the kernel itself. The unit tests are the fastest way of testing Tilck's code at runtime: currently, the whole suite passes in under 4 seconds, using the slowest debug build and in under 2 seconds in the case of release builds.
In order to build the unit tests, it is necessary to download and build the googletest library in Tilck's toolchain. To do that, just run:
./scripts/build_toolchain -s build_gtest build_gmock
Building the unit tests is as simple as running:
make gtests
And running them is simple as:
./build/gtests
It's worth noticing that the googletest framework offers nice command-line
options such as --gtest_filter. To list them all, just run the executable
with the --help option. For out-of-tree builds and other build-related topics,
check the dedicated building document.
Despite unit tests' the code built is supposed to be portable, sometimes
subtle portability bugs issues come out. For example, because the host machine
is always x86_64 and Tilck's only target architecture for the moment is i686,
that means that unit tests are never built on 32-bit machines, while the kernel
noarch code is built both for 32-bit and for 64-bit machines. To make the unit
tests robust against any kind of 32/64 bit portability issues, a special option
has been introduced in Tilck's build system: ARCH_GTESTS. When it's enabled,
the unit tests are built for the target architecture instead. Of course, in
the general case we cannot run those tests on the host machine, but in the
lucky x86 case we actually can do that. Such build configuration is part of
the CI testing and helped discover and fix a fair amount of portability issues.
To build the unit tests for the target architecture, first build the googletest framework for that architecture with:
./scripts/build_toolchain -s build_gtest_arch
And then enable the ARCH_GTESTS CMake option (see building document to
learn how to that).
Tilck's system tests are exactly what everybody would expect as a primary way of
testing a kernel: userspace applications executing syscalls and checking their
effect. In this case, all of them are part of one single binary, called
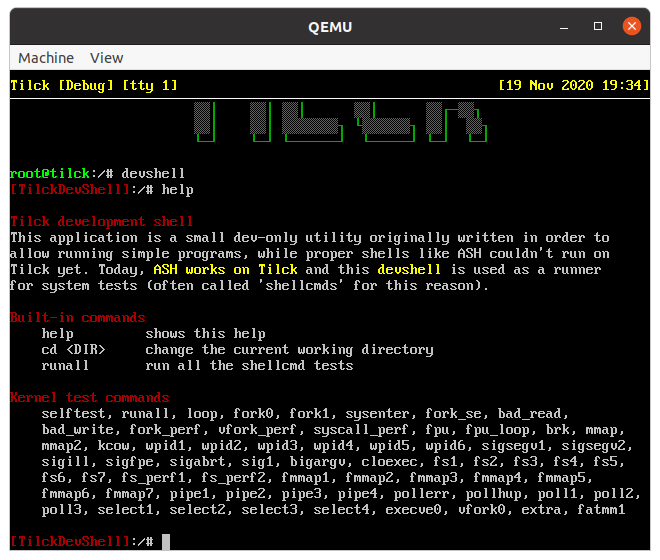
devshell. That app is a trivial shell that was actually used in the past as a
shell when Tilck was not ready to run Busybox's ASH yet. Today, it's used
just as a runner for shellcmds, an internal name for system tests. The
source code of devshell is split between userapps/devshell, which contains
application's core and the individual shellcmds, which are located in
tests/system.
One way of running those tests is to do that directly on Tilck. Just run:
runall
That works because runall is a symlink to devshell and it's equivalent to
running:
devshell -c runall
Of course, any specific test can be run instead of runall in the same way:
devshell -c <TESTNAME>
It's possible to list all the tests in a human-friendly form by running
devshell and then help or by running: devshell -c help. Tilck's test
infrastructure instead, runs devshell -l.

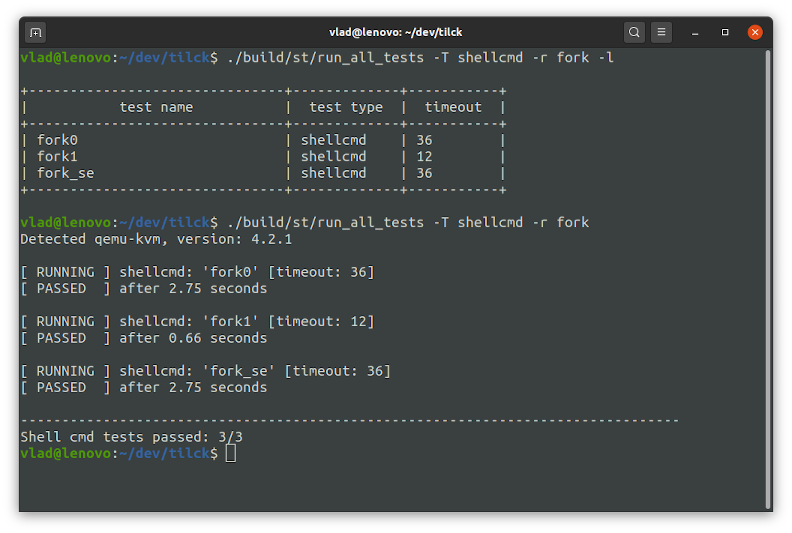
Another way of running Tilck's system tests is using run_all_tests: a python
script designed to run multiple types of tests. Due to its versatility, it is
possible that in the future it will be able to run all the types of tests
supported in the Tilck project. Back to the topic, running just the classic
system tests is simple as:
<BUILD_DIR>/st/run_all_tests -T shellcmd
It essential to remark that, by default, this script runs each test in a
dedicated VM. This means, powering on a QEMU virtual machine, booting Tilck, and
only then running just a single test. It is slow, but not so much: all of that
happens in less than 1 second on a typical laptop (using KVM) and currently,
all the tests way pass in less than 1 minute (slowest debug build). The main
advantage of this approach is that if the kernel crashes on a single test, we'll
still have it tested on all the other cases. Another advantage is that there's
a strict timeout for each test, enforced by the test runner itself and, in case
of timeout, the VM is killed. Despite that, it is still desirable being able to
run all the system tests by powering just one VM; to do that, just add the -c
option to command above:
<BUILD_DIR>/st/run_all_tests -T shellcmd -c
In this case, the runner will just run devshell -c runall as we saw above.
In case of a failure, we'll still see the whole output but, the runner will
consider runall as one test, in the tests passed report at the end. Also,
the whole run will have a single timeout from the runner's point of view.
The runner supports a variety of other options. Check them with --help.
One of them is, indeed, -T which allows us to specify the test type. Running
the command above without -T shellcmd will work but it will also run the
kernel self-tests and any other kind of tests eventually supported. With the
-l option it is possible to list the tests matching the current criteria
(dry-run), while with the -f option it is possible to filter the tests using
a regex.
While anything part of the kernel/userspace interface can be tested with shellcmds
as described above, sometimes that's simply not very convenient to do. For example,
to check that BusyBox's tar works as expected on Tilck, it would be nicer to use
a shell script instead of writing a test in C. That's why a special shellcmd called
extra has been introduced. It's just a mini test-runner for all the scripts in
tests/system/scripts. It fails when a script fails (exits with a code different
than 0). This "special" shellcmd is actually a regular shellcmd from the point of
view of the test infrastructure and can be run the same way as all the other tests
of the same type.
Tilck's self-tests are, roughly speaking, just a bunch of kernel functions that
our devshell run by calling a special syscall, sys_tilck_cmd(). Their source
is located in the tests/self directory. By default, they're built-in Tilck, on
any configuration except when in the minimal configuration. To compile the
out of the kernel's binary, just disable the KERNEL_SELFTESTS CMake option
(see building).
Because a failure in a kernel self-test means almost always a kernel panic, most of the time it isn't very convenient to run them manually in Tilck. Also, because the self-tests by definition check the correctness of core kernel features like mutexes, there's no safe way (in general) to impose a timeout and safely kill the test when it's taking too long to complete: that can be done safely only from outside the kernel itself.
Because of all of that, it is better to run the self-tests with the run_all_tests
runner, on the host machine: it will power on a VM for each test and, of course,
it will kill the VM in case of a timeout. To do that, run:
<BUILD_DIR>/st/run_all_tests -T selftest
To list all the self-tests run:
<BUILD_DIR>/st/run_all_tests -T selftest -l
In some special cases, it does make sense to run some self-tests directly on
Tilck, especially the perf ones. Those tests are actually performance tests,
not functional ones. A classic test of this kind is kmalloc_perf, introduced
to measure the performance of Tilck's memory allocator. To run it or any other
self-test directly on Tilck, use the selftest symlink to devshell this way:
selftest <test-name>
Some tests like kmalloc_perf are affected a lot by the optimization level.
If you run them on Tilck, you'll see quite a difference between regular DEBUG
builds and optimized RELEASE builds with DEBUG_CHECKS=0 (see building).
One more nice thing about the kmalloc_perf test is that it can be run
as a unit test as well. In particular, if the unit tests are built for the
same target architecture as the kernel itself (using ARCH_GTESTS=1, see
Unit tests (above) and building), we can reproduce on the
host machine a performance test with results very close to what we get can
on get Tilck: that makes a lot easier to measure and improve the implementation
of any piece of kernel code.
While it would be great to test the whole kernel just using the above-mentioned test types, sometimes that's not possible. Consider the PS/2 keyboard driver: its code is never covered during the system tests because they use the serial port for input/output and that's not a defect: that's the right way to fetch the output from system tests. Simply, even the right way have some inevitable limitations. While it's true that with some serious mocking it would be possible to test part of the PS/2 driver in unit tests, that's not very convenient and it's far too unrealistic: no IRQs, no (real or emulated) 8042 controller, etc. A better way is to test it against a reference implementation like the one in QEMU but, how to do that? QEMU's monitor has an interface for sending keystrokes to the VM, but the real problem is the following: when Tilck's console gets its input from the PS/2 keyboard, its output goes to the default (video) monitor, not to the serial port and that's how it should be. In order to check if the output produced after a given input is correct, the test infrastructure needs somehow to compare what's on the (virtual) screen with something expected. In other words, that means comparing images and that's pretty problematic.
It should be clear at this point that testing some code-paths in the kernel requires somehow to compare images to check the correctness of the output and that's pretty bad, as the intuition might suggest. Comparing images as binary blobs is easy but extremely fragile because even if a single pixel differs, the whole test will fail. This issue can be mitigated by avoiding mutable elements on the screen (e.g. date/time info) but the problem is still there because small and innocent changes will break such tests. In addition to that, images take space and that creates logistic challenges as well: where to store the set of expected images (screenshots)? Project's git repository doesn't look like a good place for that purpose. Create a dedicated "assets" git repo and use git sub-modules or make the scripts to download the "assets" from somewhere else? How to keep everything in sync? All of those approaches could work with enough effort, but none of them is in Tilck's minimalistic/extra-light style.
What would be really cool is to work with VM screenshots the same way we do with plain text because, after all, we're always only interested in the text contained in those images, nothing else. So, the solution is to use an OCR, right? Wrong: OCRs are big, bloated, and tend to be not very reliable even with purely digitally-generated images, like in this case. A perfect solution would be to have a custom OCR that knows exactly the font used by Tilck and take advantage of that to do an image-to-text conversion in a 100% reliable way. While that initially seemed hard to do, it turned out that it required just a few hundred lines of C code (also thanks to the fact that QEMU saves screenshots in the PPM file format). That's how the pnm2text tool was born.
Now, with a perfect image-to-text conversion not only it's trivial to do exact output comparisons like in the case of output comparison testing, but we can also define tests that just search for a series of words in the output and, based on that, define test's outcome as pass or fail. Both kinds of tests exist in Tilck.
Tilck's interactive tests require a special build configuration and extra packages in the toolchain. Please check building before proceeding further.
Steps
-
Check that you have ImageMagick installed on the system
-
Check and install the list of extra packages required for the special build in the
cmake_runscript (look for the--introption). Currently, onlyvimis required. -
Create a dedicated build directory and enter there
-
Run:
<TILCK>/cmake_run --intr -
Build the kernel as always with
make -
Run the tests with:
./st/run_interactive_test -a
In case of an incompatible configuration, it will fail by reporting one or multiple INVALID CONFIG errors like:
[interactive tests runner] INVALID CONFIG: expected EXTRA_VIM to be `True`
[interactive tests runner] INVALID CONFIG: expected FB_CONSOLE_BANNER to be `False`
[interactive tests runner] INVALID CONFIG: expected FB_CONSOLE_CURSOR_BLINK to be `False`

Using the top runner
It is certainly possible and convenient to use the main runner (run_all_tests)
for the interactive tests as well. That's because of its filter feature and
because it displays the output of a test run only in case of a failure: it is
higher-level tool, designed to run many tests. To run the interactive tests
with it, just execute:
./st/run_all_tests -T interactive -t any
Notes:
-
It is necessary to use the
-toption because the timeout length of interactive tests is higher than the default timeout used by the runner. -
In case of a configuration incompatible with interactive tests, the runner will just say that there aren't any tests matching the criteria. Also, listing all the tests with
-Lwon't mention the interactive tests at all. That's because, 99% of the time people won't use a build config for interactive tests: as mentioned before, these are a kind of exotic type of tests and if there are not available, that's perfectly fine. -
To run the interactive tests along with all the other tests as well, just drop the
-T interactiveoption. Keep in mind that doing so will also run thelongshellcmd tests. Set a timeout different thananyto avoid that. Checking the list of all tests with-Land the timeout labels with-jwill help.