Documenting My Build... #23
Replies: 78 comments 54 replies
-
|
I spent a week going over all the files, so I don't have to ask too many dumb questions. Though I still may have missed some things. I came up with a scavenger hunt list of the items needed to complete the project. I don't want to start until I know I can get all the pieces. I have just started looking for the items and found a few on ebay. I hope others that have built the device might chime in with ideas of where to get the items. Scavenger Hunt List: LD24AJTA (LED driver board) Supplier located: ebay 223540328731: Rotary Switch |
Beta Was this translation helpful? Give feedback.
-
|
You can get pretty much everything on AliExpress. I skipped the internal JST connectors and have hardwired everything so far. |
Beta Was this translation helpful? Give feedback.
-
|
Thank you. I have never ordered from AliExpress. I did find the GX16x6 on there, so I'll start searching for the other bits there too. |
Beta Was this translation helpful? Give feedback.
-
|
I am sorry, what was the issue of compiling BOM? Because all those parts a listed on a wiki page called "BOM" https://github.com/srozum/film_camera_tester/wiki/BOM |
Beta Was this translation helpful? Give feedback.
-
Not a problem, just mad at myself for not checking. After dragging the BOM .csv files over to LCSC ELECTRONICS site, I saw words like LED, FAN, LCD SCREEN etc and thought those components were all going to be coming in my LCSC order, however, you were just indicating those are the CONNECTORS for the devices. I didn't realize it and thought my order got messed up. |
Beta Was this translation helpful? Give feedback.
-
|
This is the box I found for a horizontal build:
|

Beta Was this translation helpful? Give feedback.
-
|
Yes, this is the box. |
Beta Was this translation helpful? Give feedback.
-
|
I built a housing from plywood, That was the cheapest solution as I still had some left over.
|


Beta Was this translation helpful? Give feedback.
-
|
I specifically used acrylic sheet which is currently available in most stores so you don't have to dig for anything special. They usually have free samples of sizes big enough for the light source. |

Beta Was this translation helpful? Give feedback.
-
|
There is a fresnel behind too, right? |
Beta Was this translation helpful? Give feedback.
-
|
OK, I didn't replace the Rcs on the driver. Must have overseen that or did you add it later? |
Beta Was this translation helpful? Give feedback.
-
|
Ah, sorry. Just got it: 0.91 Ohm, right? |
Beta Was this translation helpful? Give feedback.
-
|
Right, but 0.091 Ohm. Check #24 |
Beta Was this translation helpful? Give feedback.
-
Beta Was this translation helpful? Give feedback.
-
|
Ok, this thread goes off the subject of documenting your build progress. Please, delete comment or create new thread. |
Beta Was this translation helpful? Give feedback.
-
|
No problem (post deleted), I was just checking that the LED for the light source is the right thing to put in there before I buy it. |
Beta Was this translation helpful? Give feedback.
-
|
To organize things I put all the BOM .csv files together and added the wiki BOM items too in a complete spreadsheet, with pictures of the boards. I put the items I still need in red.
|

Beta Was this translation helpful? Give feedback.
-
|
I'm trying to support a local 3d print shop. They don't have a fancy on-line ordering system. So I spent some time re-naming the .stl files to make it clear to the printer what I want, as I'll be sending them via e-mail. I don't have much experience ordering this stuff but I came up with this. Still waiting on the Quote. Black Resin: sensor bodies, front trim pieces
|

Beta Was this translation helpful? Give feedback.
-
|
A flurry of ordering yesterday. I ordered all the boards from JLCPCB (multiples of 5). Looks like the LightUnit2 and Nano ShieldV2 boards will need to be populated after arrival, the other boards were ordered already populated with components. I did not change any of the default parameters, like FR-4, 2 layers, different design 1, single PCB, green, etc. |
Beta Was this translation helpful? Give feedback.
-
|
Sharing my experience with the 3d printing. I did see a comment that JLCPCB offers 3d printing to I decided to go that route as the local printer never got back to me. JLCPCB don't offer PLA or blue color, however. So, I ordered ABS but they will only do large parts in that; so only the two largest parts of the light will be BLACK ABS. Everything else will be BLACK RESIN. I was not sure if BLACK RESIN will be too brittle for the main face plate so I ordered an extra one in MJF BLACK DYE NYLON to see them side-by-side and choose the best one. However, they informed me the Nylon one might deform so I cancelled that item and am keeping the face plate in BLACK RESIN only. Total was about $115 including shipping. I could not see that they offered any flexible printing, so I'll have to get the "flexible hood" printed somewhere else. By my count there were 18 items to print, including the flexible hood and the new part, bracket to support the back of the light assembly. So, if one's order is more or less, need to double check. JLCPCB 3d printing service informed me that some of the items have 0.8mm thickness and requested my approval before continuing. I asked them to proceed and manufacture the parts since the .STL files are already known to be good. I will update on the quality when they arrive. |
Beta Was this translation helpful? Give feedback.
-
|
DIFFUSION MATERIAL Just documenting that I'll likely use 1/4" White #2447 White #2447 will allow some light through (more than white #7328 & #3015). White #2447 has a milky white look to it and is often used for applications needing to be back lit, but need more light to transmit through the material (for example: photo light tables, lighted drawing tables, x-ray chart readers, overhead lights, skylights). |
Beta Was this translation helpful? Give feedback.
-
|
Not really a question but just clarification for myself as to how it operates. It appears the two multi-pin connectors on the front are identical and each probe has a different voltage divider in it for identification. So, it would appear any probe can be attached to either of the two multipin connectors on the unit. |
Beta Was this translation helpful? Give feedback.
-
|
Each sensor has unique "ID" (voltage level provided by resistor divider) so Tester would tell you if you connected wrong Sensor to wrong a Socket. Check this part of documentation https://github.com/srozum/film_camera_tester/wiki#sockets |
Beta Was this translation helpful? Give feedback.
-
|
The first parts have arrived. In spite of all the clamor over the .STL files by JLCPCB, the first item came out fantastic in black resin!
|

Beta Was this translation helpful? Give feedback.
-
|
Wow, looks like 3D render. |
Beta Was this translation helpful? Give feedback.
-
|
Fantastic print wow. |
Beta Was this translation helpful? Give feedback.
-
|
I really like the way the resin does not look 3D printed. I'm looking forward to the other pieces. The fan came today. Its mounting holes match the printed parts perfectly. |
Beta Was this translation helpful? Give feedback.
-
|
First, thanks for starting this post. It's very helpful. I purchased the shutter speed tester kit a while ago but still need the calibrated light source and this will help me pull things together more quickly. |
Beta Was this translation helpful? Give feedback.
-
|
Keep following along. I want to keep the extra parts until I get farther along the build, just in case I mess up one of the boards while soldering. After that I'll want to pass them along to someone that can use them. |
Beta Was this translation helpful? Give feedback.
-
|
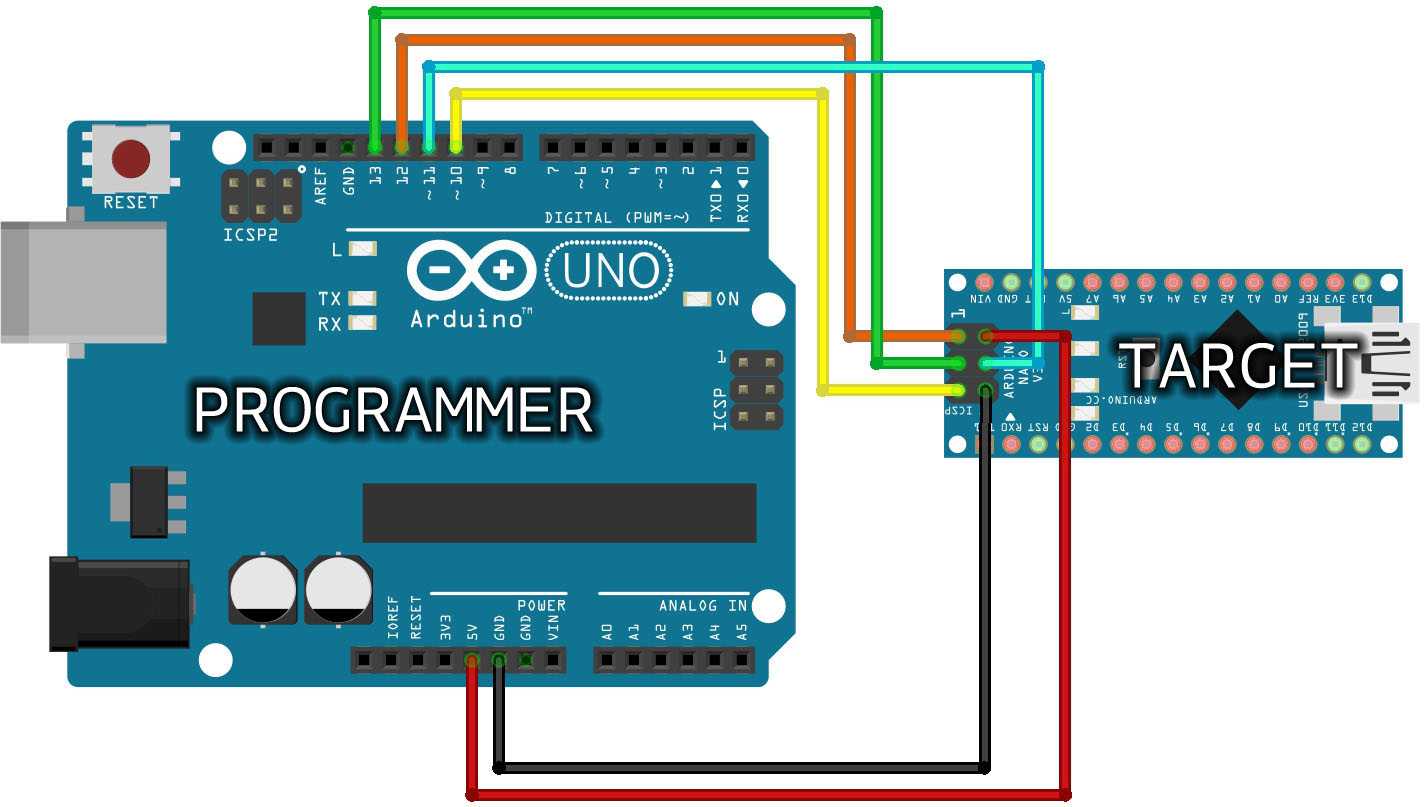
Appears the thee Nano boards I purchased don't have (the NEW) bootloaders, so was unable to turn one into a ISP programmer. It may be working using the option "Old Bootloader." I have ordered an original Uno to make the connections as indicated here: |
Beta Was this translation helpful? Give feedback.
-
|
I don't know who sells boards without a bootloader. Another option is that your USB cable doesn't have data lines. Try another cable. |
Beta Was this translation helpful? Give feedback.
-
|
I remember that I had an Arduino that made similar problems until I used a USB-cable with ferrite chokes. Maybe you have one around.
|

Beta Was this translation helpful? Give feedback.
-
Ok, maybe I choose wrong bootloader. I tried it with (old bootloader) and it may be working now. |
Beta Was this translation helpful? Give feedback.
-
|
For what its worth @ic-racer I had to try two different nano boards before I got one that would work. One kept giving me errors about not being the right board chipset. Same part numbers on the MCU IC but being a nano clone it had some trickery going on. The second worked fine. One thing to note, and my memory fails me on specifics, some of the guides show a capacitors shorting the RST and GND lines. I had to use this method. |
Beta Was this translation helpful? Give feedback.
-
|
Many of the light unit parts have arrived. Still waiting on the discrete components for the PCB.
|

Beta Was this translation helpful? Give feedback.
-
|
It look like you've got wrong fresnel lens. |
Beta Was this translation helpful? Give feedback.
-
|
This is what I ordered. It is 50mm instead of 40mm focal length, but something else must be wrong that you see. |

Beta Was this translation helpful? Give feedback.
-
|
This is what I ordered (listed as my LED 4 above) from "AliExpress RZGTOP LEDlight Store"
|

Beta Was this translation helpful? Give feedback.
-
|
@ic-racer These from RZGTOP LEDlight store are the LEDs that worked properly correct? |
Beta Was this translation helpful? Give feedback.
-
My orders for RGZTOP and LED Word Company were shipped together in the same package. After all the testing I don't know which was which but they looked identical when they arrived and got mixed up as soon as I opened the packages.
|

Beta Was this translation helpful? Give feedback.
-
|
I countersunk my holes a few millimeters with 2mm drill bit. In case there is any misalignment, the photodiodes will still get the full light through the 0.8mm hole. I made this little jig to measure the depth of the 2mm hole so the front is not too thin. The depth of the 0.8mm hole is about 1.5mm. |


Beta Was this translation helpful? Give feedback.
-
|
@ic-racer What thickness foam did you end up using? |
Beta Was this translation helpful? Give feedback.
-
|
I initially did not post these two because it shows the holes drilled on the wrong diagonal. No big deal, I just drilled two more holes in the correct position when I saw the mistake. I needed to drill from the front to back to ensure the spacing, because, without a little drill press, the holes won't go straight through. The foam was a little thick (4.25mm) so I put a washer under the board to get right to 4mm. I initially thought I could just collapse the foam a little, but the feet of the photodiodes don't collapse, they just bent. So I needed to two little washers to make up for the extra thickness.
|


Beta Was this translation helpful? Give feedback.
-
|
Covered up the two wrong holes and made ones in the correct location.
|


Beta Was this translation helpful? Give feedback.
-
|
The wires need to be tucked to the side to clear the recess for the threaded mount.
|


Beta Was this translation helpful? Give feedback.
-
|
"Sensor 6" I noticed that it needs to be in it's enclosure to calibrate. I tried to test it (before fitting it in the enclosure) but just a little stray light messes up the calibration making it appear dead or non-functional.
|


Beta Was this translation helpful? Give feedback.
-
|
I still need some finishing touches, but already I'm using it.
|

Beta Was this translation helpful? Give feedback.
-
|
In terms of the light source, these are the items that worked for my build. I got a nearly perfect linear output measured with a Sekonic L588 (12.5k) meter. I measured about 2500k or 2600k color output with a digital camera which would be consistent with the "A" type light source standard for measuring photography light meters. LENS: LED: |


Beta Was this translation helpful? Give feedback.

-
|
|


Beta Was this translation helpful? Give feedback.
-
|
On the LED assembly, did you choose to put the capacitor' side against the fan on purpose ? |
Beta Was this translation helpful? Give feedback.
-
|
I was following the pictures. |

Beta Was this translation helpful? Give feedback.
-
|
Sensor 3 almost completed. Here it is undergoing testing:
|

Beta Was this translation helpful? Give feedback.
-
|
I used one of the extra sensor module boards to make the "Sensor 3" pc board. I removed the LED and its current-limiting resistor. I replaced those with a 2.7k and 2.2k, making the voltage divider circuit for the sensor's ID. The "ID" will connect to the exposed lead on the upright 2.7k resistor. |

Beta Was this translation helpful? Give feedback.
-
|
"Sensor 3" is finished and works as expected!
|

Beta Was this translation helpful? Give feedback.

-
|
Just a followup on the tester in use. I'm very happy with the functions as the are written in the firmware. Everything works as expected. Here is a photo of some of the cameras I have repaired or calibrated with the device since I completed it. I don't know how I got a long all these years without a tester of this caliber.
|


Beta Was this translation helpful? Give feedback.
-
Just starting a discussion showing my progress. Since no parts have arrived yet, I'll start with background.
Maybe many like the project as a shutter tester, but I have made many of those in the past. I'm very interested in the calibrated light source. Of course, the shutter tester appears nice, I hope it is as good as the laser based one I'm currently using.
This is my current makeshift exposure tester that I hope to replace. It is the lightbox from my Durst enlarger and a studio lamp connected to a variac.
Beta Was this translation helpful? Give feedback.
All reactions