FAQ
I'm an unaffiliated Software Developer who is also a Free Software enthusiast and a contributor to various Open Source projects.
Akeo is the name of my company, but it's really just a one-man operation that I conduct in my spare time, so please don't expect it to have the same level of resources as Microsoft, Google, or Apple when it comes to development and support...
Oh, and incidentally, Akeo is the name of a small lough that's only visible from the top of Muckish, but you don't really care about that, do you?...
A few reasons:
- I have a regular 9 to 5 job, in a company other than Akeo, so all of my public software development activities have to occur in my limited spare time.
- Rufus is only one of the many Open Source projects in which I try to participate.
- Because of its popularity, I do spend quite a lot of time having to answer e-mail queries or looking after the issue tracker. This takes time away from development.
Mostly because I found that I really can't stand proprietary software and grew tired of seeing everybody use the trusted, yet old and limited HPUSBFW formatting utility. Reverse Engineering that tool to create a Free Software clone seemed like an interesting challenge, so I just went for it. For additional background info, see here.
Let me ask you this then: Would you pay $0.99/€0.99 for a utility that simply creates bootable USBs?
Or would you just pick one of the many free alternatives?
Heck, even I would not pay $0.99/€0.99 for this, despite being acutely aware of the cost associated with its development.
So, even if I could try to cash in on the success of Rufus, I see it better to try to benefit millions of users, by providing a free application, instead of just a few thousands with a paid one.
Besides, with the code being Free Software (which is a very deliberate choice as Rufus would not be as good as it is if it was closed source, due to its ability to leverage the great work of others!), anybody could recompile and distribute the same version free of charge.
Also known as: "You're a developer after all — it shouldn't be that hard!"
Well, there's no good way to answer that question without sounding like a condescending #"£$%, so I'll be brutally honest:
- As I already pointed out, I don't get paid for developing Rufus.
So any time I invest in developing Rufus is time that costs me and that I have to compensate from another source. Therefore, since I can't spend my days on it, I have to prioritize the features and fixes that are likely to benefit the larger number of people.
As such if the issue is that you can't boot on your specific machine (whereas everybody else's machine seems to be fine) or you are using an obscure ISO image, or want to solve a problem that is specific to your usage, or are experiencing a specific issue under conditions that very few other people are expected to meet, or want a feature that, when everything is weighted in (rather than your own partial view that "Of course, everybody will want that!"), is not going to benefit that many users after all, I am likely to push your request to the bottom of the list of what I am planning to work on next, if at all.
Also, and this is important, please realize that it's not because you want to perform an operation that is vaguely related to what Rufus does, that you should ask for Rufus to do it. The scope of Rufus is to create bootable USB drives, and that's about it. Anything else, such as duplicating whatdiskpart, or benchmarking, or supporting specific non-widely used software, or what other utilities do, is out of scope. - This is just rephrasing of one of the points already made above, but I'm afraid this needs to be stressed out: A LOT of the requests I receive for Rufus could actually be qualified as fairly selfish. In other words they are only being requested because someone "happened to get into this specific situation once, where it would have been great if Rufus could do X" or "thought it would be nice if Rufus could do X" whereas the same is not to be expected for a large enough number of Rufus users (which is the only thing that matters when deciding if a feature should be added to Rufus or not). One of the crucial steps, that people seem to miss when requesting a feature, is asking themselves the following questions:
- How many people will actually be in a situation where the feature I request would be useful, especially moving forward (i.e. considering that users are constantly moving to up to date hardware, newer versions of OSes, larger USB flash drives and so on)?
- How useful would actually that feature be then? Would it be a must have (i.e. users will actually be impaired if they try to carry their operation without it) or just a nice to have or cosmetic enhancement?
- Rufus is NOT designed as a Sysadmin/Power User-friendly application. Instead, it is designed for people to perform a one-time installation of an OS on a single target system using a single drive. Therefore, I have very little interest in adding features that deviate from that goal because it would introduce major issues, such as code maintainability, testing, support, etc. And while it is true that you may still find some advanced features here and there, those are usually hidden as cheat modes, and barely any of these stemmed from wanting to solve a specific user request...
- I can't stress that one enough: Developing isn't just about adding code!
To give you an idea, I estimate that, right now, I spend more than 33% of my allocated "development" time on non-code related activities, such as answering e-mails about existing code features, regression testing, to make sure that a feature hasn't been broken between revisions, and so on.
I will actually give you Pete's rule on that subject: In the lifetime of an Open Source project, only 10 percent of the time spent adding a feature will be spent coding it. The other 90 percent will be spent in support of that feature. Therefore, if you don't plan to spend a lot more time supporting a feature, than what you plan adding the code for it, you shouldn't add the feature in the first place!
What this all means is, whenever you ask me to add a feature or fix an issue that only you seem to be experiencing, I will try to estimate how much time it would cost to support it outside of the immediate code change, and depending on the outcome of that estimation, the odds of the change being "quick and easy" may not actually be as much in your favour as you think they are... - Developing is hard, and even outside of supporting a feature, adding the code takes much longer than you think!
What this means is that even your "How hard can it be to add <insert seemingly elementary feature here> to the app?" might actually require days of hard work, just to code the feature... and a lifetime supporting its users. This is especially true if it's anything that requires the UI to be altered.
Of course, with all this being said, remember that Rufus is 100% Open Source. So if you really want a feature, you can try to find a sympathetic programmer (or even better, develop your own programming skills) to modify the code and then submit a patch for review.
If you're downloading Linux binaries, you might be used to trying to validate your download by comparing its SHA-256 with the version published by the developer, to ensure that your download has not been corrupted or tampered with. So you might be looking towards doing the same for Rufus.
However, you should be aware that, because Rufus is digitally signed with a Windows Authenticode digital signature, this manual step is entirely superfluous because, one of the rare advantages of Windows compared to Linux is that it has a well established system for validating digitally signed executables every time you are launching them.
This means that, whenever you launch Rufus, Windows automatically computes its SHA-256 and as part of the digital signature validation process, verifies that this SHA-256 matches with the one from the application that the original developer signed.
As such, the SHA-256 is automatically verified for you, by Windows, and it is therefore unnecessary to provide an SHA-256 to perform the same operation as what Windows automatically does.
The one thing you may want to verify however, is that the User Account Control prompt when launching Rufus says:
- Verified publisher: Akeo Consulting
As it is of course possible for somebody else to create a non-official version of Rufus and sign it themselves under a different publisher name (but of course, the nice thing about digital signatures is that if they do that in order to create a malicious version of Rufus, the person behind it can easily be tracked, and their signature revoked to immediately prevent users from launching their malicious version).
Now, if you still think you would really like to validate the SHA-256 of the executable yourself, know that, since all of the binaries we publish are built from the automated (and public) GitHub Actions system, rather than on our own development machine, you can still do that, as we do produce the SHA-256 as part of the build process. You will however need to strip the digital signature first (and possibly zero-out the PE Checksum) before computing the SHA-256 on your end for comparison, as explained on our Security page (which I strongly invite you to read if you are worried about validating that an application is not malicious before running it).
As of 2023, Rufus gets downloaded close to 3 million times each month (!).
All in all, I estimate that, ever since Rufus was first released in 2012, it has been used by more than 200 million people, and counting...
First of all, I think I need to define what portability is, because a lot of people (including Wikipedia) use a wrong definition, and completely miss the point of what a portable application is really about.
A portable application is an application that (usually) doesn't require installation and that gives you the ability to carry and preserve your settings when moving from one computer to the next.
That's it. That's all a portable application does.
Thus, if you are expecting that portability implies anything about NOT writing into the registry or user directories on Windows you are very mistaken. Most of the time, being portable means that the application will write its settings to a text file (such as a .ini file on Windows) that you can carry around with the software, as you move from one computer to another, instead of the registry, and this may be the reason why many people confuse "portable" with "not writing to the registry, ever" on Windows, but there really is no promise being made from a bona fide portable application that it will leave the registry untouched.
And so, with this having been clarified, I can explain that the regular version of Rufus already qualifies as a portable application because, if you happen to have a rufus.ini in the same directory as your Rufus executable (even if it's an empty file), then Rufus will read and write its settings, such as the language you want to run the application into, or the other options that get preserved between sessions, into that file, and should you copy both your rufus.ini and the Rufus executable to another computer, you will see that your settings have been preserved from the previous computer, hence "portable". And at this stage, I also have to stress out that, even when Rufus runs in portable mode, your registry will be modified, since this is NOT what portability is about.
Then, why provide a portable version at all, you say? Well, this brings us to the ONLY difference the "portable" version of Rufus has with the "regular" one, which is that the "portable" version will create a rufus.ini by default (so that you don't have to do it yourself, if you want to use Rufus in portable mode), whereas the regular version doesn't. That's really all there is to it!
This is also the reason why when Rufus downloads an update, it always picks the "regular" version, even if the version you were running was the "portable" one, as you would already have a rufus.ini, therefore, the new "regular" version that is downloaded will continue to run in portable mode.
Now, if you're still confused about what the above means, then you should probably just use the standard version of Rufus. Portability is really ONLY for people who need to work with an application on multiple computers, and want to have their settings preserved as they do so. If that doesn't apply to you, then you should download the regular version.
That's because the way Rufus detects whether it should run in portable or regular mode is by checking the file name of the executable. The way it works is like this: if the file name contains the letter p, then the code will run in portable mode. And if there is no p, then regular mode is used. As a matter of fact, on the web server, the download for the portable version used to be a mere symbolic link to the regular version, with a p added to the name, so of course the binaries will always be identical.
But there's nothing fancy or mysterious about this method - software like Busybox has been doing this for years and you shouldn't freak out, or tell me that there an issue with the downloads, on account that the size and content of the portable and regular version of Rufus are exactly the same. There exist many ways to make the exact same executable behave in completely different manners, through external factors, such as its file name...
The table below lists the languages that are natively supported by Rufus.
The decision to include a specific language followed what I (and others) consider to be the 35 or so most prevalent languages, and at this stage, there are no plans to provide any other translations (for more on this, see below).
I can only express my sincerest thanks to all the people who contributed to these translations!
While I originally planned to support languages that aren't listed above through downloadable additional 'loc' files, due to the need of keeping translations up to date, as well as the time and effort this maintenance effectively requires, I have decided that multiplying language support beyond the ones above wasn't in the best interest of anybody (as it would take precious time away from fixing issues or adding new features).
Now, this doesn't mean that you can not create and provide your own 'rufus.loc', for additional languages, as Rufus will happily use any 'rufus.loc' file that resides in the same directory as the application, to provide additional translations. Just that, if you do, you will have to handle the distribution and support of these unofficial files yourself.
If you are being directed to this entry, it's probably because you tried to submit an unsolicited translation update, either by e-mail or through GitHub Pull Request.
While I genuinely appreciate your willingness to contribute to Rufus, and help with its localisation, and I also appreciate that it can be frustrating to see that the language you are interested may keep untranslated strings for months, I'm afraid that I can't accept your contribution for the following reasons:
- I very much want to group translation updates into a specific timeframe where I actually can allocate time to take care of it. This is because, if I were to handle translation updates piecemeal (meaning trying to get a translation update as soon as I add or modify a message), with more than 35 languages to handle, and with pretty much every new versions having a few string altered, I would literally have to spend my life dealing with translation updates (because validating and integrating a translation update in Rufus takes A LOT more time than people realise) instead of adding features or fixing bugs. For instance, even when grouping all translation requests into a specific timeframe, I estimate that I have to spend between 50 and 75 hours of work just to handle the request/validate/integration process. And no, breaking down this process would not improve the time I need to spend, but make it even worse, especially as it would not leave me with the ability to plan ahead of time.
- Most of the unsolicited translation I recieve only handle elements that the user spotted, but tend to fail into account other elements that may have changed, but that the user may not have noticed. Especially, a lot of unsolicited translations, especially Pull Requests, do not take into account the latest translation changelog (because if they did, they would know that the proper way to send a translation update is through e-mail after using
pollock.exe). - Until I start an official translation round, the English changes are NOT final, meaning that there's a good chance (and it pretty much happens every time I introduce a set of new messages) that I will alter these messages, or might remove or drastically change some of them altogether. Meaning that, if you send me an unsolicited translation not long after you spotted some new messages, chances are that some of your changes are going to become obsolete and you will have to do it again. Which means more back and forth, more processing and less time to work on other things.
- Before I start a translation round, I try to provide detailed explanatory notes to the translators about the new/updated messages, their context (which is often critical to ensure a proper translation) as well as, where possible, means to test the new/updated messages (through a test ISO or a set of steps to follow to generate the message). But because they come from unaffiliated translators, unsolicited translations do not have that information and will, by definition yet through no fault of the translator, be of lower quality than translations that have been solicited as part of a formal translation round.
- It has happened in the past that, when there are contention/litigious issues with regards to the use of a language (for instance, if there is a language reform going on, there may be very different and contrary viewpoints as to what should and should not be used for a specific transaltion), some people try to push a political agenda under the guise of an unsolicited translation update. Obviously, I do not speak of have enough knowledge of the languages I'm trying to support in the application to be able to detect these kind of damaging political endeavours, which is why I much prefer working with established trusted translators, that I have already worked with in the past, than newcomers trying to push translation updates that may very well be biased politically.
Because of all the above, it is simply not feasible for me to accept unsolicited translations.
The exception to this is if the current translator has been M.I.A. (Missing In Action) for a while and the translations have gotten way behind. To find out if that is the case, you will need to install DebugView and check the output from Rufus there. It's only if you do see a message such as the following that I will be willing to accept a translation update:
[14396] embedded.loc(13441): the version of this translation is older than the base one and may result in some messages not being properly translated.
[14396] If you are the translator, please update your translation with the changes that intervened between v3.5 and v3.14.
[14396] See https://github.com/pbatard/rufus/blob/master/res/loc/ChangeLog.txt
If, however, you do not see such a message, it means that the current official translator is very much active, but that we just haven't gotten to a translation round, where I have finalized all the strings that need an translation update, for the translation to be updated.
The log's prime purpose is to help me, the developer, troubleshoot the application when users encounter an issue. And to be able to do that, I need to be able to understand what appears in it.
Therefore, I very much want all of the log messages to be in English always. Otherwise, I won't be able to help users who don't use Rufus in English!
If you are an advanced user, you can, of course, use the log to find additional information with regards to what Rufus is doing, but, because this is not targeted at regular users, this data is not meant to be localized and you will be expected to understand English if you want to use the log.
Since version 1.4.7, Rufus can be used with Microsoft Virtual Hard Drives (VHD or VHDX). What you do with a VHD is really up to you (I am not going to provide any advice on that), but, since I sometimes ask people encountering an issue to also test with a VHD, here is how you can create one to use with Rufus, provided that you are using Windows 7 or later:
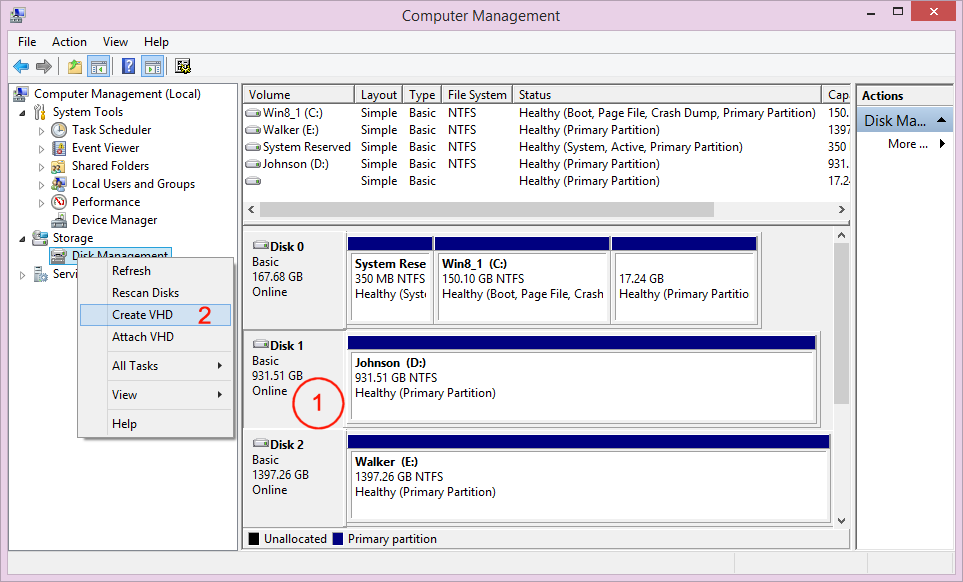
- Open Computer Management, by going to Control Panel → Administrative Tools. Note that if you don't see Administrative Tools in Control Panel, you may first have to click on the System and Security category.
- In Computer Management, click on Disk Management in the left column (under Storage), and wait for Windows to populate information about the disks.
- Click on a disk (1) and then right click on Disk Management (2). You should now be able to select Create VHD in the menu. Note that until you select a disk on the right-hand side, you will not see the Create VHD option.
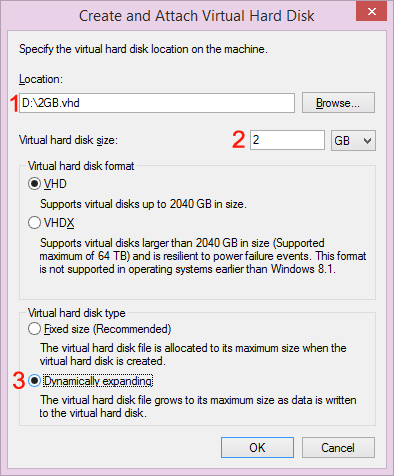
- Create the VHD by:
- Typing the path for the location where you want Windows to create the VHD file. Or you can use the Browse button. The file does not need to exist - it will be created by Windows.
- Selecting the size of the virtual disk you want Windows to create
- (Optional) Telling Windows to expand the size dynamically. Or you can use a fixed size, but in this case, Windows will need to allocate the size you specified on step 2 right away, meaning that if you chose to create an 8 GB VHD, Windows will allocate 8 GB of disk space for it, even if there isn't any data in the VHD.
-
- Once you have completed the above, Windows will display the VHD as if it was a real disk, in Disk Manager.

- The VHD will also now be available in Rufus.
Note that a VHD will be unmounted on reboot. If you want to remount it after a reboot, you can follow the same steps as above, making sure to point to your existing .vhd file.
Also, if you want to unmount a VHD without having to reboot, you should right-click on the VHD disk in Disk Manager, and select Detach VHD.
Alternatively, if what you are really interested in is create a backup of a physical bootable drive you have created, so that you can restore it to another (or the same) drive using Rufus later on, you can achieve that very simply by:
- Clicking Show advanced drive properties in Rufus
- Clicking the "Save" icon that appears next to the selected drive
It simply means that your media is not suited to run Windows To Go. You will need to go purchase an SSD-based USB drive, that has a random access write speed (rather than a sequential access write speed, which is what manufacturers usually advertises) that is actually high enough to run Windows. There is no alternative to getting a better suited media.
That is because, creating a Windows To Go drive means the creation of a lot of random small files (as opposed to creating a Windows installation drive, where one mostly need to copy a large sequential file and a relatively low number of small files), and, whereas a flash drive might report very good write speed, that high write speed might only apply to sequential access and not random file access, which the WIM extraction that is applied when creating a Windows To Go drive, relies on.
As a result, even if you have a drive that can allegedly sustain 100 MB/s sequential write speeds, the effective maximum write speed the same drive can achieve for writing the kind of small files needed during the creation of a Windows To Go drive could be much much lower, especially with non SSD-based consumer flash drives. And that speed reflects the speed at which Windows will be able to run from the same drive, since it too will need to read and write lots of small non sequential files at a high enough speed.
A decent rule of thumb is as follows: If your Windows To Go creation process takes more than 20 minutes, then it means that the media you are trying to use is ill-suited to actually run Windows. There is no workaround, besides using a media with faster random I/O speed.
The one thing we know of that may help speed up the creation of a Windows To Go drive, is to temporarily disable your Anti Virus. But you shouldn't expect a dramatic speed improvement out of it when the underlying issue is that your drive's effective random write speed is way too low to run Windows in the first place.
Okay, let's just start by getting this out of the way:
WHAT YOU HAVE READ ON THE INTERNET IS WRONG.
NO, UEFI does NOT force the use of FAT32 for boot. As a matter of fact, you can just go out there and buy an Intel NUC PC, and you'll find that it'll boot an NTFS drive, in pure UEFI mode, just fine, with no need whatsoever for a FAT32 partition to exist anywhere. And this is not in any way because the Intel NUC UEFI firmware deviates from UEFI the specs. On the contrary, since it comes from Intel, you bet that it is as compliant with the UEFI specs as can be.
So please let this be 100% clear: Despite what you might have heard, it is perfectly possible for a UEFI computer to boot from an NTFS drive, or from any other file system for that matter, because there is literally nothing in the specs that actually mandates the use of FAT32 for boot.
Now, the confusion/misinterpretation seems to come from the fact that, what the UEFI spec does mandate, is that, at the very least, a UEFI system should be able to boot from FAT32. But by no means does it state that FAT32 is the only file system that UEFI can, or even "should", boot from.
So, to make this abundantly clear, please do not misinterpret something that says “a wheeled vehicle SHOULD AT LEAST have one wheel” to mean “a wheeled vehicle CAN ONLY have one wheel”, as you'd then restrict the category of wheeled vehicles to only unicycles, which is just as wrong as saying that UEFI can/should only boot from FAT32.
Especially, it is exceedingly easy to make any UEFI firmware boot from a non-FAT32 file system: all you have to do is provide a UEFI driver for that file system, and you're good to go.
Therefore, with this being said, and if you had actually bothered to try, instead of relying on erroneous statements from the internet, you would have found out that:
- Rufus does support booting from NTFS, in pure UEFI mode, through its UEFI:NTFS feature.
- There's nothing in the way Rufus enables UEFI boot from NTFS that is even remotely non-compliant or "hackish" with regards to the UEFI specs (For instance Microsoft does something quite similar when they switch boot from the FAT32 EFI System Partition to the Windows NTFS partition).
- The above does allow to boot images that contain files larger than 4 GB
- You should trust Rufus when it allows you to select a specific file system, even in GPT for UEFI mode
Note 1: You should no longer have to disable Secure Boot if you use Rufus 3.17 or later, as the UEFI:NTFS bootloaders being used by these versions are Secure Boot signed.
Also known as: "Surely, because it says 'Secure', it shouldn't be disabled, ever!!!"
First, you might want to realise that a name is just that, a name, and that it's not because someone slaps a big "Secure" sticker onto a product or software, that it suddenly makes it any more secure. For instance, you may call the ROT13 encryption algorithm "secure encryption" all you want, it still doesn't make it an actual secure means of encrypting data...
So, I must first stress out that, instead of being paranoid about it, you should come to terms with the fact that YOU are actually being manipulated with the terminology that Microsoft (and others) decided to use when they introduced "Secure Boot" because it was deliberately chosen to convey something that it cannot really deliver (See for instance the fiasco of Microsoft's Golden Key). Instead, Secure Boot should more accurately have been called Bootloader Signature Enforcement because that is really what (and only what) it does, which is different from trying to protect your computer's security. But of course, the minute you call Secure Boot by its real name, you risk letting people realise that there may exist alternate motives for what you are trying to promote, for dubious reasons (see below) and they may also come to understand how not having "Secure Boot" enabled, as you would like them to do always, does not necessarily equate "Leaving your computer in an insecure state".
Which brings us to point number 2: When Rufus is asking you to disable Secure Boot, as a temporary measure, so that you can boot the UEFI:NTFS bootloader, it's not because this bootloader should be considered unsafe, or because we were too lazy/too cheap to get it signed for Secure Boot, or even (as some people seem keen to suggest) out of spite because we dislike Secure Boot (which is incorrect: We do like the principle behind Secure Boot. We just don't like the clear abuse of power that is being demonstrated when a single entity; Microsoft, is left in control of it and abuses it to promote a nefarious agenda). No, the ONLY reason haven't been able to provide a signed UEFI:NTFS bootloader until Rufus 3.17, which would avoid requesting that you disable Secure Boot, is because Microsoft (again the only entity that controls the Secure Boot signing process) has unilaterally decided, for no reason that stands the test of scrutiny, that anything licensed under GPLv3 cannot be signed for secure boot, ever.
And that is really all there is to it.
Microsoft has decided it doesn't like the GPLv3 and, in a clear abuse of power created a signing process that forbids the submission of anything that is GPLv3. Of course, Microsoft tried to "justify" their stance with a half baked tirade about how the GPLv3 would ultimately require them to relinquish their private keys, but that reasoning can easily be demonstrated to be utter bullshit when you also know that Microsoft has no qualms signing Linux shims, which, clearly, it should not sign, since these should logically be subjected to the same "alleged" relinquishing of private keys that the GPLv3 is supposed to entitle its users to, and therefore, if Microsoft's reasons are to be believed, having said shims load GPLv3 bootloaders such as GRUB (which they do) can only result in someone eventually demanding that the shims' private signing keys are relinquished, therefore completely defeating Secure Boot...
Well, the original NTFS driver we used for UEFI:NTFS was GPLv3, and getting a new non GPLv3 version that could be signed was anything but a walk in the park (it pretty much took us one year of hard work to get there), which means that, because the original driver can not get signed for Secure Boot, we have no choice but to ask YOU to temporarily disable Secure Boot when using UEFI:NTFS.
Now, given the feedback I am getting, I do realize that a lot of people may irrationally scream at the idea of even temporarily disabling Secure Boot. So let me pursue further on what Secure Boot is really about, and why your impression that even temporarily disabling Secure Boot is not an option, is about as wrong as thinking that UEFI cannot boot anything but FAT32 (which, as can be seen from the previous FAQ entry, is also completely wrong).
All Secure Boot does is establish trust, by verifying that the boot files have not been altered from the version that was created by the makers of the OS, and it does so through the process of using digital signatures to validate hash of the files.
Well, guess what; even if you have Secure Boot disabled, the exact same process can still apply because:
- Rufus is digitally signed, and therefore validated with about the same level of trust as a Secure Boot executable would be (and if you want to dispute that statement, may I invite you to read the Security page?)
- If you produced the OS installation image yourself, through official sources, or, if it's a retail ISO, validated its checksum against the one provided on the OS manufacturer's page, then you have also confirmed that the UEFI boot files you are going to launch are not malicious (which actually makes Secure Boot superfluous for the installation process).
Therefore, even with Secure Boot disabled, you can actually have some good level of trust that the boot files you are going to run are not going to do anything malicious, which is all Secure Boot is about. Again the only purpose of Secure Boot is to provide some level of "safety" if you have reasons not to trust the media you are about to boot. But if you are able to establish a sufficient level of trust from elsewhere, then Secure Boot becomes entirely superfluous.
So, now that you understand what Secure Boot is really about, and how Rufus tries to secure its bootloader creation process (because if Secure Boot can misappropriate "secure" in its name, then I don't see why I shouldn't), then you should really understand how there is no increased risk associated with temporarily disabling Secure Boot, as long as you are using legitimate installation media.
And again if you are using Rufus 3.17 or later, you should no longer have to disable Secure Boot and, if using an earlier version, since it's only a temporary measure, you can re-enable Secure Boot once you have finished installing your OS.
Unless you are using one of the 32-bit ARM systems that Microsoft tried to introduce a few years ago (and that produced so much backlash that manufacturers have since abandoned the idea of producing such systems), Secure Boot can always be disabled for UEFI boot.
Most of the time, this is as simple as going into your "BIOS" settings and toggling a "Secure Boot" option, however, some manufacturers might make that process a bit more difficult than others. Therefore, to help you identify how you can effectively disable Secure Boot on hardware where this operation isn't entirely straightforward, you can also refer to the non-exhaustive list below:
On some Acer platforms, a Secure Boot toggle is present but may be greyed out unless you have set an administrative password for your "BIOS". The solution then is to add a password to enter the BIOS. Then you should be able to disable Secure Boot.
You may find some hints on how to disable Secure Boot for other platform by checking out this link from Rod Smith's website (which also contains excellent information bout Secure Boot and UEFI in general).
To get the best results from Rufus with Windows images, you should ALWAYS try to use it with a genuine, UNMODIFIED retail Windows ISO, as these are the only images we can officially support. Especially, there are just too many ways a bootable Windows ISO can be rendered unbootable by trying to modify it, and, if you do value security, you also should understand that, unless you have validated that the ISO you are using is a genuine Microsoft retail ISO, you might as well consider that it is riddled with all sort of malware. As a matter of fact, this is also why we discourage the use of Media Creation Tool (MCT) generated ISO with Rufus, as MCT produced ISOs are reconstructed ISOs, that are different for each usage of the tool, and therefore can not even be validated for corruption.
If you want to install Windows in a safe and trusted manner, you should, therefore, aim at getting your hands on a genuine Windows retail ISO that you can then validate to be genuine with the help of Rufus. And of course, please keep in mind that any recent version of Rufus has the capability to download an official Windows retail ISO through the SELECT/DOWNLOAD split button.
The way to validate that your image is genuine and not corrupted is very easy:
- Open your Windows ISO in Rufus and click the
(✓)button that you can see in the UI right beside theSELECTbutton - This will compute the MD5, SHA-1 and SHA-256 checksums (Note: Because of the nature of checksumming operations, if you have a CPU with 4 cores or more, it does not take longer for Rufus to compute 3 checksums in parallel as it would take it to compute one, which is why there is no real cost associated with computing 3 instead of one). The one you are interested in is the SHA-1, so copy it
- Go to https://sha1.rg-adguard.net and enter the SHA-1 you just copied (e.g.
bee211937f3ed11606590b541b2f5b97237ac09d) into the search box, and click the search button - If you do get a result (For the SHA-1 above, that would be
Windows 10 (consumer edition), version 1809 (Updated Sept 2018) (x64) - DVD (English)), then it means that your ISO is a genuine retail Microsoft ISO, and that it has not been altered in any way. - If, on the other hand, you do not get any result, then it means that the ISO you are trying to use is either corrupted, or has been altered (maliciously or not), and it is not a genuine Microsoft retail ISO. You should, therefore, try to steer away from using it, and instead try to locate a genuine ISO.
No.
If you need the ability to run multiple ISOs or bootable entities from the same flash drive, then what you really want is to perform custom sysadmin operations, and this rapidly becomes a pain to properly automate, because there are tons of incompatible boot methods, and because no two people ever want the same thing from such automation. Thus, if you want to use your flash drive in a sysadmin manner, I would advise you to first acquire the sysadmin skills you need, so that you don't need an automated tool to be able to set up a multiboot drive exactly as you want it.
If, on the other hand, you think you need a utility to setup multiboot for you, then I would have to say that you're probably better off keeping away from trying your hand at sysadmin stuff and simply stick to a single boot USB drive instead, switching/recreating that drive as needed.
Then again, if you really insist on using Rufus as base for multiboot, you might be interested in this tutorial from our friends at RMPrepUSB... or you might as well use Ventoy (which is most likely what you are looking for) or RMPrepUSB or Easy2Boot or YUMI as there already exist quite a few solutions to perform what you seek.
Alternatively, you can do what the multiboot pros (actual sysadmins) do, and invest in a hardware device that is dedicated for multiboot support such as an IODD drive. This is because a hardware solution is the ONLY GUARANTEED way to ensure that multiple ISOs from a single drive can boot as intended. The reason why a hardware solution is needed is that, due to the contradictions of incompatible boot loaders and ISO → USB conversion, the only solution that works reliably is to present the USB device as a virtual CD or DVD ROM, and then present the selected ISO image as a CD or DVD disc mounted in the virtual device. But of course, any software solution that tries to do that after the USB has already booted as an HDD drive (which cannot be avoided) does have to make major compromises to try to pretend that your multiboot image was actually booted as a CD or DVD. However, since the BIOS or UEFI firmware knows full well that that wasn't the case, a software solution can NEVER reliably guarantee that the ISO will boot and work properly and the only way to address that issue in a pure software solution to modify the ISO content, either at runtime or prior to boot, which must be customized for each ISO type and which, as the developers of Ventoy explain, is hard work because there are so many different OS distros and so many special cases. As such, if you really are serious about multiboot, you will invest in a hardware solution.
Also, and please mark my words, I can guarantee that you will spend a lot more time trying to maintain a multiboot USB, by adding/removing new/obsolete images onto it, as well as tweaking boot settings so that everything works, than you would spend simply recreating that USB for the image you actually need right now. With a decent USB Flash Drive connected to a USB 3.0 port, creating a bootable drive takes about 2-3 minutes, during which you can do something else. Therefore, whether you like it or not, by not trying to provide multiboot, and make you waste HOURS figuring why your ultimate UEFI + Windows + Linux + ISOHybrid collection doesn't boot properly, Rufus actually tries to save you time!
But hey, since I am really getting a lot of flak about this, feel free to tell me just how arrogant I am for declining to provide you with a feature that, first, seems to be mostly requested by people wanting to install multiple copies of Windows, for which they are very unlikely to have a license (either this or there is an amazingly large number of people who managed to find a loophole to obtain very cheap MSDN subscriptions), and second, in an application that I'm not being paid to develop, and that you got absolutely for free!
Finally, after having spent the best part of 5 years dealing with making USBs bootable, as well as repeatedly coming up with innovative and advanced ways to ease some of the major USB boot process pain points, I hope I can be trusted to have acquired some insight on how things can and will go wrong, if you try to cram everything and anything into a single place, and why I feel entitled to tell you that you are genuinely better off NOT using multiboot...
No.
I certainly wish I could, because it sounds like a nice challenge, but I just don't have the time for that. Also, Rufus was designed to work very closely with the Windows APIs, and while the application may appear deceptively simple, what really happens behind the scenes is anything but.
So porting Rufus to another OS is actually a lot more effort than people seem to imagine. For instance, I currently estimate that getting a Linux version of Rufus, that would offer at least 75% of the capabilities of the Windows version (which, as far as I'm concerned, isn't even close to something I would be satisfied releasing to the public, as it would still be missing too many features), is at least a 4-months full time work endeavour. Realistically then, I can't see myself dropping everything else, and spending 8-10 hours a day for 4 or more months, just to get a basic Linux version of Rufus that would still be missing features that I consider essential (such as the ability to create Windows To Go images for instance)...
Besides, most of these platforms already have the tools needed to help you achieve part of what Rufus does (though perhaps not in as convenient a package). As a matter of fact, Rufus relies on tools that were originally designed and run on other platforms than Windows such as Syslinux, ms-sys or the bad blocks check feature from e2fsprogs, so at least these capabilities can be obtained on other platforms.
Then again, Rufus is Free Software, so if anybody wants to try to port it to another platform, they are very welcome to do so!
I had nothing to do with that application, and this is NOT AN OFFICIAL version of Rufus. If you used that application thinking that this was an official version of Rufus then congratulations; you have been scammed!
While I do welcome people creating derivatives of my software, it is very deceptive from the author(s) of this Android application to have used the Rufus name for their app (which, as far as I can tell is not even derived from our code) and qualifies as Impersonation, since they are deliberately misleading users by trying to impersonate an official Rufus application. Oh and of course, the people behind this application didn't ask for permission (else I would have told them that they could try to port Rufus to Android if they wanted, as long as they use a different name).
I therefore invite you to report the application to Google, for violation of the Google Store anti-impersonation policy.
Yes.
It's in progress, but very low priority on my list, so there again, don't expect anything fast.
No.
I briefly toyed with the idea, but I don't think it's worth it, especially as it's a lot more than just creating a bunch of partitions. As with multiboot, you're probably much better off acquiring the knowledge of doing it yourself, than relying on an automated tool to do that for you and have no clue what's going on when you run into trouble.
What's more, unless your USB Flash Drive is set by the manufacturer to behave as a fixed drive (99% aren't), Windows will not let you see more than a single partition on it (that is unless you are using Windows 10 Creators Update or later). So that makes the idea of using multiple partitions a bit moot when only one of them can be seen at any one time by Windows.
i.e. Do you plan to allow a feature that can reverse what Rufus does when converting a bootable ISO to bootale USB, so that a bootable ISO can be created back again?
The answer to that is no on account that:
- Doing so for BIOS boot is incredibly complex, since BIOS optical boot and BIOS HDD/USB boot use completely different method, and it's already taken me years to craft a reliable one way BIOS optical boot → BIOS USB boot conversion (and no that conversion process, when you have it in one direction, is not something that you can revert easily).
- Doing so for UEFI boot is completely pointless, since all you have to do to create a UEFI bootable ISO is simply use one of the many CD-burning applications (that allow you to save to an ISO) and select the content of the USB as your source for the ISO (since, unlike BIOS, UEFI works entirely at the file system level, so as long as you have the same files in your ISO as what you have on the USB, you can use that ISO to recreate the USB, and it will be UEFI bootable). For a no-fuss way of creating a bootable UEFI ISO from a bootable UEFI USB drive created by Rufus, I would recommend Folder2Iso.
What the above means is that, as long as you're planning to boot UEFI-based systems (about every PC that was produced in the last 15 years should support it), there's really no point in having Rufus support a USB media to ISO feature, as it's simply a Create ISO from a bunch of file operation, for which there exists plenty of free and readily available dedicated software.
No.
Rufus is very much designed to work with removable drives (as well as VHDs), to avoid the possibility of non tech-savvy people seeing a drive and formatting it, without realizing that it was an internal drive containing valuable data, rather than the external drive or card they just plugged in.
If I were to list internal drives, I'm pretty sure I would immediately start to get complaints from people who formatted the wrong drive by mistake. And even if I could rightfully shift the blame on user error, I'd still much rather inconvenience a few people, by not letting them erase the data they want, than inconvenience others by allowing them to erase data they don't want to erase.
My priority with Rufus is and remains to avoid any possibility of data loss, even if minimal. As such, if you want to format internal drives, I will respectfully ask that you use another method.
The Windows User Experience dialog, i.e. the dialog where Rufus enables you to remove requirement for TPM, online Windows account and so on, is designed exclusively to remove annoyances that come in the way of a streamlined Windows installation.
What this means is that the only options you find there are ones that prevent someone from launching an installation of Windows, then go away for a cup of coffee, and come back to a fully installed O/S that they can start to interact with normally (i.e. a fully working Windows system that you can start installing applications on, customize according to to your wishes, and so on).
In other words, if the feature you want to add or remove does not block the installation process of Windows, I am not planning to add it to the Windows User Experience dialog ever, because I consider that it falls under the category of customisation options that can be performed by the user after Windows have been installed, and there are simply way too many customisation options that many users will want to see configured differently, so it would make no sense to try to shove them all on onto the Windows User Experience dialog anyway.
Or to put it more succintly: If what you request can be achieved post install, and it does not stop the installation process, it will not be added to the Windows User Experience dialog.
Try to check the List USB Hard Drives option in the advanced options.
Alternatively, you can simply hit Alt-F.
Note however that formatting non-flash USB drives, such as USB HDDs, is not officially supported for now. Use at your own risks!
As to the reason why Rufus does not list HDDs by default, it is explained in this other FAQ entry.
If your drive is still not detected, the log (which can be accessed by clicking the small 'Log' button left of 'START' or by pressing - may have more information.
You may see this specific error in Rufus' log if there are more than 64 drives (either physical or virtual) currently mounted on your system as Rufus intentionally limits the range of drive it may be able to access so that an application error cannot result in a wrong drive being overwritten by mistake.
This is usually not an issue, as very few people use systems where they need more than 64 drives. However, it is possible to run into this issue when using the XBox PC Game application because it may create lots of hidden Virtual Drives in the background without unmounting them (see this entry for details). It is also possible that other applications may create a large amount of Virtual Drives thus resulting in this issue.
If you are seeing this error, you may try to reboot your computer or temporarily stop services that are creating Virtual Drives to see if that helps.
So, you created a bootable drive, possibly with a DD image, and now Windows no longer seems to see it, or it reports that its capacity is much smaller than it actually is, or it has some weird extra partitions that you don't want. And now you want to "restore" it to a state where you could just use it to copy files, with Windows recognizing the drive and letting you use its full capacity.
Well, what you really want to do is "restore" your drive to non-bootable state. And, of course Rufus has a very prominent way to allow you to do that.
See the Boot selection dropdown in Rufus? The one that has a Non bootable entry? Well, if you select that option, and pick whatever you want for the file system, then Rufus will happily "restore" your media to something Windows will recognize, with full capacity, and that you can use again to transfer files. And it will also remove any extra partition it created, such as the UEFI:NTFS one. That's all there is to it.

If you are using Rufus 3.5 or later, you may have heard that it allows you to download ISO images and that a 'DOWNLOAD' button will appear alongside the 'SELECT' button (i.e. 'SELECT' becomes a split button with a menu that allows you to switch between selecting an image and downloading an image).
You should be mindful however that, for the ISO download feature to be proposed you also need to have 'Check for updates' enabled in the Rufus settings.
This is done because that feature requires the execution of a remote PowerShell script, which people might have an issue with (even though Rufus makes sure that only a script that has been signed with our private key can ever be downloaded and executed and that the script only ever resides in memory, so that it can't be altered after download) and Rufus considers that if you don’t have 'Check for updates' enabled, then you most likely also don’t want remote scripts to be executed, and therefore it disables the feature.
Also, the feature is only proposed after Rufus validates that it was able to reach the remote script, which it does during application launch. Therefore, even if you have 'Check for updates' enabled, if there was an issue with your network while Rufus launching or if you are running Rufus in an unconnected environment, the ISO download button will not appear.
Okay, the first thing you need to understand about this option is that it is designed to make the Windows installer restore a feature that exists in Windows 11 21H2 and that Microsoft removed in 22H2.
So, obviously, the option is only offered to you in you use a Windows 11 22H2 image or later with Rufus.
If you use a Windows 11 21H2 image, you will of course not be presented with the option in Rufus, because the feature you are after comes by default with 21H2!
Second, just like with 21H2, what the option to bypass the need for a Microsoft account with Windows 11 22H2 or later does is restore the ability to use a local account when the installer is unable to connect to the internet during the account creation process.
That last part is very important, because, regardless of whether you use (regular) 21H2 or (bypassed) 22H2, you will only be offered the ability to create a local account if you make sure that your network is unplugged on the account creation page. As long as the Windows installer does have network connectivity, it will default to using a Microsoft online account, regardless of whether the bypass is in use, so you do need to make sure that the network is inaccessible then.
These options have been moved to a new dialog that you will see after you press the START button. Please press the START button and you will find what you're looking for.
Also, as what the case with previous versions of Rufus, you MUST run Rufus on Windows 8 or later to be offered the bypass options, as these are not proposed to you if you run Rufus on Windows 7 (but then again, you should know that I've stopped supporting anything that has to do with Windows 7 in Rufus a long time ago anyway...)
First of all, even if it may sound harsh, I can only hope that this mishap will help teach you a good lesson about maybe paying a bit more attention to the prompts applications such as Rufus do display, to make sure you don't format the wrong drive by mistake. Especially, Rufus explicitly lists the name of the device/partition it is going to format, with a big WARNING message, to help you confirm that this is really the one you want to erase. Therefore, if you didn't pay enough attention to the dialog that was telling you precisely which device was about to be erased, or weren't able to recognize that device from one you didn't want to erase, the fault is entirely with you, and you shouldn't be asking others to help you clean your mess. Rufus does what it can to ensure that you don't format an important drive by mistake (by never listing internal drives, or not listing USB HDDs by default), but there's only so much it can do to prevent you from erasing the wrong drive.
The second bad news is that, unless you are very lucky, there is no easy way to recover your data if you let Rufus start its drive creation process. This is because the first thing Rufus does is erase all existing partition tables, to recreate a brand new one, and right after that, Rufus also creates a new file system on the new partition(s). What this means then is that you are always going to lose all partition and file system records, which are crucial to being able to perform data recovery. And there is a huge difference between trying to recovering a drive, where a few sectors have been damaged at random, and a drive where important sectors, such as the file system/partition ones, have been overwritten with new data. Once that data has been overwritten, it is gone forever, with no possibility of restoring it.
Your only hope of recovering some data then, provided you didn't write an image, or ran a bad blocks check, or used the slow format method (which will ALL overwrite sectors sequentially, and therefore leave you with no hope of recovering any of the data that was on the sectors that were written over), is if you are very lucky and if the data you want was outside the areas Rufus wrote over. In that case, you may be able to use some file system recovery tools to see if you can reconstruct some of the existing files and restore them.
Now, since these recovery tools change all the time, and forensic recovery is way beyond the scope of what this FAQ is meant to help you with, if you require further advice or help, then you will have to ask data recovery experts, such as the ones that may lurk in Reddit's r/datarecovery, but please beare in mind that, because this is a very specialized domain (which is also the reason why we can't really help you on that topic), they'll probably you orient you towards software and services that won't come cheap...
No, it didn't.
While you may not be familiar with USB formatting operations, you should understand the following: even intentionally, it is extremely difficult for software to damage hardware, and it is even more difficult unintentionally. If you ask anyone with knowledge of what really goes on behind the scenes, they'll tell you that an application such as Rufus, that uses low-level access to partition, format, or test bad blocks, simply does not have the ability to damage USB hardware. This is because, unlike what Hollywood likes to pretend, there really doesn't exist a set of magic commands that makes hardware self-destruct, and even when governments try to do it (in the form of the Stuxnet virus for instance) they have to invest years and millions of dollars in planning just to target a very specific type of hardware controller (For reference, USB flash drives from different manufacturers tend to use completely different hardware controllers internally, with a completely different proprietary command set).
Now, because Rufus does erase some data, you might still think that a formatting operation is hazardous. But this too is a very inaccurate assumption: As far as the hardware is concerned, formatting or partitioning a drive is no more different than writing to a regular file. Furthermore, if you use quick format, very little data is actually read or written on the device during formatting and partitioning. Finally, as far as standard USB drives are concerned, there is absolutely no difference between the data that gets written during formatting or partitioning and the regular data used for files and directories - It's just completely interchangeable data blocks being read and/or written. So, it has to be stressed out that there doesn't exist any "special" data block on USB drives, that regular applications such as Rufus can access, and that must be present for the drive to be recognized and perform its operations.
What this means is, even if a formatting application were to have a bug, the worst it can do, really, is write some erroneous data to a flash block. But since the USB controller on a flash drive doesn't care about what data is present in which blocks, it still wouldn't matter if all of the flash blocks were to be corrupted, including the ones that contain partition or file system critical information, as these blocks are nothing special and get accessed in exactly the same manner as other blocks.
The only possible way Rufus could actually damage a drive, then, is if you were to repeatedly run the check for bad blocks, as flash memory is not everlasting and will wear out after a lot of read and write cycles. However, for standard USB flash hardware, the number of write cycles before it wears out should be in the tens of thousands and what's more, a proper flash drive also contains circuitry that "moves" blocks around, to minimize the wear and tear (which is another reason why you can be confident that there doesn't exist any special data block on a USB drive). But since Rufus only checks for bad blocks when a user explicitly requests it (bad blocks check is disabled by default because this is a very slow process), the only actual possibility for the application to damage your drive is if you chose to repeatedly run the bad blocks check, for days or weeks on end.
So, unless you have been running bad blocks checks for days, I have to be very categoric that your drive was not damaged by Rufus. Whatever damage you maybe believe has been incurred while you were using Rufus is either a detection issue or a standard hardware failure due to normal wear and tear, that just happened to coincide with when Rufus was accessing your drive. Obviously, when you use something, there's always a risk it will independently choose that moment to fail. But you can rest assured that your drive would have failed the exact same way, had you been copying a large file using Windows Explorer, instead of using Rufus.
Besides standard hardware failure, Windows detection issues can also be fairly common: if Rufus isn't able to complete a formatting operation, it is possible that the drive may be left improperly partitioned, or dismounted, and therefore it will not show it in Windows Explorer (though recent versions of Rufus will try to list the drive even then). This can usually be solved by going to Computer Management → Disk Management in the Windows administrative tools. Also, because Rufus tends to be faster than other tools, it may render issues with sub-par cabling more prominent (due to using poor USB 3.0 extension cables for instance), which may in turn cause Windows to report a hardware failure or disconnected device. Or it may also be that Rufus uses an OS operation, that other applications don't use, to access your device, and which your specific OS configuration has trouble with.
If the above still isn't enough to convince you, then maybe the following will: Currently, Rufus is downloaded more than 3 million times every month, to format a very wide range of USB flash drives. Yet I receive extremely few reports from people believing that Rufus damaged their drive (less than 1 or 2 per month at worst), and reports of such issues are very public, so it's not like I could really hide them, even if I wanted to! This 1 or 2 in a million is pretty much what one expects from coincidental failures, that would have happened regardless of whether someone was using Rufus or not. This should, therefore, be a good indication that Rufus is safe to use. If you still need more (especially, if you need to be convinced that, even if there is a major bug, Rufus does not actually have the possibility to send a "self-destruct" command on the USB bus), I might also suggest you read this.
I'm afraid your device is most likely dead. Or, in some limited cases where the device is reported read-only, it may mean you have a strong bitlocker policy enforced on your computer (see last paragraph).
The way a USB drive dies is usually that the flash memory gives out (because it has a limited number of rewrites before it's going to fail), and when that happens, the USB controller from the device, which is usually a generic microchip that is either the same or similar to the microchips that you would find on USB card readers, will detect that it is no longer able to access the memory, and, just like a card reader, report either that it is no longer able to detect a memory media or that it has become read-only.
In the Rufus log, for the first case, this will usually produce the message: Device eliminated because it appears to contain no media.
If you see these issues, it's probably time to purchase a new USB flash drive, because it is very unlikely that you will be able to use this one again. And, no, Rufus did not have anything to do with destroying your drive. Flash memory does have a very limited life, and things with a limited life tend to fail as you use them. See also the previous entry.
Now, if your error is that the device is reported read-only, one last possibility is that you have a strong bitlocker policy enforced on Windows (which it needs to be pointed out is not something that is expected to be the case for a consumer installation of Windows, especially a standard one, but something that some strict corporate environments may add as a global policy), in which case attempts to format or repartition the drive will fail with a read-only message and, of course, because of the way the policy is designed, any drive that is not using bitlocker is set by the OS as read-only. If that is the case then, you either need to disable the bitlocker policy of preventing write access to non-bitlocker protected drive or use the drive on a computer that is not subject to this policy.
Potentially, you can try the following, but it needs to be pointed out that doing so will be at your own risks:
- Open
regedit.exe - Try to go to
HKEY_LOCAL_MACHINE\SYSTEM\CurrentControlSet\Control\StorageDevicePolicies. - If you find that the key above doesn't exist, then it means that your problem is not due to a policy being enacted.
- If, on the other hand, you find that
StorageDevicePoliciesexists, then it means that you have custom rules in place with regards to USB devices. If that is the case, you should check whether aWriteProtectREG_DWORDvalue exists and if it does, make sure that is is set to zero.
There is usually one very simple reason for that: You created the drive without knowing whether the system you are trying to boot is BIOS or UEFI based, and you didn't pay attention to what Target system was set to in Rufus.
This cannot be stressed enough: You must IMPERATIVELY know whether the system you are trying to boot is BIOS or UEFI based — This is not something anybody else can "guess" for you. Any attempt to skip the part where you determine whether the computer you are trying to boot is BIOS or UEFI based will result in boot headaches, exactly like the one who got you to be directed to this entry. So please understand that figuring this very important information before you attempt to create a bootable drive is not something you should ignore.
Basically, there are two types of firmware a PC can use for boot, that are (mostly) incompatible with one another, and that are called "BIOS" and "UEFI".
Every single PC in existence is based on one or the other system. Typically, older systems (usually pre-2005) would use BIOS whereas a more recent system would use UEFI, but this is not a general rule, and, again, you MUST find out from your PC manufacturer's documentation whether your PC is BIOS or UEFI based.
Because neither Rufus nor anybody else can "guess" whether the target system you are trying to boot is BIOS or UEFI, you are expected to have this information when you create the boot drive, so that you can select the appropriate options.
Once you have that, then the process of ensuring that your drive will boot is very simple: You just need to make sure that the Target system option in Rufus is set to the option that's relevant for you which is either BIOS (or possibly "BIOS (or UEFI-CSM)" which is the same, but, as the tooltip indicates, is not something that will work with UEFI unless you have enabled CSM) or UEFI.
Note that you may have to change the Partition scheme option to be able to set the Target system to what you need.
Once you have set Target system to the type of system used by the PC you are trying to boot (which again, is not something Rufus can "guess" for you and therefore that you need to figure out on your own), you should be good to go.
Finally, please note that, if you are booting from a UEFI system, you may also have to temporarily disable Secure Boot in your firmware parameters, but you should usually have a Secure Boot notice if this is needed (and Rufus will also tell you if it created a drive that requires you to temporarily disable Secure Boot).
Help, I created an extended media to bypass TPM, but it still says my PC doesn't support Windows 11!
That's because you are trying to perform an upgrade instead of booting the media to perform a clean installation of Windows.
Rufus is designed to create bootable media only. It is not designed to be used if all you want to do is perform an upgrade of Windows by running the setup.exe from the ISO. That's because, you don't actually need to go through Rufus to create an installation media then. Instead, all you need to do is right click the ISO in Windows, then select Open With → File Explorer, and you will have access to the Windows setup.exe to perform an upgrade.
So, unless you are actually booting from the media you created, the TPM and Secure Boot bypassed applied by Rufus will not work, because the bypass of the Windows 11 installation restrictions enacted by Rufus are only applied for the installation checks that are performed when booting from the media, and NOT for the installation checks that are performed when running setup.exe from within Windows.
So you have two choices:
- Actually boot from the USB media created by Rufus and perform a clean installation of Windows (not an upgrade)
- Create the
AllowUpgradesWithUnsupportedTPMOrCPUregistry key as documented here if you want to perform an upgrade.
But again, it needs to be stressed out that, if all you want is run setup.exe from the ISO, you should just mount the ISO in Windows, by right clicking on it and not use Rufus, as the purpose of Rufus is to create media that you are actually going to boot from, and the installation check bypass feature only applies then.
If you are looking at this entry, it's because you got a screen similar to this one:

With text similar to:
              ╔════════════════════════════════════════════════╗
              ║                                                ║
              ║   ERROR: BIOS/LEGACY BOOT OF UEFI-ONLY MEDIA   ║
              ║                                                ║
              ╚════════════════════════════════════════════════╝

             This drive was created by Rufus [https://rufus.ie].

             It can boot in UEFI mode only but you are trying to
             boot it in BIOS/Legacy mode. THIS WILL NOT WORK!

             To remove this message you need to do ONE of the following:
             o If this computer supports UEFI, go to your UEFI settings
               and lower or disable the priority of CSM/Legacy mode.
             o OR Recreate the drive in Rufus and use:
               * Partition scheme -> MBR.
               * Target system -> BIOS (...)
             o OR Erase the whole drive in Rufus by selecting:
               * Boot Type -> Non bootable
This basically mean that you created a boot media that can only work on UEFI systems in pure UEFI mode, and your system is either not using UEFI at all (BIOS-based) or is using UEFI in Legacy mode rather than "pure" UEFI mode.
This may also happen is you used Rufus to create a media as a bootable drive (e.g. NVMe SSD through a USB adapter) and then forgot to reset it to non-bootable before using it in a computer that is booting is legacy mode.
You therefore need to apply one of the 3 options described in the message with are:
- If you are using a UEFI system, make sure Legacy BIOS is not the default
- If you are not using a UEFI system, make sure you recreate the media in Rufus with Target system set to BIOS...
- Remove the bootloader that displays this message altogether and recreate the media as non-bootable.
If you got the message after creating a Windows bootable drive, you may also want to read the previous entry.
If you are looking at this entry, it's because you got a screen similar to this one:
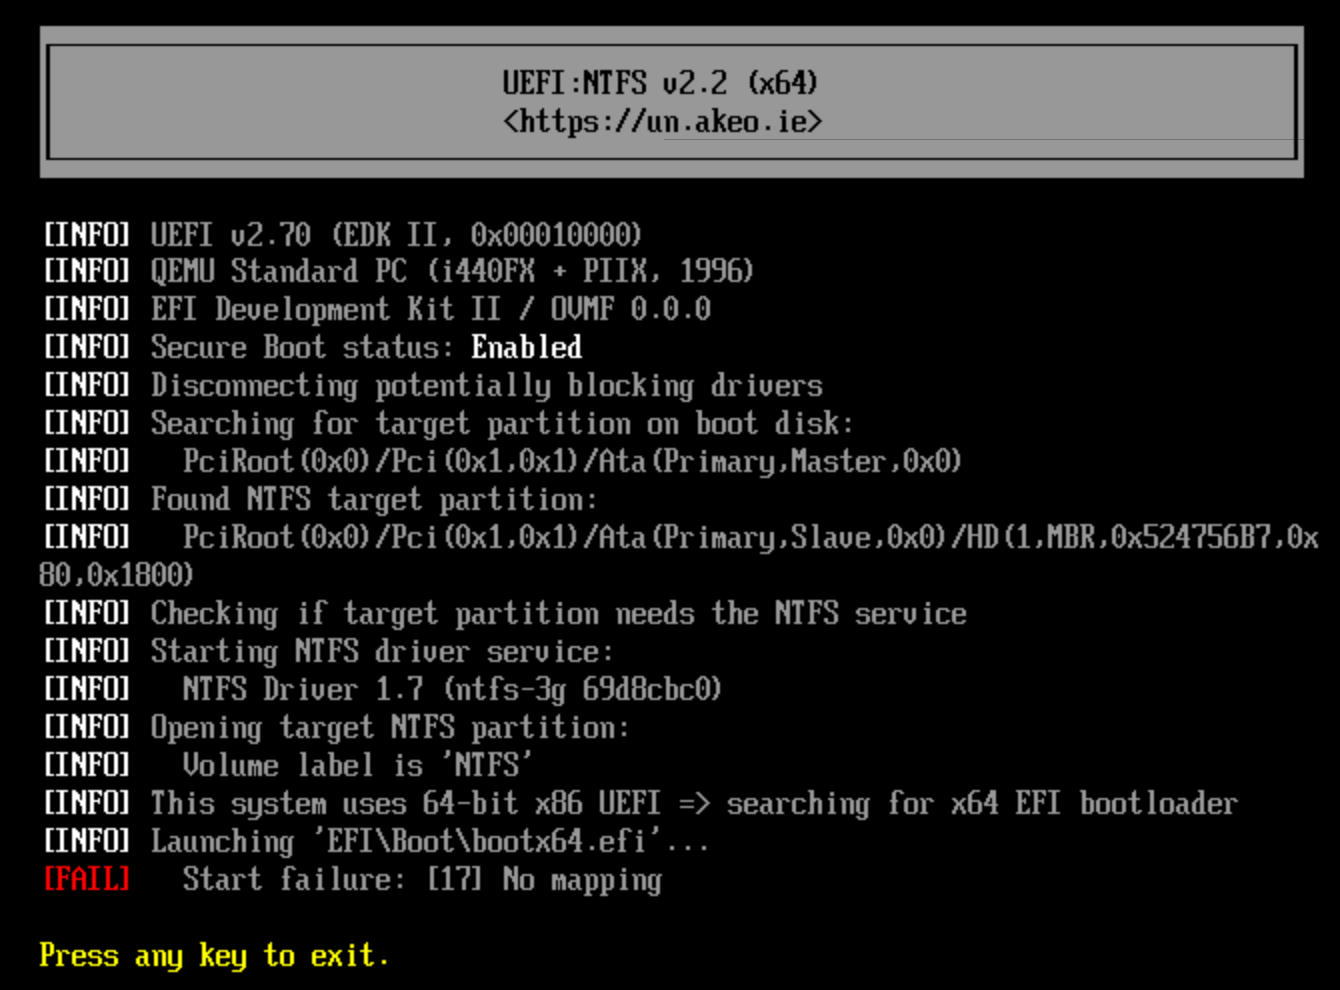
With text similar to:
┌─────────────────────────────────────────────────────────────────────────────┐
│                            UEFI:NTFS v2.2 (x64)                             │
│                            <https://un.akeo.ie>                             │
└─────────────────────────────────────────────────────────────────────────────┘

(...)

[INFO] This system uses 64-bit x86 UEFI => searching for x64 EFI bootloader
[INFO] Launching 'EFI\Boot\Bootx64.efi'
[FAIL]   Start failure: [17] No mapping
This error, which is reported by the UEFI:NTFS bootloader but does not originate from UEFI:NTFS, is usually due to the Windows bootloader UEFI:NTFS is trying to chain load reporting that it cannot proceed with the boot.
In other words, the [17] No mapping error message is an error that usually comes from Microsoft Windows and that indicates that the Windows installer is unable to boot. It is the generic UEFI error code returned by the UEFI Windows boot manager whenever it experiences an issue that forces it to abort the boot.
This may happen for instance if the Black Lotus UEFI Lock has been enabled on your system and you are using a pre 23H1 Windows boot manager but you don't have an SkuSiPolicy.p7b on your boot media (which the Microsoft bootloader considers a critical error and therefore refuses to continue to boot). It may also happen if, for any reason, the Windows boot manager is unable to locate all the files it needs to boot the system or if it considers that the current Windows partition is unsuitable for boot.
In case this is a a security issue, and especially one with the absence of SkuSiPolicy.p7b, you can try to temporarily disable Secure Boot to see if it helps. But otherwise, you will have to find what it is exactly with your system (or your boot media) that is causing the Windows bootloader to declare that it cannot proceed with boot.
Unless a human employee from the company that makes Antivirus X actually confirms the report, I'm just going to ignore yet another false-positive report and point you to this entry without further explanation.
The reason for that is, every single release of Rufus, one of the various Antivirus vendors (it's never the same) seems to find nothing better than to produce a false-positive for the latest executable, mostly because they don't seem to understand that size-conscious C programmers like yours truly would ever want to produce anything but malware on Windows... This is getting exasperating and I have better things to do than to submit a release for proper analysis every other day especially as you don't even get an apology from "security" people once they have confirmed that the application is perfectly safe and that the problem was indeed with their trigger-happy analysis engine.
This means that, if you want me to pay heed to your report that Rufus contains malware, I'm gonna ask you to forward an actual e-mail from a human person working for your security solution, that confirms that this is not another false positive and that provides actual technical details about the malware. If not, I will just point you to this and ignore your report.
You may also want to read this and especially this part, which formally demonstrates how it is impossible for me to add any behaviour to the release version of Rufus that isn't present in the public source code (therefore, anyone who think they uncovered malicious behaviour from Rufus should easily be able to point to that behaviour in the source code, since, again, it can be formally demonstrated that every single thing the published executable does can only have come from the public source).
Finally, Nir Sofer, of NirSoft fame, very eloquently put how Antivirus companies are causing a big headache to small developers in a blog article that I invite you to read, because I share his feelings exactly on why trying to contact Antivirus companies is a losing battle.
The goal of Rufus is to ensure that your USB is gonna boot, period. As a result, it is not going to take any shortcuts that might jeopardize that goal.
Unfortunately, what most people, who aren't familiar with the myriad of boot methods and the many ways in which they can fail, don't seem to realize is that the best way to ensure that a device will boot is to always start from a clean slate. In essence, that means completely repartitioning and reformatting the drive.
So, while trying to preserve existing data and partitions might theoretically work, in a limited set of cases, most of the time, trying to do so will be a major hindrance to ensuring proper boot, and I can guarantee that, regardless of how smart the application that creates your boot device is, the only thing you are going to gain is that you will run in some weird errors, that are gonna take a lot of time and effort to troubleshoot, which you wouldn't have gotten with a utility that always repartitions and reformat your drive, in accordance with the specifics of the image you are trying to boot.
Therefore, if you don't want your drive to be repartitioned and reformatted, then I will kindly ask that you use another application.
Also, please be mindful that all versions of Rufus above 1.4.4 produce a very clear extra warning that lets you know that all partitions will be destroyed. Therefore, if you happened to lose data because you assumed that a drive meant only a single volume or partition, it's because you didn't pay enough attention what Rufus was telling you, and the responsibility lies entirely on you.
If you are using a Windows ISO that can be dual booted in UEFI or BIOS mode, you may find that the USB created by Rufus does not preserve the dual UEFI+BIOS boot feature.
Especially, the Windows 8 or later installation ISOs, that support both UEFI and BIOS boot, will be converted to either one or the other mode, depending on the option you selected under Partition scheme and Target type: If you select MBR and BIOS or UEFI-CSM, the USB will be bootable in BIOS-mode only (even on UEFI systems), and if you select GPT then the USB will be bootable in UEFI mode only (and not bootable on a BIOS system at all).
This is done to avoid confusion, as it can be difficult for non-expert users to know whether they actually booted in UEFI or BIOS mode when a USB Flash Drive can be booted in both modes, and installation is meant to be a one-off operation, targeting a very specific machine and boot mode. You probably don't want to go through a full Windows installation, only to realize that it was installed in BIOS mode when all you really wanted was UEFI mode.
By ensuring that only one or the other can be used for Windows installation, there is no room for error with regards to which mode was used.
Note that this does not apply for Windows To Go and that you can also enable dual UEFI+BIOS boot by using the Alt-E cheat mode (see below) with Rufus 2.0 or higher. Also, if your UEFI firmware integrates an NTFS driver natively, then you may also find that you can dual boot a USB created in Rufus, even if only BIOS-CSM was specified.
OK, first of all, you can tell Rufus not to create an autorun.inf by unchecking the Create extended label and icon file in the Format Options. So Rufus does not force the creation of an autorun.inf file if you don't want one.
Now, as the option above indicates, the reason Rufus tries to create an autorun.inf file by default is primarily due to file system limitations. Especially, a file system such as FAT can only accommodate volume names that are UPPERCASE, less than 11 characters long and with English characters only. Oh, and it will also prevent you from using characters such as dot (.), comma (,), plus (+) and others...
Say you created a bootable USB from an ISO image labelled Linux Mint 13 Xfce 32-bit. If you don't do anything, then the best label you will be able to set for your USB drive will be LINUX MINT. If you leave that USB alone and then want to figure out what version it was, or whether it's 32 or 64 bit next time you reuse it, good luck!
Even worse, if English is not your mother tongue, as is the case for an estimated 93% of the world you can also forget about labelling your drive in your own language!
All in all, I hope you agree that these limitations with regards to the drive label aren't exactly nice and that an application like Rufus should try to do something about it if it can...
This is where the autorun.inf file comes into play. Windows actually makes it possible to set a display label that can be as long and contain as many extended characters as you want (Chinese, Russian, Greek and so on), through the use of an autorun.inf file.
When autorun support is enabled, Windows checks any drive for the presence of an autorun.inf file, and, if such a file is found and it contains a label = line, then rather than use the default label, Windows will display whatever comes after the equal sign as the drive label in explorer.
This very useful feature then, lets you list drives with a label that contain lowercase, extended characters and is more than 11 letters long. And this is why Rufus will make use of it by default.
Also, the autorun.inf can also be used to set the icon that should be displayed for the drive in Windows Explorer, and Rufus also uses that feature to make it easy to recognize a flash drive that was created by Rufus.
As to the presence of an autorun.inf being dangerous, there does exist antivirus software (as well as some people) that are paranoid about seeing an autorun.inf created anywhere, due to these files also providing the capability to automatically execute an application (hence the name).
While it is true that, in the past, this capability was used by some viruses to replicate themselves, Rufus does not use the autorun.inf in this fashion, and as such, only a poorly designed security application, that isn't smart enough to actually scan the content of the file and find out whether it attempts to automatically execute a program, should erroneously take objection to the autorun.inf that Rufus creates.
I hope that this explanation is enough to make you understand that, unlike dumb security applications, you need not overreact when you see an autorun.inf on your USB drive and, what's more, understand that this is really done to help the vast majority of the world have the ability to label their drive as they see fit. After all, provided you don't speak Chinese, how would you like it if you could only label all your USB drives in Chinese?
Finally, remember that Rufus does provide some tooltips when you mouse over the options, and in this case, the Create extended label and icon file option indicates that it will create an autorun.inf. And of course, if an ISO already contains an autorun.inf file, Rufus will not overwrite it.
Formatting a drive, and even more so altering its boot record, is a privileged operation by nature.
If unprivileged users had the ability to perform it, then the first malicious application ran as a non-elevated user could do all sorts of nasty things. It doesn't matter whether the drive is a USB flash drive or a system disk, the same restrictions apply.
As such, you must have the right to run applications with elevated privileges (i.e. Administrator rights) if you run Rufus, and no, it is not possible to create a version of Rufus that doesn't require elevation / can be run as a non-administrative user.
If you used Rufus and have an external USB HDD or USB SSD enclosure plugged in, you may have noticed that Rufus does not list it by default. Instead, it only seems to list flash drives.
The reason for that is by design, because we expect that a large number of people will have backup media plugged in to their computer, with valuable backup data on it, and, especially if they aren't tech-savvy, it would be very easy for them to make a mistake and select that backup drive for erasing instead of the generic USB Flash Drive they just plugged, resulting in a loss of data that they didn't want to lose.
As a result, Rufus has an extended detection mechanism that is designed to prevent the listing of USB HDDs and SSDs, as those drives are unlikely to be used by the vast majority of people to create bootable drives. Of course, you can still list those external drives if you know what you are doing, by checking the relevant option under Advanced drive properties. But this feature is not something that is enabled by default.
And while I do understand that, if you are an advanced user, it may sound like an inconvenience not to have all external drives listed by default, especially since that is what other similar applications may choose to do, please remember that, as a developer I'd still much rather inconvenience a few people, by not letting them erase the data they want, than inconvenience others by allowing them to erase data they don't want to erase.
This is because, since it is a formatting utility, Rufus needs to run with administrative credentials, and, by default, Windows considers the Administrator and your regular user as two completely different entities. Therefore, for security reasons, it will not carry over the network shares you have. You will actually see the exact same behaviour, for instance, if you try to run notepad as Administrator. If you do that and try to access a text file that resides on one of your usual network shares, you will find that they are missing too.
However, Rufus user Jim Woodring indicates that, if you really need to, you should be able to work around this restriction by following the steps documented by Microsoft here, by creating a DWORD registry key labelled EnableLinkedConnections with value 1 under HKEY_LOCAL_MACHINE\SOFTWARE\Microsoft\Windows\CurrentVersion\Policies\System and rebooting your system.
Congratulations. If you are coming to this FAQ with the idea that DD mode has no drawbacks, then you have drunk the ISOhybrid kool aid, which has been a massive plague for people who are effectively trying to ensure that users can actually create a bootable drive in the best possible condition, without being constrained to the shortcomings of a "one method to rule them all" fallacy.
And here, I hear you protesting: "But dd is a lot faster than copying individual files, and it enables the use of a native Linux file system as well as an ESP, plus it makes sure that the resulting drive is a bit for bit copy of the one created by the person who produced the ISO. How could this not objectively be the better option???"
Well, unfortunately for you, it is very easy to disprove that dd mode is the better option for users (and that's not even counting the similar reports I get through e-mail). The fact that Windows cannot natively mount the usual Linux partition that follows the ESP is EXCEEDINGLY CONFUSING FOR MANY USERS. So, writing an ISOHybrid in dd mode will usually break the principle of least astonishment, which Linux maintainers, who are less tuned to hearing reports from Windows users, tend to disregard as a non issue, when it most certainly is an issue.
Furthermore, whereas pretty much any OS provides native tools to easily create a FAT32 partition onto a USB drive, and extract ISO content onto it (which, if you have a UEFI system, should be more than enough to create a bootable drive, provided that the image creators did their job properly), so that you shouldn't even have to use a utility like Rufus, using dd for copying an image requires a little more involvement and, if you are using it manually, can lead to dramatic mishaps (dd is not also called Disk Destroyer by mistake), which are a lot less likely to happen when using file extraction mode.
There is also the problem of restricting the media you create to UEFI boot only, which can be very desireable to do (to prevent installing your OS in BIOS/Legacy/CSM mode when you wanted to install it in UEFI mode), but that can only be accomplished if you can set the partition scheme to GPT... whereas most ISOHybrid media is designed to boot from either BIOS or UEFI and therefore uses MBR.
Oh, and you can of course forget about adding any extra content (such as, say, proprietary Wifi firmware binaries, which you may need to load in order for your platform to have connectivity during installation), or a persistent partition, or using a bootable drive for data on Windows, if it was written in DD mode. For instance, one can't simply use DD mode to install a generic Linux distribution on the Raspberry Pi, whereas, when that same distribution supports ISO mode, one can just take the vanilla ISO, add the handful of extra files that are required for Pi boot (which of course would be impossible to accomplish in DD mode) and install that OS in the same manner as you would do on a PC.
Finally, when using GPT as a partition scheme, using dd to write an ISOhybrid image will imediately result in a "broken" drive, on account that the backup GPT table will not be written where it should (in the very last 33 sectors of the drive) unless you use a drive that is the exact same size as the image, which is never ever the case. This means that, should a UEFI firmware be pedantic (and some are!), it may very well choose not to boot the drive altogether, on account that the GPT is broken. So much for DD mode being a panacea!
The above often results in a first time experience, for Windows users who are trying to try or transition to Linux, that can be very subpar and it is very unfortunate, though not entirely surprising, that a lot of Linux maintainers have so far been turning a deaf ear to the plight of said users, by disimissing these issues as something unfamiliar users should just "plow through", on account of treating ISOHybrids as a mere DD image (which is what the Manjaro and PopOS maintainers currently do) making their own lives so much easier...
Still, because we do believe that Windows users should have the best experience when creating a bootable drive, and not be confronted with something very unexpected that will leave them, at best, inconvenienced, or, at worst, believing that their drive is "broken", where possible, Rufus will continue to recommend ISO mode over DD mode (while obviously still giving the choice, for users who wish to do so, to write their ISOHybrid in DD mode).
That is a result of the check for update feature and the name of the executable you use. Depending on the name of the Rufus executable you downloaded, the check for update will or will not be enabled by default. In the second case, you will be prompted to decide whether you want to let Rufus access the internet to check for updates, to which you can say no if you want.
To explain this behaviour, I have to provide some history:
As a software user, I too prefer to use software that is opt-in, i.e. that lets users know that it may try to connect to the internet, and asks users for their permission before it attempts to do so.
As such, initially, I was planning to make Rufus opt-in always. However, I got requests from people redistributing Rufus NOT to prompt the user with regards to connecting to the internet, on account that some people would be confused by the question.
How could I solve this dilemma then? Simple: When Rufus starts, it checks for the name of its executable, and if it finds that it is called "rufus.exe", it does not display the question on whether a user wants to check for update, and enables that check automatically.
On the other hand, if you launch rufus-#.#.exe (or any version of Rufus that isn't named rufus.exe), you will be prompted on whether you want to enable the check for updates, in which case you have the option to disable it altogether, as well as find more information about the information we collect.
This allows people who really want to make Rufus available without having users being bombarded by a prompt on first use to simply rename the application to rufus.exe.
And of course, if you did come across an application called rufus.exe, or you renamed it yourself, but would like to disable update checks, you can easily override the initial choice by going to the settings.
Yes
1. Whether you enable or disable the check for updates, Rufus needs to store some registry keys under HKEY_CURRENT_USER\Software\Akeo Consulting\Rufus\ so that it can identify whether the check for update was enabled by the end-user, and how this check should behave (how frequent, when the last check was ran, etc.).
These keys can be deleted by pressing Alt-R while Rufus is running.
2. Also, while Rufus is running, and even if you use the portable version, it temporarily modifies the Local Group Policy so that you don't get a Windows notification about a newly inserted USB device. If we weren't doing that, Windows would prompt you to choose what you want to do with the device, which is annoying when all you probably want to do is use Rufus to format it.
This Local Group Policy is restored to its original value when Rufus exits.
If there are any residuals from this operation, they are not due to Rufus, but rather are the result of how Windows handles Group Policy changes, as it may have to create keys when a Policy is first applied, but that doesn't mean the presence of these extra keys will change the behaviour of your system. On exit, Rufus always requests Windows to restore the policy settings as it found them.
For more on this, please have a look at SetLGP() calls in rufus.c, and the implementation of SetLGP() in stdfn.c.
Oh, and since I'm getting some very vocal complaints about this, if you freak out about an application modifying registry keys and/or using the methodology (Group Policies) that Microsoft advocates system administrators to use when changing Windows settings, then you're probably better off not using Windows at all. Seriously.
Code 715-123130 ('unable to complete your request at this time') when trying to download a Windows ISO
You may get the following error when trying to download a Windows ISO through Rufus:
With message (that may be translated in your own language):
Error: We are unable to complete your request at this time. Some
users, entities and locations are banned from using this service. For
this reason, leveraging anonymous or location hiding technologies
when connecting to this service is not generally allowed. If you
believe that you encountered this problem in error, please try again.
If the problem persists you may contact Microsoft Support - Contact
Us page for assistance. Refer to message code 715-123130 and
xxxxxxxx-xxxx-xxxx-xxxx-xxxxxxxxxxxx.
This error comes from Microsoft, since Rufus downloads Windows ISOs directly from the Microsoft servers.
In early 2023, Microsoft have stepped up the anti-abuse protection of their ISO download servers and are a lot more proactive (read: aggressive) at banning IP addresses that they consider to be either putting excessive stress on their servers, or that come from a specific region that they want to filter out.
If you aren't trying to download an ISO from a download restricted country, this error usually occurs if you (or someone behind the same external IP as the one you use) downloaded a few too many ISOs in rapid succession, and Microsoft have banned that IP as a result. If that is the case, this should be a temporary ban that expires after something like 24 hours, so you should either wait a day or two or, if possible, get a new IP address. But, again, because it is Microsoft-controlled and IP based, there is nothing Rufus can do about it and, as a matter of fact, if you try to download an ISO from https://www.microsoft.com/en-US/software-download, you should find that you get the same error.
This is a generic top-level error which can happen for many reasons. You will need to look at the log to determine the actual error, which may be some of the ones listed below:
If you are seeing [0x00000005] Access is denied during USB drive creation, it means that something external to Rufus is preventing it from accessing the drive, and YOU will need to figure out what it is. For a start, you can take a look at the list of software Rufus is not compatible with, bearing in mind that this list is far from being exhaustive.
It also needs to be pointed out that, as per the incompatible list above, if you are using a recent version of Windows 10, and have enabled the Controlled Folder Access feature, you will need to disable it to be able to use Rufus, as the whole point of that feature is to prevent applications from writing to drives outside of the location of the software being executed, which of course, Rufus must be able to do if you want it to create your drive. Of course, you may wonder why Rufus is unable to repartition and reformat a drive when Windows can, but it is only because, since Microsoft controls the whole thing, they added an exception to Controlled Folder Access for the Windows native utilities...
Outside of Controlled Folder Access, which is mostly a feature of Windows 10, it could be something like a security application or your OS settings or it could even be a hardware issue, that prevents access to your USB drive. For instance, there exist poorly designed security solutions that scan removable drives, but "forget" to relinquish access to the drive when they are done scanning. This creates conflicts with Rufus, as the first thing Rufus does is request exclusive access to the drive before repartitioning and reformatting it, in order to ensure that it never erases a drive that is still being accessed for reading or writing. In our opinion, requesting exclusive access to a drive is something that any formatting applications should do, as it can avoid a lot of bad surprises...
With version 2.15 and later, Rufus might actually help you identify the name of the application or service that is preventing access. For instance, if you happen to have a command prompt open to a partition on your USB, Rufus might report the following in the log:
Requesting lock...
Could not lock access to \\?\Volume{d25bbe87-287c-11e5-82ba-acfdce2112d0}: [0x00000005] Access is denied.
WARNING: The following process(es) or service(s) are accessing \Device\HarddiskVolume9:
o 'C:\Windows\System32\cmd.exe' (pid: 13124, access: x)
You should try to close these applications before attempting to reformat the drive.
Could not lock volume
This tells you that C:\Windows\System32\cmd.exe (the Windows executable behind every instance of a command prompt) is the problematic application and that it is probably a good idea to close it before trying to format your drive again.
Now, if you can't seem to identify the problematic application, yet are absolutely sure that whatever application might still be accessing the drive is not doing anything with it, you can try the Alt-, cheat mode (see below), which tells Rufus not to request exclusive access, but we strongly recommend that instead, you try to identify the culprit application, and report the issue to its developers so that they can fix it (because an application should only keep access to a drive open when it actually needs to read/write to it).
At any rate, Access is denied is NOT a problem that is internal to Rufus, so there really is nothing more that I can do with the application to work around this error.
This error can happen early on in the formatting process if you happen to have disabled automounting (which is a different feature from autorun) and if you are using a Fixed USB drive. If that is the case, you should do the following:
- Open an elevated command prompt (type
cmdin the Windows menu search box, then right click oncmd.exeand select Run as Administrator). - Type:
mountvol /e - Close the command prompt
It may also happen later on during the ISO file extraction process, in which case this isn't the result of the automount settings, but more likely a problem due to a flaky USB connection. For instance it may happen if you try to connect an USB 3.0 flash drive through an extension cable.
The reason is that USB 3.0 is fast and therefore very prone to cross-talk and interferences if the connection to the device is of poor quality, due to a bad cable/connector. When that happens, a temporary disconnection of the flash drive may occur, and because Rufus is usually faster to transfer data than the other tools, it will detect a problem.
Since version 1.4.2, code has been added that attempts to retry the writing of the file if that happens to try to mitigate the problem, but if your USB 3.0 flash drive is not using a solid connection, you should try to take measures to avoid that.
If you are seeing the following in your log:
Creating file system...
Error while formatting
Format error: Undetermined error while formatting.
It usually means there exists an incompatibility, that has nothing to do with Rufus, between Windows and your device. You should usually be able to confirm this by attempting to format your drive, using the same file system as the one you selected in Rufus (e.g. NTFS or FAT32), using the native Windows format utility, such as the one you can access by right-clicking in the device.
This means that there is very little Rufus can do, as Rufus does rely on Windows' native services to format a device, and therefore, if Windows itself cannot format your device, neither will Rufus.
If you are reporting an issue with this error then, unless you have actually tested that Windows was able to format your drive using the same file system as the one you selected in Rufus, whereas Rufus failed, I will simply point you to this FAQ entry, as there is not much I can do about Windows' native incompatibilities.
Unfortunately, there exist many types of bootable ISOs, and Rufus cannot support them all, especially as some of the bootable ISO types Rufus doesn't support are very custom and not used very much.
However, if the bootable content is DOS based, which would be the case for most unsupported El Torito bootable ISOs, you can usually work around the limitation, by doing the following. For this example, I am going to use the SeaTools for DOS bootable ISO image provided by Seagate. The other tool that you should also have installed for the following is the invaluable 7-zip.
The steps then are as follows:
- Create a bootable USB from Rufus using FAT32 for the file system and FreeDOS as the target
- Open the seatools.iso with 7-zip. In this case, you will see something like this:
- In this case, the content of the root drive doesn't seem to contain the DOS files. However the SeaTools.ima file looks interesting, as it appears to be a virtual disk image. Let's open it with 7-zip (just double click on the file):
- That's more like it! These are DOS files, so you can try extracting them to the root of the bootable USB you created with Rufus (overwriting existing files if needed) and see how it goes...
ISO images for OpenBSD are unsupported due to the boot method used. Use the ###.img images instead. These will be written in DD mode and work on supported USB drives.
Most of the time, if Rufus managed to create a bootable USB, and that USB booted, you are pretty much on your own, and you will have to see with the makers of the ISO if something doesn't work as expected. This is because, unlike what you may believe, it's NOT because an ISO can boot from optical disc that it will also boot from USB, and, outside of very rare cases, the people who created the ISO must actually take steps with the media, to ensure that it can boot once converted to USB (such as ensuring that FAT32 or NTFS are supported as boot file system, or having an installation procedure that can actually locate a USB media rather than just the optical disk, or properly following the UEFI specs for disk boot, and so on). Outside of fairly straightforward cases, however, Rufus cannot compensate for these steps if they haven't been carried by the people who created the ISO, as almost every ISO would require its own very specific exception to be properly converted to USB, which is unrealistic to expect a generic conversion application to do.
Now, rather fortunately (or unfortunately depending on your point of view), most major OS distributors out there have properly solved the dual optical/USB compatibility, which is why many people tend to believe that any ISO that can be booted when burned to a disc should also have no problem being booted from USB. This couldn't be further from the truth. It only appears this way because the Microsoft developers, and the Arch developers, and the Debian developers, and the Ubuntu developers, and so on, have actually done a good job at hiding the subtleties that are required for supporting USB boot, and made it look easy. Every so often, however, you'll get a distro that isn't aware of the work that isn't aware of those and, even if they are based on a distro that has long solved these issues, will manage to screw up the process.
It could be that they will seek the installation media by label, without realizing that FAT32 limits these labels to 11 uppercase characters (therefore lookup will fail when converted to FAT32 USB), or they will create a custom UEFI optical boot loader, without realizing that they also need to create disk equivalent, that support FAT32, and make sure that these are located in /efi/boot/bootia32.efi or /efi/boot/bootx64.efi.
All this to say that, in most circumstances, you will need to see with the makers of the ISO when it comes to issues encountered after the USB has booted.
This being said, here are a few items that may be helpful to you with that respect:
Please don't ask for support if you are experiencing an issue when running Rufus on a Windows Insider build (such as Windows 10 Insider or Windows 11 Insider).
Microsoft often introduces breaking features in Insider builds that don't get carried out in the actual release, and it is actually counter productive, as well as a massive waste of time, to try to figure out the various ways in which EXPERIMENTAL WINDOWS BUILDS may break applications.
As such, if you want to receive support, I will ask you to please make sure that you run Rufus on an actual release version of Windows and not on an Insider build.
Please don't ask for support regarding Windows XP, Windows Vista or Windows 7 installations, or even regarding running Rufus on these platforms. Because they have been retired by Microsoft, and supporting Windows 10 and Windows 11 already takes more than enough of my time, I simply don't have the scope to support these versions of Windows any longer.
- The last version of Rufus that runs on Windows XP is version 2.18, which you can download here.
- The last version of Rufus that runs on Windows 7 is version 3.22, which you can also download here.
Also note that while versions of Rufus up to 3.22 may run on Windows 7, it will still be lacking some of the features that the same version may offer on more recent platforms such as Windows To Go or Windows User Experience/Windows 11 bypass.
Therefore, if you want support and all the features, I will kindly ask that you use a version of Windows that is actively supported by Microsoft. Thank you.
If you selected the Remove requirement for an online Microsoft account option in the Windows User Experience prompt of Rufus, it is possible that you might run into the following error during Windows installation:
Windows could not parse or process the unattend answer file for pass [specialize].
The settings specified in the answer file cannot be applied.
The error was detected while processing settings for component [Microsoft-Windows-Deployment].
This can happen if you are trying to install or reinstall Windows on a machine where Windows S Mode has been enabled, because Windows S Mode forces the use of a Microsoft online account, and therefore, it is incompatible with the installation option that enables the use of a local account.
You should also be aware that, since Windows S Mode is a setting that is permanently applied to the hardware (through UEFI variables), even if you deleted the existing Windows partition altogether, Windows Setup will still detect that your PC uses S Mode and produce the error.
As such, if you want to proceed, you must recreate the media in Rufus and uncheck the Remove requirement for an online Microsoft account option or find a way to first remove S Mode from your computer... which may be difficult to do if you have already uninstalled Windows, as most of the options to remove S Mode require doing it from Windows.
This seems to happen only with some USB Flash Drives on some platforms, for reasons that only Microsoft knows.
Here is what you should do to work around this issue:
- Remove all partitions on the drive (no need to launch
diskpartas some suggest, you can just use the partition selection screen) - Unplug the USB drive.
- Click Next. You will get the error:
Windows is unable to install to the selected location. Error: 0x80300001. - Replug the USB drive.
- Click Refresh.
- Click Next.
The installation should now proceed as expected.
- As of Rufus 2.0, Windows To Go is only available if you are running Rufus on Windows 8 or later. If you are running Rufus on Windows 7 or earlier, the option will not be offered (though you can create Windows To Go drives from Windows 7 ISOs if you run Rufus on Windows 8 or later).
- To create your Windows To Go drive, you should try to use a version of Windows that it at least the same version as the one of the ISO you are trying to create a To Go drive from. This means that, if you want to create a Windows 8.1 To Go drive, you should run Rufus on Windows 8.1, Windows 10, or a later version of Windows. Trying to create a Windows 8.1 To Go drive on Windows 8.0, for instance, is unsupported and will likely result in errors during creation.
- The Windows To Go option may not be available with all Windows images, especially the ones created with the Windows 10 Media Creation Tool. This is because Microsoft tools can create ISOs containing an
install.wimthat is incompatible with Microsoft's own WIM extraction APIs (which is what Rufus uses). If that is the case, you will see a line in the log that states:Note: This WIM version is NOT compatible with Windows To Go. - For more technical details on how Windows To Go is currently implemented in Rufus, see here.
Unfortunately, it looks like deleting user documents is not the only quality issue that Microsoft let slip through with the 1809 update. It also happens that they included a new version of the WppRecorder.sys driver that has a major bug when you are trying to run Windows from a media that is accessed through USB. If you do so, and depending on the media being used, you may experience Blue Screen Of Death (BSOD) on boot, with error code: DRIVER UNLOADED WITHOUT CANCELLING OPERATION against WppRecorder.sys.
If you want to run Windows 10 1809 as a Windows To Go drive, you should, therefore, replace C:\Windows\System32\Drivers\WppRecorder.sys from your media with an earlier version, such as the one you can find from Windows 10 1803.
Note that, while we do understand that you prefer to see this driver replaced automatically by Rufus, the fact that Rufus must support more than the Intel x86 architectures when it comes to Windows To Go drive creation (for instance Rufus will happily let you create an ARM64 Windows To Go drive if you have the relevant ISO), and that only Microsoft has the legal rights to distribute the driver binary means that, no, we cannot embed a "working" version of that file in Rufus which we would replace the problematic driver with during the drive creation. And even trying to replace the driver with the local system version (if it exists) can be problematic, as it requires the Windows To Go creation process being conducted from a version of Windows that is not already running 1809, with the same architecture as the target, and that provides a driver that has been validated to be compatible with Windows 10 1809...
Instead, we recommend that you either use 1803 to create a Windows To Go drive or wait for the next feature release of Windows 10, where Microsoft will hopefully have fixed this bug.
This can happen if the people who created the ISO chose not to add FAT32 module support in their GRUB EFI bootloader (for instance, the Manjaro distro maintainers are currently doing just that, which is VERY BAD PRACTICE), because they are relying a bit too much on the kludge that is ISOHybrid. Of course, since Rufus tries to use as much of the original ISO as it can, if the distro maintainers decide to use a crippled bootloader and completely ignore the de-facto way of booting a UEFI ISO, which is to copy all its content, as-is, onto a FAT32 drive (a.k.a. File System Transposition), then you will encounter issues...
In this case, as Rufus explicitly advises you to do if you find that copying files in ISO-mode doesn't work properly, you can try recreating the USB and select DD-mode when prompted. Or you can voice your concerns directly to to the distro maintainers, so that they include FAT32 support in their GRUB EFI bootloader, as this is what they should have done from the start.
Alternatively, you may also run into issues when booting a drive that was partitioned as GPT if the distro maintainers also chose not to include the part_gpt module when running grub-mkimage (See here). In this case, you need to select MBR partition scheme for UEFI computer, and the grub.efi boot should work as expected.
See the note above.
If you created a media with persistence enabled (i.e. if you created the media and set the persistent partition size to something else than 0), you may find that you are getting the following during boot:
BusyBox v1.27.2 (Ubuntu 1:1.27.2-2ubuntu3) built-in shell (ash)
Enter 'help' for a list of built-in commands.

(initramfs) mount: mounting /cow on /root failed: Invalid argument
overlay mount failed
This is because all Ubuntu derivatives, except for Ubuntu 19.10 are currently plagued with bug #1489855 that prevents the OS from being able to mount a persistent partition that resides on the same media as the one it booted from. This is a major Linux/casper bug that, unfortunately, has remained uncorrected for years, therefore almost all releases that use casper to mount a persistent partition are affected. Especially, this currently applies to both Ubuntu 18.04 LTS and Ubuntu 19.04, as well as Mint.
Your only option here is to either use Ubuntu 19.10, where the bug has finally been patched, or use a distro that doesn't rely on casper for persistence (such as Debian Live) or disable persistence altogether.
This also demonstrates how critical it is for people to report Linux issues when they encounter one, or remind distro maintainers that an open issue is affecting them too, rather than assume that things will get fixed on their own (or that, somehow, Linux distros are immune to major bugs such as the above). This bug was reported in 2015, yet it took 4 years for the maintainers to realize how serious it was, on account that too few people complained about what is, in retrospect, a very serious failure of the persistence mechanism implemented by Ubuntu. And if you are reading this FAQ entry specifically because you ran into this issue, then you are ultimately paying the price for people just like yourself choosing not to get involved in bug reporting. So please always strive to make an effort to report issues you encounter with Open Source software, so that you don't have to be confronted with yet another major Open Source bug, that should have been fixed a long time ago, but wasn't due to lack of user reports... And yes, this applies to Rufus as well!
When starting the installation of openSUSE, you may get the error:
Unable to create repository from URL 'hd:/?device=/dev/disk/by-id/usb-Your_USB_Brand_AABBCCDDEEFF1234567890-0:0-part1'.

Details:
[|] Valid metadata not found at the specified URL
History:
 - [|] Repository type can't be determined.

Try again?
If that is the case, you should answer Yes and on the YaST2 prompt that appears and enter /media.1 in the Directory field (you can leave the Repository Name field empty). Then you should be able to proceed with the installation.
Note: This also affects openSuse Live derivatives such as Mandriva or Gnome.
Because the openSuse Live media detection process is incompatible with a FAT filesystem, it is not possible for Rufus to convert openSuse based live media to bootable USB using its regular method.
If the ISO was created as hybrid, you may, however, be able to create a bootable USB image by disabling ISO support (Alt-I) and using DD-Image mode, or selecting "Write in DD-Image mode" when prompted.
This is a problem that is described in greater details in this QubeOS issue.
The checksum error has to do with the fact that almost any recent ISOHybrid image, that contains a checksum validation test, supports UEFI boot and therefore will have a small FAT32 partition. And the root of the issue is that:
- Windows automatically mounts any partition it recognizes from a removable media (that is anything that is FAT/FAT32, NTFS, exFAT or ReFS).
- After mounting such a partition, Windows automatically alter its file system, be it by creating unwanted files (which Microsoft does not provide any details about) in the
System Volume Informationdirectory, and, if that wasn't enough, by altering the last access timestamps in the global file system records.
Because of this, and through no fault of the utility who created the drive, the image does get altered after it is copied on disk. It doesn't matter if you used something like Win32 Disk Imager, or created the image on Linux using dd and then plugged it on a Windows machine, it's just the default behaviour of Windows to alter the content of flash drives...
As such, the only way to get a checksum that works is to have the distro maintainers acknowledge the issue, and update their checksum validation to ensure that the content that may get altered by Windows is excluded.
First of all, you should understand that there is a big difference between major errors, which will be reported to the end user through a prompt and prevent the creation of the drive, and benign errors, that are perfectly normal as part of the boot creation process and are simply reported in the log.
Because distros tend to recompile their own version or Syslinux or GRUB, most of the times with very minimal changes, Rufus uses a complex fallback mechanism when it looks for Syslinux/GRUB, which ensures that, should a distro create a version of Syslinux/GRUB that is incompatible with the official release, a custom set of Syslinux/GRUB binaries can be uploaded to the server, to help users of said distro create compatible bootable drives.
So, what happens is that Rufus will first look to see if there is any need for such custom binaries, by looking for a subdirectory, tagged with the custom string that the distro used to compile their version.
This means that if Rufus finds that you are using a distro that uses a custom version of Syslinux 6.03, tagged 20151222, it will see if it can find the required files in a Syslinux-6.03/20151222/ subdirectory on the server.
If this directory does not exist (which will produce a benign error in the log), then it means that the default Syslinux 6.03 files should work, and thus Rufus will simply pick those from the Syslinux-6.03/ directory on the server.
Therefore, unless you actually experience an issue with Syslinux during boot, you shouldn't assume that the messages you see in the log mean that there exists an issue with the Syslinux/GRUB downloads. As long as the drive boots, there really is nothing special about these "errors".
Finally, in case you are having issues with your internet connectivity (corporate filtering, etc.), you may want to see this entry from the Usage Notes.
If you have a USB drive that is plugged regularly on your computer, and that you want to make sure not to format with Rufus, even accidentally, you can actually tell Rufus to always ignore this drive so that it will never get listed. Note however that this can only apply to USB drives, and not non USB hardware (such as virtual drives).
To filter out a USB drive, you first need to obtain its VID and PID, which you can get from the Rufus log (these will be the XXXX:YYYY values listed on the Found USB device ... line in yhe log).
Then, once you have that, if using the regular version, you should create a new IgnoreUsb## DWORD (32 bit) Value in the registy, where ## is a numeric value from 01 to 08, under Computer\HKEY_CURRENT_USER\Software\Akeo Consulting\Rufus\ and set it to the VID:PID value of your device.
For instance, if you saw a line such as Found USB device 'Mushkin Ventura Ultra USB Device' (174C:55AA) [ID] in your log, then you can create a Computer\HKEY_CURRENT_USER\Software\Akeo Consulting\Rufus\IgnoreUsb01 DWORD registry entry and if you set its value to 174C55AA (in hexadecimal), the next time you run Rufus, you will see a line like:
Ignoring 'Mushkin Ventura Ultra USB Device' (174C:55AA), per user settings
If using the portable version, the process is basically the same, except you would add the following line to your .ini file:
IgnoreUsb01 = 0x174C55AA
First of all, a little reminder as to why this prompt is here in the first place.
By default, the Windows installation process is a two-step one. The first step is to boot from USB and copy the installation files to the hard drive, and the second step (after reboot), is to boot from the hard drive and continue the installation.
Obviously, if Rufus creates a USB that always boot, regardless of the step being executed, unattended installations of Windows would be impossible, as someone would need to be in front of the computer to remove the USB or change the BIOS option after the first step is completed to ensure the computer boots from the HDD.
By installing an MBR that prompts the user and will default to boot from the HDD if no action is taken (and it is bootable - if not the USB is always booted), Rufus does let users perform an unattended installation of Windows, which is a very desirable feature. As a matter of fact, the "Press any key to boot from USB" prompt mimics the "Press any key to boot from CD" prompt you get when installing Windows from optical media, so in that respect, Rufus tries to be as close as possible to the behaviour one would get when installing from the CD or DVD.
Now, there may be some cases where you still want to disable that prompt and ensure that your USB will boot always. If so, here's what you should do:
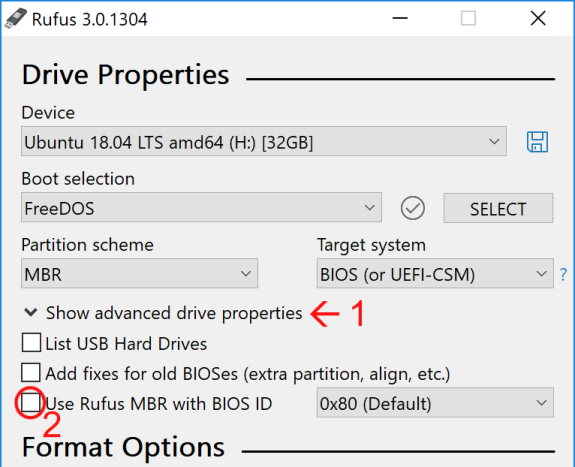
- Click on the arrow to display the advanced options.
- Uncheck the checkbox for "Use Rufus MBR with BIOS ID:", which should have been checked by default.
You can display advanced options by clicking on the white arrow near Format Options.
Then by, selecting the relevant option in the Create a bootable disk dropdown, this mode also gives you the ability to install:
- a blank Syslinux bootloader
- a blank Grub/Grub4DOS bootloader (
grldr) - a blank ReactOS bootloader (
freeldr) - a blank UEFI:NTFS bootloader
Of course, since all of the above does is install the boot records, you will still have to manually provide the relevant configuration files and additional binaries.
Note: If a cheat mode has a star (*), it means it gets preserved between runs.
-
Alt-B* (v1.4.7 or later) - Toggle fake drive detection during bad blocks check:
By default, Rufus will check for fake USB flash drives that pretend there is more capacity than actually is by looping over the flash. This check which is enabled by default is performed by writing the block number sequence and reading it back during the bad block check.
-
Alt-D(v3.0 or later) - Delete therufus_filessubdirectory.
-
Alt-C(v2.18 or later) - Cycle (reset) the USB port of the currently selected device.
Note that this will not work on Vista, Windows 7 or Server 2008. -
Alt-E* (v2.0 or later) - Enable dual BIOS+UEFI mode for Windows installation media. For the reason why dual BIOS+UEFI is disabled by default, see here
-
Alt-F- Enable fixed disk detection (v1.3.4 or earlier)/Enable USB HDD detection (v1.4.0 or later):
This is the same as enabling List fixed (non flash) or unpartitioned USB disks (v1.3.4 or earlier) or List USB Hard Drives (v1.4.0 or later) in the advanced options. This UNSUPPORTED mode will let Rufus detect and format USB drives such as USB HDDs, which it doesn't do by default. The reason this is disabled by default is that it can be a potentially risky operation when Rufus is used by non technical-savvy people. For instance, if someone also keeps an USB HDD as a backup drive, and plug an USB Flash Drive, they may inadvertently end up formatting their HDD and lose valuable data. If you use Rufus with this option enabled, you are on your own!
-
Alt-G* (v3.11 or later) - Toggle VHD detection:
By default, mounted Virtual Hard Drives (e.g. Microsoft or VMWare) are enumerated for use by Rufus. With this option, you can prevent them from being listed.
-
Alt-I(v1.4.7 or later) - Toggle ISO image support:
By default, when an ISO image can be used as both a regular bootable ISO (Syslinux, WinPE, ...) or bootable flat disk image (DD), Rufus will propose the former method, as default, when copying the data (while still leaving you the option to select DD if you wish). With this option, you can disable ISO mode altogether to force DD image writing without being prompted.
-
Alt-J(v1.4.3 or later) - Toggle Joliet support for ISO9660 images:
Some ISOs (e.g. Ubuntu) have Joliet extensions but expect applications not to use them, due to their reliance on filenames that are greater than 64 chars (the Joliet max length for a file name). This option allows users to ignore Joliet when using such images.
-
Alt-K(v1.4.3 or later) - Toggle Rock Ridge support for ISO9660 images:
Note that when Rock Ridge is enabled, Rufus performs the initial scan of an ISO9660 image with Joliet disabled, so that it can find if Rock Ridge extensions are being used (if there exists a Rock Ridge file with a name greater than 64 chars or if there exist symbolic links). If you would rather prefer Joliet to have precedence over Rock Ridge, you can disable Rock Ridge altogether using this option.
-
Alt-L* (v1.3.3 or later) - Force the use of Large FAT32 formatting for all target sizes:
By default, the Large FAT32 formatting functionality, developed by RidgeCrop, is only used for drives that are larger than 32 GB. For any drive smaller than 32 GB, the default Microsoft FAT32 format is used. If you would prefer the Large FAT32 formatting to be used always, you can use this option.
-
Alt-M* (v3.13 or later) - Ignore Boot Marker:
This toggles the check for the 0x55 0xAA boot marker at offset 0x1fe, without which a disk image is seen as non-bootable and won't be opened by Rufus. When this is enabled, Rufus will treat anything you select as a writeable DD image. However, this does NOT mean that Rufus can magically make it bootable. If you use this option, you are 100% on your own!
-
Alt-N(v1.4.4 or later) - Enable compression when creating an NTFS drive:
You may have to play withAlt-Sto disable size checks when using this feature. Also, bear in mind that NTFS file compression is not possible on drives that have a larger cluster size than 4K (which Rufus will NOT check). Finally, if you use this unsupported option, you are 100% on your own!
-
Alt-O(v2.12 or later) - Dump ISO image:
Dumps the first compatible optical media Rufus finds to an ISO image. If you use this and it works, great! If it doesn't, you are 100% on your own!
-
Alt-Q* (v2.11 or later) - Toggle file indexing:
Toggle the file indexing attribute (“Allow files on this drive to have contents indexed in addition to file properties”) for the file systems that support it. Note that starting with Rufus 3.0, file indexing is disabled by default.
-
Alt-P(v3.11 or later, Windows 10 ONLY) - Toggle a GPT ESP (EFI System Partition) to Basic Data so that it can be accessed:
By default, Windows 10 prevents access to GPT ESPs. By using this cheat mode, you can convert an ESP residing on the currently selected drive back and forth to Basic Data, thus enabling access with File Explorer or other software. Note that this cheat mode will only work when Rufus is running on Windows 10 and if the drive is GPT (MBR ESPs are not handled, as they are usually not prevented access by Windows).
-
Alt-R(v1.3.0 or later) - Erase registry keys:
Remove all registry keys that were created by Rufus (underHKEY_CURRENT_USER\SOFTWARE\Akeo Consulting\Rufus).
-
Alt-S- Disable size limits:
By default, Rufus will not copy ISOs that are larger in size than the target USB drive. If this is enabled, the size checks are disabled.
-
Alt-T* (v2.3 or later) - Preserve timestamps when extracting ISO content.
-
Alt-U* (v1.4.7 or later) - Use PROPER units when displaying sizes, instead of the whole Kibi/Gibi nonsense.
-
Alt-V* (v3.6 or later) - Use VDS for partitioning and formatting [EXPERIMENTAL] (or, from v2.3 to v2.18, save selected device to UNCOMPRESSED VHD).
-
Alt-W* (v2.0 or later) - Enable VMWare disk detection.
-
Alt-Y(v2.18 or later) - Force the check for update to be successful:
This is only useful if you are working on a translation and want to check the content of the check for update dialog.
-
Alt-X- (v3.0 or later) Delete theNoDriveTypeAutorunkey on exit:
This key is used to disable Windows popup messages when an USB drive is plugged in. Rufus does modify it through the use of Local Group Policies. This is only really useful if the app crashed.
-
Alt-Z(v2.6 or later) - Zap (zero) the whole target device.
-
CtrlAlt-Z(v3.2 or later) - "Fast" Zap (zero) the whole target device:
The difference with the above is that this "Fast" version tries not to re-write blocks that have already been zeroed. This is only useful if you have a drive that has already been zeroed, with a read speed that is much higher than its write speed, as this incurs an additional block read, which, depending of the circumstances, might make the zeroing much slower...
-
Alt-.* (v2.3 or later) - Enable verbose USB enumeration debugging.
-
Alt-,(v2.5 or later) - Disable exclusive locking of the USB drive.
-
Alt(v3.7 or later) - Can be used on some operations to switch between percent completed/transfer speed/time remaining. -
Ctrl-L- Opens the log window (same action as pressing the 'Log' button left of START). -
Ctrl-P* (v3.22 or later) - Preserve the log between sessions. -
Ctrl-SELECT(v3.11 or later) - After having selected an ISO, this can be used to provide the path to a zip archive (only .zip files are supported for now) containing extract content that you want to extract "as is" on top of the extracted ISO image content. Obviously this only works when writing an image in ISO mode. Also it is your responsability to ensure that the destination drive had enough space for this additional content, as Rufus will not do that for you.
If you want some more insight about what Rufus does when it checks for updates, you can create the following registry key: HKEY_CURRENT_USER\Software\Akeo Consulting\Rufus\VerboseUpdateCheck as a DWORD, and assign it a value or 1 (verbose) or 2 (even more verbose). You will then extended information about the update check in the log.
The following images (ISO, DD) are either incompatible or have been known to cause problems when used with the current version of Rufus:
-
Acronis True Image
Uses a boot method that is incompatible with Rufus, so stop asking already. Note that newer versions should be compatible with UEFI boot, however. -
openSUSE LIVE ISOs, and its derivatives such as Mandriva/Mageia
This should only apply when trying to run the pre Leap Live images (pre-Leap installation should be okay, barring one potential issue, and Leap rescue more should also run fine). This mostly had to do with the openSUSE maintainers having decided to restrict Live support to a file system (ISO9660), which was too limiting for Windows usage. Hopefully, the Leap releases will make this a thing of the past.
-
Chromium/ChromeOS images
While the image can be written successfully in DD Image mode, once written you will NOT be able to repartition/reformat your USB from Windows if you used any application that tried to clean the drive, such asdiskpartor Rufus 2.9 or earlier.
This is linked to the fact that the Windows "clean disk" command (IOCTL_DISK_CREATE_DISK) does not properly erase all of the MBR/GPT structures and leaves artefacts behind that Windows cannot handle properly. Unfortunately, this means that the only option to recover your drive is to erase it in Linux...
Rufus 2.10 and later include a workaround, so that, at the very least, it does not leave your drive inoperable from Windows, after trying to reformat a drive where Chromium was installed. But, because this is essentially a Windows bug, you will need to be cautious about which application you use to repartition or reformat a drive after installing Chromium on it.
If you're using any of the following, Rufus may not work as expected. In all cases, this is due to the listed software or hardware preventing the level of access required by Rufus to properly set up a USB device, for instance, by preventing operations that are 100% legitimate, such as writing an autorun.inf file or by latching onto a USB drive and preventing the exclusive access that Rufus requires for partitioning and formatting.
Thus, if you want to use Rufus, I would advise using an alternative from the items listed below:
- Lexar JumpDrive Secure USB device
- PNY 16GB Retract USB (and some other PNY drives). This is due to a buggy firmware from PNY, and it is not a Rufus issue. You may be able to recover your drive using one of the Ufix downloads from this page. If you need more help, please contact PNY support.
- ASUS USB 3.0 Boost Storage Driver
-
ASUS Armoury-Crate (
LightingService.exe) - Avira Antivirus
- Bit Defender Client Security
- Windows Defender's Controlled Folder Access
- Defraggler
- ESET Anti Virus, if device control is enabled.
- Explorer++
- Ext2Fsd Only intermittently, as reported by a user.
- G DATA Antivirus, when behavior monitor is enabled.
- Genie Timeline Backup Pro
- IObit MalwareFighter (seems to use BitDefender Engine)
- Legion Fan Control
- MBR Filter
- Open Hardware Monitor
- Panda USB vaccine
- Paragon ExtFS for Windows / Paragon HFS+ for Windows
- RealPlayer Cloud
- Sophos Antivirus if you have Peripheral Control Policy set to disable access to USB storage devices. But even if you don't have Peripheral Control Policy set, you'll probably experience very slow startup times.
- Sophos Endpoint Protection
- Sophos Intercept-X (Starting to get the trend yet? In short: Don't use Sophos)
- Trend Micro OfficeScan and some other versions of Trend Anti Virus.
- USB Drive Letter Manager (USBLDM)
- USB Safely Remove
- Windows' ReadyBoost (if enabled on the drive you are trying to format)
Copyright © 2012-2024 Pete Batard
