接上文,我们继续分析,本文将分析SpringApplication#run(String...)方法。
方法内容如下:
public ConfigurableApplicationContext run(String... args) {
    // 1\. 创建 StopWatch 实例,其实就是个计时器,用来统计springboot启动耗时
    StopWatch stopWatch = new StopWatch();
    stopWatch.start();
    // 准备空的ApplicationContext,以及一组异常报告器
    ConfigurableApplicationContext context = null;
    Collection<SpringBootExceptionReporter> exceptionReporters = new ArrayList<>();
    // 2\. 配置一个系统属性:java.awt.headless,java.awt.headless模式是系统的一种配置模式,
    // 在系统可能缺少显示设备、键盘或鼠标这些外设的情况下可以使用该模式
    configureHeadlessProperty();
    // 3\. 获取监听器,也是从 META-INF/spring.factories 中获取
    SpringApplicationRunListeners listeners = getRunListeners(args);
    // starting():首次启动run方法时立即调用。可用于非常早期的初始化(准备运行时环境之前)。
    // 4\. 发布事件
    listeners.starting();
    try {
        // 封装传入的参数
        ApplicationArguments applicationArguments = new DefaultApplicationArguments(args);
        // 5\. 处理环境参数
        ConfigurableEnvironment environment
                = prepareEnvironment(listeners, applicationArguments);
        // 6\. 如果有配置 spring.beaninfo.ignore,则将该配置设置进系统参数
        configureIgnoreBeanInfo(environment);
        // 7\. 输出banner
        Banner printedBanner = printBanner(environment);
        // 8\. 创建applicationContext
        context = createApplicationContext();
        // 启动错误报告的自定义回调接口
        exceptionReporters = getSpringFactoriesInstances(SpringBootExceptionReporter.class,
                new Class[] { ConfigurableApplicationContext.class }, context);
        // 9\. 准备上下文,设置了一系列的属性值
        prepareContext(context, environment, listeners, applicationArguments, printedBanner);
        // 10\. 调用 AbstractApplicationContext.refresh,启动spring容器
        refreshContext(context);
        // 11\. 刷新后的处理
        afterRefresh(context, applicationArguments);
        stopWatch.stop();
        if (this.logStartupInfo) {
            new StartupInfoLogger(this.mainApplicationClass)
                .logStarted(getApplicationLog(), stopWatch);
        }
        // 12\. 发布事件
        listeners.started(context);
        // 13\. 调用 runner,实现了 ApplicationRunner或CommandLineRunner 的接口
        callRunners(context, applicationArguments);
    }
    catch (Throwable ex) {
        handleRunFailure(context, ex, exceptionReporters, listeners);
        throw new IllegalStateException(ex);
    }
    try {
        // 14\. 发布事件
        listeners.running(context);
    }
    catch (Throwable ex) {
        handleRunFailure(context, ex, exceptionReporters, null);
        throw new IllegalStateException(ex);
    }
    return context;
}
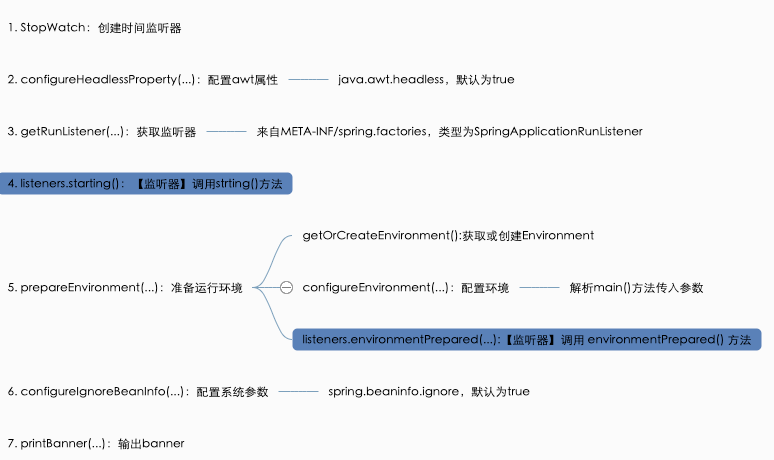
整个启动流程如下:
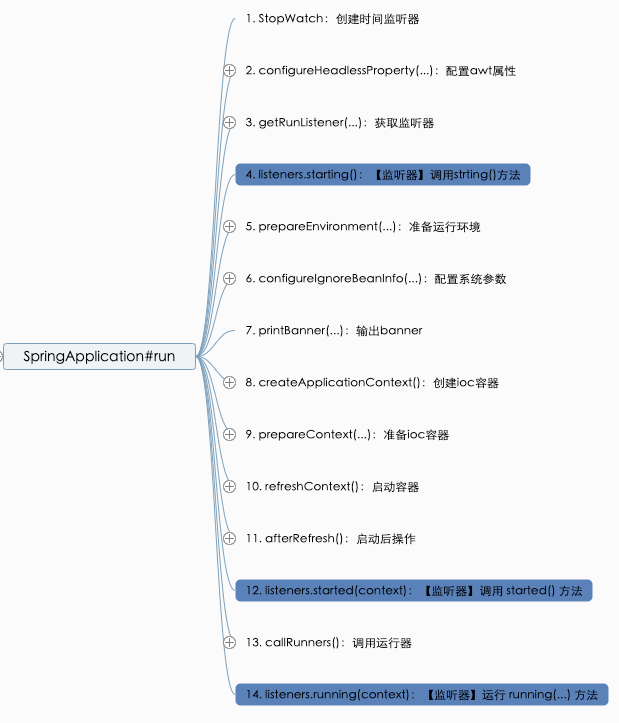
接下来我们来重点分析这 13 个启动流程。
一开始,springboot 就创建了stopWatch实例,然后调用StopWatch#start()启动计时功能,关于这个类没啥好说的,它就是个计时器,这里是用来计算 springboot 启动耗时,以下日志中的时间就是由这个计时器得到的:

SpringApplication#configureHeadlessProperty方法的相关代码如下:
public class SpringApplication {

    private static final String SYSTEM_PROPERTY_JAVA_AWT_HEADLESS = "java.awt.headless";

    ...

    private boolean headless = true;

    public void setHeadless(boolean headless) {
        this.headless = headless;
    }
    ...

    private void configureHeadlessProperty() {
        // 将 java.awt.headless 的值配置到系统变量
        System.setProperty(SYSTEM_PROPERTY_JAVA_AWT_HEADLESS,
                System.getProperty(SYSTEM_PROPERTY_JAVA_AWT_HEADLESS,
                Boolean.toString(this.headless)));
    }
    ...
}
这个方法仅仅是将java.awt.headless的值设置到了系统变量,设置成true,表示启动java.awt.headless模式。那么它是个啥模式呢?简单来说,该模式就是系统缺少了显示设备、键盘或鼠标等情况的模式,服务器一般都是在这种情况下工作的。
继续,这一步是获取运行监听器,可以监听运行期间的一些状态,看代码:
// 获取监听器,也是从 META-INF/spring.factories 中获取
SpringApplicationRunListeners listeners = getRunListeners(args);
进入SpringApplication#getRunListeners:
public class SpringApplication {
    ...

    private SpringApplicationRunListeners getRunListeners(String[] args) {
        Class<?>[] types = new Class<?>[] { SpringApplication.class, String[].class };
        return new SpringApplicationRunListeners(logger,
                // 依然是从META-INF/spring.factories 中获取,key 是 SpringApplicationRunListener
                getSpringFactoriesInstances(SpringApplicationRunListener.class, types, this, args));
    }
    ...
}
可以看到,SpringApplicationRunListener依然是从META-INF/spring.factories中获取,那SpringApplicationRunListener是个啥呢?我们来看代码:
public interface SpringApplicationRunListener {

    /**
     * 首次启动run方法时立即调用。可用于非常早期的初始化。
     */
    default void starting() {
    }

    /**
     * 准备好环境(Environment构建完成),但在创建ApplicationContext之前调用。
     */
    default void environmentPrepared(ConfigurableEnvironment environment) {
    }

    /**
     * 在创建和构建ApplicationContext之后,但在加载之前调用。
     */
    default void contextPrepared(ConfigurableApplicationContext context) {
    }

    /**
     * ApplicationContext已加载但在刷新之前调用。
     */
    default void contextLoaded(ConfigurableApplicationContext context) {
    }

    /**
     * ApplicationContext已刷新,应用程序已启动,
     * 但尚未调用CommandLineRunners和ApplicationRunners。
     */
    default void started(ConfigurableApplicationContext context) {
    }

    /**
     * 在运行方法彻底完成之前立即调用,
     * 刷新ApplicationContext并调用所有CommandLineRunners和ApplicationRunner。
     */
    default void running(ConfigurableApplicationContext context) {
    }

    /**
     * 在运行应用程序时失败时调用。
     */
    default void failed(ConfigurableApplicationContext context, Throwable exception) {
    }
}
SpringApplicationRunListener是一个接口,定义了一系列的方法来监听 springboot 的启动过程,方法的说明已经在文档中有详细定义,如果我们需要在 springboot 的启动中的某个过程做一些事情,就可以实现SpringApplicationRunListener然后重写对应的方法。
通过调试,发现 springboot 获得的运行监听器如下:

回到SpringApplication#run(java.lang.String...),获取到运行监听器后,会立即调用starting()方法来发布启动事件:
// 获取监听器
SpringApplicationRunListeners listeners = getRunListeners(args);
// starting():首次启动run方法时立即调用。可用于非常早期的初始化(准备运行时环境之前)。
listeners.starting();
进入SpringApplicationRunListeners#starting方法:
void starting() {
    for (SpringApplicationRunListener listener : this.listeners) {
        listener.starting();
    }
}
可以看到,所谓的发布事件,就是遍历所有的监听器,逐一调用其starting()罢了,this.listeners就是上面获取到的所有的运行监听器。不仅如此,SpringApplicationRunListener的其他方法如environmentPrepared(...)、contextPrepared(...)等都是这样的调用套路,后面看到了就不重复分析了。
接下我们来看看环境参数的处理,代码如下:
// 封装传入的参数
ApplicationArguments applicationArguments = new DefaultApplicationArguments(args);
// 处理环境参数
ConfigurableEnvironment environment = prepareEnvironment(listeners, applicationArguments);
进入SpringApplication#prepareEnvironment:
private ConfigurableEnvironment prepareEnvironment(SpringApplicationRunListeners listeners,
        ApplicationArguments applicationArguments) {
    // 获取环境,如果不存在则创建
    ConfigurableEnvironment environment = getOrCreateEnvironment();
    // 配置运行时环境
    configureEnvironment(environment, applicationArguments.getSourceArgs());
    ConfigurationPropertySources.attach(environment);
    //  SpringApplicationRunListener 的 environmentPrepared 方法
    // (Environment构建完成,但在创建ApplicationContext之前)
    listeners.environmentPrepared(environment);
    // 环境与应用绑定
    bindToSpringApplication(environment);
    if (!this.isCustomEnvironment) {
        environment = new EnvironmentConverter(getClassLoader())
                .convertEnvironmentIfNecessary(environment, deduceEnvironmentClass());
    }
    ConfigurationPropertySources.attach(environment);
    return environment;
}
可以看到各种环境准备,咱们挑重点讲。
直接进入SpringApplication#getOrCreateEnvironment:
private ConfigurableEnvironment getOrCreateEnvironment() {
    if (this.environment != null) {
        return this.environment;
    }
    switch (this.webApplicationType) {
    case SERVLET:
        return new StandardServletEnvironment();
    case REACTIVE:
        return new StandardReactiveWebEnvironment();
    default:
        return new StandardEnvironment();
    }
}
从代码来看,这个方法是根据应用类型来创建对应的Environment实例,当前应用类型是SERVLET,咱们直接看StandardServletEnvironment是如何创建的。
我们知道,在 java 中,创建类时,会先调用父类的构造方法,这里我们直接进入AbstractEnvironment构造方法:
public abstract class AbstractEnvironment implements ConfigurableEnvironment {

    ...

    public AbstractEnvironment() {
        customizePropertySources(this.propertySources);
    }

    ...
}
发现在AbstractEnvironment的构造方法中,调用了customizePropertySources(),而这个方法在StandardServletEnvironment实现:
public class StandardServletEnvironment extends StandardEnvironment
        implements ConfigurableWebEnvironment {
    public static final String SERVLET_CONTEXT_PROPERTY_SOURCE_NAME = "servletContextInitParams";
    public static final String SERVLET_CONFIG_PROPERTY_SOURCE_NAME = "servletConfigInitParams";
    public static final String JNDI_PROPERTY_SOURCE_NAME = "jndiProperties";

    @Override
    protected void customizePropertySources(MutablePropertySources propertySources) {
        // 添加 servletConfigInitParams
        propertySources.addLast(new StubPropertySource(SERVLET_CONFIG_PROPERTY_SOURCE_NAME));
        // 添加 servletContextInitParams
        propertySources.addLast(new StubPropertySource(SERVLET_CONTEXT_PROPERTY_SOURCE_NAME));
        if (JndiLocatorDelegate.isDefaultJndiEnvironmentAvailable()) {
            propertySources.addLast(new JndiPropertySource(JNDI_PROPERTY_SOURCE_NAME));
        }
        // 调用父类的方法
        super.customizePropertySources(propertySources);
    }

    @Override
    public void initPropertySources(@Nullable ServletContext servletContext,
            @Nullable ServletConfig servletConfig) {
        // 替换上面设置的 servletContextInitParams 为 servletContext
        // 替换上面设置的 servletConfigInitParams 为 servletConfig
        WebApplicationContextUtils.initServletPropertySources(
                getPropertySources(), servletContext, servletConfig);
    }

}
可以看到,StandardServletEnvironment的customizePropertySources()方法只是添加了几个 servlet 相关的参数,然后就去调用父类的构造方法了,我们继续进入StandardEnvironment:
这个类似乎并没有做什么,我们继续追踪,看它父类的构造方法:
public class StandardEnvironment extends AbstractEnvironment {

    /** 系统环境 */
    public static final String SYSTEM_ENVIRONMENT_PROPERTY_SOURCE_NAME = "systemEnvironment";

    /** 系统属性 */
    public static final String SYSTEM_PROPERTIES_PROPERTY_SOURCE_NAME = "systemProperties";

    @Override
    protected void customizePropertySources(MutablePropertySources propertySources) {
        // 获取系统属性,调用的是 System.getenv()
        propertySources.addLast(new PropertiesPropertySource(
                SYSTEM_PROPERTIES_PROPERTY_SOURCE_NAME, getSystemProperties()));
        // 获取系统环境,调用的是 System.getProperties()
        propertySources.addLast(new SystemEnvironmentPropertySource(
                SYSTEM_ENVIRONMENT_PROPERTY_SOURCE_NAME, getSystemEnvironment()));
    }

}
可以看到,StandardEnvironment的customizePropertySources()方法主要是将系统属性与系统环境添加到Environment中。而实际上,Environment中包含了许多的系统与环境相关的参数,本身也提供了一些getter方法可以很方便地获取这些参数:
到这里,我们就明白了,StandardServletEnvironment中包含了如下内容:
- 系统属性,我们平时调用
System.getenv()得到的参数; - 系统环境,我们平时调用
System.getProperties()得到的参数; servlet的servletContext与servletConfig.
我们继续分析,接着看看配置环境的流程,也就是SpringApplication#configureEnvironment方法:
protected void configureEnvironment(ConfigurableEnvironment environment, String[] args) {
    if (this.addConversionService) {
        // 添加转换器,处理参数类型转换,如 String转Number,Integer转Enum等
        ConversionService conversionService = ApplicationConversionService.getSharedInstance();
        environment.setConversionService((ConfigurableConversionService) conversionService);
    }
    // 将启动参数添加到 environment 中
    configurePropertySources(environment, args);
    // 处理 ActiveProfiles 值
    configureProfiles(environment, args);
}
这个方法代码不多,关键点都已在代码中注释清楚了,这里需要稍微提下SpringApplication#configurePropertySources:
protected void configurePropertySources(ConfigurableEnvironment environment, String[] args) {
    MutablePropertySources sources = environment.getPropertySources();
    // 设置默认属性,如果指定了默认属性,就在这里配置
    if (this.defaultProperties != null && !this.defaultProperties.isEmpty()) {
        sources.addLast(new MapPropertySource("defaultProperties", this.defaultProperties));
    }
    if (this.addCommandLineProperties && args.length > 0) {
        String name = CommandLinePropertySource.COMMAND_LINE_PROPERTY_SOURCE_NAME;
        if (sources.contains(name)) {
            PropertySource<?> source = sources.get(name);
            CompositePropertySource composite = new CompositePropertySource(name);
            composite.addPropertySource(
                    // 解析启动时传入的参数
                    new SimpleCommandLinePropertySource("springApplicationCommandLineArgs", args));
            composite.addPropertySource(source);
            sources.replace(name, composite);
        }
        else {
            sources.addFirst(new SimpleCommandLinePropertySource(args));
        }
    }
}
在这个方法里会对传入的参数进行解析,进入SimpleCommandLinePropertySource:
public class SimpleCommandLinePropertySource
        extends CommandLinePropertySource<CommandLineArgs> {

    public SimpleCommandLinePropertySource(String... args) {
        super(new SimpleCommandLineArgsParser().parse(args));
    }
    ...
}
最终解析的方法是SimpleCommandLineArgsParser#parse:
public class SimpleCommandLineArgsParser {
    public CommandLineArgs parse(String... args) {
        CommandLineArgs commandLineArgs = new CommandLineArgs();
        for (String arg : args) {
            if (arg.startsWith("--")) {
                String optionText = arg.substring(2, arg.length());
                String optionName;
                String optionValue = null;
                if (optionText.contains("=")) {
                    // -- 开头且包含 = 的参数,会被解析成 key/value
                    optionName = optionText.substring(0, optionText.indexOf('='));
                    optionValue = optionText.substring(optionText.indexOf('=')+1, optionText.length());
                }
                else {
                    optionName = optionText;
                }
                if (optionName.isEmpty() || (optionValue != null && optionValue.isEmpty())) {
                    throw new IllegalArgumentException("Invalid argument syntax: " + arg);
                }
                commandLineArgs.addOptionArg(optionName, optionValue);
            }
            else {
                commandLineArgs.addNonOptionArg(arg);
            }
        }
        return commandLineArgs;
    }

    ...
}
解析方法还是比较简单的,就是字符串的处理而已。
springboot 的启动参数有啥好解析的呢?在启动 spring 项目时,我们可以这样指定参数:
java -jar xxx.jar --a1=aaa --b1=bbb
然后我们就能通过@Value("${a1}")获取到,关键就是在这里,可以看到,springboot 会把传入的--a1=aaa、--b1=bbb解析成a1/aaa、b1/bbb键值对的形式,保存到Environment,后续要用到时,就可很方便地从Environment中获取了。
好了,准备环境的分析就到这里了。
这块主要是配置了一个参数:spring.beaninfo.ignore,用来控制是否跳过BeanInfo类的搜索,并且由源码可知默认值是true,感觉用的不多,就不分析了。
banner是在这里打印出的:
Banner printedBanner = printBanner(environment);
我们也可以自己定义 banner,这个网上教程一大堆,demo 就不提供了。
关于banner,与 springboot 的启动流程关系不大,就不分析了,小伙伴们只需了解怎么样用即可。
好了,限于篇幅,本文就到这里了,下篇我们继续。
本文原文链接:https://my.oschina.net/funcy/blog/4882417,限于作者个人水平,文中难免有错误之处,欢迎指正!原创不易,商业转载请联系作者获得授权,非商业转载请注明出处。