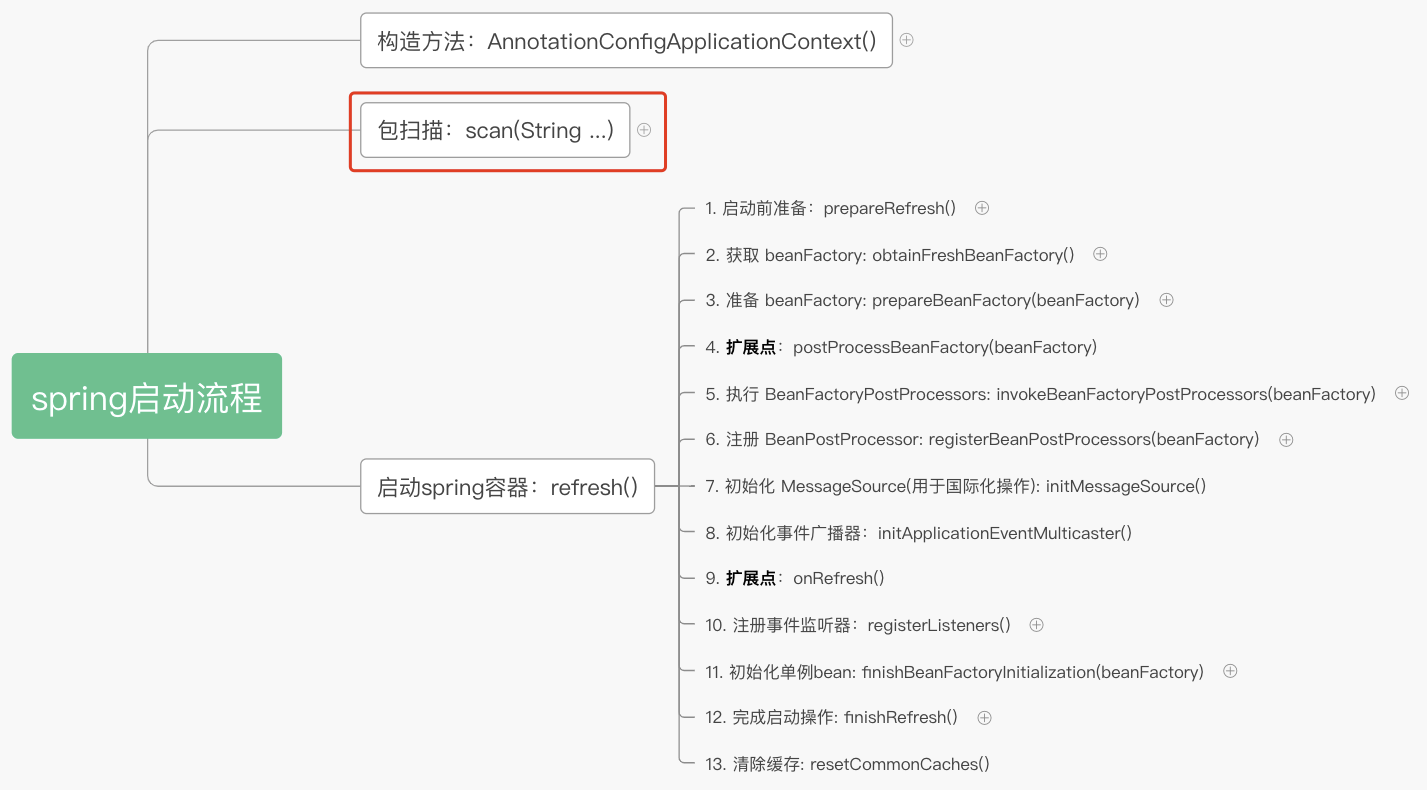
在 applicationContext 的创建中,我们分析了 applicationContext 的创建过程,在本文中,我们将分析 spring 是如何进行包扫描的。
依旧是 AnnotationConfigApplicationContext 的构造方法:
public AnnotationConfigApplicationContext(String... basePackages) {
    this();
    //对传入的包进行扫描,扫描完成后,会得到一个 BeanDefinition 的集合
    scan(basePackages);
    refresh();
}
这次我们将目光放在 scan(basePackages); 上,进入该方法:
AnnotationConfigApplicationContext#scan
public void scan(String... basePackages) {
     Assert.notEmpty(basePackages, "At least one base package must be specified");
     // 这里的scanner对象就是在this()中创建的
     this.scanner.scan(basePackages);
}
这个方法关键代码是 this.scanner.scan(basePackages);,这个 scanner 就是在 this() 中创建的对象:
public AnnotationConfigApplicationContext() {
    this.reader = new AnnotatedBeanDefinitionReader(this);
    // scanner 就是在这里创建的
    this.scanner = new ClassPathBeanDefinitionScanner(this);
}
继续追踪,这里我们对不重要的方法仅给出调用链,重点关注扫描包的过程:
AnnotationConfigApplicationContext#AnnotationConfigApplicationContext(String...)
 |-AnnotationConfigApplicationContext#scan
  |-ClassPathBeanDefinitionScanner#scan
   |-ClassPathBeanDefinitionScanner#doScan
ClassPathBeanDefinitionScanner#doScan 代码如下:
protected Set<BeanDefinitionHolder> doScan(String... basePackages) {
    Assert.notEmpty(basePackages, "At least one base package must be specified");
    Set<BeanDefinitionHolder> beanDefinitions = new LinkedHashSet<>();
    //遍历需要扫描的包路径
    for (String basePackage : basePackages) {
        //获取所有符合条件的BeanDefinition
        Set<BeanDefinition> candidates = findCandidateComponents(basePackage);
        for (BeanDefinition candidate : candidates) {
            //绑定BeanDefinition与Scope
            ScopeMetadata scopeMetadata = this.scopeMetadataResolver.resolveScopeMetadata(candidate);
            candidate.setScope(scopeMetadata.getScopeName());
            //查看是否配置类是否指定bean的名称,如没指定则使用类名首字母小写
            String beanName = this.beanNameGenerator.generateBeanName(candidate, this.registry);
            //下面两个if是处理lazy、Autowire、DependencyOn、initMethod、enforceInitMethod、destroyMethod、
            // enforceDestroyMethod、Primary、Role、Description这些逻辑的
            if (candidate instanceof AbstractBeanDefinition) {
                postProcessBeanDefinition((AbstractBeanDefinition) candidate, beanName);
            }
            if (candidate instanceof AnnotatedBeanDefinition) {
                AnnotationConfigUtils.processCommonDefinitionAnnotations(
                        (AnnotatedBeanDefinition) candidate);
            }
            //检查bean是否存在
            if (checkCandidate(beanName, candidate)) {
                //又包装了一层
                BeanDefinitionHolder definitionHolder = new BeanDefinitionHolder(candidate, beanName);
                //检查scope是否创建,如未创建则进行创建
                definitionHolder = AnnotationConfigUtils.applyScopedProxyMode(
                        scopeMetadata, definitionHolder, this.registry);
                beanDefinitions.add(definitionHolder);
                //注册 beanDefinition
                registerBeanDefinition(definitionHolder, this.registry);
            }
        }
    }
    return beanDefinitions;
}
这段代码完成的功能很明了,大体上做了以下几件事:
- 根据包路径,得到符合条件的 BeanDefinition
- 遍历 BeanDefinition,进一步丰富 beanDefinition 信息
- 将 BeanDefinition 添加到 beanFactory
BeanDefinition 也是 spring 的重要组件之一,关于 BeanDefinition 的分析,可参考 spring 组件之 BeanDefinition。
接下来我们主要分析这三个的操作。
这一步主要发生在 Set<BeanDefinition> candidates = findCandidateComponents(basePackage);,我们跟进去看看代码的执行,这里依旧对不重要代码给出调用链,该方法的调用如下:
AnnotationConfigApplicationContext#AnnotationConfigApplicationContext(String...)
 |-AnnotationConfigApplicationContext#scan
  |-ClassPathBeanDefinitionScanner#scan
   |-ClassPathBeanDefinitionScanner#doScan
    |-ClassPathScanningCandidateComponentProvider#findCandidateComponents
     |-ClassPathScanningCandidateComponentProvider#scanCandidateComponents
最终调用到了 ClassPathScanningCandidateComponentProvider#scanCandidateComponents,代码如下 (有删减):
private Set<BeanDefinition> scanCandidateComponents(String basePackage) {
    Set<BeanDefinition> candidates = new LinkedHashSet<>();
    //组装扫描路径(组装完成后是这种格式:classpath*:org/springframework/learn/demo01/**/*.class)
    String packageSearchPath = ResourcePatternResolver.CLASSPATH_ALL_URL_PREFIX +
            resolveBasePackage(basePackage) + '/' + this.resourcePattern;
    //根据路径获取资源对象,即扫描出该路径下的的所有class文件,得到 Resource
    Resource[] resources = getResourcePatternResolver().getResources(packageSearchPath);
    for (Resource resource : resources) {
        if (resource.isReadable()) {
            //根据资源对象获取资源对象的MetadataReader
            MetadataReader metadataReader = getMetadataReaderFactory().getMetadataReader(resource);
            // 这里做了两件事:
            // 1\. 是否需要初始化为spring bean,即是否有 @Component、@Service等注解
            // 2\. 查看配置类是否有@Conditional一系列的注解,然后是否满足注册Bean的条件
            if (isCandidateComponent(metadataReader)) {
                ScannedGenericBeanDefinition sbd = new ScannedGenericBeanDefinition(metadataReader);
                sbd.setResource(resource);
                sbd.setSource(resource);
                if (isCandidateComponent(sbd)) {
                    candidates.add(sbd);
                }
            }
        }
    }
    return candidates;
}
可以看到,以上代码做了三件事:
- 根据传入的 basePackage 得到扫描路径
- 根据扫描路径得到该路径下的所有 class 文件对应的 Resource
- 将 Resource 转化为 beanDefinition
接下来我们就以上代码进行分析。
这一步没啥好分析,就是一个字符串的拼接与替换,将传入的 org.springframework.learn.demo01 转换为 classpath*:org/springframework/learn/demo01/**/*.class,相关代码就一行:
String packageSearchPath = ResourcePatternResolver.CLASSPATH_ALL_URL_PREFIX +
        resolveBasePackage(basePackage) + '/' + this.resourcePattern;
得到包扫描路径后,接下来就是进行扫描了。spring 在扫描时,会把扫描路径下的所有 class 文件扫描出来,然后封装成 Resource,代码如下
Resource[] resources = getResourcePatternResolver().getResources(packageSearchPath);
跟进代码,同样地,我们对不重要的方法,依旧只给出方法调用:
AnnotationConfigApplicationContext#AnnotationConfigApplicationContext(String...)
 |-AnnotationConfigApplicationContext#scan
  |-ClassPathBeanDefinitionScanner#scan
   |-ClassPathBeanDefinitionScanner#doScan
    |-ClassPathScanningCandidateComponentProvider#findCandidateComponents
     |-ClassPathScanningCandidateComponentProvider#scanCandidateComponents
      |- GenericApplicationContext#getResources
       |-AbstractApplicationContext#getResources
        |-PathMatchingResourcePatternResolver#getResources
         |-PathMatchingResourcePatternResolver#findPathMatchingResources
我们将代码聚集于 PathMatchingResourcePatternResolver#findPathMatchingResources:
protected Resource[] findPathMatchingResources(String locationPattern) throws IOException {
    // 传入的 locationPattern 是 classpath*:org/springframework/learn/demo01/**/*.class
    // rootDirPath 是 classpath*:org/springframework/learn/demo01/
    String rootDirPath = determineRootDir(locationPattern);

    // subPattern 是 **/*.class
    String subPattern = locationPattern.substring(rootDirPath.length());

    // 这里返回的 Resource 是 rootDirPath 的绝对路径(用url表示)
    // URL [file:/xxx/spring-learn/build/classes/java/main/org/springframework/learn/demo01/]
    Resource[] rootDirResources = getResources(rootDirPath);

    Set<Resource> result = new LinkedHashSet<>(16);
    for (Resource rootDirResource : rootDirResources) {
        rootDirResource = resolveRootDirResource(rootDirResource);
        URL rootDirUrl = rootDirResource.getURL();
        if (equinoxResolveMethod != null && rootDirUrl.getProtocol().startsWith("bundle")) {
            URL resolvedUrl = (URL) ReflectionUtils.invokeMethod(equinoxResolveMethod, null, rootDirUrl);
            if (resolvedUrl != null) {
                rootDirUrl = resolvedUrl;
            }
            rootDirResource = new UrlResource(rootDirUrl);
        }
        // 处理 vfs 资源查找
        if (rootDirUrl.getProtocol().startsWith(ResourceUtils.URL_PROTOCOL_VFS)) {
            result.addAll(VfsResourceMatchingDelegate
                    .findMatchingResources(rootDirUrl, subPattern, getPathMatcher()));
        }
        // 处理jar包文件查找
        else if (ResourceUtils.isJarURL(rootDirUrl) || isJarResource(rootDirResource)) {
            result.addAll(doFindPathMatchingJarResources(rootDirResource, rootDirUrl, subPattern));
        }
        // 处理文件路径下的文件查找
        else {
            result.addAll(doFindPathMatchingFileResources(rootDirResource, subPattern));
        }
    }
    return result.toArray(new Resource[0]);
}
通过分析,发现该类的处理过程如下:
- 通过传入的 locationPattern 得到该 pattern 下的 url 绝对路径,封装为 Resource
- 遍历返回的路径,查找 class 文件,封装为 Resource
我们来看看 spring 是如何将 pattrn 转换为 url 路径的,我们跟进代码:
|-PathMatchingResourcePatternResolver#getResources
 |-PathMatchingResourcePatternResolver#findAllClassPathResources
  |-PathMatchingResourcePatternResolver#doFindAllClassPathResources
最终代码到了 PathMatchingResourcePatternResolver#doFindAllClassPathResources:
protected Set<Resource> doFindAllClassPathResources(String path) throws IOException {
    Set<Resource> result = new LinkedHashSet<>(16);
    ClassLoader cl = getClassLoader();
    // path对应的url
    Enumeration<URL> resourceUrls = (cl != null ? cl.getResources(path) :
            ClassLoader.getSystemResources(path));
    while (resourceUrls.hasMoreElements()) {
        URL url = resourceUrls.nextElement();
        // 将url转换为Resource,并添加到结果中
        result.add(convertClassLoaderURL(url));
    }
    if ("".equals(path)) {
        addAllClassLoaderJarRoots(cl, result);
    }
    return result;
}

// 将url转换为Resource
protected Resource convertClassLoaderURL(URL url) {
    return new UrlResource(url);
}
此时传入的 path 为 org/springframework/learn/demo01/,从代码可知,最终调用了 java 的 ClassLoader 方法来获取 path 对应的 url,然后将 url 转换为 Resource 添加到结果集中并返回。
拿到类的绝对路径之后,接下就是对路径进行遍历,拿到 class 文件了。让我们再回到 PathMatchingResourcePatternResolver#findPathMatchingResources,spring 扫描时,会根据传入的 url 类型,共扫描 3 个地方:
- vfs
- jar 包
- 文件路径
vfs 注释上说是 "URL protocol for a general JBoss VFS resource",即通用 JBoss VFS 资源的 URL 协议,这里不深究。如果项目中引入了 jar 包且需要扫描 jar 中的路径,就会使用 jar 包扫描方式进行 class 文件查找,由于调试时,demo01 是使用文件方式扫描的,这里就重点分析文件扫描方式,至于 jar 是如何扫描的,有兴趣的小伙伴可自行研究下。
我们跟进 findPathMatchingResources 方法:
|-PathMatchingResourcePatternResolver#findPathMatchingResources
 |-PathMatchingResourcePatternResolver#doFindPathMatchingFileResources
  |-PathMatchingResourcePatternResolver#doFindMatchingFileSystemResources
protected Set<Resource> doFindMatchingFileSystemResources(File rootDir,
            String subPattern) throws IOException {
    // 这里进行文件查找
    Set<File> matchingFiles = retrieveMatchingFiles(rootDir, subPattern);
    Set<Resource> result = new LinkedHashSet<>(matchingFiles.size());
    for (File file : matchingFiles) {
        result.add(new FileSystemResource(file));
    }
    return result;
}
在 PathMatchingResourcePatternResolver#doFindMatchingFileSystemResources 中,spring 将扫描到的 File 转换为 FileSystemResource 保存,这是我们遇到的第二个 Resource 类型了 (前面为 UrlResource,这里为 FileSystemResource).
接下我们重点关注 Set<File> matchingFiles = retrieveMatchingFiles(rootDir, subPattern);,看看 spring 是如何完成文件查找的:
|-PathMatchingResourcePatternResolver#findPathMatchingResources
 |-PathMatchingResourcePatternResolver#doFindPathMatchingFileResources
  |-PathMatchingResourcePatternResolver#doFindMatchingFileSystemResources
   |-PathMatchingResourcePatternResolver#retrieveMatchingFiles
    |-PathMatchingResourcePatternResolver#doRetrieveMatchingFiles
protected void doRetrieveMatchingFiles(String fullPattern, File dir, Set<File> result)
        throws IOException {
    for (File content : listDirectory(dir)) {
        String currPath = StringUtils.replace(content.getAbsolutePath(), File.separator, "/");
        if (content.isDirectory() && getPathMatcher().matchStart(fullPattern, currPath + "/")) {
            if (!content.canRead()) {
            }
            else {
                // 如果是文件夹,递归调用
                doRetrieveMatchingFiles(fullPattern, content, result);
            }
        }
        // 如果是文件且文件路径
        if (getPathMatcher().match(fullPattern, currPath)) {
            result.add(content);
        }
    }
}
以上代码比较简单,与我们平常遍历文件的方式是一样的。
值得一提的是,getPathMatcher().match(fullPattern, currPath) 最终调用到的是 AntPathMatcher#doMatch,这是一个 ant 风格的路径匹配验证,即路径中带有 *,如传入的 pattern 是 /xxx/spring-framework/spring-learn/build/classes/java/main/org/springframework/learn/demo01/**/*.class,表示匹配 /xxx/spring-framework/spring-learn/build/classes/java/main/org/springframework/learn/demo01/ 及其子文件夹下所有以.class 文件结尾的文件,当前传入的 path 是 /xxx/spring-framework/spring-learn/build/classes/java/main/org/springframework/learn/demo01/BeanObj2.class,显然匹配。关于 AntPathMatcher#doMatch 方法是如何进行匹配的,这里就不进行展开了。
经过了以上步骤,我们终于得到了 class 文件对应的 Resource 了.
将 Resource 转化为 BeanDefinition,代码是
ClassPathScanningCandidateComponentProvider#scanCandidateComponents
// 从 resource 得到 MetadataReader
MetadataReader metadataReader = getMetadataReaderFactory().getMetadataReader(resource);

// 这里做了两件事:
// 1\. 是否需要初始化为spring bean,即是否有 @Component、@Service等注解
// 2\. 查看配置类是否有@Conditional一系列的注解,然后是否满足注册Bean的条件
if (isCandidateComponent(metadataReader)) {
    // 将 metadataReader 转换为 ScannedGenericBeanDefinition,这也是BeanDefinition家族中的一员
    ScannedGenericBeanDefinition sbd = new ScannedGenericBeanDefinition(metadataReader);
    ...
}
我们追踪下 MetadataReader 的获取:
|-ClassPathScanningCandidateComponentProvider#scanCandidateComponents
 |-CachingMetadataReaderFactory#getMetadataReader
  |-SimpleMetadataReaderFactory#getMetadataReader(Resource)
   |-SimpleMetadataReader#SimpleMetadataReader
代码最终运行到了 SimpleMetadataReader 的构造方法:
SimpleMetadataReader(Resource resource, @Nullable ClassLoader classLoader) throws IOException {
    SimpleAnnotationMetadataReadingVisitor visitor
        = new SimpleAnnotationMetadataReadingVisitor(classLoader);
    // 这里发生了class文件的读取与解析
    getClassReader(resource).accept(visitor, PARSING_OPTIONS);
    this.resource = resource;
    this.annotationMetadata = visitor.getMetadata();
}
再进一步追踪,发现 class 文件的读取与解析发生在 ClassReader 类:
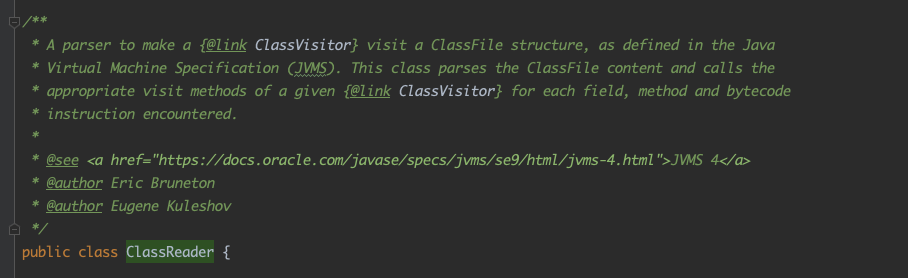
这个类使用 asm 来读取 class 文件,代码比较复杂,就不深究了。
一直以来,我都以为 spring 是通过反射来获取类信息的,到这里才知道,原来 spring 是通过 asm 直接读取 class 文件来获取类的信息的 。
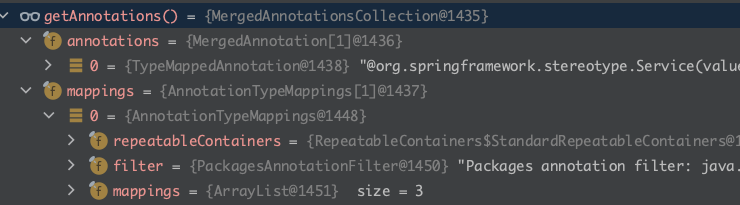
最后我们来看下得到的 MetadataReader 的结果:
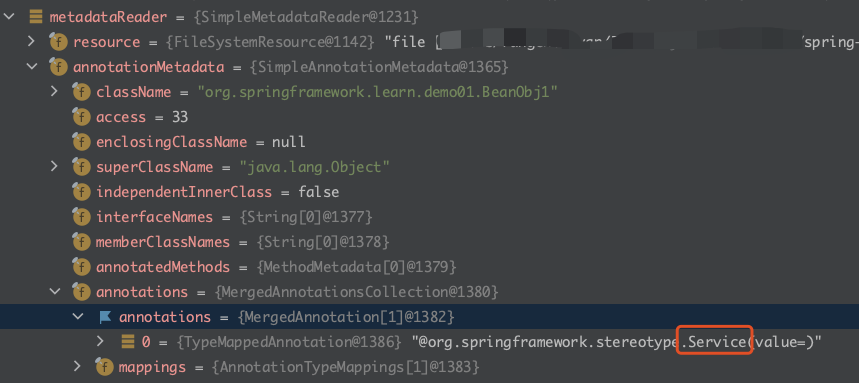
这里重点关注 annotations 属性,里面有一个 annotations 和 mappings,annotations 内容为 @Service,mappings 是一个数组,内容为
0-@Service
1-@Component
2-@Index


annotations 本人猜测是 BeanObj1 上的注解:
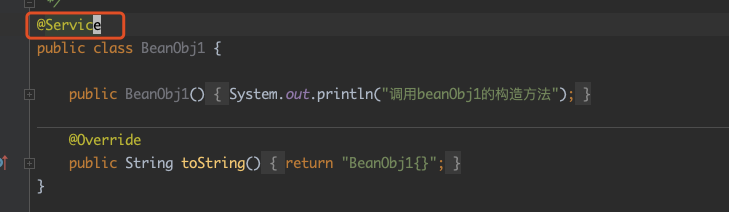
至于 mappings 是啥,我不好猜测,不过也可以从注解中发现一些端倪:


@Service 上有 @Component 注解,@Component 上有 @Indexed,而这三者都出现在了 mappings 中,这看着像是专门用来保存拿注解之上的注解的?不纠结这个了,暂且就当作是这功能吧!注意:mappings 里面的内容很重要,后面会用来!
在上一步中,我们得到了 basePackage 下所有类的 MetadataReader 描述文件,注意这里是所有类,但这些类是不是都要转成 spring bean,托管到 spring 容器呢?这就是 isCandidateComponent(MetadataReader) 的功能了。废话少说,上代码:
protected boolean isCandidateComponent(MetadataReader metadataReader) throws IOException {
    // 省略部分代码
    for (TypeFilter tf : this.includeFilters) {
        // 这里判断是否需要托管到spring容器
        if (tf.match(metadataReader, getMetadataReaderFactory())) {
            // 判断是否有@Conditional一系列的注解
            return isConditionMatch(metadataReader);
        }
    }
    return false;
}
这段主要是做了两个判断:
- 是否需要为 spring bean
- 是否有
@Conditional等一系列的注解
这里我们先来看第一个判断。
在 spring 中,标明 spring bean 的注解有很多,像 @Component、@Repository、@Service、@Controller、@Configuration,甚至是你自己写的注解类,只要上面标了这些注解,像
@Target(ElementType.TYPE)
@Retention(RetentionPolicy.RUNTIME)
@Documented
// 添加 @Component 或 @Service 或 @Repository 等其中之一
@Component
public @interface MySpringBean {
    ...
}
都能被 spring 识别。如果是 spring 提供的注解(@Component、@Repository 等),在判断是不是 spring bean 时,只需要做类似
if(annotation == Component.class || annotation == Repository.class) {
    ...
}
的判断就行了。但对于自定义的注解 @MySpringBean,spring 是怎么知道这是 spring bean 呢?在我们定义 @MySpringBean 时,一定要在类上添加 @Component 或 @Service 或 @Repository 等其中之一才能被 spring 识别,这其中有什么玄机呢?我们跟进代码 AbstractTypeHierarchyTraversingFilter#match(MetadataReader, MetadataReaderFactory),这里我们对不重要的代码依旧只给出调用链:
|-ClassPathScanningCandidateComponentProvider#isCandidateComponent(MetadataReader)
 |-AbstractTypeHierarchyTraversingFilter#match(MetadataReader, MetadataReaderFactory)
  |-AnnotationTypeFilter#matchSelf
代码最终到了 AnnotationTypeFilter#matchSelf:
@Override
protected boolean matchSelf(MetadataReader metadataReader) {
    AnnotationMetadata metadata = metadataReader.getAnnotationMetadata();
    // 这里的annotationType就是 @Component
    return metadata.hasAnnotation(this.annotationType.getName()) ||
        (this.considerMetaAnnotations && metadata.hasMetaAnnotation(this.annotationType.getName()));
}
关键就在这了:
metadata.hasAnnotation(this.annotationType.getName())
与
this.considerMetaAnnotations && metadata.hasMetaAnnotation(this.annotationType.getName())
我们先看 metadata.hasAnnotation(this.annotationType.getName()) 的比较:
// AnnotationMetadata#hasAnnotation
default boolean hasAnnotation(String annotationName) {
    return getAnnotations().isDirectlyPresent(annotationName);
}
这里的 getAnnotations() 得到的结果是
mappings 里的内容是
0-@Service
1-@Component
2-@Index
这其实就是我们前面得到的 MetadataReader 里的内容!
再追踪下去,发现 isDirectlyPresent 就是判断 annotations 与 mappings 里有没有出现 @Component:
private boolean isPresent(Object requiredType, boolean directOnly) {
    // 判断 annotations 里有没有出现 @Component
    for (MergedAnnotation<?> annotation : this.annotations) {
        Class<? extends Annotation> type = annotation.getType();
        if (type == requiredType || type.getName().equals(requiredType)) {
            return true;
        }
    }
    if (!directOnly) {
        // 判断 mappings 里有没有出现 @Component
        for (AnnotationTypeMappings mappings : this.mappings) {
            for (int i = 1; i < mappings.size(); i++) {
                AnnotationTypeMapping mapping = mappings.get(i);
                if (isMappingForType(mapping, requiredType)) {
                    return true;
                }
            }
        }
    }
    return false;
}
接着我们再来看 this.considerMetaAnnotations && metadata.hasMetaAnnotation(this.annotationType.getName()),查看调用:
|-AnnotationTypeFilter#matchSelf
 |-AnnotationMetadata#hasMetaAnnotation
  |-MergedAnnotationsCollection#get(String, Predicate)
   |-MergedAnnotationsCollection#get(String, Predicate, MergedAnnotationSelector)
    |-MergedAnnotationsCollection#find
最终的查找方法在 MergedAnnotationsCollection#find:
private <A extends Annotation> MergedAnnotation<A> find(Object requiredType,
        @Nullable Predicate<? super MergedAnnotation<A>> predicate,
        @Nullable MergedAnnotationSelector<A> selector) {

    MergedAnnotation<A> result = null;
    for (int i = 0; i < this.annotations.length; i++) {
        MergedAnnotation<?> root = this.annotations[i];
        AnnotationTypeMappings mappings = this.mappings[i];
        // mappings 遍历 mappings
        for (int mappingIndex = 0; mappingIndex < mappings.size(); mappingIndex++) {
            AnnotationTypeMapping mapping = mappings.get(mappingIndex);
            if (!isMappingForType(mapping, requiredType)) {
                continue;
            }
            // 到这里,就是找到了 @Component 注解
            MergedAnnotation<A> candidate = (mappingIndex == 0
                ? (MergedAnnotation<A>) root
                : TypeMappedAnnotation.createIfPossible(mapping, root, IntrospectionFailureLogger.INFO));
            if (candidate != null && (predicate == null || predicate.test(candidate))) {
                if (selector.isBestCandidate(candidate)) {
                    return candidate;
                }
                result = (result != null ? selector.select(result, candidate) : candidate);
            }
        }
    }
    return result;
}
可以看到,查找方式跟上面的 metadata.hasAnnotation(this.annotationType.getName()) 高度相似。
以上就是 spring 用来判断是否包含 @Service、@Component 等注解的逻辑了。
在 java 中,注解是不能继承的,如
@Target({ElementType.TYPE, ElementType.METHOD})
@Retention(RetentionPolicy.RUNTIME)
@Documented
public @interface Base {

}

@Target({ElementType.TYPE, ElementType.METHOD})
@Retention(RetentionPolicy.RUNTIME)
@Documented
public @interface Child extends  Base {

}
以上语法在 java 中不被允许的,spring 就是采用这解析注解的注解的方式,实现了类似于继承的功能。
接着我们再来看 ClassPathScanningCandidateComponentProvider#isConditionMatch 方法。实际上,这个方法是用来判断类是否含有 @Conditional 注解的,满足条件则会识别为 spring bean,代码最终调用到了 ConditionEvaluator#shouldSkip(AnnotatedTypeMetadata, ConfigurationCondition.ConfigurationPhase):
public boolean shouldSkip(@Nullable AnnotatedTypeMetadata metadata, @Nullable ConfigurationPhase phase) {
    // 省略了一些代码

    // 得到 condition 对象
    List<Condition> conditions = new ArrayList<>();
        for (String[] conditionClasses : getConditionClasses(metadata)) {
            for (String conditionClass : conditionClasses) {
                Condition condition = getCondition(conditionClass, this.context.getClassLoader());
                conditions.add(condition);
            }
        }
    }

    AnnotationAwareOrderComparator.sort(conditions);
    // 遍历,判断 condition 条件是否成立
    for (Condition condition : conditions) {
        ConfigurationPhase requiredPhase = null;
        if (condition instanceof ConfigurationCondition) {
            requiredPhase = ((ConfigurationCondition) condition).getConfigurationPhase();
        }
        if ((requiredPhase == null || requiredPhase == phase)
                // 判断 condition 条件是否成立,一个条件满足就返回true
                && !condition.matches(this.context, metadata)) {
            return true;
        }
    }

    return false;
}

// 通过反射获取 Condition 对象
private Condition getCondition(String conditionClassName, @Nullable ClassLoader classloader) {
    Class<?> conditionClass = ClassUtils.resolveClassName(conditionClassName, classloader);
    return (Condition) BeanUtils.instantiateClass(conditionClass);
}
这里做了两件事:
- 获取 condition 对象
- 遍历 condition 对象,调用
condition.matches()方法,判断条件是否成立
这里仅是做了一个简单的赋值,看下 ScannedGenericBeanDefinition 的构造方法就明白了:
ScannedGenericBeanDefinition#ScannedGenericBeanDefinition
public ScannedGenericBeanDefinition(MetadataReader metadataReader) {
    Assert.notNull(metadataReader, "MetadataReader must not be null");
    this.metadata = metadataReader.getAnnotationMetadata();
    setBeanClassName(this.metadata.getClassName());
}
代码比较简单,就不多做分析了。
历经千难万险,终于得到了 beanDefinition,但此时 beanDefinition 并不丰富,接下来就是进一步扩展 beanDefinition 的信息了。这些信息包括 bean的名称、bean的作用域、@Lazy 注解、@Primary 注解、@DependsOn 注解等,代码如下:
public abstract class AnnotationConfigUtils {

    ...

    /**
     * 进一步丰富 BeanDefinition
     */
    static void processCommonDefinitionAnnotations(AnnotatedBeanDefinition abd,
            AnnotatedTypeMetadata metadata) {
        // 处理 @Lazy
        AnnotationAttributes lazy = attributesFor(metadata, Lazy.class);
        if (lazy != null) {
            abd.setLazyInit(lazy.getBoolean("value"));
        }
        else if (abd.getMetadata() != metadata) {
            lazy = attributesFor(abd.getMetadata(), Lazy.class);
            if (lazy != null) {
                abd.setLazyInit(lazy.getBoolean("value"));
            }
        }
        // 处理 @Primary
        if (metadata.isAnnotated(Primary.class.getName())) {
            abd.setPrimary(true);
        }
        // 处理 @DependsOn
        AnnotationAttributes dependsOn = attributesFor(metadata, DependsOn.class);
        if (dependsOn != null) {
            abd.setDependsOn(dependsOn.getStringArray("value"));
        }
        // 处理 @Role
        AnnotationAttributes role = attributesFor(metadata, Role.class);
        if (role != null) {
            abd.setRole(role.getNumber("value").intValue());
        }
        // 处理 @Description
        AnnotationAttributes description = attributesFor(metadata, Description.class);
        if (description != null) {
            abd.setDescription(description.getString("value"));
        }
    }
}
将 BeanDefinition 到 beanFactory 的操作比较简单,关键的代码如下:
|-ClassPathBeanDefinitionScanner#registerBeanDefinition
 |-BeanDefinitionReaderUtils#registerBeanDefinition
  |-GenericApplicationContext#registerBeanDefinition
   |-DefaultListableBeanFactory#registerBeanDefinition
DefaultListableBeanFactory#registerBeanDefinition
this.beanDefinitionMap.put(beanName, beanDefinition);
从 ClassPathBeanDefinitionScanner#registerBeanDefinition 到 DefaultListableBeanFactory#registerBeanDefinition,这其中虽然经历了一些弯弯绕绕,但依旧不妨碍我们找到关键的代码。
到此,磁盘上的 class 文件,经过 spring 扫描,终于变成了 BeanDefinition,保存在 BeanFactory 中了。
本文比较长,主要分析了 spring 扫描包路径得到 beanDefinition 的过程,主要流程如下:
- 根据包名得到路径
Resource; - 根据路径
Resouce得到该路径下所有 class 文件的Resouce; - 根据 class 文件的
Resouce通过 asm 解析得到MetadataReader,注意:这里的MetadataReader还是所有 class 文件的MetadataReader; - 从
MetadataReader中找到需要 spring 托管的MetadataReader,将其转化为ScannedGenericBeanDefinition,ScannedGenericBeanDefinition为BeanDefinition的子类; - 进一步丰富
ScannedGenericBeanDefinition的信息; - 将上面得到的
BeanDefinition添加到BeanFactory中
至此,包名转换为 BeanDefinition 完成。

本文还有两个值得注意的地方:
- spring 在获取类上的注解时,不是通过反射,而是使用 asm 直接解析 class 文件,然后再获取类上的注解的
- 在处理注解时,spring 通过解析 “注解的注解” 实现了一套类似于注解继承的方式,这也是 spring 能识别
@Component、@Service甚至是开发者自定义注解的原因。
得到了 BeanDefinition 后,接着就是 spring 容器的初始化了,我们下篇文章再见。
本文原文链接:https://my.oschina.net/funcy/blog/4614071 ,限于作者个人水平,文中难免有错误之处,欢迎指正!原创不易,商业转载请联系作者获得授权,非商业转载请注明出处。