Learn and practice a release-based workflow and explore branching strategies.
Tags: Protected branches, Kanban, Semantic versioning, Projects, GitHub Apps
When your team uses a release-based workflow, GitHub makes it easy to collaborate on your next big idea.
GitHub releases allow your team to package and provide software to your users based on a specific point in the history of your project. In this course, you'll learn how to create a release-based workflow that is built on the foundations of the GitHub flow.
This course will answer common questions like:
- How do I choose a branching strategy?
- When should I use topic branches?
- When should I use release branches?
- How do I use the Projects tab on my repository?
- How do I create a release-centered workflow?
- How do I backport changes for a prior release?
- How do I implement a hotfix?
After completing this course, you'll be able to:
- Build a project board to manage your next release
- Create and commit changes on a release branch
- Create a Git tag and a release on GitHub
- Resolve bugs after a release
- Automate and better document your release changes

- Completed source repository
- Published releases created throughout the course
- Deployed AlienInvasion game which is the source code for this repository.
We recommend you first complete the following courses:
- Introduction to GitHub to learn how to use pull requests, a feature heavily utilized in this course
- Reviewing pull requests for additional instruction on pull requests
This course makes use of the following open source projects. Consider exploring these repos and maybe even making contributions!
- cykod/AlianInvasion: Demo Game for Mobile HTML5 Game Development
Developers, DevOps Engineers, IT Operations, managers, teams
This repository will teach you about release workflows. By the end of this course, you'll have two versions of the classic arcade game, "Alien Invasion". Let's get started! If you'd like, you can use GitHub Pages to host your Invasion game and see live updates. Go to the Settings tab of this repository. Scroll down to GitHub Pages. Select main as a Source.
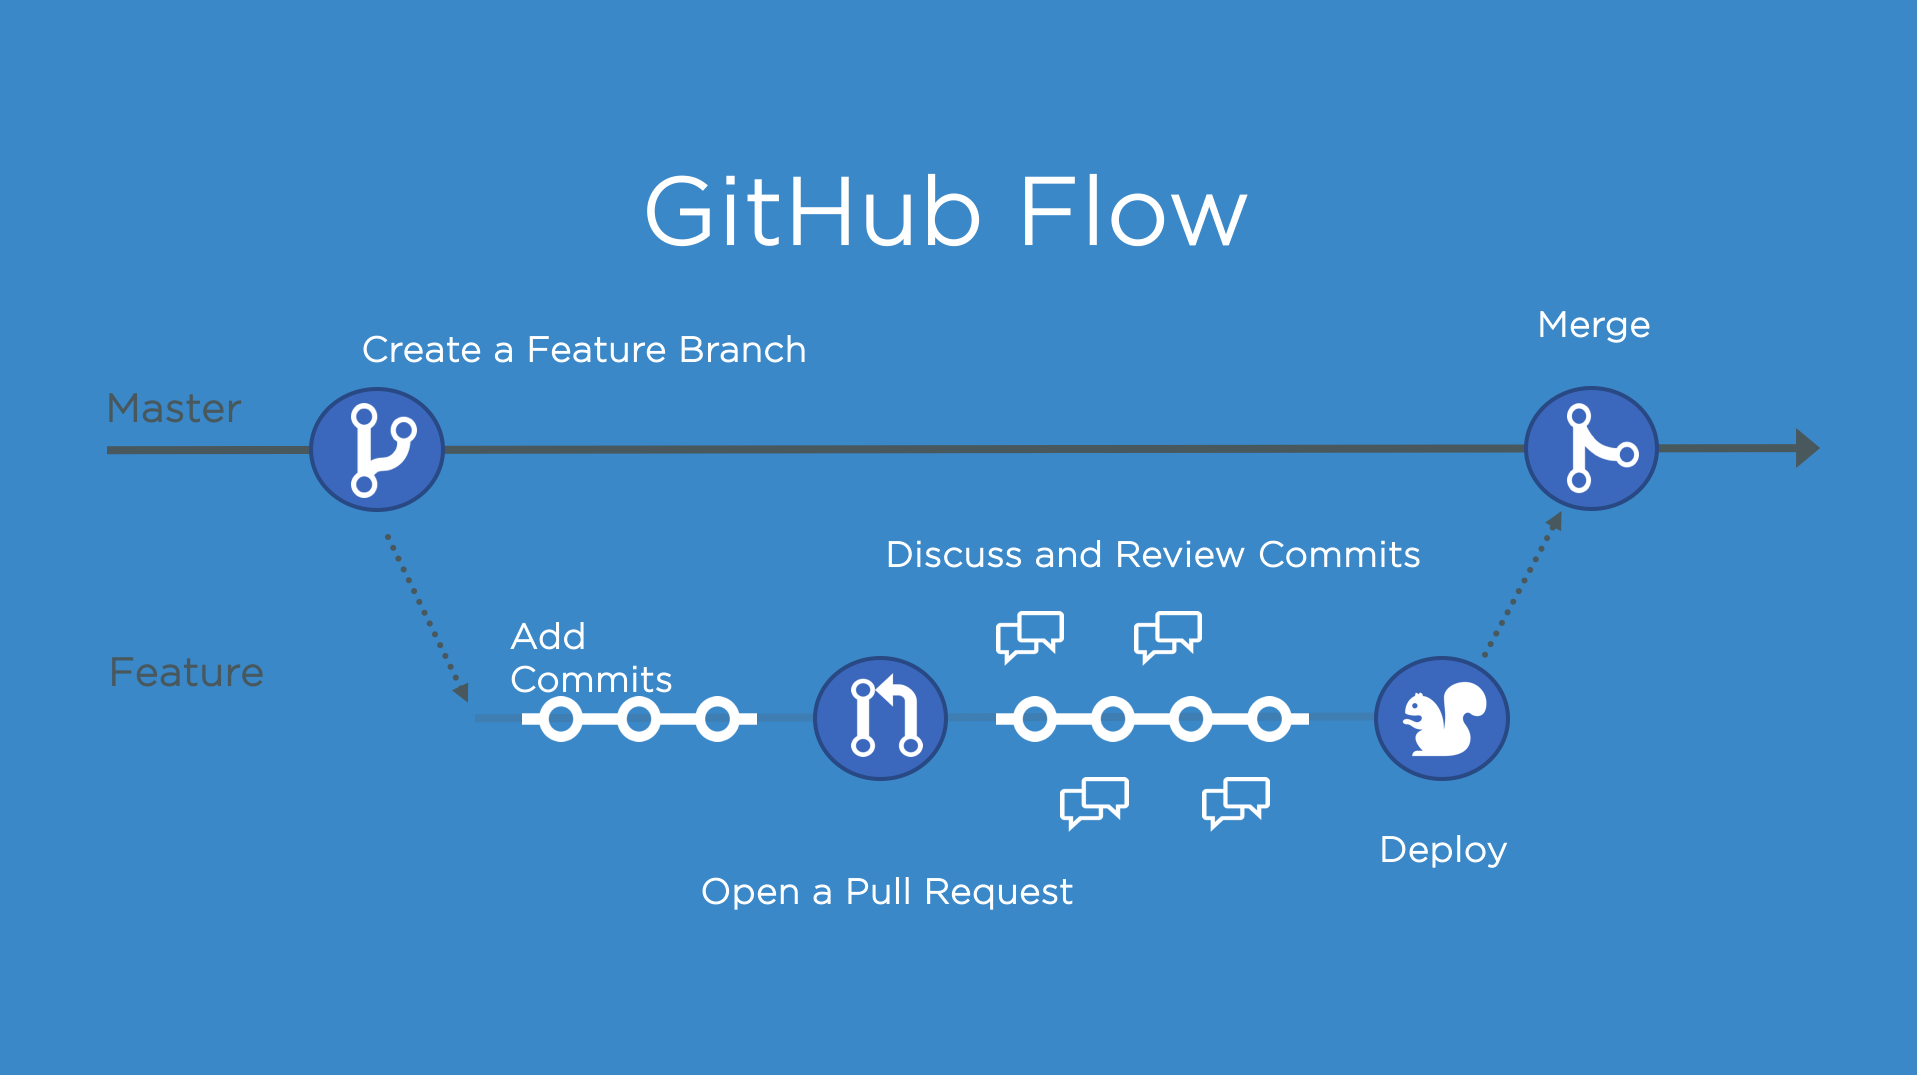
The GitHub flow is a lightweight, branch-based workflow for projects with regular deployments.
Some projects may deploy more often, with continuous deployment. There might be a "release" every time there's a new commit on main.
But, some projects rely on a different structure for versions and releases.
Versions are different iterations of updated software like operating systems, apps, or dependencies. Common examples are "Windows 8.1" to "Windows 10", or "macOS High Sierra" to "macOS Mojave".
Developers update code, and then run tests on the project for bugs. During that time, the developers might set up certain securities to protect from new code or bugs. Then, the tested code is ready for production. Teams version the code and release it for installation by end users.
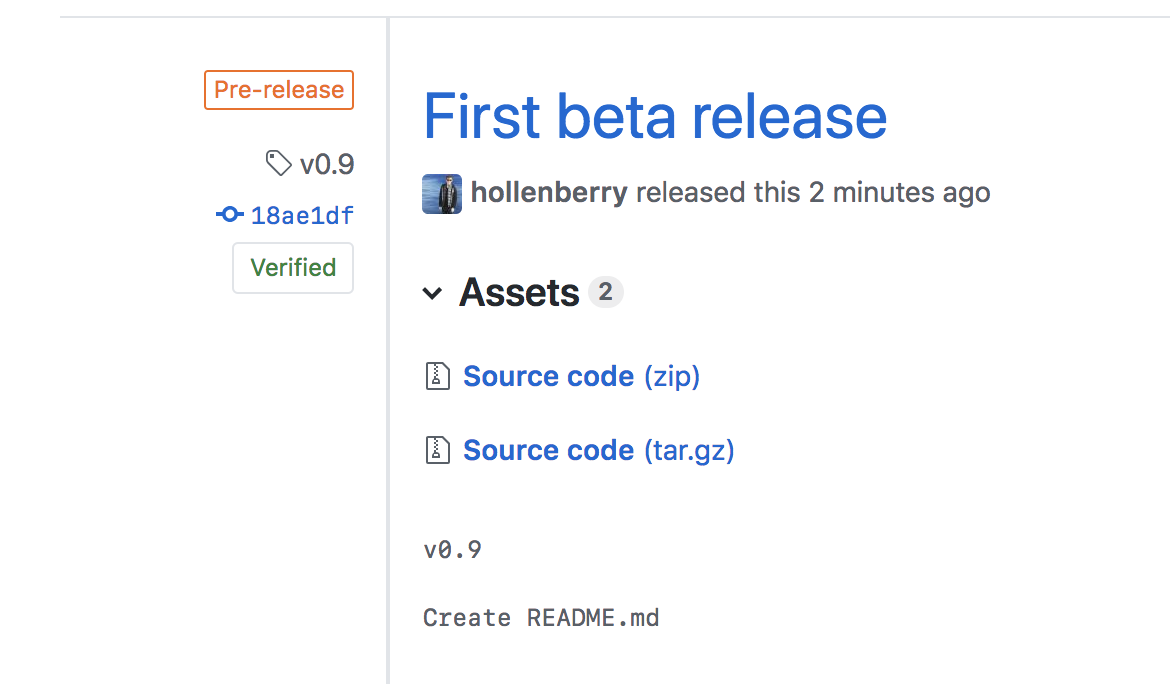
Create a release for this repository on GitHub.
GitHub Releases point to a specific commit. Releases can include release notes in Markdown, and attached binaries.
Before using a release based workflow for a larger release, let's create a tag and release.
- Go to the [Releases page]({{ releases }}) for this repository.
- You can click the link above, or click the Code tab at the top of your repository. Then, find the navigation bar below the repository description, and click 0 releases.
- Click Create a new release.
- In the field for Tag version, specify a number. In this case, use v0.9. Keep the Target as main.
- Give the release a title, like "First beta release". If you'd like, you could also give the release a short description.
- Select the checkbox next to This is a pre-release, since it is representing a beta version.
- Click Publish release.
Note: There are a lot of options here, like pre-releases, and attaching binaries. We'll talk more about these later. You might also see some yellow bars along the top in this repository for existing branches. We'll come to those later, too.
Sometimes I respond too fast for the page to update! If you perform an expected action and don't see a response, wait a few seconds and refresh the page for your next steps.
Creating a release package on GitHub might be easy, but it's only a piece of the puzzle. Releases often involve prioritized bug fixes, feature releases, and assorted tasks. How do you make sure you're keeping track? What happens if you want to save the most exciting features for a larger update?
On GitHub, let's keep track of several related issues with a GitHub project board.
- Navigate to the [Projects]({{ projects }}) tab of this repository.
- Click Create a project.
- Under Project board name, type "Release 1.0 tracker".
- In the Template dropdown, select Automated kanban.
- Click Create project.
Note: After you create your project, you'll see that GitHub has created a few cards for you. You can keep these, or delete them.
Great work! Notice that your release URL is ready for sharing or testing as both a zip or tar.gz file. If you selected "Pre-release", your co-contributors will know that this release isn't stable.
Your next steps can be found in your next issue.
Project boards have columns, and columns can contain cards. Cards can be existing issues or pull requests, or a stand-alone bit of Markdown text.
Throughout the course, you can keep track of the issues and pull requests by adding them as cards to the project board.
Add this issue to your new project board.
- Return to your [project]({{ projects }}/1).
- Above the project columns, click Add cards.
- Drag the Organizing a release card to your recently added "In Progress" column.
As you prepare for a future release, you'll need to organize more than the tasks and features. It's important to create a clear workflow for your team, and to make sure that the work remains organized.
There are several strategies for managing releases. Some teams might use long-lived branches, like production, dev, and main. Some teams use simple feature branches, releasing from the main branch.
No one strategy is better than another. We always recommend being intentional about branches and reducing long-lived branches whenever possible.
In this exercise, you'll use the release-v1.0 branch to be your one long-lived branch per release version.
Like the main branch, you can protect release branches. This means you can protect branches from force pushes or accidental deletion. This is already configured in this repository.
Releases are usually made of many smaller changes. This is a practice repository, but we will still make at least two feature adjustments.
Since we don't know of any bugs, we'll focus on a few features to update on our game before the version update.
- You should update the README.md to point to the correct game URL
- I'll help you change the text colors to green
First, update the URL in your README.md.
Using the GitHub flow, make your update, and open a pull request with release-v1.0 as your base branch.
- Create a new branch and change the URL in the
README.mdto point to your own GitHub Pages site. - Open a pull request with
release-v1.0as thebasebranch, and your new branch ascompare. - Fill in the pull request template to describe your changes.
- Add the pull request to the project board, using the Projects section on the right side of the pull request.
Great work! After you added the Organizing a release issue card to the project board, I closed this issue. With project board automation, the card you added to the "In progress" column is now in the "Done" column.
To check to see if your card moved, check out your [project]({{ repoUrl }}/projects/1).
Your next steps can be found in [your next issue]({{ url }}).
Uh oh, the base of this pull request isn't quite right.
Please change the base: to release-v1.0.
See Changing the base branch of a pull request for full instructions.
Nice work!
Even with releases, the GitHub flow is still an important strategy for working with your team. It's a good idea to use short-lived branches for quick feature additions and bug fixes.
Merge this pull request so that you can open the release pull request as early as possible.
- Click Merge pull request, and delete your branch.
Uh oh, you closed instead of merging! I'll reopen, and you can go ahead and merge the pull request now.
You should open a pull request between your release branch and main as early as possible. It might be open for a long time, and that's okay. The pull request corresponds to the work in the project board.
The pull request description should:
- Include a brief description of the pull request
- Include a task list of expected features
- Propose a ship date
To expedite the creation of this pull request, I've added a pull request template to the repository. Now when you create a pull request, default text will automatically be displayed, this should help you identify and fill out all the necessary information. If you don't want to use the template content, just remove the text from the pull request and repace it with your pull request message.
Let's make a new pull request comparing the release branch to the main branch.
- Open a [new pull request]({{ prUrl }}) with
base: mainandcompare: release-v1.0. - Ensure the title of your pull request is Release v1.0
- Include a detailed pull request body.
Thank you for merging. Your next steps are found in the [next issue]({{ url }}).
Uh oh, the branches in this pull request aren't quite right.
I was expecting base: set to main, and compare: set to release-v1.0.
- To change just your base, see Changing the base branch of a pull request for full instructions.
- To change the
compare:branch, close this pull request and open a new one withbase:set tomainandcompare:set torelease-v1.0.
I'll respond in this pull request when you've changed the base, or in your new pull request if you close this one out.
Uh oh, the title of your pull request isn't right.
I was expecting a title of: Release v1.0
- To change the title of your pull request, see Changing the base branch of a pull request for full instructions. The instructions for changing the base include how to change the title.
This pull request adds green text functionality to our game.
👽💚👽

So that this can be included in our release, review this pull request.
- Review this pull request, and Approve.
How do I approve a pull request?
To approve a pull request, perform the following:
- Click Files changed
- Click the Review changes drop-down
- Select Approve
- Click Submit review

Release branches are long lived, and we opened a pull request for another feature change. This will give our release a more detailed history. We changed the default text to green instead of white.
Several changes might be included in release branches. This is a common practice, and allows you to continue to ship code quickly without blockers.
Head over to the next pull request for your next steps.
Now that our release branch is ready to be merged, we have two more steps to take.
First, let's make sure that we're set up to document the version changes for the users.
We'll be using the Release Drafter GitHub app to draft our release notes as pull requests are merged.
The Release Drafter updates releases, so it requires write access to this repository. When you install the app, you don't need to add it to your entire GitHub account. Only install it on this repository. Release Drafter doesn't work just out of the box. If you use this in the future, you'll need to add .github/release-drafter.yml to your repository. We'll take care of adding this in a separate PR.
- Install the Release Drafter GitHub app to this repository only.
- Open a [new pull request]({{ prUrl }}) with
base: release-v1.0andcompare: config-release-drafter. This will add the configuration file for Release Drafter to this repository.
Note: For privacy reasons, we can't see what other apps have access to this repository, so we'll take your word for it.
Sometimes I respond too fast for the page to update! If you don't see a response from me, wait a few seconds and refresh the page for your next steps.
Nice work. Your next steps are back in the [release's pull request]({{ url }}).
Uh oh, the branches in this pull request aren't quite right.
I was expecting base: set to release-v1.0, and compare: set to config-release-drafter.
- To change just your base, see Changing the base branch of a pull request for full instructions.
- To change the
compare:branch, close this pull request and open a new one withbase:set torelease-v1.0andcompare:set toconfig-release-drafter.
I'll respond in this pull request when you've changed the base, or in your new pull request if you close this one out.
Oops, it looks like something about your release-drafter.yml file is off.
Make sure the file is in the .github folder of your repository.
Moving a file into a folder
- Click the pencil icon to edit the file
- In the file name field, click in front of the first character in the file name and press the Backspace or Delete key
- Enter
.github/, your file should now be in the.githubfolder - Commit the change
Make sure to copy and paste this text into the file.
template: |
  ## What's Changed

  $CHANGES
Great! It looks like you've configured Release Drafter by adding a .github/release-drafter.yml file. Let's make sure it makes it into our upcoming release.
- Click Merge pull request, and delete your branch.
Nice work. Your next steps are back in the [release's pull request]({{ url }}).
Because the main branch is protected, this pull request couldn't be merged until it received an approval. I've gone ahead and approved this one for you. It looks great!
It's generally a good idea to make sure that branches, especially long-lived ones like release branches, have the approval of your peers. Go ahead and merge before we move onto our next steps.
- Click Merge pull request.
Note: Usually, you delete a branch after merging. The release branch is protected, so it cannot be deleted.
Uh oh, you closed instead of merging this pull request! I'll reopen it, so you can merge.
It's important to be aware of the information what will be visible in that release. In the pre-release, the version and commit messages are visible.
Semantic versioning is a formal convention for specifying compatibility. It uses a three-part version number: major version; minor version; and patch. Version numbers convey meaning about the underlying code and what has been modified. For example, versioning could be handled as follows:
| Code status | Stage | Rule | Example version |
|---|---|---|---|
| First release | New product | Start with 1.0.0 | 1.0.0 |
| Backward compatible fix | Patch release | Increment the third digit | 1.0.1 |
| Backward compatible new feature | Minor release | Increment the middle digit and reset the last digit to zero | 1.1.0 |
| Breaking updates | Major release | Increment the first digit and reset the middle and last digits to zero | 2.0.0 |
Check out this article on Semantic versioning to learn more.
Let's now change our recently automated release from draft to latest release.
- Go to the [Releases page]({{ releases }}) for this repository.
- You can click the link above, or click the Code tab at the top of your repository. Then, find the navigation bar below the repository description, and click 1 release.
- Click the Edit button next to your draft release.
- Using semantic versioning, then type
v1.0.0as your release title. - Include a description of the changes made in this branch.
- Click Publish release.
Thanks for the merge. Notice that I didn't delete the branch? That's intentional.
Sometimes mistakes can happen with releases, and we'll want to be able to correct them on the same branch. Before we worry about any of that, let's finalize our first release!
Look for instructions in [this issue]({{ url }}).
Now that your release is finalized, we have a confession to make... somewhere in our recent update, I made a mistake and introduced a bug. Instead of changing the text colors to green, we changed the whole background.
Sometimes GitHub Pages takes a few minutes to update. Your page might not immediately show the recent updates you've made.

"Hotfixes", or a quick fix to address a bug in software, are a normal part of development. Oftentimes you'll see application updates whose only description is "bug fixes".
When bugs come up after you release a version, you'll need to address them.
We've already created this branch, pull request, and suggested a fix. The suggested change will be merged into the main branch. Later we will cherry-pick the hotfix commits into the release branch.
Submit a hotfix by applying the suggested change and approving this PR.
- Click Commit suggestion
- Enter a commit message
- Click Commit changes
- Approve this pull request
How's this change?
starCtx.fillStyle = "#000";
For more information about suggest changes, check out this GitHub Help article.
Congratulations on creating Release v1.0.0! Navigate to [the next pull request]({{ url }}) for your next steps.
If you have previous release branches that are impacted by this bug, you might need to make a few retroactive pull requests. Generally, we do this by using git cherry-pick to apply just those commits that should be backported.
In our case, no new changes have been merged into main since we shipped our hotfix, so we can merge the entire branch as is.
- Approve this pull request
Your fix is now on main! This ensures that any new code isn't based on our bug.
Let's backport those changes to the branch with release v1.0.
Go to the next pull request.
You updated the source code, but users can't readily access your most recent changes. Prepare a new release, and distribute that release to the necessary channels.
With automation, you don't have to spend a lot of time working on your release draft. Follow the same steps we took before, and you'll find a new release drafted and ready for your approval.
- Go to the [Releases page]({{ releases }}/releases) for this repository.
- You can click the link above, or click the Code tab at the top of your repository. Then, find the navigation bar below the repository description, and click 3 releases.
- Click the Edit button next to your draft release.
- Practice your semantic version syntax. What should this version be labeled?
- Click Publish release.
Congratulations! Your hotfix is now:
- on the
mainbranch (for any new code) - on the
releasebranch (so we can cut release v1.0.1)
Go to the next issue to continue.
Congratulations @{{ user.username }}, you've completed the Creating a Release Based workflow course!

- Created a release on GitHub based on a Git tag
- Built an automated project board within your repository to manage your release
- If you look at the board now, everything has moved to the Done [column]({{ releases }})
- Created and committed changes on a release branch
- Created a hot fix branch to fix a bug on the release branch
- Installed a Probot app to craft a changelog for your releases
Want to keep learning? Feel free to [check out our other courses]({{ host }}/courses)!
Great work! Your next steps can be found in [your next issue]({{ url }}).