Learn how to create workflows that enable you to use Continuous Integration (CI) for your projects.
Tags: GitHub Actions, Workflows, CI, Continuous Integration, Integration
GitHub Actions makes it easier than ever to incorporate continuous integration (CI) into your repositories. This course will get you from zero-to-CI by setting up two workflow files to automate the way you work.
We'll answer common questions like:
- What is Continuous Integration?
- How do GitHub Actions and workflows enable CI?
- What are build artifacts and how are they used?
- How can a unit testing framework be implemented with GitHub Actions?
And when you're done you'll be able to:
- Describe the importance of GitHub Actions in Continuous Integration
- Use and customize a templated workflow
- Create CI workflows that match a team's needs and behaviors
- Use a repository's source code and build artifacts across jobs in a workflow
- Implement a unit testing framework using GitHub Actions
- Create a workflow that runs tests and produces test reports
- Set up a matrix build to create build artifacts for multiple target platforms
- Save and access a repository's build artifacts
- Choose virtual environments for an application's CI needs
In this course, we'll be walking through CI using GitHub Actions, and creating a Tic Tac Toe game!

Before you start, you should be familiar with GitHub. We recommend taking the following two Learning Labs prior to this course:
And a great follow-on course is
This course makes use of the following technologies:
- Node.js and npm
- Jest, a popular JavaScript testing framework.
Developers, DevOps Engineers, new GitHub users, students, teams
In this repository, we'll be diving into the world of Continuous Integration. Continuous Integration, or CI, can benefit your projects and change how you work on GitHub. If you're new to Continuous Integration, you may be thinking, "What exactly is it, and do I need it in my project?"

CI can help you stick to your team’s quality standards by running tests and reporting the results on GitHub. CI tools run builds and tests, triggered by commits. The results post back to GitHub in the pull request. This reduces context switching for developers, and improves consistency for testing. The goal is fewer bugs in production and faster feedback while developing.
Choices around CI that will work best for your project depend on many factors, including:
- Programming language and application architecture
- Operating system and browsers you plan to support
- Your team’s experience and skills
- Scaling capabilities and plans for growth
- Geographic distribution of dependent systems and the people who use them
- Packaging and delivery goals
In other courses, you may have noticed that some actions take me longer to respond to than others. In this course, many of the actions will be related to builds. Those builds sometimes take longer to build, up to several minutes. Don't be concerned if I take a few minutes to respond, or if I respond too quickly. Sometimes, I'll let you know what the build will say before it finishes! Please wait for the builds to finish before moving on to your next step.
If you aren't already familiar, it may be a good idea to go through the Introduction to GitHub Learning Lab.

There's a bug somewhere in this repository. We'll use the practice of Continuous Integration (CI) to set up some automated testing to make it easier to discover, diagnose, and minimize scenarios like this.
Let's first introduce CI to this repository. The codebase is written with Node.js. GitHub Actions allows us to use some templated workflows for common languages and frameworks, like Node.js! Let's add it:
- Go to the [Actions tab]({{ actionsUrl }}).
- Choose the template Node.js workflow.
- Commit the workflow to a new branch.
- Create a pull request titled CI for Node.
I'll respond in the new pull request when I detect it has been created.
If at any point you're expecting a response and don't see one, refresh the page.
The title of this pull request isn't what I expected!
To rename your pull request:
- Click on Edit next to the pull request's title.
- The title will turn to a text field, {{ title }} in the title field.
- Click Save.
I'll respond when I detect this pull request has been renamed.
Great job adding the templated workflow. Adding that file to this branch is enough for GitHub Actions to begin running CI on your repository. This takes a couple of minutes, so let's take this opportunity to learn about some of the components of the workflow file you just added. We'll dive deeper into some of the key elements of this file in future steps of the course.
I'll respond when GitHub Actions finishes running the workflow. You can follow along in the [Actions tab]({{ actionsUrl }}), or by clicking Details on the pending status below.
Actions workflow not running? Click here
When a GitHub Actions workflow is running, you should see some checks in progress, like the screenshot below.
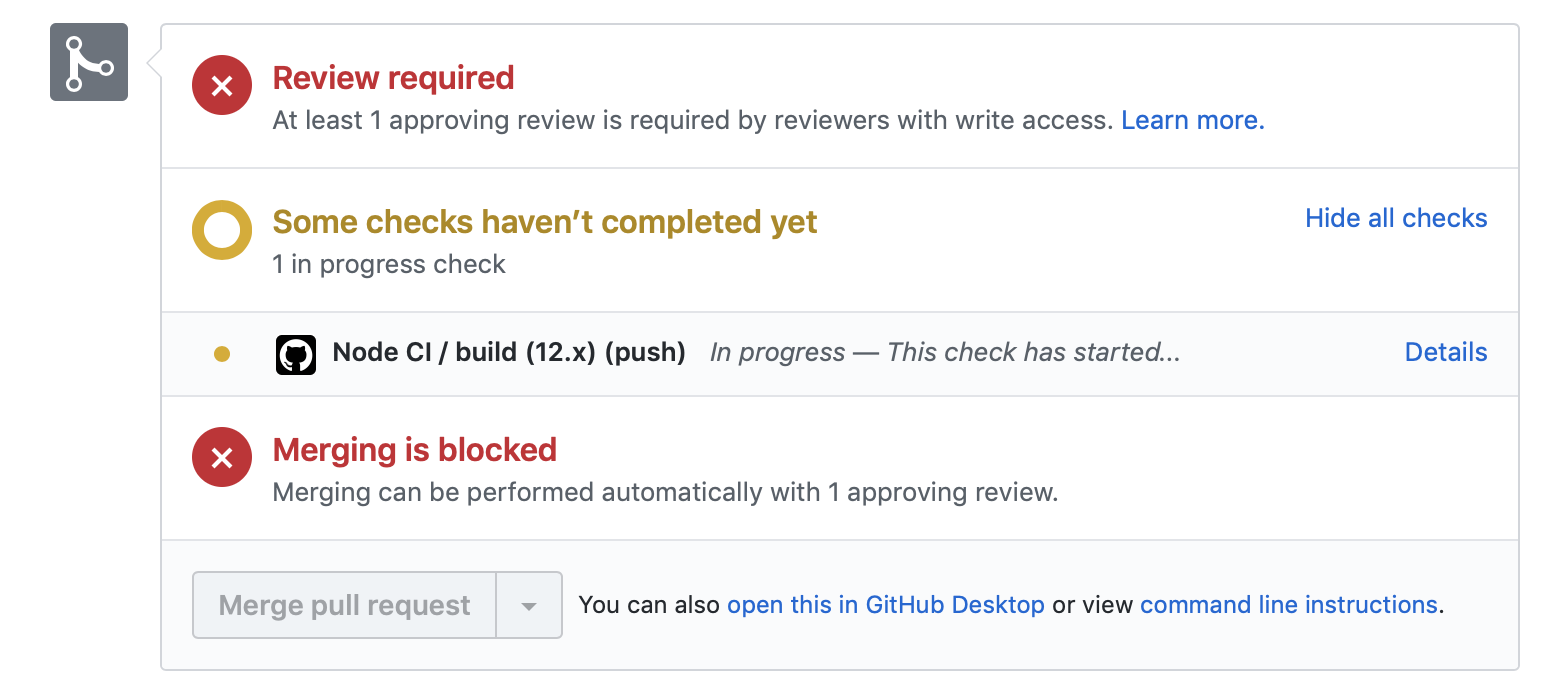
If the checks don't appear or if the checks are stuck in progress, there's a few things you can do to try and trigger them:
- Refresh the page, it's possible the workflow ran and the page just hasn't been updated with that change
- Try making a commit on this branch. Our workflow is triggered with a
pushevent, and committing to this branch will result in a newpush - Edit the workflow file on GitHub and ensure there are no red lines indicating a syntax problem
The on: field is what tells GitHub Actions when to run. In this case, we're running the workflow anytime there's a push.
To learn more about the fields discussed here, see:
- Workflow syntax for GitHub Actions:
on:on GitHub Help - Events that trigger workflows on GitHub Help
The jobs: block defines the core component of an Actions workflow. Workflows are made of jobs, and our template workflow defines a single job with the identifier build.
Every job also needs a specific host machine on which to run, the runs-on: field is how we specify it. The template workflow is running the build job in the latest version of Ubuntu, a Linux-based operating system.
To learn more about the fields discussed here, see:
- Workflow syntax for GitHub Actions:
jobs:on GitHub Help - Workflow syntax for GitHub Actions:
jobs.<job_id>:on GitHub Help - Workflow syntax for GitHub Actions:
jobs.<job_id>.runs-on:on GitHub Help - Virtual environments for GitHub Actions on GitHub Help
- Ubuntu on Wikipedia

Let's dig into the vocabulary of GitHub Actions.
- Workflow: A workflow is a unit of automation from start to finish, including the definition of what triggers the automation, what environment or other aspects should be taken account during the automation, and what should happen as a result of the trigger.
- Job: A job is a section of the workflow, and is made up of one or more steps. In this section of our workflow, the template defines the steps that make up the
buildjob. - Step: A step represents one effect of the automation. A step could be defined as a GitHub Action, or another unit, like printing something to the console.
- Action: A GitHub Action is a piece of automation written in a way that is compatible with workflows. Actions can be written by GitHub, by the open source community, or you can write them yourself!
The power of GitHub Actions lies in access to actions written by the ✨ GitHub community. Here, we'll use two Actions officially written and supported by GitHub:
actions/checkout@v2is used to ensure our virtual machine has a copy of our codebase. The checked out code will be used to run tests against.actions/setup-node@v1is used to set up proper versions of Node.js since we'll be performing testing against multiple versions.
To learn more about the fields discussed here, see:
- Workflow syntax for GitHub Actions:
jobs.<job_id>.steps:on GitHub Help - Referencing actions in your workflow on GitHub Help
- Source repository for the
actions/checkoutaction - Source repository for the
actions/setup-nodeaction
In addition to running pre-built actions, the workflow can also execute commands, just as you would if you had direct access to the virtual machine. In this portion of the template workflow, we run some common commands relevant to Node.js projects, like npm install to install dependencies and npm test to run the chosen testing framework.
To learn more about the fields discussed here, see:
- Workflow syntax for GitHub Actions:
jobs.<job_id>.steps.run:on GitHub Help npm installon the npm Documentationnpm runon the npm Documentationnpm teston the npm Documentation
If you don't see an explanation of your CI logs below when the workflow has executed, refresh this page.
This pull request introduces Jest, a popular JavaScript testing framework. We'll use it to learn how to use it for continuous integration.
When the bot asks you to, merge this pull request.
Great job! Go ahead and merge this pull request so your changes are automatically shared with anyone that contributes to this project.
I'll respond when you merge this pull request.
The workflow ran! But it failed 😭. But, that's OK. Every time CI fails, it's an opportunity to learn from what's causing it. By running CI with GitHub Actions, we have access to the logs for the attempted build. These are found:
- In the [Actions]({{ actionsUrl }}) tab
- In the merge box for this pull request, by clicking on "Details".
If you navigate over to the build logs, you may notice that the error is "No tests found".

Learning how to read build logs and isolate the cause of the problem is an art on its own. We'll try and cover some of the basics here. In our case, the source of the error is the npm test command. The npm test command looks for a testing framework. We want to use Jest, as we mentioned earlier. Jest requires unit tests in a directory named __test__. A __test__ directory doesn't exist on this branch.
Not to worry, I've got you covered! Navigate to the open pull request titled [Add Jest tests]({{ url }}) and merge it into this branch. That'll get us the test files we need. I'll respond when you merge the [Add Jest tests pull request]({{ url }}) into this branch.
- Navigate to the open pull request titled [Add Jest tests]({{ url }})
- Merge the pull request
Great! Now that the testing framework is properly configured, we should get a response from it soon. This time, you'll practice reading the logs on your own. Just like before, you can follow along as GitHub Actions runs your job by going to the [Actions tab]({{ actionsUrl }}) or by clicking on "Details" in the merge box below.
When the tests finish, you'll see a red X ❌ or a green check mark ✔️ in the merge box. At that point, you'll have access to logs for the build job and its associated steps.
By looking at the logs, can you identify which tests failed? To find it, go to one of the failed builds and scrolling through the log. Look for a section that lists all the unit tests. We're looking for the name of the test with an "x".
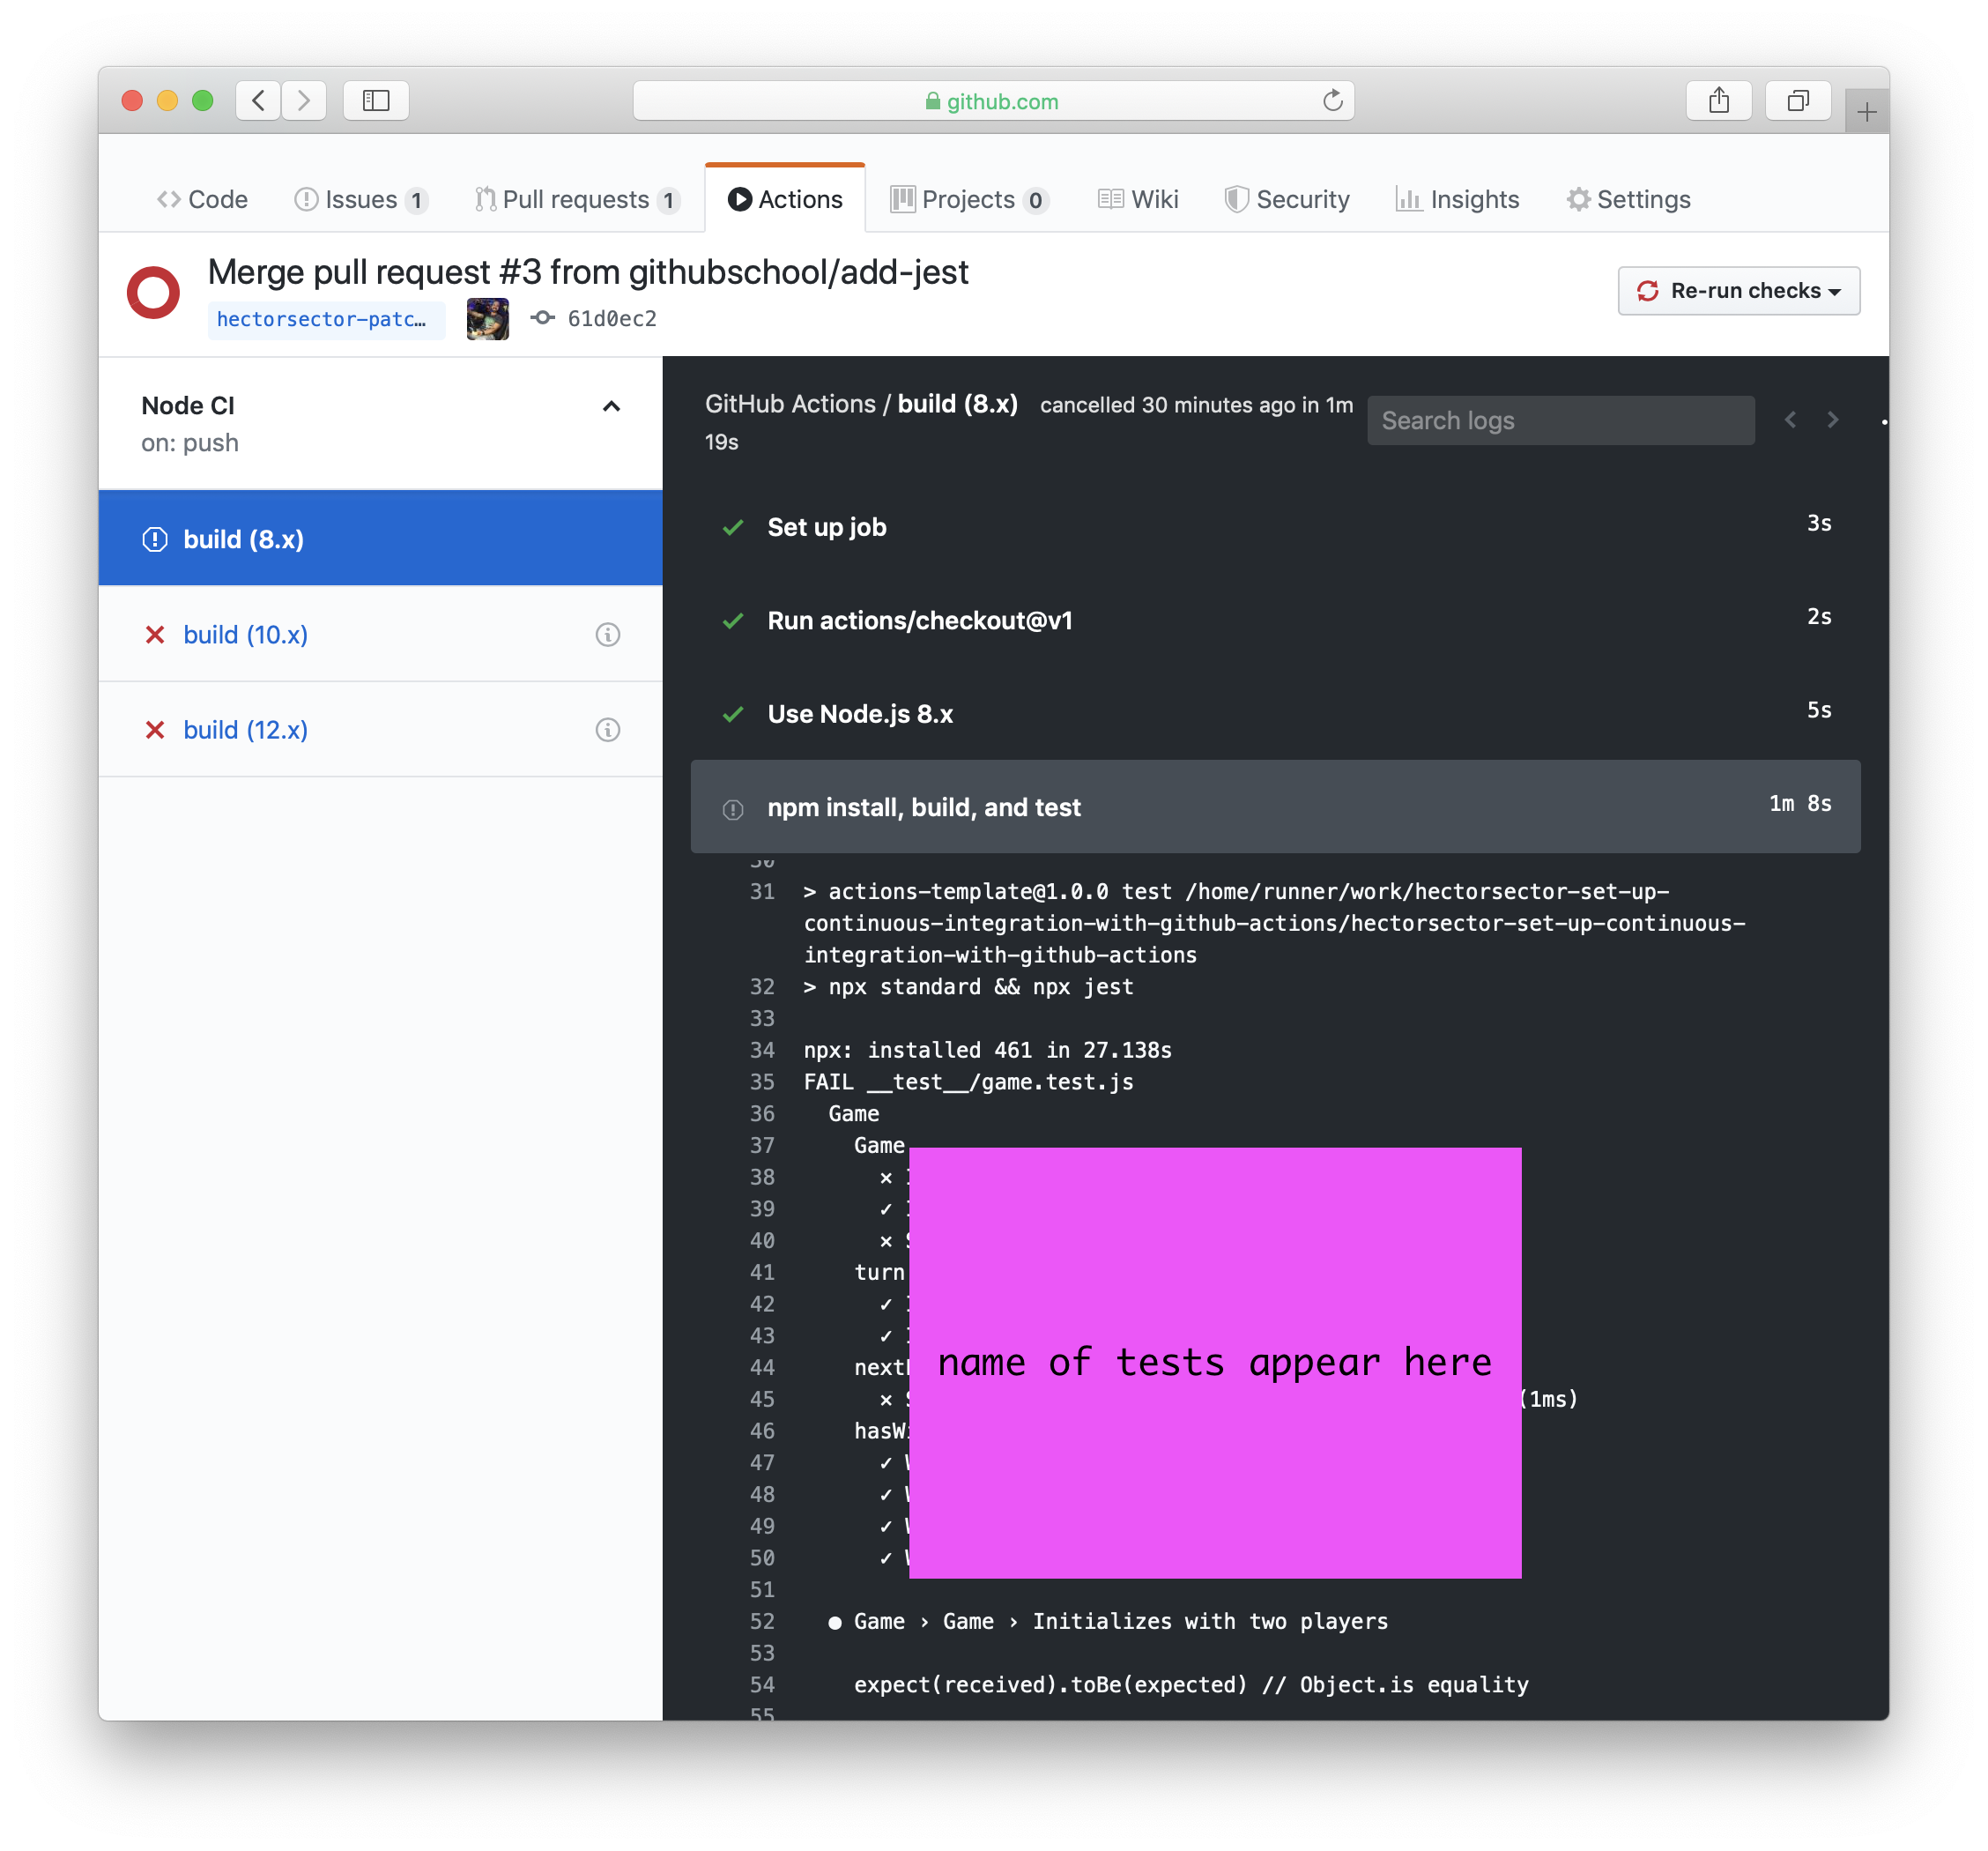
- Navigate to the log output
- Identify a name of a failing test
- Comment the name of the failing test here
I'll respond when you enter the name of at least one failing test. You can either copy and paste that portion of the log directly, or type the name of the test as a comment.
Let's go to the [next step]({{ url }}).
That wasn't the test name I expected, but that's alright. If you typed something slightly different than what I looked for that may explain it.
I expected one of the following test names:
- Contains the compiled JavaScript
- Initializes with two players
- Starts the game with a random player
- Sets the current player to be whoever it is not
Let's keep going anyway!
One of the failing tests is: Initializes with two players. If you dig deeper into the logs, you may notice these results in particular:
  ● Game › Game › Initializes with two players

    expect(received).toBe(expected) // Object.is equality

    Expected: "Nate"
    Received: "Bananas"

      12 |     it('Initializes with two players', async () => {
      13 |       expect(game.p1).toBe('Salem')
    > 14 |       expect(game.p2).toBe('Nate')
         |                       ^
      15 |     })
      16 |
      17 |     it('Initializes with an empty board', async () => {

      at Object.toBe (__test__/game.test.js:14:23)
This tells us that a unit test has been written that names the two players Salem and Nate, and then checks if that name sticks. However, we get 🍌 Bananas instead of Nate! How did this happen?
To find out, it may help to know it's common practice to name test files the same as the code file they are testing, but with a .test.js extension. Therefore, we can assume that the test result from game.test.js is caused by a problem in game.js. I'll point it out below.
Make the changes suggested below. I'll respond when the workflow runs.
Actions workflow not running? Click here
When a GitHub Actions workflow is running, you should see some checks in progress, like the screenshot below.
If the checks don't appear or if the checks are stuck in progress, there's a few things you can do to try and trigger them:
- Refresh the page, it's possible the workflow ran and the page just hasn't been updated with that change
- Try making a commit on this branch. Our workflow is triggered with a
pushevent, and committing to this branch will result in a newpush - Edit the workflow file on GitHub and ensure there are no red lines indicating a syntax problem
This line is causing the problem. Let's fix it by initializing this instance of p2 to the proper value.
Edit the src/game.js file directly, or accept the suggestion below.
this.p2 = p2
Once you commit the changes, the tests will run again and should pass. I'll respond when the tests pass. If the tests don't pass, I'll provide some troubleshooting information.
The Actions workflow failed and I was expecting it to succeed. Let's see if we can find how to fix it.
Try the following: {{ troubleshooting }}
I'll respond when you commit and the tests run again.
Great job! Go ahead and merge this pull request so your changes are automatically shared with anyone that contributes to this project.
I'll respond when you merge this pull request.
Now that we've learned how to quickly set up CI, let's try a more realistic use case.
Our fictional team has a custom workflow that goes beyond the template we've used so far. We would like the following features:

Test against multiple targets so that we know if our supported operating systems and Node.js versions are working

Dedicated test job so that we can separate out build from test details

Access to build artifacts so that we can deploy them to a target environment

Branch protections so that the main branch can't be deleted or inadvertently broken

Required reviews so that any pull requests are double checked by teammates

Obvious approvals so we can merge quickly and potentially automate merges and deployments
Can GitHub Actions support this workflow? Let's find out. We'll tackle some of the changes to the existing workflow file first.
- Edit your [existing workflow]({{ workflowUrl }}) file in a new branch
- In that file, target versions
12.xand14.xof Node, only - Open a new pull request titled Improve CI for your change.
I'll respond when you open the pull request.
Let's go to the [next step]({{ url }}).
The title of this pull request isn't what I expected!
To rename your pull request:
- Click on Edit next to the pull request's title.
- The title will turn to a text field, {{ title }} in the title field.
- Click Save.
I'll respond when I detect this pull request has been renamed.
Great work so far! By targeting specific versions of Node, we've configured a build matrix which allow us to test across multiple operating systems, platforms, and language versions. See Configuring a matrix build in GitHub Help if you'd like to learn more.
I'll respond when you commit the changes in the comment below.
Since we'd like to support deploying our app to Windows environments, let's add Windows to the matrix build configuration.

You can follow the suggestion, or manually make the changes in the numbered instructions.
        os: [ubuntu-latest, windows-2016]
        node-version: [12.x, 14.x]
- Edit the workflow config at [
.github/workflows/nodejs.yml]({{ fileUrl }}) - Add an
osfield to thestrategy.matrixsection of your workflow - Add
ubuntu-latestandwindows-2016to the target operating systems - Commit your workflow changes to this branch.
I'll respond in this pull request when you've committed.
Great, if you look at the logs now, you'll notice that multiple builds will exist: 4 build to be exact! That's because for each of the 2 operating systems we're running tests against 2 versions so: 2 OS ✖️ 2 Node.js versions = 4 builds.
Our custom workflow now accounts for:
- ✅ test against multiple targets so that we know if our supported operating systems and Node.js versions are working

Let's now try to create a dedicated test job and satisfy the second item in our custom workflow checklist.
This will allow us to separate the build and test functions of our workflow into more than one job that will run when our workflow is triggered.
- Edit [your workflow file]({{ fileUrl }})
- Create a new job called "test" as follows (we'll use ellipses
...to only show the parts of the workflow we're interested in, but you should not copy the ellipses directly):name: Node CI on: [push] jobs: build: ... test: ...
- In the
buildjob, include the following portions of your existing workflow:build: runs-on: ubuntu-latest steps: - uses: actions/checkout@v2 - name: npm install and build webpack run: | npm install npm run build
- In the newly created
testjob, include the following portions of your existing workflow:test: runs-on: ubuntu-latest strategy: matrix: os: [ubuntu-latest, windows-2016] node-version: [12.x, 14.x] steps: - uses: actions/checkout@v2 - name: Use Node.js {% raw %}${{ matrix.node-version }}{% endraw %} uses: actions/setup-node@v1 with: node-version: {% raw %}${{ matrix.node-version }}{% endraw %} - name: npm install, and test run: | npm install npm test env: CI: true
If you'd like to copy and paste the full workflow file instead, click here to see it in its entirety.
name: Node CI
on: [push]
jobs:
build:
  runs-on: ubuntu-latest
  steps:
    - uses: actions/checkout@v2
    - name: npm install and build webpack
      run: |
        npm install
        npm run build
test:
  runs-on: ubuntu-latest
  strategy:
    matrix:
      os: [ubuntu-latest, windows-2016]
      node-version: [12.x, 14.x]
  steps:
  - uses: actions/checkout@v2
  - name: Use Node.js {% raw %}${{ matrix.node-version }}{% endraw %}
    uses: actions/setup-node@v1
    with:
      node-version: {% raw %}${{ matrix.node-version }}{% endraw %}
  - name: npm install, and test
    run: |
      npm install
      npm test
    env:
CI: trueWhen you commit to this branch, the workflow should run again. I'll respond when it is finished running.
Actions workflow not running? Click here
When a GitHub Actions workflow is running, you should see some checks in progress, like the screenshot below.
If the checks don't appear or if the checks are stuck in progress, there's a few things you can do to try and trigger them:
- Refresh the page, it's possible the workflow ran and the page just hasn't been updated with that change
- Try making a commit on this branch. Our workflow is triggered with a
pushevent, and committing to this branch will result in a newpush - Edit the workflow file on GitHub and ensure there are no red lines indicating a syntax problem
Great! We've now got two nicely separated build and test jobs. Our custom workflow now accounts for:
- ✅ test against multiple targets so that we know if our supported operating systems and Node.js versions are working
- ✅ dedicated test job so that we can separate out build from test details
If you'd like to learn more about jobs, see:
- About GitHub Actions: Job in GitHub Help
- About CI: Job in GitHub Help
- Workflow syntax for GitHub Actions:
jobs
No action required in this step - just waiting. I'll respond when the workflow runs your jobs.
Actions workflow not running? Click here
When a GitHub Actions workflow is running, you should see some checks in progress, like the screenshot below.
If the checks don't appear or if the checks are stuck in progress, there's a few things you can do to try and trigger them:
- Refresh the page, it's possible the workflow ran and the page just hasn't been updated with that change
- Try making a commit on this branch. Our workflow is triggered with a
pushevent, and committing to this branch will result in a newpush - Edit the workflow file on GitHub and ensure there are no red lines indicating a syntax problem
The workflow has finished running!
You may notice build succeeded, but each of the test jobs failed. That's because the build artifacts created in build aren't available to the test job. Each job executes in a fresh instance of the virtual environment. This is due to the design of the virtual environments themselves.
So what do we do when we need the work product of one job in another? We can use the built-in artifact storage to save artifacts created from one job to be used in another job within the same workflow.

Artifacts allow you to persist data after a job has completed, and share that data with another job in the same workflow. An artifact is a file or collection of files produced during a workflow run.
To upload artifacts to the artifact storage, we can use an action built by GitHub: actions/upload-artifacts.
You can follow the manual steps below, or accept the suggestion in the following comment.
- Edit [your workflow file]({{ fileUrl }})
- Add a step to your
buildjob that uses theupload-artifactsaction.build: runs-on: ubuntu-latest steps: - uses: actions/checkout@v2 - name: npm install and build webpack run: | npm install npm run build - uses: actions/upload-artifact@main with: name: webpack artifacts path: public/
- Commit your change to this branch
I'll respond when you commit to this branch.
You can commit this suggestion directly.
      - uses: actions/upload-artifact@master
        with:
          name: webpack artifacts
          path: public/
Great! The build artifacts will now be uploaded to the artifact storage. If you wait for the workflow to finish, you'll notice the test job still fails. This is for a number of reasons:
- jobs run in parallel, unless configured otherwise
- each job runs in its own virtual environment, so although we've pushed our artifacts to storage, the
testjob needs to retrieve them.
To remedy this, we'll run test only after build is finished so the artifacts are available.
Similar to the upload action to send artifacts to the storage, we'll use another action built by GitHub to download these previously uploaded artifacts from the build job: actions/download-artifact.
You can follow the manual steps below, or accept the suggestions in the following comments.
- Edit your [workflow file]({{ fileUrl }})
- Configure the
testjob to run only after thebuildjob is completed (we'll use ellipses...to only show the parts of the workflow we're interested in, but you should not copy the ellipses directly):test: needs: build runs-on: ubuntu-latest ...
- Add a step to your
testjob that uses thedownload-artifactsaction.test: needs: build runs-on: ubuntu-latest ... steps: - uses: actions/checkout@v2 - uses: actions/download-artifact@main with: name: webpack artifacts path: public - name: Use Node.js {% raw %}${{ matrix.node-version }}{% endraw %} uses: actions/setup-node@v1 with: node-version: {% raw %}${{ matrix.node-version }}{% endraw %} - name: npm install, and test run: | npm install npm test env: CI: true
I'll respond when you've edited your workflow file.
You can commit this suggestion directly.
needs: build
You can commit this suggestion directly.
    - uses: actions/download-artifact@main
      with:
        name: webpack artifacts
        path: public
    - name: npm install, and test
Awesome work!
Our custom workflow now accounts for:
- ✅ test against multiple targets so that we know if our supported operating systems and Node.js versions are working
- ✅ dedicated test job so that we can separate out build from test details
- ✅ access to build artifacts so that we can deploy them to a target environment
- Merge this pull request so our new CI workflow is available to the entire team
In the next few steps, we'll finish supporting our team's workflow:
- branch protections so that the
mainbranch can't be deleted or inadvertently broken - required reviews so that any pull requests are double checked by teammates
- obvious approvals so we can merge quickly and potentially automate merges and deployments
I'll respond when you merge this pull request.
Remember the [custom workflow]({{ workflowIssue }}) we are attempting to create for the team? Here's our status on the list of requirements we defined:
- ✅ test against multiple targets so that we know if our supported operating systems and Node.js versions are working
- ✅ dedicated test job so that we can separate out build from test details
- ✅ access to build artifacts so that we can deploy them to a target environment
- branch protections so that the
mainbranch can't be deleted or inadvertently broken - required reviews so that any pull requests are double checked by teammates
- obvious approvals so we can merge quickly and potentially automate merges and deployments
The last three remaining items don't really belong in a code, build, and test pipeline because they have to do with processes that involve humans.
GitHub Actions can run multiple workflows for different event triggers. Let's create a new approval workflow that'll work together with our Node.js workflow.
- Create a [new file]({{ fileUrl }}),
.github/workflows/approval-workflow.yml, on this branch - Enter a name for your workflow in the new file, something like:
name: Team awesome's approval workflow
I'll respond when you commit to this branch.
Let's go to the [next step]({{ url }}).
Great job creating a new workflow!
As we briefly discussed earlier, workflows can be configured to run:
- Using events from GitHub
- At a scheduled time
- When an event outside of GitHub occurs
Full details are available in Events that trigger workflows on GitHub Help. So far, we've used the push event for our Node.js workflow. That makes sense when we want to take action on code changes to our repository.
For a review workflow, we want to engage with human reviews, instead. For example, we'll use the Label approved pull requests action so that we can easily see when we've gotten enough reviews to merge a pull request.
Let's prep our review workflow by triggering it with a pull_request_review event.
Trigger your review workflow. Apply the suggestion or follow the instructions to do it directly.
name: Team awesome's approval workflow
on: pull_request_review
- Edit your newly created [workflow file]({{ editUrl }})
- Below the title, run the workflow on a pull request review event:
on: pull_request_review
- Commit your changes to this branch
I'll respond when you commit something to this branch.
Great work! Let's get some more practice with jobs. Apply the suggested change below or follow the instructions.
In a later step, we'll use an action that adds a label to any pull requests after a preset number of approvals. These labels could be used as a visual indicator to your team that something is ready to merge, or even as a way to use other actions or tools to automatically merge pull requests when they receive the required number of approvals.
- Edit your newly created [workflow file]({{ editUrl }})
- Create a new job called
labelWhenApproved.on: pull_request_review jobs: labelWhenApproved: runs-on: ubuntu-latest - Commit your changes to this branch
I'll respond when you commit something to this branch.
We've now got a job with the labelWhenApproved identifier. We're off to a great start!
It's now time to use a community-created action. The action we'll use is pullreminders/label-when-approved-action.

Let's see if you can use this action on your own.
If you'd like a hint, submit a comment on this pull request with the word "hint".
- the workflow file needs a
steps:block - give your new step any name you wish
- to use a community action, use the
uses:keyword label-when-approved-actionrequires a block calledenv:with the following environment variables:APPROVALSis the number of required approvals that are required for a label to be applied, please set this to"1"GITHUB_TOKENis necessary so the action can create and apply labels to this repository. See the action's documentation for how to use itADD_LABELis the name of the label which should be added when the number of approvals have been met, choose any label name you wish
- Using your prior knowledge, configure the pullreminders/label-when-approved-action action in this workflow
I'll respond when you push a new commit to this branch.
- Edit the [workflow file]({{ editUrl }}) on this branch.
- Give your step a name, have it use
pullreminders/label-when-approved-action@main, and set all the required environment variables.runs-on: ubuntu-latest steps: - name: Label when approved uses: pullreminders/label-when-approved-action@master env: APPROVALS: "1" GITHUB_TOKEN: {% raw %}${{ secrets.GITHUB_TOKEN }}{% endraw %} ADD_LABEL: "approved" - Commit your changes to this branch.
Awesome! We can now check an additional requirement off our list!
- ✅ test against multiple targets so that we know if our supported operating systems and Node.js versions are working
- ✅ dedicated test job so that we can separate out build from test details
- ✅ access to build artifacts so that we can deploy them to a target environment
- ✅ obvious approvals so we can merge quickly and potentially automate merges and deployments
- branch protections so that the
mainbranch can't be deleted or inadvertently broken - required reviews so that any pull requests are double checked by teammates
We'll now use branch protections in combination with this change so that everything goes smoothly. Up until now, I've handled branch protections for you, but I've removed them so that you can learn how to set them.
Take a look at the merge box, you'll notice you can merge this even though the review process hasn't been met. Still see the protection? Refresh this page.

Protected branches ensure that collaborators on your repository cannot make irrevocable changes to branches. Enabling protected branches also allows you to enable other optional checks and requirements, like required status checks and required reviews.
Next, add branch protections and continue with the course.
- Go to [Branches]({{ settingsUrl}}/branches) settings. You can navigate to that page manually by clicking on the right-most tab in the top of the repository called Settings and then clicking on Branches.
- Click on [Add rule]({{ settingsUrl }}/branch_protection_rules/new) under "Branch protection rules".
- Type
mainin Branch name pattern. - Check Require pull request reviews before merging.
- Check Require status checks to pass before merging.
- Check all build and test jobs that you'd like to see in the newly visible gray box.
- Click Create.
- Return to this pull request, and [approve the requested review]({{ approvalUrl }}).
I'll respond when I receive an approval from your pull request review.
I couldn't detect your protected branch. Please protect your master branch, and approve this pull request once again.
Nice work, you did it! Your workflows now contain:
- ✅ test against multiple targets so that we know if our supported operating systems and Node.js versions are working
- ✅ dedicated test job so that we can separate out build from test details
- ✅ access to build artifacts so that we can deploy them to a target environment
- ✅ branch protections so that the
mainbranch can't be deleted or inadvertently broken - ✅ required reviews so that any pull requests are double checked by teammates
- ✅ obvious approvals so we can merge quickly and potentially automate merges and deployments
There's so much more you can do with continuous integration, and you have a solid start. Now...[what will you learn next]({{ host }}/courses)?
Awesome work! Our workflows are now complete.
GitHub Actions will apply a label to this pull request because you've approved it. This may take a few moments to run, you can follow along in the Actions tab.
Labeling the pull request allows us to automate the merging of pull requests. I'll act as the 🤖 automation in this example and merge the pull request for you.
Let's go to the [next step]({{ url }}).