Merge conflicts are a normal part of working in Git. Learn why they happen and how to resolve them with ease.
Tags: Git, Merge conflicts, GitHub
Merge conflicts happen when two people make changes to the same file on GitHub—a common occurrence when you’re working with other developers. While resolving differences might involve some discussion, merge conflicts don’t have to be scary.
This course guides you through the steps to finding the best merge conflict solution, so your team can keep building.
We'll answer common questions like:
- What is a merge conflict and what causes them?
- How do you resolve merge conflicts?
- How do you reduce merge conflicts?
And when you're done you'll be able to:
- Understand how merging happens and what causes merge conflicts
- Resolve simple and complex merge conflicts with ease
- Share best practices to reduce merge conflicts with your team

- Completed source repository
- Completed resume deployed to GitHub Pages.
We recommend taking Introduction to GitHub prior to this course.
This makes use of the following open source projects. Consider exploring these repos and maybe even making contributions!
- resume-template: A simple Jekyll + GitHub Pages powered resume template
- Jekyll: a simple, blog-aware, static site generator.
New developers, new GitHub users, users new to Git, students, managers, teams
Hello, and welcome! If you're here to learn about and practice resolving merge conflicts, you're in the right place.
In this course, you'll learn why merge conflicts happen and solve a few of them. The merge conflicts in this course are simple enough to solve from GitHub.com. But, if you'd prefer, you can solve them using the command line or other local tools.
As an added bonus, the project we are using for this course is a resume hosted on GitHub Pages! So, if you want to keep working after you complete this course, please feel free!
Before starting this course, we recommend completing the [Introduction to GitHub Learning Lab]({{ host }}/{{ course.Owner.login }}/introduction-to-github) first.
Note: You may notice that some branches and pull requests already exist. We'll be using them in later activities in this course.
A Merge conflict occurs when changes are made to the same part of the same file on two different branches. You usually find out about conflicts in a pull request.
This can be intimidating, but have no fear, Git knows how to handle this! It only needs a human to decide how to resolve the conflict.
You may merge a lot of pull requests before you encounter your first merge conflict. That’s because Git is smart when it comes to merging. Unless you're paying close attention to other branches, you won't know about conflicts until you create a pull request.
This branch is a great example. In this scenario, two of our friends have been working in this repository. They both created branches, made changes to the _config.yml file, and opened pull requests. One pull request was merged to main without problems, but now the other pull request has a conflict.
The history of main and this branch look something like this:

Because this pull request changes the same lines in the _config.yml file, there is a merge conflict.
Let's help our friends resolve this conflict.
{% if preferences.gitTool == 'cli' %}
-
Open your preferred command line interface, which we'll call your shell from now on.
-
Clone this repository:
git clone {{ thePayload.repository.clone_url }} -
Navigate to the repository in your shell:
cd {{ thePayload.repository.name }} -
Checkout to the
update-configbranch and ensure it is up to date:git checkout update-config git pull
-
Merge the
mainbranch into theupdate-configbranch. To ensure that you're working with an up to date copy ofmain, we'll use its remote tracking branch:git merge origin/main
-
In Git's response, you'll see the file with the conflict. Open it in your text editor.
-
Look for the marked hunks that begin with
<<<<<<< update-configand ends with>>>>>>> main. These markers are added by Git to show you the content that is in conflict. -
Remove the changes made on the main branch by deleting all of the content below the
=======and above>>>>>>> main. -
Next, remove the merge conflict markers by deleting the following lines:
<<<<<<< update-config ======= >>>>>>> main -
Save and close the file. Stage and commit your changes:
git add .
git commit -m "merge main into update-config"
-
Push your merged branches to GitHub:
git push
{% elsif preferences.gitTool == 'desktop' %}
-
First, make sure you have GitHub Desktop installed and configured.
-
On the
codetab of this repository, click the green Clone or download button. Click Open in Desktop. -
In GitHub Desktop, confirm the blue Clone button in the pop up window.
-
Checkout to the
update-configbranch by clicking Current branch, and selectingupdate-config. -
Merge
maininto theupdate-configbranch by clicking Current branch, and selecting Choose a branch to merge into update-config. -
Select the
mainbranch, and click Merge main into update-config. -
You'll be prompted about the merge conflict, and asked if you'd like to resolve it in your default editor. Click the button to open the file in your default editor.
-
Look for the marked hunks that begin with
<<<<<<< update-configand ends with>>>>>>> main. These markers are added by Git to show you the content that is in conflict. -
Remove the changes made on the main branch by deleting all of the content below the
=======and above>>>>>>> main. -
Next, remove the merge conflict markers by deleting the following lines:
<<<<<<< update-config ======= >>>>>> main -
Save and close the file.
-
Back in GitHub Desktop, click Commit merge.
-
Push your changes back to the remote by clicking Push origin.
{% else %}
-
At the bottom of the page in the "This branch has conflicts that must be resolved" section of the Pull Request, click the Resolve conflicts button.
-
Look for the highlighted sections that begins with
<<<<<<< update-configand ends with>>>>>>> main. These markers are added by Git to show you the content that is in conflict. -
Remove the changes made on the main branch by deleting all of the content below the
=======and above>>>>>>> main. -
Next, remove the merge conflict markers by deleting the following lines:
<<<<<<< update-config ======= >>>>>>> main -
With the merge conflict markers removed, click Mark as resolved.
-
Finally, click Commit merge.
{% endif %}
Sometimes, the best way to resolve a merge conflict is to add content that's from both branches, or even something that isn't on either! This is why Git needs a human to look at the code and make the proper fixes.
This pull request adds changes to the _data/education.yml file. It's the same file that you just changed in your pull request.
After this pull request is merged, your pull request will have a merge conflict. That's because there will have been changes on two different branches to the same part of the same file.
Just like your first conflict, this pull request is already conflicted.
This time, however, I've made it a bit more complicated.
- Instead of one conflict, you get three!
- Instead of conflicts in one file only, you get two!
- One of your files actually has some leftover merge conflict markers. This can happen if someone forgets to remove the markers while resolving a conflict.
{% if preferences.gitTool == 'cli' %}
- Checkout to the
add-experiencebranch and ensure it is up to date:git checkout add-experience git pull
- Merge the
mainbranch into theadd-experiencebranch. To ensure that you're working with an up to date copy ofmain, we'll use its remote tracking branch:git merge origin/main
- In Git's response, you'll see two files with conflicts:
_data/experience.ymland_data/interests.yml. - Open
_data/experience.ymlin your text editor. - Remove the conflict markers and pick your desired content.
- With the merge conflicts resolved and the markers removed in the
_data/experience.ymlfile, stage the file:git add _data/experience.yml
- Open the next file in your text editor:
_data/interests.yml. - Remove the conflict markers and pick your desired content.
- Close the file. Stage it and commit your changes:
git add _data/interests.yml git commit -m "merge main into add-experience" - Push your merged branches to GitHub:
git push
{% elsif preferences.gitTool == 'desktop' %}
- Checkout to the
add-experiencebranch by clicking Current branch, and selectingadd-experience. - Merge
maininto theadd-experiencebranch by clicking Current branch, and selecting Choose a branch to merge into update-config. - Select the
mainbranch, and click Merge main into update-config. - You'll be prompted about the merge conflict, and asked if you'd like to resolve it in your default editor. Click the button to open each file in your default editor.
- Remove the conflict markers and pick your desired content for each file.
- Save and close the files.
- Back in GitHub Desktop, click Commit merge.
- Push your changes back to the remote by clicking Push origin.
{% else %}
- Click Resolve conflicts.
- On the left, you will notice two files listed:
_data/experience.ymland_data/interests.yml. Let's start with_data/experience.yml. - Remove the conflict markers and pick your desired content.
- With the merge conflicts resolved and the markers removed in the
_data/experience.ymlfile, click Mark as resolved. - GitHub will present the next file with conflicts,
_data/interests.yml. - Remove the conflict markers and pick your desired content.
- When you are finished, click Mark as resolved.
- Click Commit merge.
{% endif %}
So far, this pull request doesn't have any conflicts. I have added some new branch protections to prevent you from merging before you're ready.
In the last activity, you solved a merge conflict that someone else created. This time, you'll create the merge conflict yourself.
{% if preferences.gitTool == 'cli' %}
- Check out to this branch:
git checkout add-education
- Open
_data/education.ymlin your text editor. - Modify the content in the
degree:,uni:,year:, andsummary:lines. - Stage and commit the changes:
git add _data/education.yml git commit -m "<YOUR-MESSAGE>" - Push your changes to GitHub:
git push
{% elsif preferences.gitTool == 'desktop' %}
- Checkout to the
add-educationbranch. - Merge
maininto theadd-educationbranch. - Open the
_data/education.ymlfile in your default editor. - Modify the content in the
degree:,uni:,year:, andsummary:lines. - Save and close the file.
- Back in GitHub Desktop, see that your changes are staged for commit because the box next to the title is checked on the left side.
- Enter a short and descriptive commit message, and click Commit to add-education.
- Push your changes back to the remote by clicking Push origin.
{% else %}
- Click on the Files changed tab in this pull request.
- Click
in the top right-hand corner of the
_data/education.ymlfile that had been previously modified. - Click Edit file to open the file editor.
- Modify the content in the
degree:,uni:,year:, andsummary:lines. - Scroll to the bottom of the page and enter a commit message for your change.
- Click the Commit changes button, making sure the "Commit directly to the add-education branch" option is selected.

{% endif %}
Uh oh @{{ user.username }}, something went wrong! I wasn't expecting this change. Please go over the instructions again and make sure you've followed them as exactly as you can.
If this is a pull request, you might close it so you can start fresh. Keep trying, you'll get there!
If you would like help troubleshooting, create a post on the [GitHub Community]({{ communityBoard }}) board. You might also want to search for your issue to see if other people have resolved it in the past.
You did it, @{{ user.username }}! Nice job resolving the conflict. Most conflicts in your day to day experience should be pretty simple, as in that activity. You may need to discuss the resolution with your peers. If your team is working together and reviewing pull requests, resolving conflicts is easy.
Resolving a conflict doesn't automatically merge the Pull Request in GitHub. Instead, it stores the resolution of the conflict in a merge commit and allows you and your team to keep working.
To resolve a conflict, GitHub performs what is known as a reverse merge. This means that the changes from the main branch were merged into your update-config branch.
With a reverse merge, only the update-config branch is updated. This allows you to test the resolved code on your branch before you merge it into main. The main branch should be treated as production ready, bug-free code.
Go ahead and merge this pull request now.
I have already approved this pull request, so if you still see "Review required" in the merge view, try refreshing the page.
- Click Merge pull request below.
- Click Confirm merge.
- Click Delete branch and get ready for your next activity.
{% if preferences.gitTool == 'cli' %} You can also merge locally:
- Checkout to the main branch:
git checkout main
- Ensure the main branch is up to date:
git pull
- Merge the
{{ branch }}branch:git merge {{ branch }} - Enter a commit message, if asked.
- Push your merged branches up to GitHub:
git push
{% elsif preferences.gitTool == 'desktop' %} You can also merge locally:
- Checkout to the
mainbranch by clicking Current branch, and selectingmain. - Ensure the branch is up to date by clicking Fetch origin.
- Merge
{{ branch}}into themainbranch by clicking Current branch, and selecting Choose a branch to merge into main. - Select the
{{ branch }}branch, and click Merge {{ branch }} into main. - Push your changes back to the remote by clicking Push origin. {% endif %}
Uh oh @{{ user.username }}, something went wrong! I wasn't expecting this change. Please go over the instructions again and make sure you've followed them as exactly as you can.
If this is a pull request, you might close it so you can start fresh. Keep trying, you'll get there!
If you would like help troubleshooting, create a post on the [GitHub Community]({{ communityBoard }}) board. You might also want to search for your issue to see if other people have resolved it in the past.
Good job! You've solved your first merge conflict.
Go to the next pull request now.
Uh oh @{{ user.username }}, something went wrong! I wasn't expecting this change. Please go over the instructions again and make sure you've followed them as exactly as you can.
If this is a pull request, you might close it so you can start fresh. Keep trying, you'll get there!
If you would like help troubleshooting, create a post on the [GitHub Community]({{ communityBoard }}) board. You might also want to search for your issue to see if other people have resolved it in the past.
Great job, @{{ user.username }}, your pull request is free of conflicts. 🎉
Go ahead and merge this pull request now.
- Click Merge pull request below.
- Click Confirm Merge.
- Click Delete branch.
{% if preferences.gitTool == 'cli' %} You can also merge locally:
- Checkout to the main branch:
git checkout main
- Ensure the main branch is up to date:
git pull
- Merge the
{{ branch }}branch:git merge {{ branch }} - Enter a commit message, if asked.
- Push your merged branches up to GitHub:
git push
{% elsif preferences.gitTool == 'desktop' %} You can also merge locally:
- Checkout to the
mainbranch by clicking Current branch, and selectingmain. - Ensure the branch is up to date by clicking Fetch origin.
- Merge
{{ branch}}into themainbranch by clicking Current branch, and selecting Choose a branch to merge into main. - Select the
{{ branch }}branch, and click Merge {{ branch }} into main. - Push your changes back to the remote by clicking Push origin. {% endif %}
Uh oh @{{ user.username }}, something went wrong! I wasn't expecting this change. Please go over the instructions again and make sure you've followed them as exactly as you can.
If this is a pull request, you might close it so you can start fresh. Keep trying, you'll get there!
If you would like help troubleshooting, create a post on the [GitHub Community]({{ communityBoard }}) board. You might also want to search for your issue to see if other people have resolved it in the past.
Good job! You've solved more merge conflicts.
Go to the next pull request now.
Uh oh @{{ user.username }}, something went wrong! I wasn't expecting this change. Please go over the instructions again and make sure you've followed them as exactly as you can.
If this is a pull request, you might close it so you can start fresh. Keep trying, you'll get there!
If you would like help troubleshooting, create a post on the [GitHub Community]({{ communityBoard }}) board. You might also want to search for your issue to see if other people have resolved it in the past.
In a real world scenario, it's possible that a peer or colleague will have edited the same file in the same place as your pull request.
To demonstrate, I'll stand in as your colleague 👋. In this other pull request {{ secondPR }}, you'll see that the education file has been changed. The other pull request was just merged to main, which means there's now a conflict in your pull request.
{% if preferences.gitTool == 'cli' %}
- Make sure main is up to date by checking out to
main, and typinggit pull. - Resolve the conflicts locally by checking out to the
add-educationbranch, mergingmain, and repeating your previous steps. {% elsif preferences.gitTool == 'desktop' %} - Get any new changes by clicking Fetch origin.
- Resolve the conflicts locally by checking out to the
add-educationbranch, mergingmain, and repeating your previous steps. {% else %} - In the "This branch has conflicts that must be resolved" section of the pull request, click Resolve conflicts. {% endif %}
Because you created the conflict, feel free to resolve this conflict as you wish.
Uh oh @{{ user.username }}, something went wrong! I wasn't expecting this change. Please go over the instructions again and make sure you've followed them as exactly as you can.
If this is a pull request, you might close it so you can start fresh. Keep trying, you'll get there!
If you would like help troubleshooting, create a post on the [GitHub Community]({{ communityBoard }}) board. You might also want to search for your issue to see if other people have resolved it in the past.
Great job, @{{ user.username }}, your pull request is free of conflicts. 🎉 Go ahead and merge this pull request now.
- Click Merge pull request below.
- Click Confirm Merge.
- Click Delete branch.
{% if preferences.gitTool == 'cli' %} You can also merge locally:
- Checkout to the main branch:
git checkout main
- Ensure the main branch is up to date:
git pull
- Merge the
{{ branch }}branch:git merge {{ branch }} - Enter a commit message, if asked.
- Push your merged branches up to GitHub:
git push
{% elsif preferences.gitTool == 'desktop' %} You can also merge locally:
- Checkout to the
mainbranch. - Ensure the branch is up to date by clicking Fetch origin.
- Merge
{{ branch}}into themainbranch by clicking Current branch, and selecting Choose a branch to merge into main. - Select the
{{ branch }}branch, and click Merge {{ branch }} into main. - Push your changes back to the remote by clicking Push origin. {% endif %}
Uh oh @{{ user.username }}, something went wrong! I wasn't expecting this change. Please go over the instructions again and make sure you've followed them as exactly as you can.
If this is a pull request, you might close it so you can start fresh. Keep trying, you'll get there!
If you would like help troubleshooting, create a post on the [GitHub Community]({{ communityBoard }}) board. You might also want to search for your issue to see if other people have resolved it in the past.

Congratulations @{{ user.username }}, you've completed this course!
Before I say good-bye, here's a recap of all the tasks you've accomplished in your repository:
- You learned why merge conflicts happen
- You resolved a simple merge conflict
- You resolved a multi-file merge conflict
- You created a merge conflict, and resolved it!
Here are some instructions you can use to keep working on your resumé:
Finishing the resume
To update the other sections of the resume, create a new branch and edit the files found in the _data folder.
For example, to modify the "Projects" section, edit the _data/projects.yml file. After making your changes, create a new pull request and merge your changes.
Changing the picture
If you would like to change the image used on your resume, you need to make a few changes to the files.
- Create a new branch, maybe name it something like
new-avatar. - Navigate to the
imagesdirectory and click the Upload files button. - Drag and drop your image.
- Commit your change by clicking Commit changes.
- On the
new-avatarbranch, open the_layouts/resume.htmlfile and edit line 16. Replaceimages/bob-avatar.jpgwithimages/YOURFILENAME. - Create a pull request.
- Merge the pull request, and delete the branch.
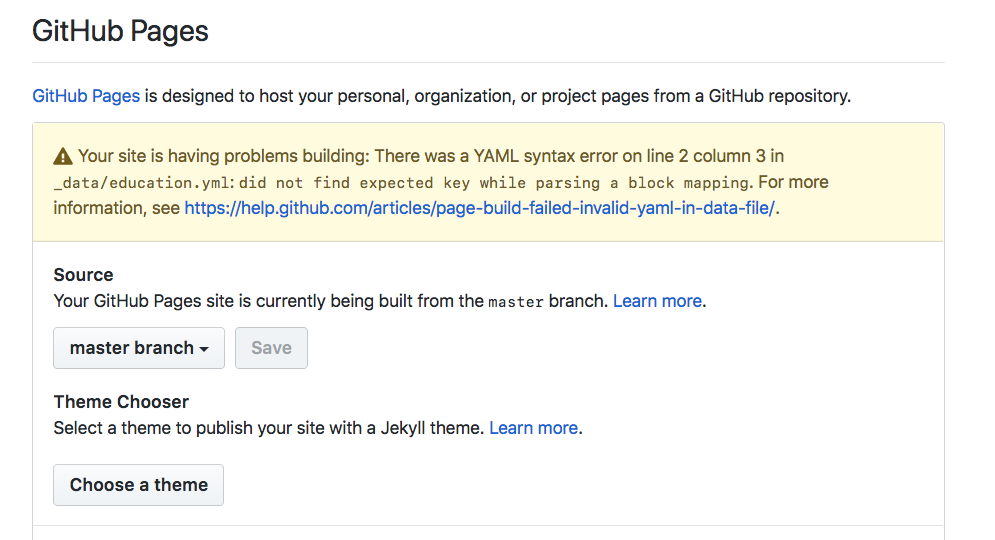
Enabling GitHub Pages
When you are happy with your resume, you will need to publish it with GitHub Pages. This resume is ready for GitHub Pages, you just need to turn it on. Follow these steps to enable GitHub Pages when you are ready to publish your resume:
- Click on the [Settings]({{ repoUrl }}/settings) tab.
- Scroll to the "GitHub Pages" section.
- In the "Source" drop-down, select main branch.
- Click Save.
- 🚧 Warning! 🚧 Make sure you don't see any errors after you select save. If you do, your page won't build correctly and this step will be incomplete.
Your GitHub Pages resumé site will be live very shortly at the proper URL.
Want to work on resolving merge conflicts using the command line? Check out this documentation.
Want to keep learning? Feel free to [check out our other courses]({{ host }}/courses)?
Yay! You've done it! You've resolved all of the conflicts. I have a few pointers for completing your resume, so I've opened one last issue for that information.