If you are looking for a quick and fun introduction to GitHub, you've found it. This class will get you started using GitHub in less than an hour.
Tags: Git, GitHub Pages, Branches, Commits, Pull Requests
People use GitHub to build some of the most advanced technologies in the world. Whether you’re visualizing data or building a new game, there’s a whole community and set of tools on GitHub that can help you do it even better.
Now, with GitHub Learning Lab, you’ve got a sidekick along your path to becoming an all-star developer.
From managing notifications to merging pull requests, GitHub Learning Lab’s “Introduction to GitHub” course guides you through everything you need to start contributing in less than an hour. See a word you don't understand? We've included an emoji 📖 next to some key terms. Click on it to see its definition.
We'll answer common questions like:
- What is GitHub?
- How does one use GitHub?
- What are issues and pull requests?
- How do you create a branch and a commit?
- How do you use GitHub Pages?
And when you're done you'll be able to:
- Communicate in issues
- Manage notifications
- Create branches
- Make commits
- Introduce changes with pull requests
- Deploy a web page to GitHub pages

- Completed source repository
- Interactive slideshow deployed to GitHub Pages.
None. This course is a great introduction for your first day on GitHub.
This makes use of the following open source projects. Consider exploring these repos and maybe even making contributions!
- reveal.js: A framework for creating presentations using HTML
- Jekyll: a simple, blog-aware, static site generator.
New developers, new GitHub users, users new to Git, students, managers, teams
To get started, I’ll guide you through some important first steps in coding and collaborating on GitHub.
👇 This arrow means you can expand the window! Click on them throughout the course to find more information.
What is GitHub?
I'm glad you asked! Many people come to GitHub because they want to contribute to open source 📖 projects, or they're invited by teammates or classmates who use it for their projects. Why do people use GitHub for these projects?
At its heart, GitHub is a collaboration platform.
From software to legal documents, you can count on GitHub to help you do your best work with the collaboration and security tools your team needs. With GitHub, you can keep projects completely private, invite the world to collaborate, and streamline every step of your project.
GitHub is also a powerful version control tool.
GitHub uses Git 📖, the most popular open source version control software, to track every contribution and contributor 📖 to your project--so you know exactly where every line of code came from.
GitHub helps people do much more.
GitHub is used to build some of the most advanced technologies in the world. Whether you're visualizing data or building a new game, there's a whole community and set of tools on GitHub that can get you to the next step. This course starts with the basics, but we'll dig into the rest later!
Exploring a GitHub repository
📺 Video: Exploring a repository
The video covered some of the most commonly-used features. Here are a few other items you can find in GitHub repositories:
- Project boards: Create Kanban-style task tracking board within GitHub
- Wiki: Create and store relevant project documentation
- Insights: View a drop-down menu that contains links to analytics tools for your repository including:
- Pulse: Find information about the work that has been completed and the work that’s in-progress in this project dashboard
- Graphs: Graphs provide a more granular view of the repository activity including who contributed to the repository, who forked it, and when they completed the work
In the video you learned about a special file called the README.md. Here are a few other special files you can add to your repositories:
- CONTRIBUTING.md: The
CONTRIBUTING.mdis used to describe the process for contributing to the repository. A link to theCONTRIBUTING.mdfile is shown anytime someone creates a new issue or pull request. - ISSUE_TEMPLATE.md: The
ISSUE_TEMPLATE.mdis another file you can use to pre-populate the body of an issue. For example, if you always need the same types of information for bug reports, include it in the issue template, and every new issue will be opened with your recommended starter text.
This is an issue 📖: a place where you can have conversations about bugs in your code, code review, and just about anything else.
Issue titles are like email subject lines. They tell your collaborators what the issue is about at a glance. For example, the title of this issue is Getting Started with GitHub.
Using GitHub Issues
Issues are used to discuss ideas, enhancements, tasks, and bugs. They make collaboration easier by:
- Providing everyone (even future team members) with the complete story in one place
- Allowing you to cross-link to other issues and pull requests 📖
- Creating a single, comprehensive record of how and why you made certain decisions
- Allowing you to easily pull the right people and teams into a conversation with @-mentions
Managing notifications
📺 Video: Watching, notifications, stars, and explore
Once you've commented on an issue or pull request, you'll start receiving email notifications when there's activity in the thread.
- Go to the issue or pull request
- Under "Notifications", click the Unsubscribe button on the right to silence notifications or Subscribe to unmute them
You'll see a short description that explains your current notification status.
- Click your profile icon
- Click Settings
- Click Notifications from the menu on the left and adjust your notification preferences
- Watch: You'll receive a notification when a new issue, pull request or comment is posted, and when an issue is closed or a pull request is merged
- Not watching: You'll no longer receive notifications unless you're @-mentioned
- Ignore: You'll no longer receive any notifications from the repository
- Click your profile icon
- Click Settings
- Click Notification from the menu on the left
- Click on the things you’re watching link
- Select the Watching tab
- Click the Unwatch button to disable notifications, or Watch to enable them
Unassigned issues don't have owners to look after them. When you’re assigned to an issue or pull request, it tells repository visitors and contributors that you'll be facilitating the conversation or task 💪.
- On the right side of the screen, under the "Assignees" section, click the gear icon and select yourself
For a printable version of the steps in this course, check out the [Quick Reference Guide]({{ host }}/public/{{ course.slug }}.pdf).
Sometimes I respond too fast for the page to update! If you perform an expected action and don't see a response from me, wait a few seconds and refresh the page for your next steps.
🎉 You're now the proud manager of this issue! Now that you've assigned yourself, people who drop by know that they're welcome to participate, but you'll be carrying this issue across the finish line. 😎.
Now, on to business! GitHub Pages allow you to serve a static site from a repository. We've filled this repository with some site content, but the rendered site isn't visible right now. Let's change that.
- Click on the [Settings]({{ repoUrl }}/settings) tab in this repository
- Scroll down to the "GitHub Pages" section
- From the "Source" drop down, select main branch
Note: Even though you'll see an option to choose a theme, do not apply a theme at this point. We've protected the code so you can't make unintended changes. You'll have the opportunity to apply a theme when the course is completed.
Turning on GitHub Pages creates a deployment of your repository. I may take up to a minute to respond as I await the deployment.
You turned on GitHub Pages!
Your site is now visible to the public. Check it out at {{ store.pagesUrl }}.
Now that you’ve completed the tasks in this issue, it's time to close it! Closing an issue tells other contributors that this particular conversation or task has come to an end.
- Click the Close issue button below
Now that you're familiar with issues, let's use this issue to track your path to your first contribution.
People use different workflows to contribute to software projects, but the simplest and most effective way to contribute on GitHub is the GitHub flow.
📺 Video: Understanding the GitHub flow
Let’s complete the first step of the GitHub flow: creating a branch 📖.
Creating a branch
You just learned how to create a branch—the first step in the GitHub flow.
Branches are an important part of the GitHub flow because they allow us to separate our work from the main branch. In other words, everyone's work is safe while you contribute.
A single project can have hundreds of branches, each suggesting a new change to the main branch.
The best way to keep branches organized with a team is to keep them concise and short-lived. In other words, a single branch should represent a single new feature or bug fix. This reduces confusion among contributors when branches are only active for a few days before they’re merged 📖 into the main branch.
{% if preferences.gitTool == 'cli' %}
- Open your preferred command line interface, which we'll call your shell from now on.
- Clone this repository:
git clone {{ thePayload.repository.clone_url }} - Navigate to the repository in your shell:
cd {{ thePayload.repository.name }} - Create a branch, use whatever name you like. Feel free to use the suggested name below.
git branch my-slide
- Push the branch to GitHub:
git push --set-upstream origin <BRANCH-NAME>
{% elsif preferences.gitTool == 'vscode' %}
- Download and open Visual Studio Code (referred to as VS Code) if you don't already have it.
- In VS Code, open the Command Palette using Ctrl+Shift+P on Windows, or Command ⌘+Shift+P on macOS. You can also follow VS Code's official documentation on cloning.
- Type:
git cloneand press Enter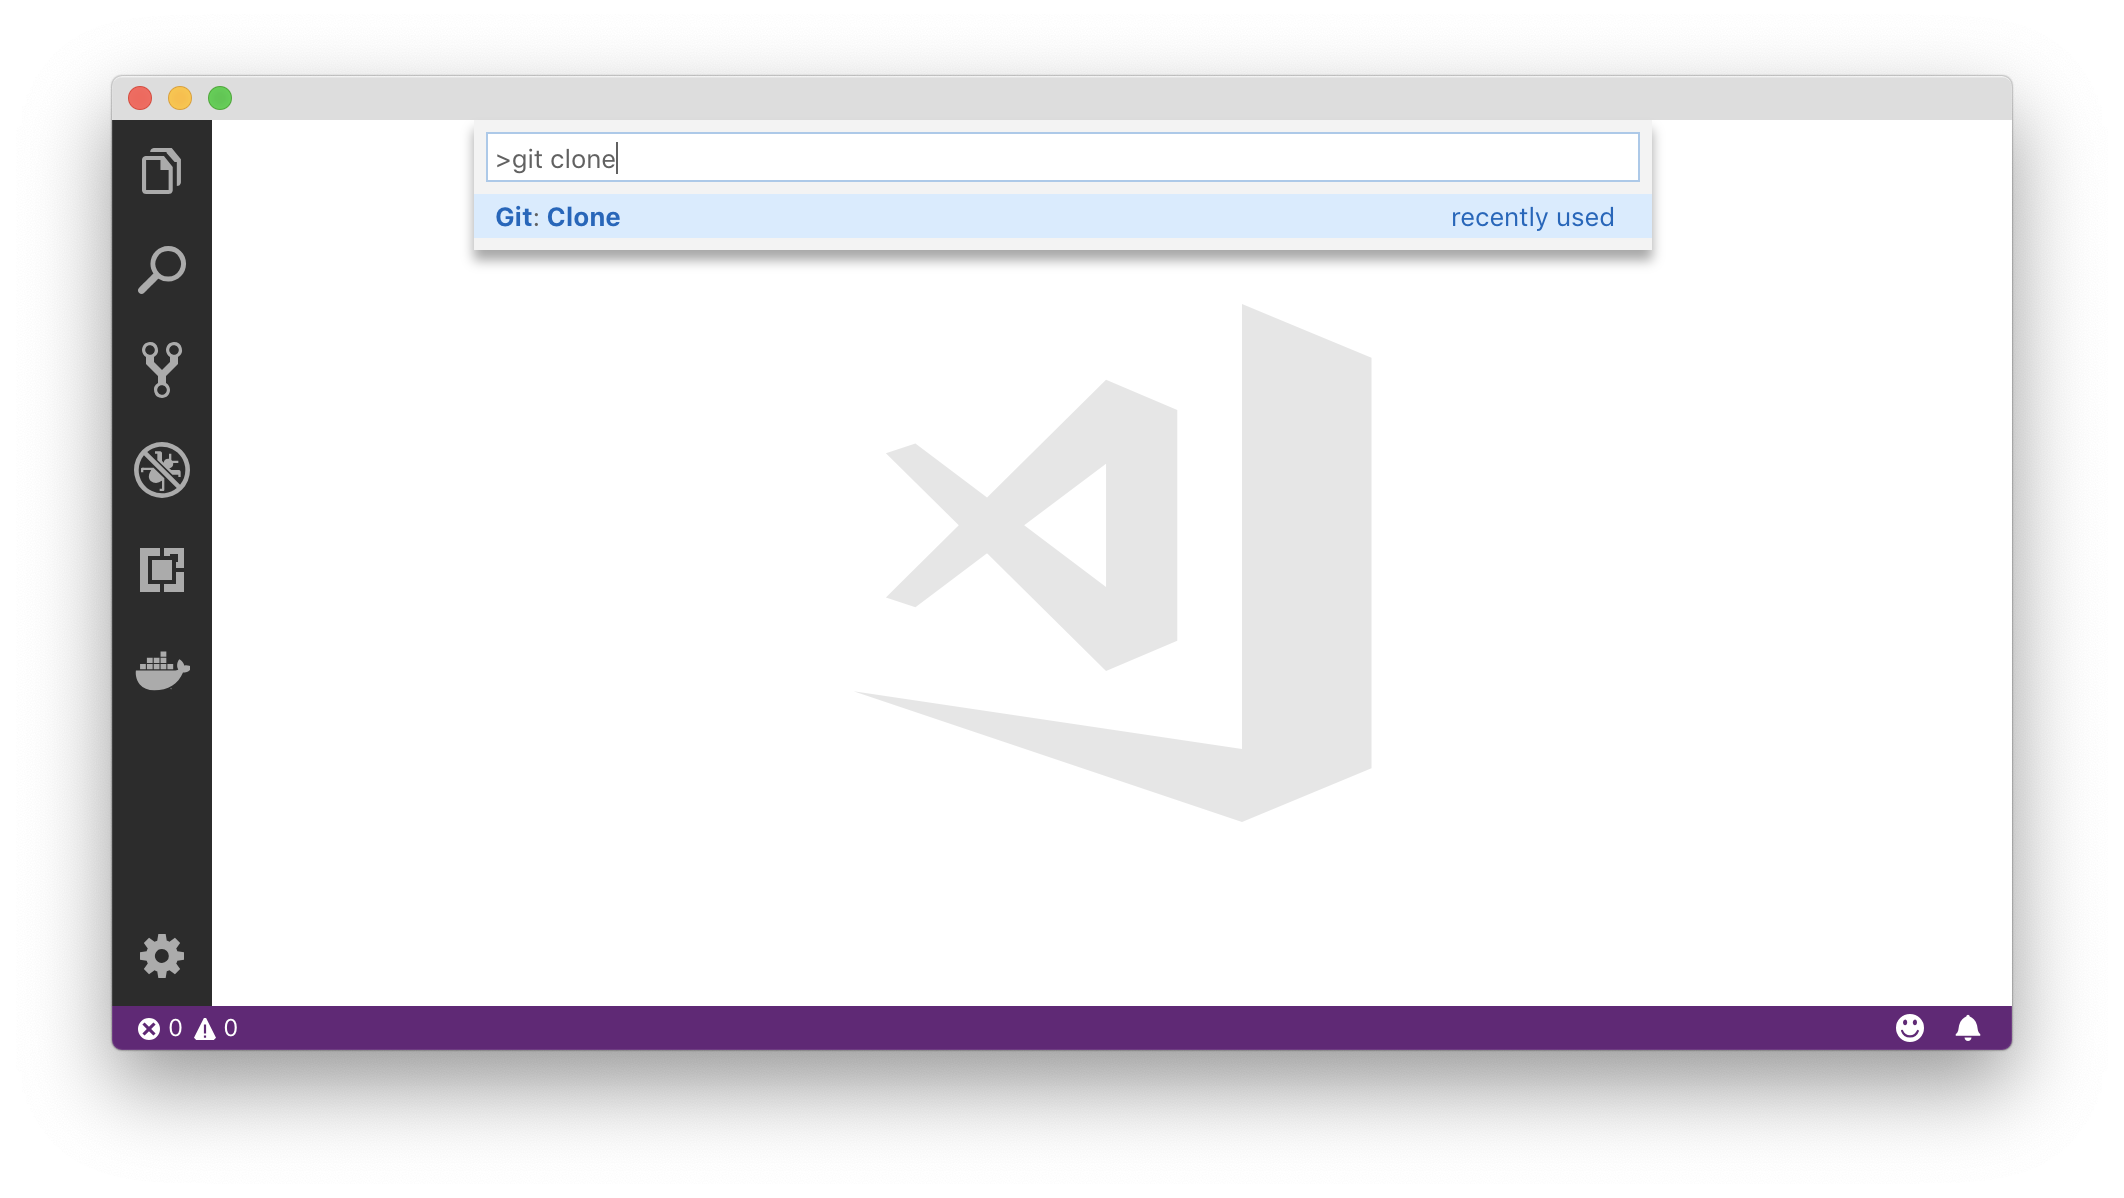
- Paste in the URL of the repository in the new window and press Enter:
{{ thePayload.repository.clone_url }} - Select the location in which to save the repository and click Choose folder. Then, open the location you selected.
- The repository folder should now be open in your VS Code project. Click on
mainat the bottom left of the VS Code window. This will bring up the Command Palette with the commands related to Git branches.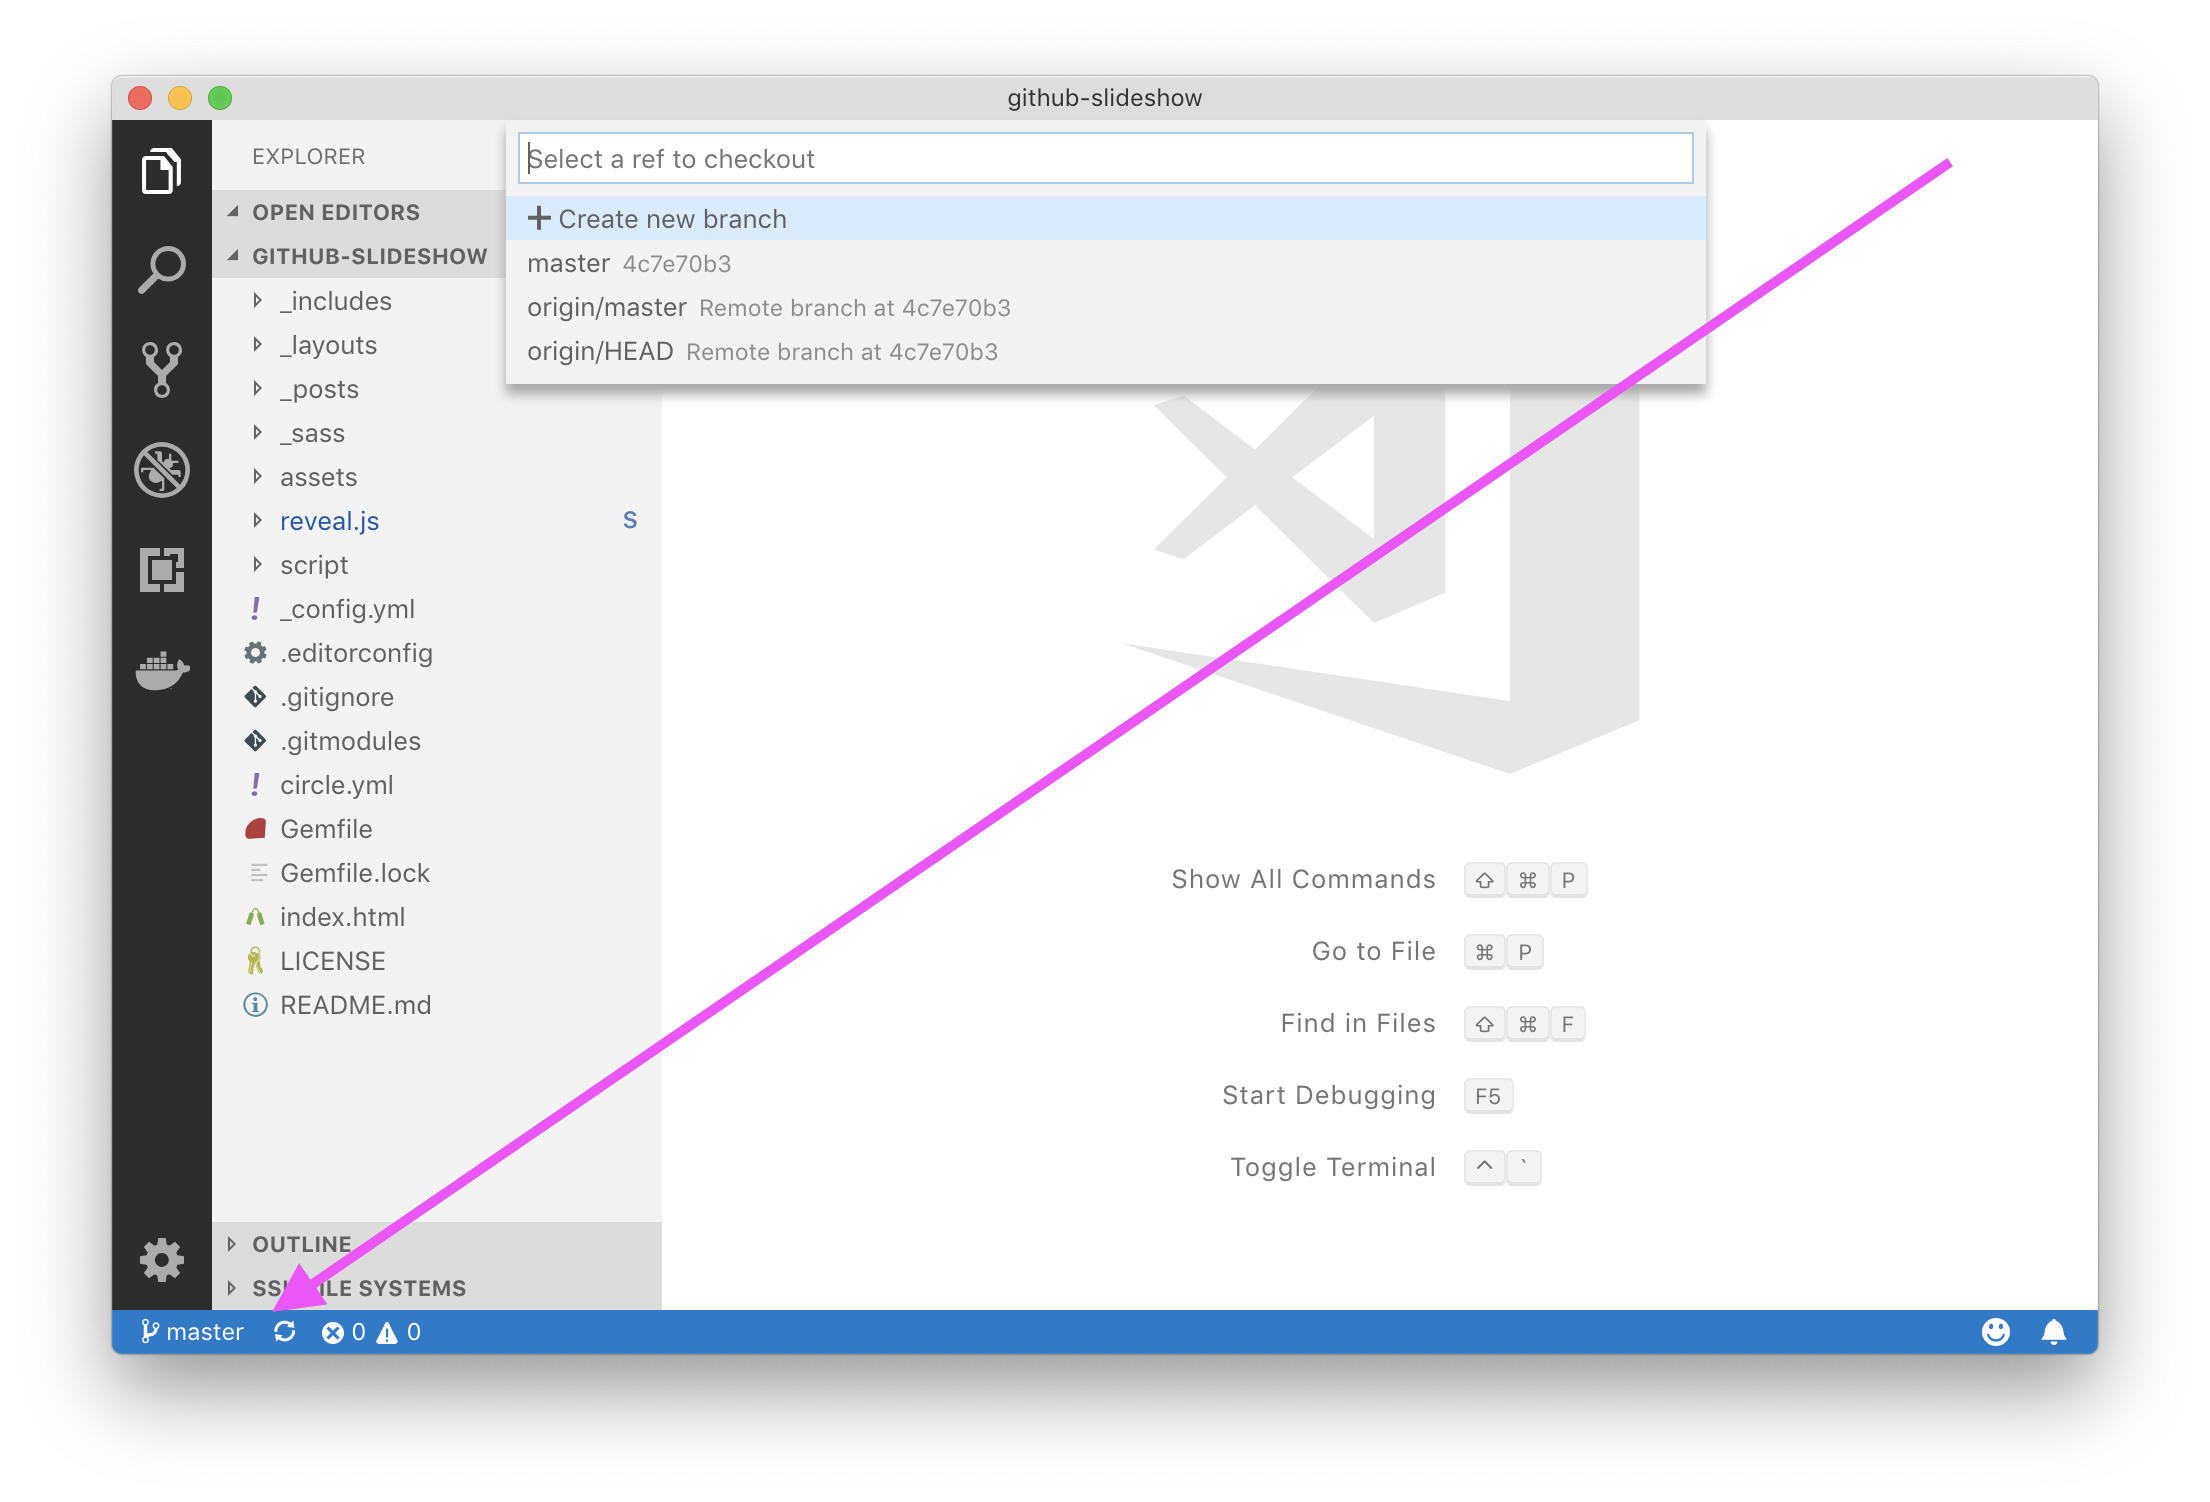
- Click Create new branch and enter any branch name you'd like, such as
my-slide. Then press Enter. - When asked to select the ref to create the branch from, select
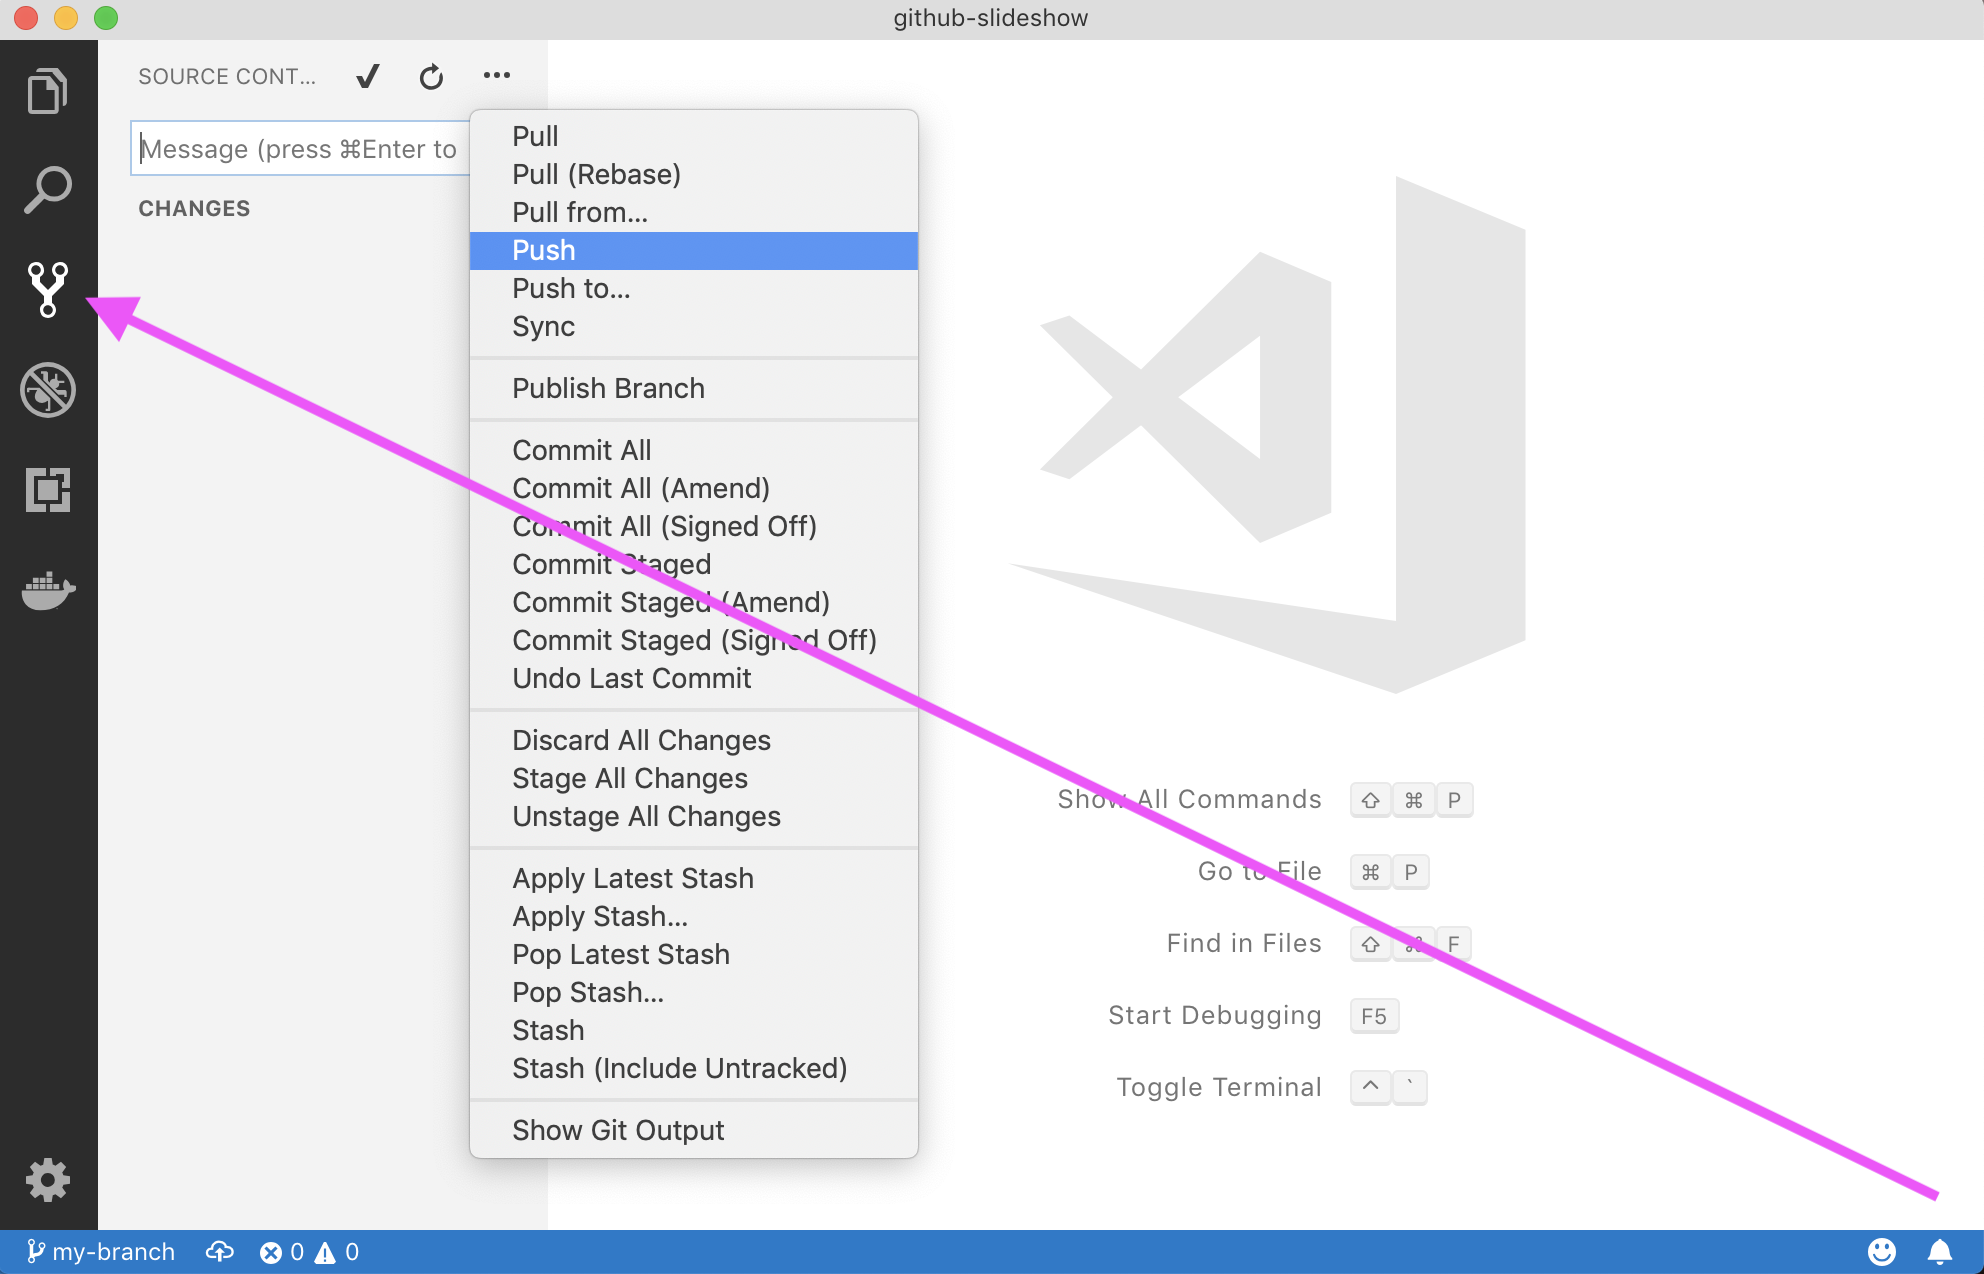
main. - Go to the Source Control view, click on the ellipsis (...) and select Push. Confirm the dialog box asking you to publish the branch.
{% else %}
- Navigate to the [Code tab]({{ thePayload.repository.html_url }})
- Click Branch: main in the drop-down
- In the field, enter a name for your branch, like
my-slide - Click Create branch: or press the Enter key to create your branch
{% endif %}
Head over to the next issue now!
🎉 You created a branch!
Creating a branch allows you to make modifications to your project without changing the deployed main branch. Now that you have a branch, it’s time to create a file and make your first commit!
Commits 101
When you’re finished creating or making changes to a file on GitHub, scroll to the bottom of the page. Then find the "Commit new file" section.
In the first field, type a commit message. The commit message should briefly tell contributors about the changes you are introducing to the file.
- Don’t end your commit message with a period.
- Keep your commit messages to 50 characters or less. Add extra detail in the extended description window if necessary. This is located just below the subject line.
- Use active voice. For example, "add" instead of "added" and "merge" instead of "merged".
- Think of your commit as expressing intent to introduce a change.
The following steps will guide you through the process of committing a change on GitHub.
{% if preferences.gitTool == 'cli' %}
- Check out to your branch:
git checkout {{ thePayload.ref }} - Create a new file named
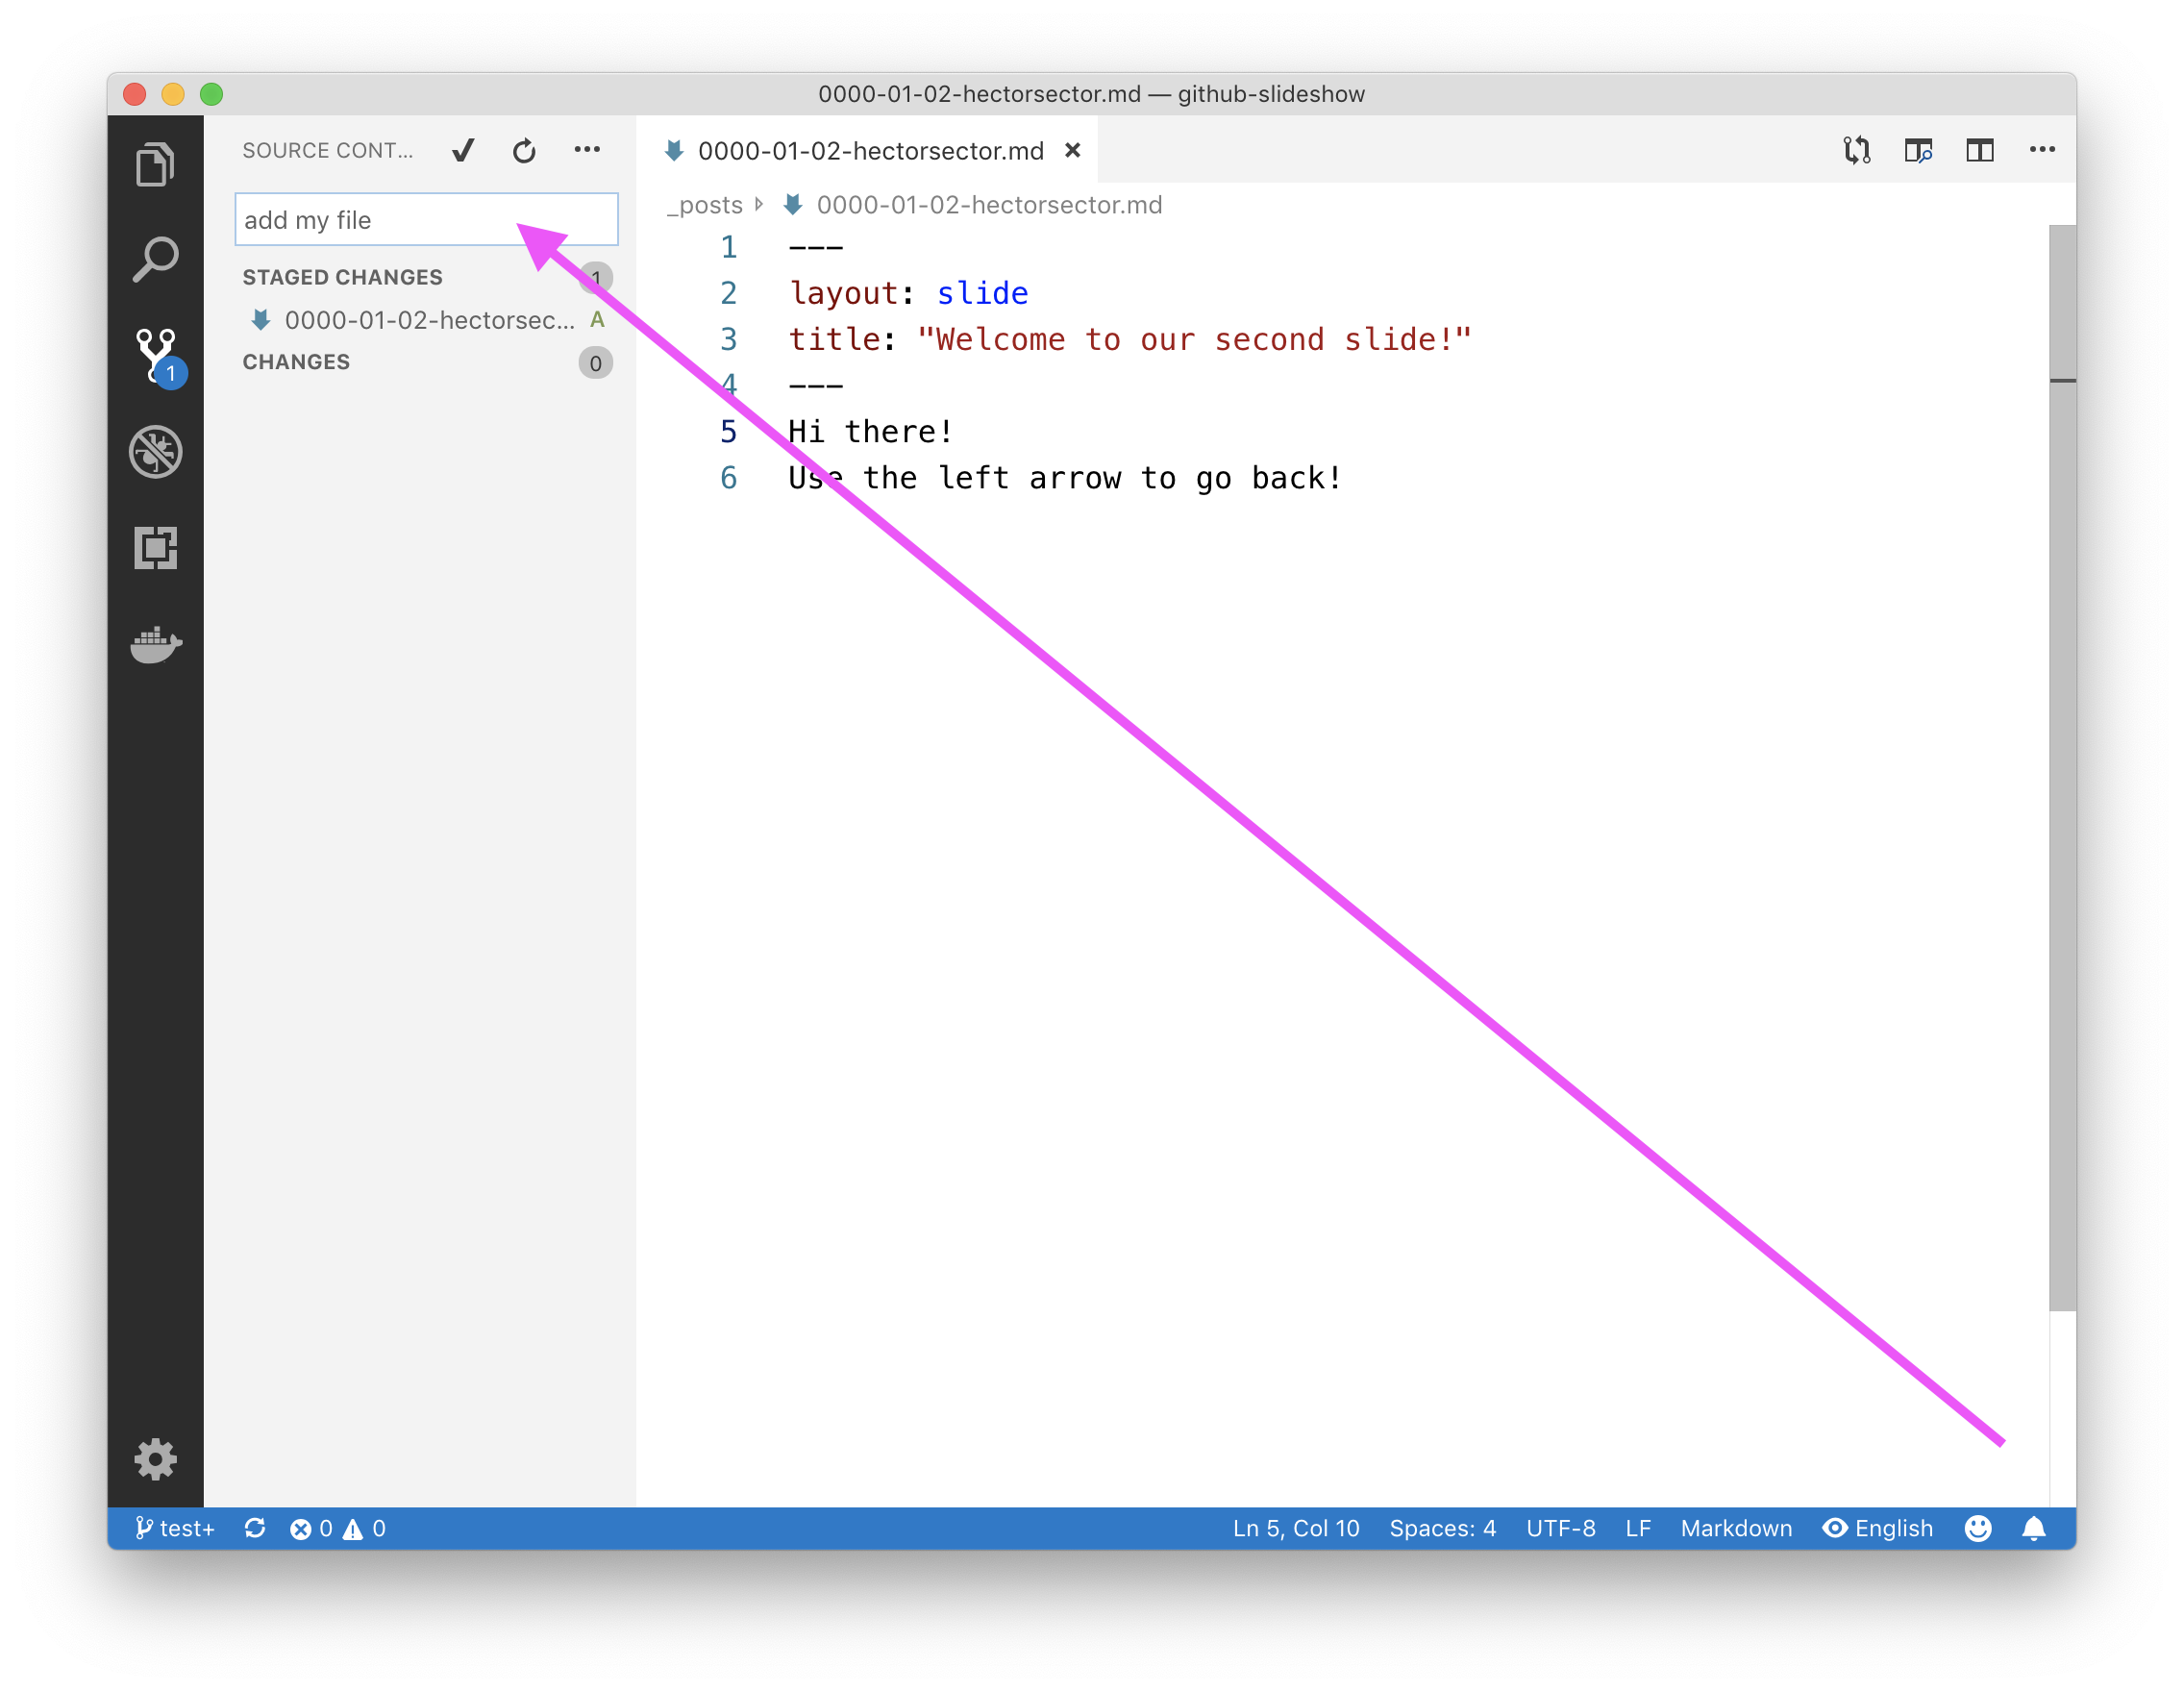
_posts/0000-01-02-{{ user.username }}.md. - Add the following content to your file:
---
layout: slide
title: "Welcome to our second slide!"
---
Your text
Use the left arrow to go back!
- Stage your new file:
git add _posts/0000-01-02-{{ user.username }}.md - After adding the text, commit the change while providing a commit message. For guidelines on commit messages, check out the Commits 101 drop-down, just above these instructions:
git commit -m "<YOUR-MESSAGE>" - Push your new commit to GitHub:
git push
{% elsif preferences.gitTool == 'vscode' %}
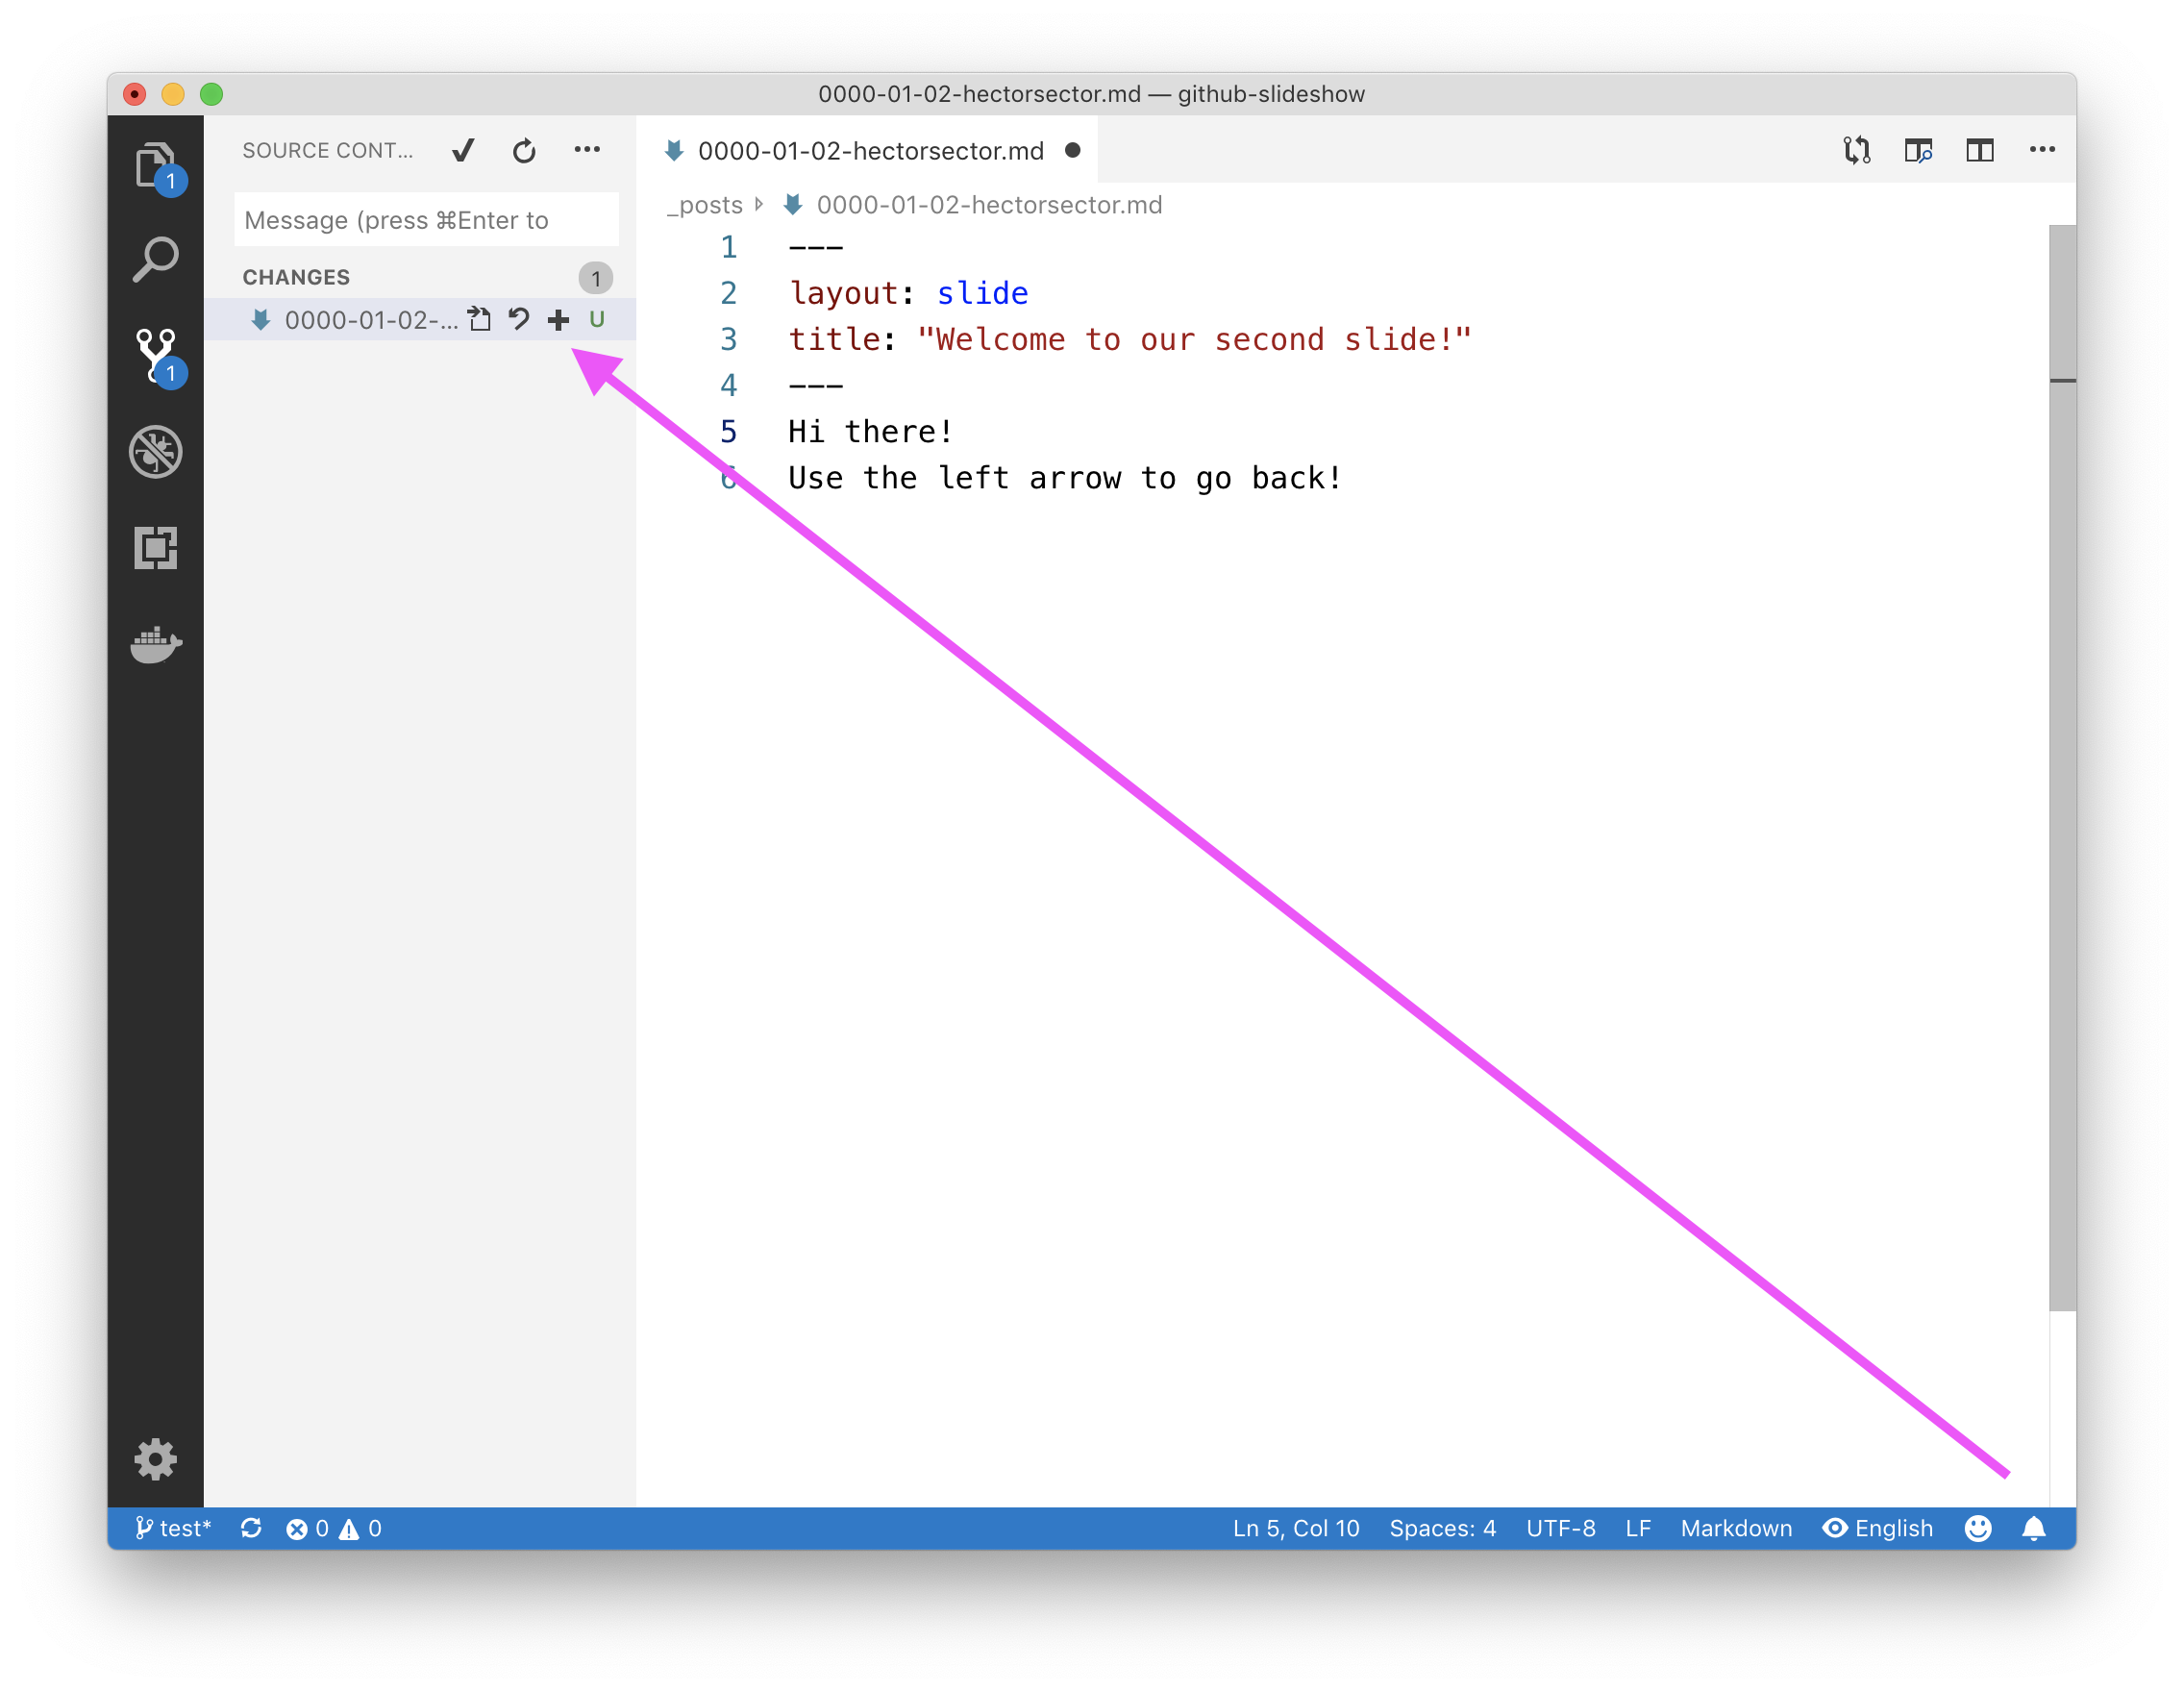
- In the
_postsfolder, create a new file named0000-01-02-{{ user.username }}.md. The full path to your file will be:_posts/0000-01-02-{{ user.username }}.md. - Add the following content to your file and save it:
---
layout: slide
title: "Welcome to our second slide!"
---
Your text
Use the left arrow to go back!
- To stage your new file: go to the Source Control view and click the + button next to the file. You can also follow along with VS Code's official documentation.
- Commit the change by typing a commit message in the text field and pressing Ctrl+Enter on Windows or Command ⌘+Enter on macOS.
- Click on the ellipsis (...) and select Push.
{% else %}
- Create a new file on this branch, in a
_postsfolder called0000-01-02-{{ user.username }}.md. You can do so using [this shortcut]({{ thePayload.repository.html_url }}/new/{{ thePayload.ref }}?filename=_posts/0000-01-02-{{ user.username }}.md) or manually as follows:- Return to the "Code" tab
- In the branch drop-down, select "{{ thePayload.ref }}"
- Click Create new file
- In the "file name" field, type
_posts/0000-01-02-{{ user.username }}.md. Entering the/in the filename will automatically place your file in the_postsdirectory.
- When you’re done naming the file, add the following content to your file:
---
layout: slide
title: "Welcome to our second slide!"
---
Your text
Use the left arrow to go back!
- After adding the text, you can commit the change by entering a commit message in the text-entry field below the file edit view. For guidelines on commit messages, check out the Commits 101 drop-down, just above these instructions
- When you’ve entered a commit message, click Commit new file {% endif %}
Nice work making that commit ✨
Now that you’ve created a commit, it’s time to share your proposed change through a pull request! Where issues encourage discussion with other contributors and collaborators on a project, pull requests help you share your changes, receive feedback on them, and iterate on them until they’re perfect!
What is a pull request?
Let’s think back to the GitHub flow again. You have created a branch, added a file, and committed the file to your branch. Now it’s time to collaborate on your file with other students taking this class. This collaboration happens in a pull request. Check out this video to learn more:
📺 Video: Introduction to pull requests
This pull request is going to keep the changes you just made on your branch and propose applying them to the main branch.
- Open a pull request using [this shortcut]({{ url }}) or manually as follows:
- From the "Pull requests" tab, click New pull request
- In the "base:" drop-down menu, make sure the "main" branch is selected
- In the "compare:" drop-down menu, select "{{ branch | remove: 'refs/heads/' }}"
- When you’ve selected your branch, enter a title for your pull request. For example
Add {{ user.username }}'s file - The next field helps you provide a description of the changes you made. Feel free to add a description of what you’ve accomplished so far. As a reminder, you have: created a branch, created a file and made a commit, and opened a pull request
- Click Create pull request
Good pull requests have a body description that tells other contributors about the change you're suggesting, so they understand the context.
Let's edit this pull request to add a body description.
- The first comment on your pull request will have the default text of No description provided. Click on the ... icon located at the top right corner of the comment box, then click on Edit to make an edit
- Add a description of the changes you've made in the comment box. Feel free to add a description of what you’ve accomplished so far. As a reminder, you have: created a branch, created a file and made a commit, and opened a pull request
- Click the green Update comment button at the bottom right of the comment box when done
If you would like assistance troubleshooting the issue you are encountering, create a post on the [GitHub Community]({{ communityBoard }}) board. You might also want to search for your issue to see if other people have resolved it in the past.
Your base branch should be named main. Let's open a new pull request to fix this.
- Click on the Edit button located to the right of your pull request's title
- Below the title's comment box, in the "base:" drop-down menu, make sure the “main” branch is selected
- A pop-up window will appear asking if you want to change the "base". Click the green Change base button
If you would like assistance troubleshooting the issue you are encountering, create a post on the [GitHub Community]({{ communityBoard }}) board. You might also want to search for your issue to see if other people have resolved it in the past.
I was expecting your file to be named {{ expected }}.
Let's edit this pull request to fix both of these issues.
{% if preferences.gitTool == 'cli' %}
- Check out to your branch:
git checkout {{ branch }} - Type
lsto see a listing of your root directory. - Confirm that you've got a folder titled
_posts. - Step into the folder with
cd _posts. - Type
lsto see a listing of your_postsfolder. - Ensure you've got a file named
{{ expected }}. - If you find you have to make any changes, then stage, commit, and push those changes:
git add .
git commit -m "<YOUR-MESSAGE>"
git push
{% else %}
- Click the [Files Changed tab]({{ url }}) in this pull request.
- Verify that the only file edited is named
{{ expected }}. - If the file is improperly named, or not in a proper location, use the edit function to correct it.
- Above the contents of the file, select all text in the field that contains the filename and delete it.
- Continue pressing your backspace key to also delete any directory names that exist.
- Type the proper filename:
{{ expected }} - Scroll to the bottom and enter a commit message and commit in the Commit Changes section.
 {% endif %}
Note: You can find directions on how to move files while editing in our documentation.
If you would like assistance troubleshooting the issue you are encountering, create a post on the [GitHub Community]({{ communityBoard }}) board. You might also want to search for your issue to see if other people have resolved it in the past.
Your pull request is looking great!
Let’s add some content to your file. Replace line 5 of your file with a quotation or meme and witty caption. Remember: Markdown is supported.
{% if preferences.gitTool == 'cli' %}
- Check out to your branch:
git checkout {{ branch }} - Open the file
_posts/0000-01-02-{{ user.username }}.md. - Replace line 5 of the file with something new.
- Stage your new changes:
git add _posts/0000-01-02-{{ user.username }}.md - Commit your changes:
git commit -m "<YOUR-MESSAGE>" - Push your edits to GitHub:
git push
{% elsif preferences.gitTool == 'vscode' %}
- Open the file
_posts/0000-01-02-{{ user.username }}.md. - Replace line 5 of the file with something new.
- Stage your new changes. As a reminder, you can do this in the Source Control view, click the + symbol next to the file.
- Commit your changes. You can do this in the Source Control view, enter a commit message in the text field and press Ctrl+Enter on Windows or Command ⌘+Enter on macOS.
- Push your edits to GitHub. In the Source Control view, click on the ellipsis (...), and select Push.
{% else %}
- Click the [Files Changed tab]({{ url }}) in this pull request
- Edit your newly added file
- Replace line 5 with something new
- Scroll to the bottom and click Commit Changes {% endif %}
Note : Can't find the button to edit the file? It may look like a pencil, or it may look like three dots.
Nicely done @{{ user.username }}! ✨
You successfully created a pull request, and it has passed all of the tests. You can now merge your pull request.
{% if preferences.gitTool == 'cli' %}
- Check out to the
mainbranch:git checkout main
- Merge your branch:
git merge {{ branch }} - Push the merged history to GitHub:
git push
- Delete your the branch locally:
git branch -d {{ branch }}
{% else %}
- Click Merge pull request
- Click Confirm merge {% endif %}
- Once your branch has been merged, you don't need it anymore. Click Delete branch.
Oooops! It looks like you might have accidentally closed your pull request.
- Click Reopen pull request. If this button is inactive, you will need to click Restore branch first
- Merge the pull request.
Congratulations @{{ user.username }}, you've completed this course!
Now, you have your slide deck deployed [here]({{ store.pagesUrl }}) and you've gone through the GitHub Flow.
Before I say good-bye, here's a recap of all the tasks you've accomplished in your repository:
- You learned about issues, pull requests, and the structure of a GitHub repository
- You learned about branching
- You created a commit
- You viewed and responded to pull request reviews
- You edited an existing file
- You enabled GitHub Pages
- You made your first contribution! 🎉
We'd love to hear what you thought of this course. Please share your feedback in this brief survey.
We hope this course helped you feel more comfortable using GitHub. Remember: You’re always welcome to repeat course topics if you’d like additional practice. If you’re ready to build on your new skills, here are some ideas.
To find projects to contribute to through trending topics and curated collections, check out GitHub Explore.
Here are some suggestions for future courses you can take:
- [GitHub Pages]({{ host }}/{{ course.Owner.login }}/github-pages): Continue learning about GitHub Pages, which we touched on in this course.
- [Communicating using Markdown]({{ host }}/{{ course.Owner.login }}/communicating-using-markdown): We used a little Markdown in this course, but if you want to learn all about this ✨ syntax, take the course!
[What will you learn next]({{ host }}/courses)?