This course will walk you through everything you need to start organizing ideas and collaborating using Markdown, a lightweight language for text formatting.
Tags: GitHub, Markdown
GitHub is about more than code. It’s a platform for software collaboration—and Markdown is one of the most important ways developers can make their communication clear and organized in issues and pull requests.
This course will walk you through creating and using headings more effectively, organizing thoughts in bulleted lists, and showing how much work you’ve completed with checklists. You can even use Markdown to add some depth to your work with the help of emoji, images, and links. See a word you don't understand? We've included an emoji 📖 next to some key terms. Click on it to see its definition.
In this course, you’ll learn how to:
- Use Markdown to add lists, images, and links in a comment or text file
- Determine where and how to use Markdown in a GitHub repository

- A published GitHub Pages site showcasing different types of Markdown that you can edit and use in the future
In this course you will work with issues and pull requests, as well as edit files. If these things aren't familiar to you, we recommend you take the [Introduction to GitHub]({{ host }}/githubtraining/introduction-to-github) course, first!
This makes use of the following open source projects. Consider exploring these repos and maybe even making contributions!
- Jekyll: a simple, blog-aware, static site generator.
Developers, GitHub users, users new to Git, students, managers, teams
In this repository 📖, you’ll learn how to write with Markdown 📖, a simple and widely used markup language for formatting text. Here, you’ll start building a static webpage for your customized portfolio.
Markdown is a lightweight syntax for communicating on GitHub, and many other websites. You can format words as bold or italic, add images, and create lists. Markdown is regular text combined with a few non-alphabetic symbols, such as # or *. You can use Markdown with the formatting toolbar in issues 📖 and pull requests 📖, or you can type the syntax.
You can use Markdown most places around GitHub:
- Comments in issues and pull requests (like this one!)
- Files with the
.mdor.markdownextension - Sharing snippets of text in Gists
For more information, see “Writing on GitHub” in the GitHub Help.
Let's get started!
A task list creates checkboxes for people with access 📖in a repository to check off. They're very useful for tracking issues and pull requests.
If you include a task list in the body of an issue or pull request, you'll see a progress indicator in your issue list.
Watch out! The syntax for task lists is very specific. Be sure to include the spaces where required, or else they won't render.
- [x] Additional markup is supported, including @mentions, #references, [links](url), **emphasis**, and <del>HTML tags</del>.
- [x] List syntax is required.
  - You can nest lists below, too!
- [x] This item is completed.
- [ ] This item is not complete.
- Additional markup is supported, including @mentions, #references, links, emphasis, and
HTML tags. - List syntax is required.
- You can nest lists below, too!
- This item is complete.
- This item is not complete.
-
Add a comment to this issue, using Markdown to create a list of items to complete. Your task can include any tasks you wish, or you can use this example:
- [ ] Turn on GitHub Pages - [ ] Outline my portfolio - [ ] Introduce myself to the world -
Use the Preview tab to check your markdown formatting.
-
Click Comment.
For a printable version of the steps in this course, check out the [Quick Reference Guide]({{ host }}/public/{{ course.slug }}.pdf).
If you perform an expected action and don't see a response from me after a few seconds, refresh the page for your next steps.
I didn't see a task list in that comment. Remember, a task list starts with the syntax - [ ] and then the task list item. The formatting is specific! Try again with a new comment. You can copy this one if you would like to see how they look:
- [ ] Turn on GitHub Pages
- [ ] Outline my portfolio
- [ ] Introduce myself to the world
If you would like assistance troubleshooting, create a post on the [GitHub Community]({{ communityBoard }}) board. You might also want to search for your issue to see if other people have resolved it in the past.
{{ user.username }}, it looks like your task list has too many spaces between the [ ] square brackets.
The formatting for a task list requires that there is exactly one space between the brackets. When you check the box, that blank space will be replaced by an x.
Go ahead and try again!
Add a comment to this issue. Use Markdown to create a task list of todo items. Here is an example:
- [ ] Turn on GitHub Pages
- [ ] Outline my portfolio
- [ ] Introduce myself to the world
Now let's turn our focus to the content of your portfolio. Because this portfolio will display as a static web page, you'll need to enable GitHub Pages.
- Under your repository name at the upper right, click [:gear: Settings]({{ repoUrl }}/settings).
- Then on the lower left, click Pages
- In the GitHub Pages section, use the Select source drop-down menu to select
mainas your GitHub Pages publishing source. - Click the Save button.
- Read the page. Make no changes to the Theme. When ready under your repository name at the upper right click Issues(1)
- Then click on closed
- Then click on "Getting Started with GitHub" issue and scroll down to find your last progress and instruction for the next step.
I may take up to a minute to respond as I wait for GitHub Pages to create a deployment of your repository.
For more information, see Configuring a publishing source for GitHub Pages in the GitHub Help.
As you saw on your website, your portfolio doesn't have much content yet. We'll learn how to edit the file in this pull request to incorporate some Markdown headers.
You can see an example of a header at the top of this page! Just like in HTML, a header is a larger bit of text at the beginning of a section. There are six sizes.
# This is an <h1> header, which is the largest
## This is an <h2> header
###### This is an <h6> header, which is the smallest
In issues, pull requests, and comments, you can use the text formatting toolbar.
The toolbar isn't available everywhere. When you edit a file, you must type the # symbols manually.
{% if preferences.gitTool == 'cli' %}
- Open your preferred command line interface, which we'll call your shell from now on.
- Clone this repository:
git clone {{ thePayload.repository.clone_url }} - Navigate to the repository in your shell:
cd {{ thePayload.repository.name }} - Checkout to the branch in this pull request:
git checkout add-headers
- In your text editor of choice, open the file called
01-name.md, in the_includesdirectory. On the first line, replace the text with your name, and add a#before the content to make it an H1 Header. - Save your file. Every time you make changes, it's a good idea to type
git status. You should type this after you stage files, and after you commit. It's always a good idea! - Stage your file:
git add _includes/01-name.md
- Commit the change and add a commit message:
git commit -m "<YOUR MESSAGE>" - Push your new commit to GitHub:
git push
{% else %}
- In this pull request, click the Files changed tab.
- To edit the file titled
_includes/01-name.md, click the small pencil ✏️ or select "Edit file" from the three dotted ... menu in the upper right corner of the file view. - On the Edit file tab, add a
#, followed by a space, before the content to make it an H1 Header. You can add more headers, using one to six#characters followed by a space. - Above your new content, click Preview changes.
- At the bottom of the page, type a short, meaningful commit message that describes the change you made to the file.
- Click Commit changes. {% endif %}
Take a look at your published site here: {{ url }}
As we add content throughout the course, this site will update.
I've closed this issue and opened a pull request for you to work on headers in your portfolio.
Go to the pull request now!
You've made a change to this file, but I don't see a header yet. Add another commit with a header. You can continue to make commits on a branch even after you open a pull request.
{% if preferences.gitTool == 'cli' %}
- Open your preferred command line interface, which we'll call your shell from now on.
- Clone this repository:
git clone {{ thePayload.repository.clone_url }} - Navigate to the repository in your shell:
cd {{ thePayload.repository.name }} - Checkout to the branch in this pull request:
git checkout add-headers
- In your text editor of choice, open the file called
01-name.md, in the_includesdirectory. On the first line, replace the text with your name, and add a#before the content to make it an H1 Header. - Save your file.
- Stage your file:
git add _includes/01-name.md
- Commit the change and add a commit message:
git commit -m "<YOUR MESSAGE>" - Push your new commit to GitHub:
git push
{% else %}
- Click the "Files changed" tab.
- Scroll to find the
_includes/01-name.md. - Click the 📝 pencil icon.
- Add a header by including a
#hash followed by a space. - Scroll to the bottom and commit your changes to your branch. {% endif %}
If you would like assistance troubleshooting, create a post on the [GitHub Community]({{ communityBoard }}) board. You might also want to search for your issue to see if other people have resolved it in the past.
I see you've added at least one header, @{{ user.username }}. You can continue working if you'd like, otherwise let's merge 📖 this pull request and move on with the course.
{% if preferences.gitTool == 'cli' %}
- Check out to the
mainbranch:git checkout main
- Merge your branch:
git merge add-headers
- Push the merged history to GitHub:
git push
- Delete your the branch locally:
git branch -d add-headers
{% else %}
- Click Merge pull request below. {% endif %}
Now, you're going to add an image. You can add an image of yourself or anything else you'd like to feature. You'll also learn how to create descriptive text, or "alt text", for images, and how to create links.
Let's add an image. Don't forget to include descriptive text in the square brackets. This text is read aloud for people using screen readers. It's also shown at times when your image doesn't display, such as when there's a poor connection. You can see the syntax for images below:


{% if preferences.gitTool == 'cli' %}
- In your shell, checkout to the branch in this pull request:
git checkout add-images-links
- In your text editor of choice, open the file called
02-image.md, in the_includesdirectory. In the file, replace the content with the correct Markdown for your image of choice. Don't forget to include alt-text! - Save your file.
- Stage your new file:
git add _includes/02-image.md
- Commit the change and add a commit message:
git commit -m "<YOUR MESSAGE>" - Push your new commit to GitHub:
git push
{% else %}
- As you did before, edit the file in this pull request.
- In the file, replace the content in
_includes/02-image.mdwith the correct Markdown for your image of choice. Don't forget to include alt-text! - Commit your changes. {% endif %}
Nice headers, @{{ user.username }}! You can see your work here: {{ url }}
- Delete your branch 📖 in this pull request.
Go to the next pull request now!
Something doesn't look quite right with this image. Make sure:
- The placeholder text is deleted
- Your image formatting is correct (
) - The image has alt text
{% if preferences.gitTool == 'cli' %}
- In your shell, checkout to the branch in this pull request:
git checkout add-images-links
- In your text editor of choice, open the file called
02-image.md, in the_includesdirectory. In the file, replace the content with the correct Markdown for your image of choice. Don't forget to include alt-text! - Save your file.
- Stage your new file:
git add _includes/02-image.md
- Commit the change and add a commit message:
git commit -m "<YOUR MESSAGE>" - Push your new commit to GitHub:
git push
{% else %}
- Click the "Files changed" tab.
- Scroll to find the
_includes/02-image.md. - Click the 📝 pencil icon.
- Add an image using the syntax
. - Scroll to the bottom and commit your changes to your branch. {% endif %}
If you would like assistance troubleshooting, create a post on the [GitHub Community]({{ communityBoard }}) board. You might also want to search for your issue to see if other people have resolved it in the past.
Your image looks great! Next, you'll want to add links to your awesome portfolio projects. Links help create context when you’re communicating in issues and pull requests.
You might link to a website, a repository, or even a line of code. To create a link, put the text you want to display in square brackets, and the URL in the following parentheses.
[GitHub](http://github.com)
{% if preferences.gitTool == 'cli' %}
- In your shell, verify that you are currently checked out to the branch
add-images-links:git status
- If you are not, then checkout to that branch:
git checkout add-images-links
- In your text editor of choice, open the file called
03-links.md, in the_includesdirectory. Replace the filler text with a link to your GitHub profile (or anywhere else). - Save your file.
- Stage your new file:
git add _includes/03-links.md
- Commit the change and add a commit message:
git commit -m "<YOUR MESSAGE>" - Push your new commit to GitHub:
git push
{% else %}
- Edit the file
_includes/03-links.md. - Replace the filler text with a link to your GitHub profile (or anywhere else). {% endif %}
Something doesn't look quite right with this link. Make sure:
- The placeholder text is deleted
- Your link formatting is correct (
[text](url))
{% if preferences.gitTool == 'cli' %}
- In your shell, verify that you are currently checked out to the branch
add-images-links:git status
- If you are not, then checkout to that branch:
git checkout add-images-links
- In your text editor of choice, open the file called
03-links.md, in the_includesdirectory. Add a link using the syntax[text](https://example.com). - Save your file.
- Stage your new file:
git add _includes/03-links.md
- Commit the change and add a commit message:
git commit -m "<YOUR MESSAGE>" - Push your new commit to GitHub:
git push
{% else %}
- Click the "Files changed" tab.
- Scroll to find the
_includes/03-link.md. - Click the 📝 pencil icon.
- Add a link using the syntax
[text](https://example.com). - Scroll to the bottom and commit your changes to your branch. {% endif %}
If you would like assistance troubleshooting, create a post on the [GitHub Community]({{ communityBoard }}) board. You might also want to search for your issue to see if other people have resolved it in the past.
This looks great, @{{ user.username }}! You've created a link to show off your portfolio, and now you can share it with the world.
{% if preferences.gitTool == 'cli' %}
- Check out to the
mainbranch:git checkout main
- Merge your branch:
git merge add-images-links
- Push the merged history to GitHub:
git push
- Delete your the branch locally:
git branch -d add-images-links
{% else %}
- Click Merge pull request below. {% endif %}
In this pull request, you'll learn about lists and emoji. You'll also list a few details in your resume.
👇 These are expandable dialogues! Click to open and see more information.
Emoji
Emoji are fun ✨, and they can be silly 😜, but they can also be an important communication tool when working with remote teams ✅. Tone doesn't come across as clearly when reading text as it comes speaking face to face, and emojis can be helpful in conveying context and emotions. ❤️
Emoji are best used as additive extras, not replacements for text. With images, descriptive text makes it clearer for screen readers, but screen readers aren't guaranteed to convey the intent of an emoji. Make sure your meaning is clear in text, so emoji will help instead of causing more confusion.
Here are some examples of popular emojis in markdown.
| What you see | What you type |
|---|---|
| ❤️ | :heart: |
| 👍 | :+1: |
| 😄 | :smile: |
| ✨ | :sparkles: |
| 🎉 | :tada: |
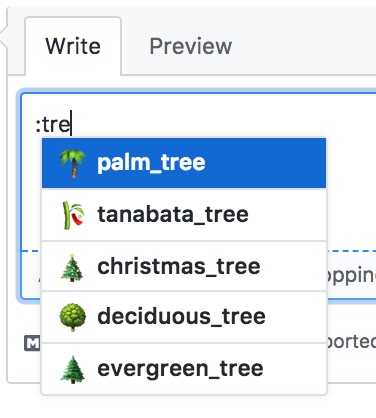
For more information about available emoji, see this handy cheat sheet. In most text fields on GitHub, you can type : and then begin to type the name of an emoji. A fuzzy search will bring up the 5 best guesses and let you select one.
Ordered Lists
Ordered lists have numbers. You can nest ordered lists within a list item by indenting them. You can read more about formatting and syntax in the GitHub Help.
1. Item 1
2. Item 2
3. Item 3
   1. Item 3a
   2. Item 3b
- Item 1
- Item 2
- Item 3
- Item 3a
- Item 3b
Unordered Lists
To create an unordered list, use either the - or * character. As with ordered lists, you can nest a list by indenting two spaces.
* Item 1
* Item 2
  * Item 2a
  * Item 2b
- Item 1
- Item 2
- Item 2a
- Item 2b
Help people get to know you by adding a list containing a few of your favorite things. Don't know what to add? Why not add a list of your favorite books or places to eat.
{% if preferences.gitTool == 'cli' %}
- In your shell, checkout to the branch in this pull request:
git checkout add-lists-emphasis
- In your text editor of choice, open the file called
04-lists.md, in the_includesdirectory. Create a markdown list in the file. It can be ordered or unordered. - Save your file.
- Stage your new file:
git add _includes/04-lists.md
- Commit the change and add a commit message:
git commit -m "<YOUR MESSAGE>" - Push your new commit to GitHub:
git push
{% else %}
- Edit the
_includes/04-lists.mdin this pull request. - Create a markdown list in the file. It can be ordered or unordered.
- Commit your changes. {% endif %}
Good job with images and links! See your work here: {{ url }}
- Delete your branch in this pull request.
Go to the next activity now!
Uh oh, we're not finding a list.
Remember the format for a list looks like this:
- item
It is important to put a space between the - or * and the list item text.
{% if preferences.gitTool == 'cli' %}
- In your shell, checkout to the branch in this pull request:
git checkout add-lists-emphasis
- In your text editor of choice, open the file called
04-lists.md, in the_includesdirectory. Create a markdown list in the file. It can be ordered or unordered. Use either-or*to indicate the bullets. - Save your file.
- Stage your new file:
git add _includes/04-lists.md
- Commit the change and add a commit message:
git commit -m "<YOUR MESSAGE>" - Push your new commit to GitHub:
git push
{% else %}
- Click the "Files changed" tab.
- Scroll to find the
_includes/04-lists.md. - Click the 📝 pencil icon.
- Add a list using either
-or*to indicate the bullets. - Scroll to the bottom and commit your changes to your branch. {% endif %}
If you would like assistance troubleshooting, create a post on the [GitHub Community]({{ communityBoard }}) board. You might also want to search for your issue to see if other people have resolved it in the past.
Great job with those lists! Let's try something new. You can use bold and italic text in Markdown. There are a couple of ways to create emphasis.
*This text will be italic*
_This will also be italic_

**This text will be bold**
__This will also be bold__

_You **can** combine them_
{% if preferences.gitTool == 'cli' %}
- In your shell, verify that you are currently checked out to the branch
add-lists-emphasis:git status
- If you are not, then checkout to that branch:
git checkout add-lists-emphasis
- In your text editor of choice, open the file called
05-emphasis.md, in the_includesdirectory. Add some information on your skills, including emphasis (like bold or italics). - Save your file.
- Stage your new file:
git add _includes/05-emphasis.md
- Commit the change and add a commit message:
git commit -m "<YOUR MESSAGE>" - Push your new commit to GitHub:
git push
{% else %}
- Edit the file
_includes/05-emphasis.mdin this pull request. - Use the Preview tab and your ✨ new Markdown knowledge, add emphasis (like bold or italics) to your skills.
- Enter a short and descriptive commit message.
- Commit your changes. {% endif %}
🤔 I don't see any text with emphasis yet. To complete this exercise, you need to add some emphasized text to the _includes/05-emphasis.md file, in the form of a bold or italicized words.
{% if preferences.gitTool == 'cli' %}
- In your shell, verify that you are currently checked out to the branch
add-lists-emphasis:git status
- If you are not, then checkout to that branch:
git checkout add-lists-emphasis
- In your text editor of choice, open the file called
05-emphasis.md, in the_includesdirectory. Add some information on your skills, including emphasis (like bold or italics). - Save your file.
- Stage your new file:
git add _includes/05-emphasis.md
- Commit the change and add a commit message:
git commit -m "<YOUR MESSAGE>" - Push your new commit to GitHub:
git push
{% else %}
- Click the "Files changed" tab.
- Scroll to find the
_includes/05-emphasis.md. - Click the 📝 pencil icon.
- Add emphasis using
**for bold or_for italics (emphasis should not have a space between the markdown and the word to be modified). - Scroll to the bottom and commit your changes to your branch. {% endif %}
If you would like assistance troubleshooting, create a post on the [GitHub Community]({{ communityBoard }}) board. You might also want to search for your issue to see if other people have resolved it in the past.
Nice list, @{{ user.username }}! You can merge this pull request when you're ready.
{% if preferences.gitTool == 'cli' %}
- Check out to the
mainbranch:git checkout main
- Merge your branch:
git merge add-lists-emphasis
- Push the merged history to GitHub:
git push
- Delete your the branch locally:
git branch -d add-lists-emphasis
{% else %}
- Click Merge pull request below. {% endif %}
Congratulations @{{ user.username }}, you've completed this course!

During this course you successfully:
- Added a checklist to an issue comment
- Enabled GitHub Pages on your repository
- Committed changes to your webpage by:
- Adding headers to the
01-name.mdfile - Including an image in the
02-image.mdfile - Creating links to other websites in the
03-links.mdfile - Adding your accomplishments to the
04-lists.mdfile - Using emphasis like bold and italics in the
05-emphasis.mdfile
- Adding headers to the
Now that you have mastered the basics of Markdown @{{ user.username }}, here's some quick information about some of the other cool features we didn't cover.
Username and Team @mentions
Typing an @ symbol, followed by a GitHub username, will send a notification to that person about the comment. This is called an “@mention”, because you’re mentioning the individual. You can also @mention teams within an organization. For more information, see “Receiving notifications about activity on GitHub in the GitHub Help.
@githubteacher
@githubteacher
Cross Links
To bring up a list of suggested issues and pull requests within a repository, type #. Type the issue or pull request number or title to filter the list, and then press either Tab or Enter to complete the highlighted result.
Additionally, references to issues and pull requests are automatically converted to shortened links to the issue or pull request. For example,
| Reference type | Raw reference | Short link |
|---|---|---|
| Issue or pull request URL | https://github.com/desktop/desktop/pull/3602 |
#3602 |
# and issue or pull request number |
#3602 | #3602 |
GH- and issue or pull request number |
GH-3602 | GH-3602 |
Username/Repository# and issue or pull request number |
desktop/desktop#3602 | desktop/desktop#3602 |
For more information, see “Autolinked references and URLs” in the GitHub Help.
Linking Specific Commits
References to a commit's ID (commonly called a SHA or hash) are automatically converted into shortened links to the commit on GitHub. For example,
| Reference type | Raw reference | Short link |
|---|---|---|
| Commit URL | https://github.com/desktop/desktop/commit/8304e9c271a5e5ab4fda797304cd7bcca7158c87 | 8304e9c |
| SHA | 8304e9c271a5e5ab4fda797304cd7bcca7158c87 | 8304e9c |
| User@SHA | desktop@8304e9c271a5e5ab4fda797304cd7bcca7158c87 | desktop@8304e9c |
| Username/Repository@SHA | User/Repository@SHA: desktop/desktop@8304e9c271a5e5ab4fda797304cd7bcca7158c87 | desktop/desktop@8304e9c |
Quotes
You can create quote text with a >.
In the words of Abraham Lincoln:

> Pardon my French
In the words of Abraham Lincoln:
Pardon my French
Tables
You can create tables by assembling a list of words and dividing them with hyphens - (for the first row), and then separating each column with a pipe |:
```
First Header | Second Header
------------ | -------------
Content from cell 1 | Content from cell 2
Content in the first column | Content in the second column
```
| First Header | Second Header |
|---|---|
| Content from cell 1 | Content from cell 2 |
| Content in the first column | Content in the second column |
For more detail on formatting with tables, see "Organizing information with tables" in the GitHub Help.
Inline Code Blocks
Certain words and phrases need to be formatted in monospace fonts, especially when writing about code. As you've seen throughout this lab, words can be distinguished in markdown with inline code blocks.
Inline code is just one ``` character on either side of the text, and can be used within paragraphs, headers, or other Markdown.
`inline code is just one backtick`
inline code is just one backtick
Separate Code Blocks
To separate out a larger block of code, use three ``` characters instead of one, and set the text aside in its own paragraph.
What we type:
```
Anything written in this **paragraph** will not be _formatted_ even if it would normally be recognized in this setting. :taco:
```
What we see:
Anything written in this **paragraph** will not be _formatted_ even if it would normally be recognized in this setting. :taco:
Syntax Highlighting
In addition to code blocks, some code blocks should be rendered differently depending on the language, such as Javascript or command-line text.
What we type:
  ```sh
  github-learning-lab ~/Projects/recipe-repository
  $ git init
  Initialized empty Git repository in /Users/github-learning-lab/Projects/recipe-repository/.git/
  ```
What we see:
github-learning-lab ~/Projects/recipe-repository
$ git init
Initialized empty Git repository in /Users/github-learning-lab/Projects/recipe-repository/.git/
Summary dropdown
Most of the text in this issue is formatted in collapsible summary blocks. Here's how to make them with Markdown:
<details>
  <summary>Title</summary>

  Content here

</details>
Want to keep learning? Feel free to [check out our other courses]({{ host }}/courses).
Nicely done, @{{ user.username }}. See your work here: {{ url }}
I gave your portfolio a makeover by adding a Jekyll theme. To select another theme, see “Adding a Jekyll theme to your GitHub Pages site with the Jekyll Theme Chooser in the GitHub Help.
- Delete your branch in this pull request.