![]()
An application for monitoring, profiling and inspecting a running eXist-db instance.
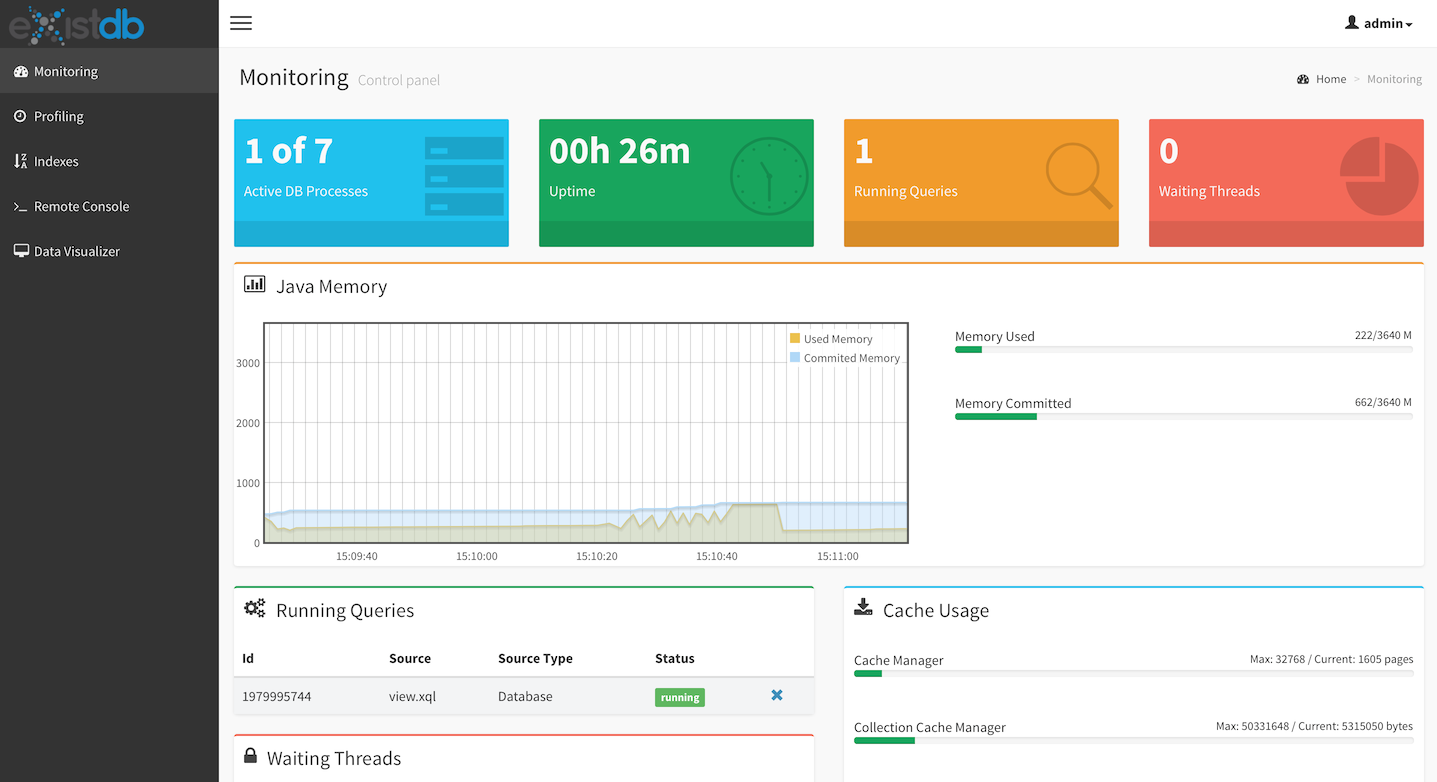
The app includes:
- Monitoring dashboard: shows memory usage, running queries, locked threads, cache usage and more
- Query profiling page: essential for tuning queries and indexes
- Index browser: inspect existing indexes
- Remote console: send log messages from any query in eXist to the remote console. Uses web sockets for real-time updates.
- Data visualizer: get a quick overview of the frequency of elements in a collection.
- Remote Monitoring: monitor multiple remote eXistdb instances. Provides timelines for long term monitoring.
Monex remote monitoring requires the eXistdb scheduler module to be enabled. Make sure it is enabled in $eXistdb_home/extensions/build.properties
# Scheduler module
include.module.scheduler = true
and in $eXistdb_home/conf.xml make sure the Scheduler module is not commented out:
<module uri="http://exist-db.org/xquery/scheduler"
		class="org.exist.xquery.modules.scheduler.SchedulerModule" />
This needs only to be done if include.module.scheduler in extensions/build.properties was set to false. Then eXistdb has to be rebuild to enable the scheduler module. Shutdown the database and in the root of the eXistdb project simply call
./build.sh
After starting the database again, the remote monitoring tab should show no more error warnings.
For each eXistdb instance to monitor its url and its unique token is needed. The token can be found in the data directory on the filesystem . The file is called jmxservlet.token. The path to the data directory can be found in $existdb_home/conf.xml
<db-connection files="path-to-your-data-dir" ... />
Each eXistdb installation to monitor is added as an instance entry at /db/apps/monex/instances.xml.
Sample Monex Instances
<instance name="localhost"
url="http://localhost:8080/exist"
token="3268b570-392e-56ea-9550-117012413e15" cron="0 * * * * ?">
<poll cron="0/30 * * * * ?" store="yes">
<alert name="More than 30 threads waiting for locks to be released"
condition="count($jmx//LockManager/WaitingThreads/row) > 30"/>
<alert name="More than 40 brokers active"
condition="$jmx//Database/ActiveBrokers > 10"/>
<alert name="Process CPU load > 1.0"
condition="$jmx//UnixOperatingSystem/ProcessCpuLoad > 0.5"/>
</poll>
</instance>
In the Monex Remote Monitoring tab click "Run" to start all remote monitoring jobs. You should now see an entry "localhost" beneath "Remote Monitoring" and beneath that an entry "Timelines".
If you wish to build Monex from source code you should follow these steps:
- Ensure you have Git, Apache Maven 3.3+, and Java JDK 8 installed and available:
$ git --version
git version 2.20.0

$ mvn --version

Apache Maven 3.5.4 (1edded0938998edf8bf061f1ceb3cfdeccf443fe; 2018-06-18T02:33:14+08:00)
Maven home: /usr/local/maven
Java version: 1.8.0_192, vendor: Azul Systems, Inc., runtime: /Library/Java/JavaVirtualMachines/zulu8.33.0.1-jdk8.0.192-macosx_x64/jre
Default locale: en_GB, platform encoding: UTF-8
OS name: "mac os x", version: "10.14.1", arch: "x86_64", family: "mac"- Clone and build an EXPath package by running:
$ git clone https://github.com/eXist-db/monex.git
$ cd monex
$ mvn package
The resulting XAR will be in the target/ folder.