Interested in interacting with DF1 from Raspberry Pi or just hacking BLE in general? You've come to the right place (or tutorial)!
Here, you'll learn how to communicate with DF1 using Raspberry Pi.
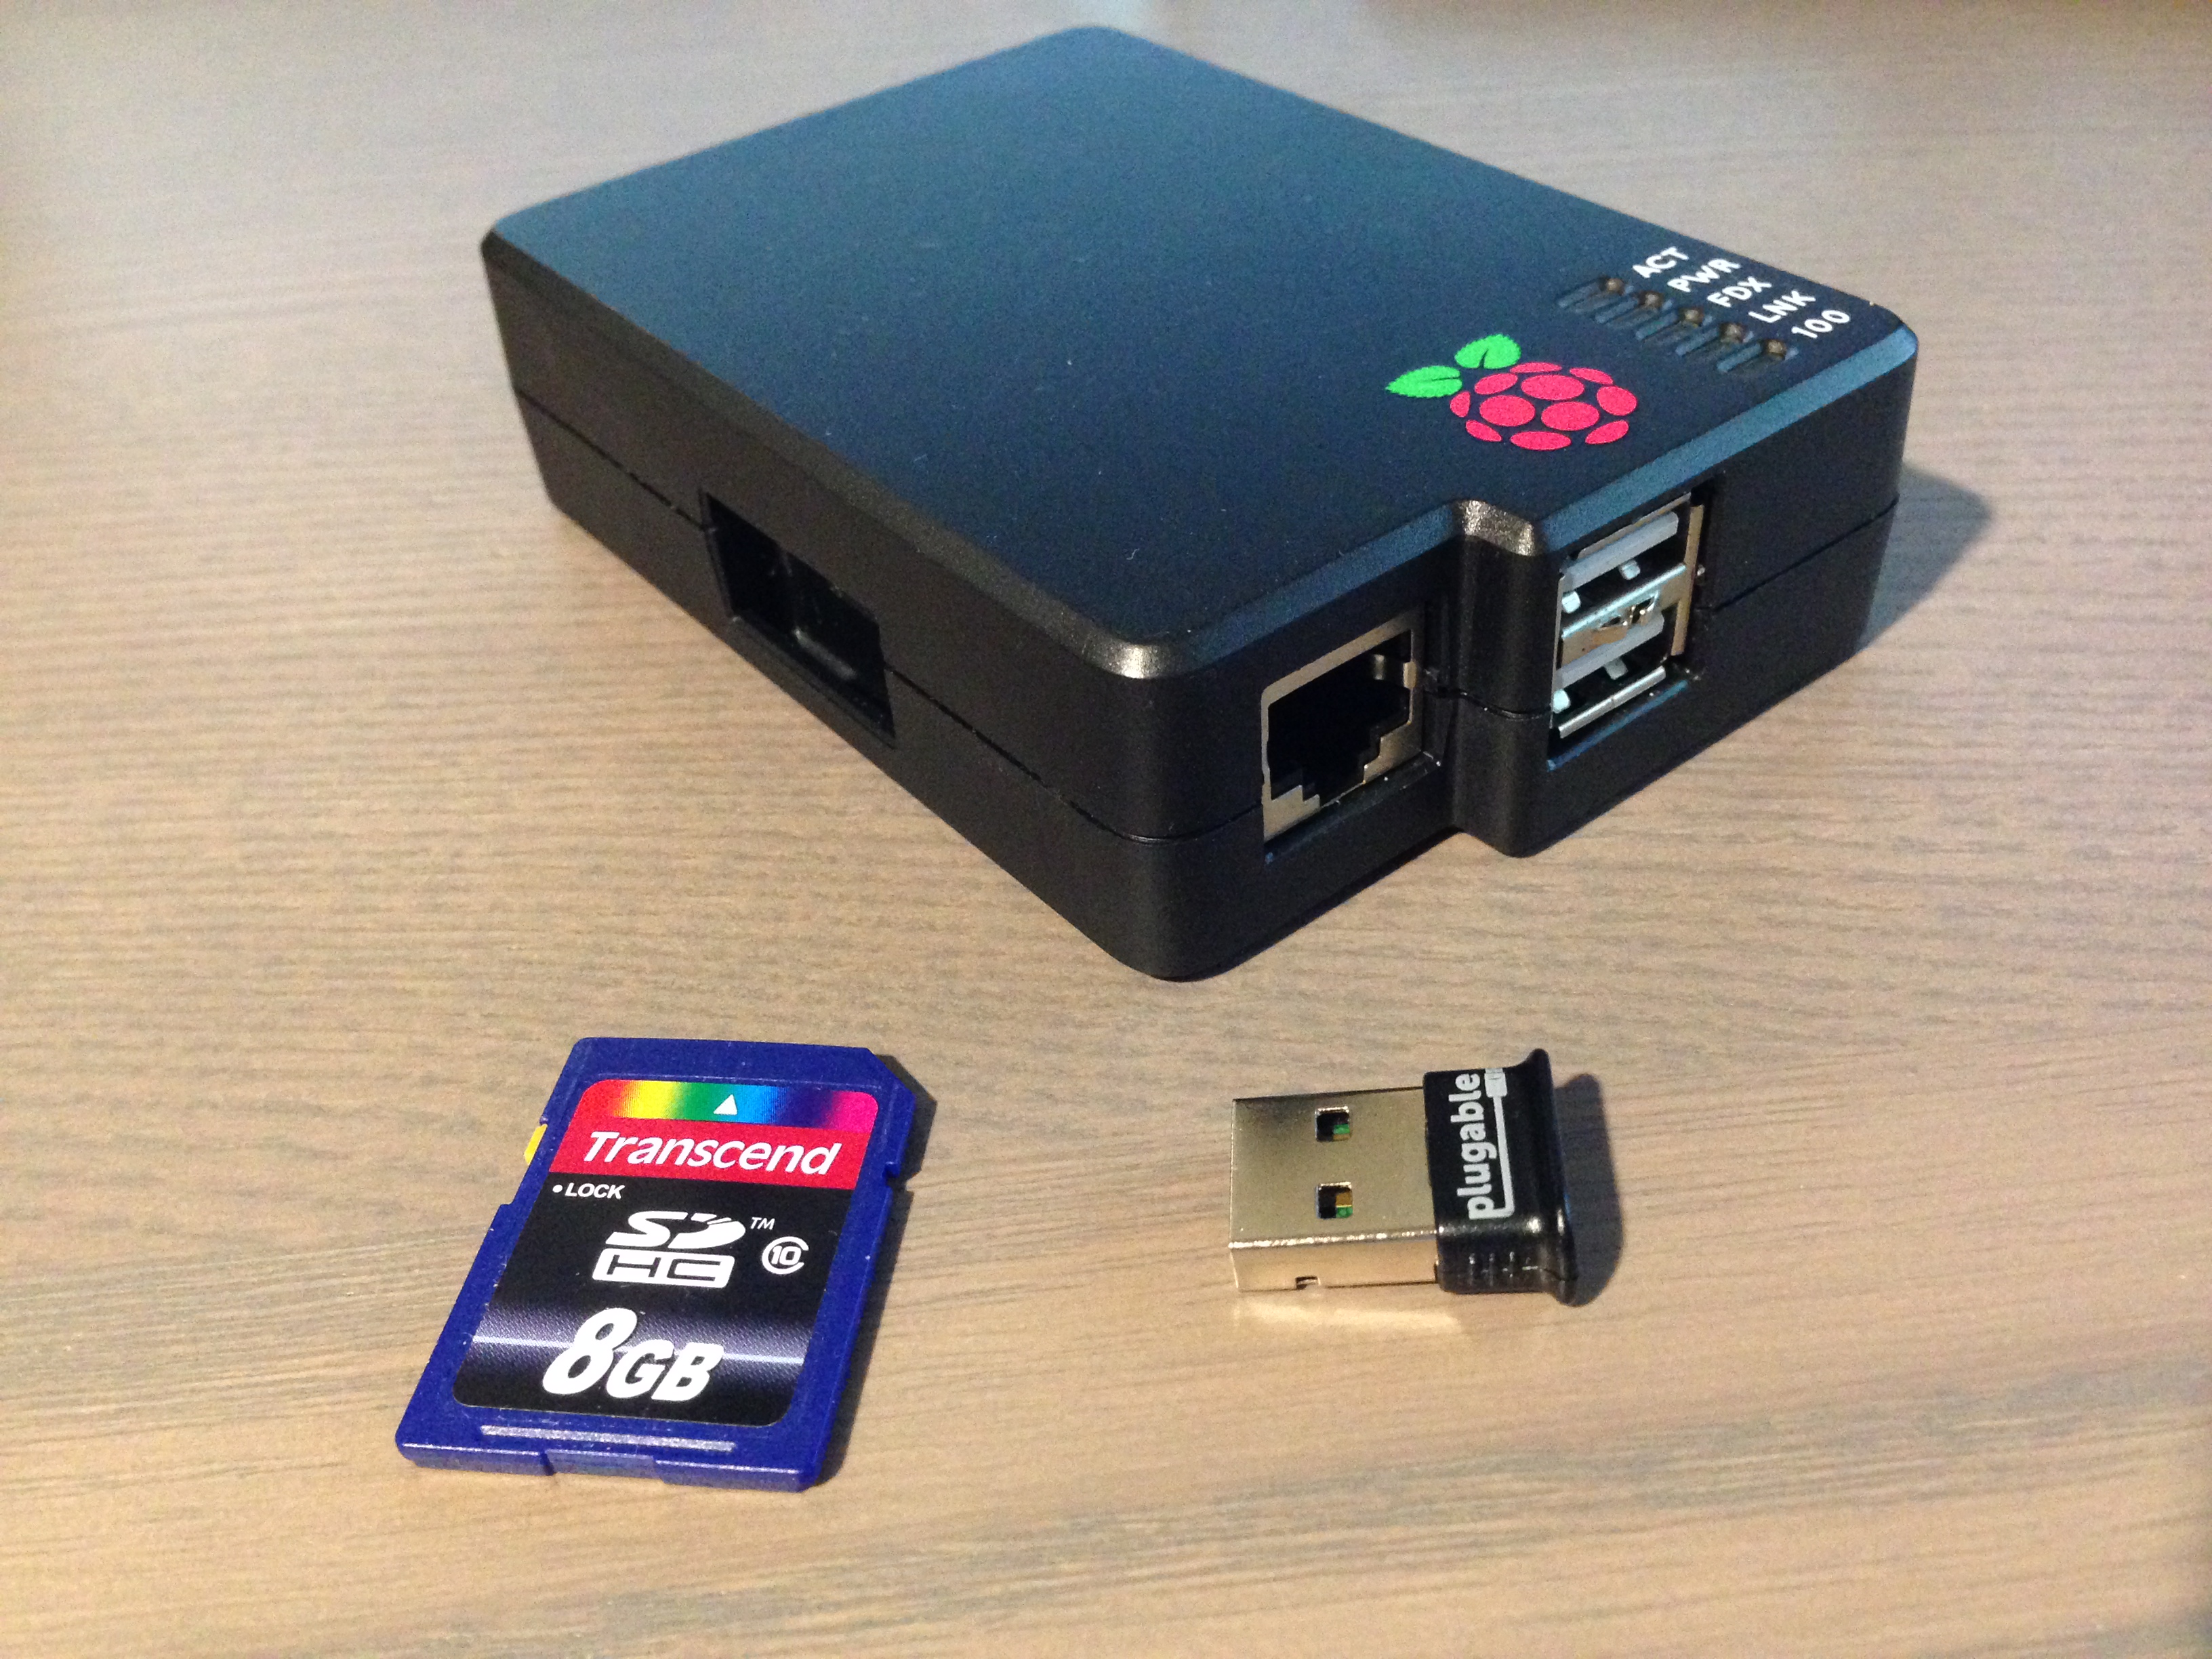
But before we begin, we need to make sure Raspberry Pi is equipped with all the necessary parts.
The tools and techniques presented here is not specific to Raspberry Pi. In fact, all of the
BLE related commands (hciconfig, hcitool, gatttool) work on linux machines as well.
-
Raspberry Pi (Model B)
Haven't tested on Model A, but why settle for Model A when you can get Model B??
-
BLE Dongle
Pluggable USB dongle is the one we are using. You can find it in Amazon.com for just $13 as of this writing. There are various supported BLE dongles out there. Here is a list
-
SD Card (8BG preferred) with necessary software installed.
Unless you want to install all the necessary packages yourself, we suggest using the Raspberry Pi image we've prepared. Refer to the installation section below for more details.
-
Optional: enclosure
Raspberry Pi looks sweeter with an enclosure. :-)
-
Optional: Lapdock
Used to be cheaper, but Motorola Atrix 4G Lapdock is perfect for on-the-go Raspberry Pi computing. You can find some more information about the setup here.
If You Prefer the Image
-
First click on this link: Download RPi Image
The image contains all the necessary packages already compiled and installed for you to just get up and running with BLE.
-
Install the image to an SD card at least 4GB in size
Follow these tutorials to setup your SD card.
-
Optional: Extending the partition
If you have a larger SD card, you'll notice that writing the image only allows RPi to "see" only 4GB of usable space.
CAUTION You can extend the partition under your SD card, but it's easy to cause yourself serious headache if you mess it up. Please Skip this section if you are unsure about what you are doing.
First insert the SD card to a linux machine. If you don't have a linux machine, follow other tutorials online on extending raspberry pi partition on SD cards.
This command will tell you which "disks" are available on your system.
$ fdisk -lChoose the device corresponding to the SD card. BEWARE: if you choose the wrong disk in the next step, you can mess up your linux machine.
In my case, I had the SD card mounted on /dev/sdd.
$ sudo parted /dev/sdd
GNU Parted 2.3
Using /dev/sdd
Welcome to GNU Parted! Type 'help' to view a list of commands.
(parted) print
Model: USB 2.0 SD/MMC Reader (scsi)
Disk /dev/sdd: 7948MB
Sector size (logical/physical): 512B/512B
Partition Table: msdos

Number  Start   End     Size    Type     File system  Flags
 1      4194kB  62.9MB  58.7MB  primary  fat16        lba
 2      62.9MB  3905MB  3842MB  primary  ext4
(parted) rm 2
(parted) mkpart primary 62.9MB 7948MB
(parted) p
(parted) quit
Now that the partition table was modified using
parted, I can extend the filesystem.sudo e2fsck -f /dev/sdd2 sudo resize2fs /dev/sdd2That's it, now you can insert the SD card into RPi and make use of all available space.
-
Check the tools
Run these commands on the command line to confirm:
$ which hciconfig
$ which hcitool
$ which gatttool
These commands should be available under
/usr/local/bin.As a bonus, you should also see:
$ which node
$ which tmux
$ which vim
If you prefer installing things yourself
-
Download and Install bluez package.
You can find some helpful instructions on how to get this package installed on Raspberry Pi. You will need an active network connection, because required libraries need to be installed using debian pkg manager (apt-get) first. We are currently using older 5.4 version, but the newer versions should work just fine.
One bit of note: the installation of required libs as well as compilation of bluez package will take a while. It would be faster to just download the 4GB file and write the image to an SD.
-
Optional: Install node.js
With the help of noble Node.js library, BLE development gets much easier.
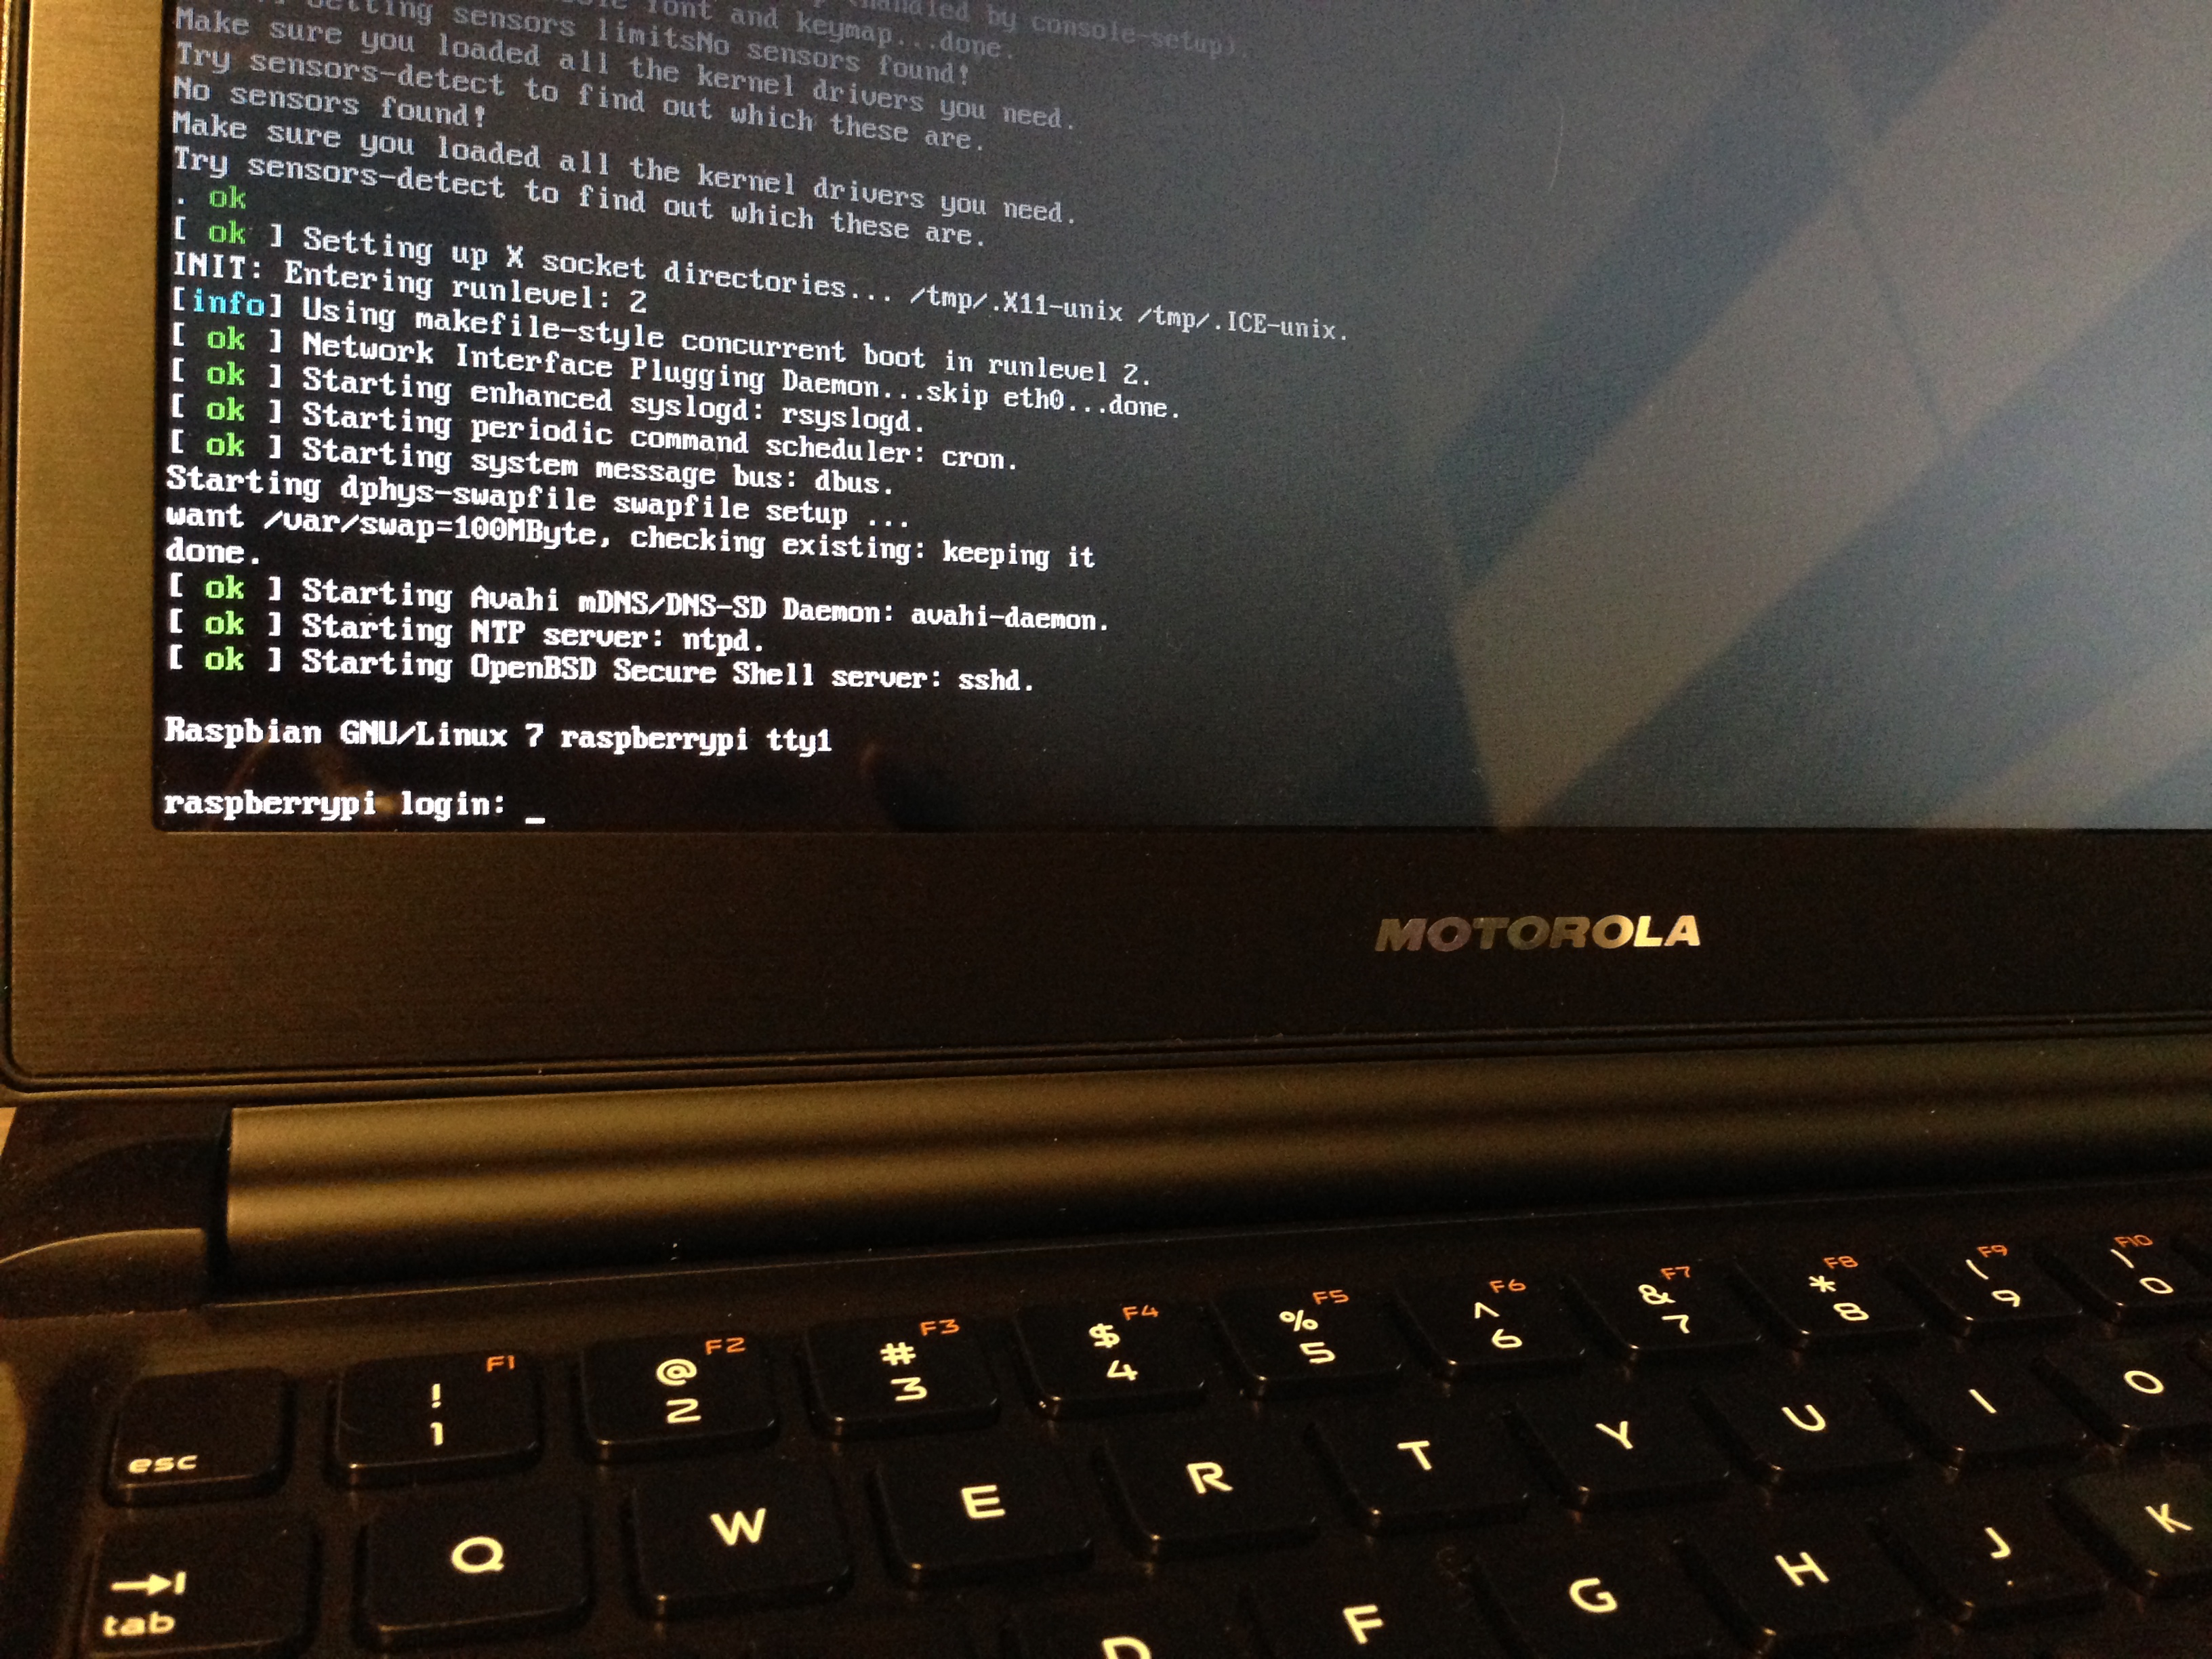
With the SD card loaded up with necessary software, first plug in the BLE usb dongle and power on the Raspberry Pi. Take note that the following sections also apply to any linux machine with BLE usb dongle and Bluez software installed.
- Turning the adaptor on
First check if hci0 adaptor is up.
$ sudo hciconfig
It should show output like the following. In the output, hci0 indicates the device representing your BLE USB dongle.
hci0:   Type: BR/EDR  Bus: USB
        BD Address: 00:02:72:C5:C3:4A  ACL MTU: 1021:8  SCO MTU: 64:1
        UP RUNNING PSCAN
        RX bytes:606 acl:0 sco:0 events:36 errors:0
        TX bytes:939 acl:0 sco:0 commands:36 errors:0
Run this to turn on the adaptor.
$ sudo hciconfig hci0 up
- Discover BLE Devices
In order to connect to any BLE peripheral, we first need to find out their addresses.
$ sudo hcitool lescan
It should start listing out the devices like so:
LE Scan ...
1C:BA:8C:2F:CF:43 (unknown)
1C:BA:8C:2F:CF:43 df1
DC:78:C8:E5:A1:F8 (unknown)
84:DD:20:EA:F3:F0 (unknown)
84:DD:20:EA:F3:F0 df1
- Connect to DF1
From the discovered devices above, I chose 84:DD:20:EA:F3:F0. It gets a bit harder to identify the devices when
you have lots of DF1's around...
$ gatttool -b 84:DD:20:EA:F3:F0 -i hci0 -I
Now, this command will put you into an interactive session that looks like:
[84:DD:20:EA:F3:F0][LE]>
Try typing connect and you'll get:
[84:DD:20:EA:F3:F0][LE]> connect
Attempting to connect to 84:DD:20:EA:F3:F0
Connection successful
- Discover and Toggle
Under gatttool interface, try the following commands:
> primary
You'll see that all the services get listed like this:
attr handle: 0x0001, end grp handle: 0x000b uuid: 00001800-0000-1000-8000-00805f9b34fb
attr handle: 0x000c, end grp handle: 0x000f uuid: 00001801-0000-1000-8000-00805f9b34fb
attr handle: 0x0010, end grp handle: 0x0022 uuid: 0000180a-0000-1000-8000-00805f9b34fb
attr handle: 0x0023, end grp handle: 0x0027 uuid: 0000180f-0000-1000-8000-00805f9b34fb
attr handle: 0x0028, end grp handle: 0x006a uuid: 0000aa10-0000-1000-8000-00805f9b34fb
attr handle: 0x006b, end grp handle: 0x0071 uuid: 0000aa60-0000-1000-8000-00805f9b34fb
attr handle: 0x0072, end grp handle: 0xffff uuid: f000ffc0-0451-4000-b000-000000000000
Btw, you can get more commands and their usage by typing
> help
Now, the following command will take a bit longer, and it will come back with exhaustive list of all available characteristics in the peripheral.
> characteristics
Let's try to toggle the LED. Locate the interested UUID by looking at the long string that comes after
uuid: on each line. For example, you can spot the Test Conf characteristic aa62 here:
handle: 0x006c, char properties: 0x02, char value handle: 0x006d, uuid: 0000aa61-0000-1000-8000-00805f9b34fb
handle: 0x006f, char properties: 0x0a, char value handle: 0x0070, uuid: 0000aa62-0000-1000-8000-00805f9b34fb
Let's write to that handle to turn on the RED LED. Notice that the uuid: 0000aa62-0000-1000-8000-00805f9b34fb
corresponds to char value handle: 0x0070. We will write to that handle.
> char-write-cmd 0x0070 01
> char-write-cmd 0x0070 00
> char-write-cmd 0x0070 02
> char-write-cmd 0x0070 00
From gatttool's interactive commandline, try the following:
- Trying Tap Event!
In the previous tutorial, we've shown how to get 8bit xyz data. This time, we are going to subscribe to tap event motion from DF1.
First enable the tap event mode by writing to the handle associated with Accelerometer Enable UUID aa12.
The UUID aa12 has char value handle address 0x002d.
handle: 0x002c, char properties: 0x0a, char value handle: 0x002d, uuid: 0000aa12-0000-1000-8000-00805f9b34fb
> char-write-cmd 0x002d 04
Now the crucial part. Subscribing from notification handle requires a bit of knowledge about how BLE characteristics are organized. The notification write handle is always 1 address higher than the actual notification address.
The tap event UUID aa15 is located here:
handle: 0x0037, char properties: 0x12, char value handle: 0x0038, uuid: 0000aa15-0000-1000-8000-00805f9b34fb
Notice the char value handle 0x0038. We add 1 to get 0x0039. Also, notification request handles are 2 bytes long.
And these bytes are organized in little-endian. So we have to write:
> char-write-cmd 0x0039 0100
Ok! Now try tapping DF1 and see the values like these show up on your terminal:
Notification handle = 0x0038 value: 91
Notification handle = 0x0038 value: a2
Notification handle = 0x0038 value: a2
In order to unsubscribe from the notification handle, simply write 0000 to the same handle.
> char-write-cmd 0x0039 0000
And turn off the accelerometer to save battery life.
> char-write-cmd 0x002d 00
There are bunch of other notification handles DF1 supports. Take a gander at this list.
- Stream data without interactivity
Hopefully you can see how the command line interface can immediately give you access to DF1's data.
But sometimes you just want to automate data acquisition.
gatttool gives you the ability to just pipe the data to stdout without going through the interactive session.
Try the following commands on your shell. Note the backslash ''. That's intentional and it indicates continuation of the command.
$ gatttool -b 84:DD:20:EA:F3:F0 -i hci0 --char-write --handle=0x002d -n 01 && \
  gatttool -b 84:DD:20:EA:F3:F0 -i hci0 --char-write-req --handle=0x0031 -n 0100 --listen
To turn off,
$ gatttool -b 84:DD:20:EA:F3:F0 -i hci0 --char-write --handle=0x002d -n 00
Lastly, some shell and perl commandline magic to parse and convert the outputs into readeable csv:
$ gatttool -b 84:DD:20:EA:F3:F0 -i hci0 --char-write --handle=0x002d -n 01 && \
  gatttool -b 84:DD:20:EA:F3:F0 -i hci0 --char-write-req --handle=0x0031 -n 0100 --listen \\
  | perl -ne 'if(/.*value: (\w+) (\w+) (\w+)/) { ($x,$y,$z) = ($1,$2,$3); \\
     printf("%f,%f,%f\n", unpack("c",pack("C",hex($x)))/64., \\
                          unpack("c",pack("C",hex($y)))/64., \\
                          unpack("c",pack("C",hex($z)))/64.); }'
The following python script merely wraps gatttool using pexpect python module.
This sample code is included along with this repository, under py directory.
You will need to install the python module pexpect first:
sudo pip install pexpect
First find out your DF1's bluetooth address by running sudo hcitool lescan.
(Mine was 1C:BA:8C:2F:CF:43)
You can then simply issue the following command to extract XYZ values into machine readeable format:
# retrieve 8 bit XYZ data
./df1pexpect.py 1C:BA:8C:2F:CF:43 acc
# retrieve 14 bit XYZ data
./df1pexpect.py 1C:BA:8C:2F:CF:43 acc14
# retrieve battery level
./df1pexpect.py 1C:BA:8C:2F:CF:43 batt