


SageMaker SSH Helper is the "army-knife" library that helps you to securely connect to Amazon SageMaker training jobs, processing jobs, batch inference jobs and realtime inference endpoints as well as SageMaker Studio Notebooks and SageMaker Notebook Instances for fast interactive experimentation, remote debugging, and advanced troubleshooting.
Three most common tasks that motivated to create the library, sometimes referred as "SSH into SageMaker", are:
- A terminal session into a container running in SageMaker to diagnose a stuck training job, use CLI commands like nvidia-smi, or iteratively fix and re-execute your training script within seconds.
- Remote debugging of a code running in SageMaker from your local favorite IDE like PyCharm Professional Edition or Visual Studio Code.
- Port forwarding to access auxiliary tools running inside SageMaker, e.g., Dask dashboard, Streamlit apps, TensorBoard or Spark Web UI.

Other tasks include but not limited to connecting to a remote Jupyter Notebook in SageMaker Studio from your IDE, or starting a VNC session to SageMaker Studio to run GUI apps.
SageMaker SSH helper uses AWS Systems Manager (SSM) Session Manager, to register a SageMaker container in SSM, followed by creating a session between your client machine and the Session Manager service. From there, you can "SSH into SageMaker" by creating an SSH (Secure Shell) connection on top of the SSM sessions, that allows opening a Linux shell and configuring bidirectional SSH port forwarding to run applications like remote development, debugging, desktop GUI, and others.

If you want to understand deeper how both the SageMaker service and the SageMaker SSH Helper library work, check the Flow Diagrams of the common use cases and carefully read all sections of the documentation.
Make sure you also looked at our Frequently Asked Questions, especially at the troubleshooting section, as well as at the existing both open and resolved issues.
To get started, your AWS system administrator must configure IAM and SSM in your AWS account as shown in Setting up your AWS account with IAM and SSM configuration.
Note: This repository is a sample AWS content. You should not use the sample content in your production accounts, in a production environment or on production or other critical data. If you plan to use the content in production, please, carefully review it with your security team. You are responsible for testing, securing, and optimizing the sample content as appropriate for production grade use based on your specific business requirements, including any quality control practices and standards.
Also make sure that the documentation you are reading corresponds the version you are installing. The best way to do that is to access the repository from the Releases page. In this case the URL in the address bar should look like sagemaker-ssh-helper/tree/vX.Y.Z.
SageMaker SSH Helper supports a variety of use cases:
- Connecting to SageMaker training jobs with SSM - shell access only, open a shell to a single- or multi-node training job to examine its file systems, monitor resources, produce thread-dumps for stuck jobs, and interactively run your train script
- Forwarding TCP ports over SSH tunnel - intermediate layer for debugging and remote code execution, enables through SSH and port forwarding the access to remote apps like Dask, Streamlit or Jupyter Notebook
- sm-ssh - SageMaker SSH Helper CLI, introduced in v2.2
- ~/.ssh/config - to use
sshCLI command instead ofsm-ssh
- Remote code execution with PyCharm / VSCode over SSH - debugging and remote code execution, lets your IDE run or debug your code line-by-line inside SageMaker container with SSH interpreter, e.g. inside a SageMaker training job
- Remote debugging with PyCharm Debug Server over SSH - debugging and remote code execution, uses debug server, lets SageMaker run your code that connects to PyCharm with a callback, to start line-by-line debugging with PyDev.Debugger, a.k.a. pydevd
- Local IDE integration with SageMaker Studio over SSH for PyCharm / VSCode - debugging and remote code execution in SageMaker Studio, iterate fast on a single node at early stages of development without submitting SageMaker jobs
- Support of SageMaker Notebook Instances - see FAQ
- Web VNC - run virtually any IDE or GUI tool in a browser though AWS Jupyter Proxy extension and VNC remote desktop protocol
Pro Tip: While multiple use cases allow debugging and remote code execution, the typical development journey looks as follows: (1) you start developing and running code in the IDE on your local machine, then (2) you connect the IDE to SageMaker Studio with SageMaker SSH Helper to test and troubleshoot it on the remote instance, then (3) you integrate your code with SageMaker and run it as a training, processing or inference job, using SageMaker SSH Helper if needed, and finally (4) assemble jobs into MLOps pipelines with SageMaker Projects, to be deployed into multi-account structure on top of (5) the secure enterprise ML platform.
If you want to add a new use case or a feature, see CONTRIBUTING.
Note: This demo is recorded with a previous version of SSH Helper and may be not up-to-date with the recent features. Check the below documentation for the most up-to-date steps.
Before starting the whole procedure, check that both pip and python commands point to Python version 3.8 or higher with python --version command. Check all supported Python versions in the PyPI repo under "Programming Language" list.
Important: Make sure you read the "Getting started" section and didn't skip the steps from Setting up your AWS account with IAM and SSM configuration.
Install the latest stable version of library from the PyPI repository:
pip install sagemaker-ssh-helperCaution: It's always recommended to install the library into a Python venv, not into the system env.
- Add import for
SSHEstimatorWrapper - Add a
dependenciesparameter to theEstimatorobject constructor. Alternatively, instead ofdependenciesparameter, putsagemaker_ssh_helperintosource_dir/training/requirements.txt. - Add an
SSHEstimatorWrapper.create(estimator,...)call before callingfit(). - Add a call to
ssh_wrapper.print_ssh_info()orssh_wrapper.get_instance_ids()to get the SSM instance(s) id. You'll use this information to connect to the instance later on.
In a nutshell:
import logging
from sagemaker.pytorch import PyTorch
from sagemaker_ssh_helper.wrapper import SSHEstimatorWrapper  # <--NEW--

role = ...

estimator = PyTorch(
    entry_point='train.py',
    source_dir='source_dir/training/',
    dependencies=[SSHEstimatorWrapper.dependency_dir()],  # <--NEW--
    role=role,
    framework_version='1.9.1',
    py_version='py38',
    instance_count=1,
    instance_type='ml.m5.xlarge'
)

ssh_wrapper = SSHEstimatorWrapper.create(estimator, connection_wait_time_seconds=600)  # <--NEW--

estimator.fit(wait=False)

ssh_wrapper.print_ssh_info()  # <--NEW--
The connection_wait_time_seconds is the amount of time the SSH Helper will wait inside SageMaker before it continues the job execution. It's useful for training jobs, when you want to connect before training starts.
If you don't want the job to wait and start training as soon as the job starts, set it to 0.
As an example, here's the full working code from a unit test: test_end_to_end.py#L31-L56 . The method start_ssm_connection_and_continue(port_number) will connect to the instance through API, terminate the waiting loop and start training (useful for automation).
If you configured distributed training (i.e., instance_count is more than one), SSH Helper
will start by default only on the first two nodes (i.e., on algo-1 and algo-2).
If you want to connect with SSH to other nodes, you can log in to either of these nodes, e.g., algo-2,
and then SSH from this node to any other node of the training cluster, e.g., algo-4, without running SSH Helper
on these nodes, e.g., inside the pre-build SageMaker framework containers like PyTorch training container just run ssh algo-4 from the shell.
Alternatively, for distributed training, pass the additional parameter ssh_instance_count with the desired instance count
to SSHEstimatorWrapper.create(), e.g., SSHEstimatorWrapper.create(..., ssh_instance_count=3)
Note: if you a/ don't use script mode, b/ use basic Estimator class and c/ all code is already stored in your Docker container, check the code sample in the corresponding section of the FAQ.
Don't run the modified code yet, see the next step.
import sagemaker_ssh_helper
sagemaker_ssh_helper.setup_and_start_ssh()
The setup_and_start_ssh() will start an SSM Agent that will connect the training instance to AWS Systems Manager.
See the train.py from the corresponding unit test, as a full working code sample.
Once you launched the job, you'll need to wait, a few minutes, for the SageMaker container to start and the SSM Agent
to start successfully. Then you'll need to have the ID of the managed instance. The instance id is prefixed by mi-
and will appear in the job's CloudWatch log like this:
Successfully registered the instance with AWS SSM using Managed instance-id: mi-1234567890abcdef0
To fetch the instance IDs in an automated way without looking into the logs, you can call the Python method ssh_wrapper.get_instance_ids() or ssh_wrapper.print_ssh_info(), as mentioned in the step 1:
estimator = ...
ssh_wrapper = ...
estimator.fit(wait=False)
instance_ids = ssh_wrapper.get_instance_ids(timeout_in_sec=900)
The method get_instance_ids() accepts the optional parameter timeout_in_sec (default is 900, i.e., 15 minutes).
If timeout is not 0, it will retry attempts to get instance IDs every 10 seconds.
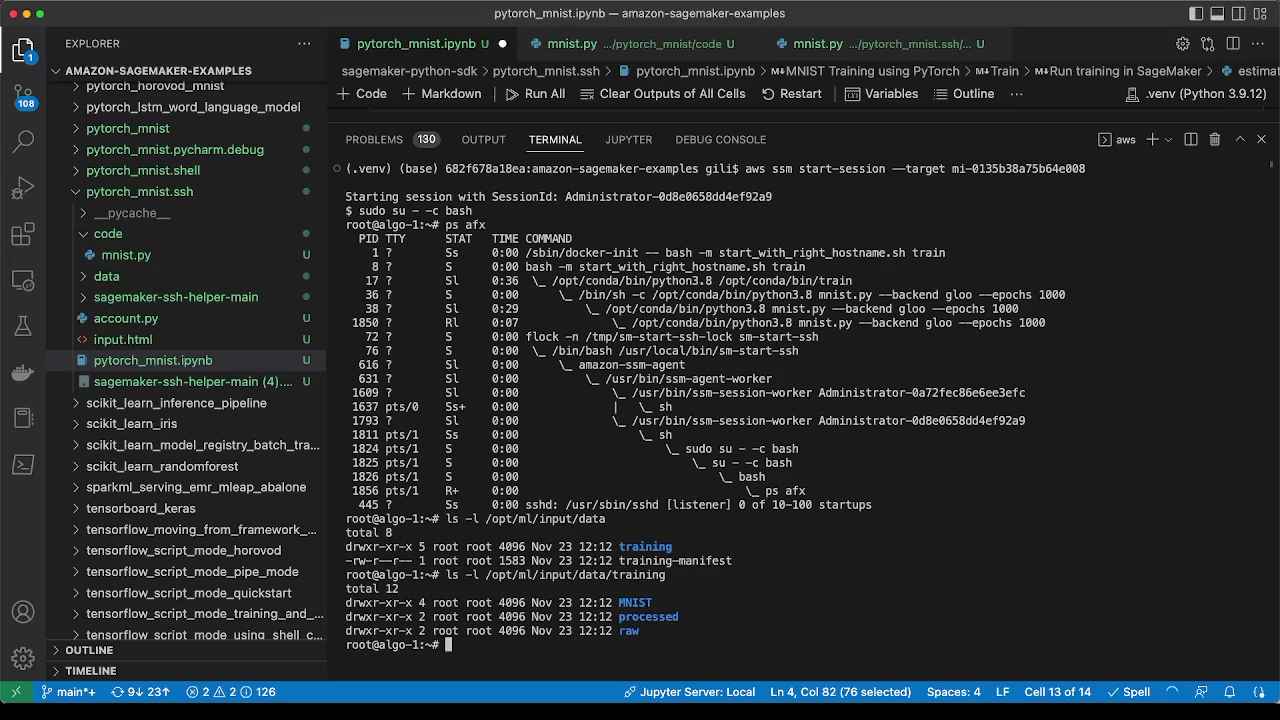
With the instance ID at hand, you will be able to connect to the training container using the command line or the AWS web console.
Method A. Connecting using command line:
- On the local machine, make sure that you installed the latest AWS CLI v2 and the AWS Session Manager CLI plugin. Run the following command to perform the installation:
sm-local-configure- Run this command (replace the target value with the instance id for your SageMaker job). Example:
aws ssm start-session --target mi-1234567890abcdef0Note: Recently SageMaker has introduced the native way to connect to training jobs with SSM.
Method B. Connecting using the AWS Web Console:
- In AWS Web Console, navigate to Systems Manager > Fleet Manager.
- Select the node, then Node actions > Start terminal session.
Once connected to the container, you might want to switch to the root user with sudo su - command.
Method C. Connecting with SSH and port forwarding:
This method uses sm-ssh connect command and described in more details in the section sm-ssh.
Method D. Connecting from SageMaker Studio
See the corresponding step Connecting from SageMaker Studio in IAM / SSM configuration section. Follow the same steps as in the Method A for the local machine, but run them inside SageMaker Studio. If you run the commands from SageMaker Studio image terminal, make sure that your Python environment is activated, e.g., with conda activate base.
Here are some useful commands to run in a terminal session:
ps xfaww- Show running tree of processesps xfawwe- Show running tree of processes with environment variablesls -l /opt/ml/input/data- Show input channelsls -l /opt/ml/code- Show your training codepip freeze | less- Show all Python packages installeddpkg -l | less- Show all system packages installed
In case your training job is stuck, it can be useful to observe what where its threads are waiting/busy. This can be done without connecting to a python debugger beforehand.
- Having connected to the container as root, find the process id (pid) of the training process (assuming it's named
train.py):pgrep --newest -f train.py - Install GNU debugger:
apt-get -y install gdb python3.9-dbg - Start the GNU debugger with python support:
gdb python
source /usr/share/gdb/auto-load/usr/bin/python3.9-dbg-gdb.py - Connect to the process (replace 361 with your pid):
attach 361 - Show C low-level thread dump:
info threads - Show Python high-level thread dump:
py-bt - It might also be useful to observe what system calls the process is making:
apt-get install strace - Trace the process (replace 361 with your pid):
sudo strace -p 361
If you're looking for the full automation of the pipeline with SSM and SSH, and not only with get_instance_ids() method, take a look at the automation question in the FAQ.
Note: Recently SageMaker has introduced the native way to connect to endpoints with SSM, but it requires allow-listing of an AWS account (as of writing).
Adding SageMaker SSH Helper to inference endpoint is similar to training with the following differences.
- Wrap your model into
SSHModelWrapperbefore callingdeploy()and add SSH Helper todependencies:
from sagemaker import Predictor
from sagemaker_ssh_helper.wrapper import SSHModelWrapper  # <--NEW--

estimator = ...
...
endpoint_name = ...

model = estimator.create_model(
    entry_point='inference_ssh.py',
    source_dir='source_dir/inference/',
    dependencies=[SSHModelWrapper.dependency_dir()]  # <--NEW
    # (alternatively, add sagemaker_ssh_helper into requirements.txt
    # inside source dir) --
)

ssh_wrapper = SSHModelWrapper.create(model, connection_wait_time_seconds=0)  # <--NEW--

predictor: Predictor = model.deploy(
    initial_instance_count=1,
    instance_type='ml.m5.xlarge',
    endpoint_name=endpoint_name,
    wait=True
)

predicted_value = predictor.predict(data=...)
Note: For the inference endpoint, which is always up and running, there's not too much value
in setting connection_wait_time_seconds, so it's usually set to 0.
Similar to training jobs, you can fetch the instance ids for connecting to the endpoint with SSM with
ssh_wrapper.get_instance_ids() or ssh_wrapper.print_ssh_info().
- Add the following lines at the top of your
inference_ssh.pyscript:
import os
import sys
sys.path.append(os.path.join(os.path.dirname(__file__), "lib"))

import sagemaker_ssh_helper
sagemaker_ssh_helper.setup_and_start_ssh()
Note: adding lib dir to Python path is required, because SageMaker inference is putting dependencies
into the code/lib directory, while SageMaker training put libs directly to code.
On the following screenshot you see the sample code for the notebook Deploy SD2.1 to Inferentia2 + SageMaker + HF Optimum Neuron + SageMaker SSH Helper that has the inference code running in SageMaker endpoint on AWS Inferentia accelerator chip.
The user has connected to the endpoint with the sm-ssh connect command and executed the neuron-ls command to list the currently utilized Inferentia cores:

You can also notice on the screenshot that the user configured the remote Python interpreter that connects to SageMaker Studio, so the user also executes the notebook itself remotely inside SageMaker. This setup is further described in the section for Local IDE Integration with SageMaker Studio.
For multi-model endpoints, the setup procedure is slightly different from regular endpoints:
from sagemaker.multidatamodel import MultiDataModel
from sagemaker_ssh_helper.wrapper import SSHModelWrapper, SSHMultiModelWrapper  # <--NEW--

model_data_prefix = "s3://DOC-EXAMPLE-BUCKET/mms/"
model_name = ...
endpoint_name = ...
estimator = ...
...

model = estimator.create_model(entry_point='inference_ssh.py',
                               source_dir='source_dir/inference/',
                               dependencies=[SSHModelWrapper.dependency_dir()])  # <--NEW--

mdm = MultiDataModel(
    name=model.name,
    model_data_prefix=model_data_prefix,
    model=model
)

ssh_wrapper = SSHMultiModelWrapper.create(mdm, connection_wait_time_seconds=0)  # <--NEW--

predictor = mdm.deploy(initial_instance_count=1,
                       instance_type='ml.m5.xlarge',
                       endpoint_name=endpoint_name)


mdm.add_model(model_data_source=model.repacked_model_data, model_data_path=model_name)

predicted_value = predictor.predict(data=..., target_model=model_name)
Important: Make sure that you're passing to add_model() the model ready for deployment with dependencies located at model.repacked_model_data,
not the estimator.model_data that points to the trained model artifact. To obtain model suitable for inference, you might want to deploy first your model to a temporary single-node endpoint, so that SageMaker Python SDK takes care of repacking the model, or call the prepare_container_def() method, like in the MMS test code.
Also note that SageMaker SSH Helper will be lazy loaded together with your model upon the first prediction request.
So you should try to connect to the multi-model endpoint only after calling predict().
The inference.py script is the same as for regular endpoints.
Note: If you are using PyTorch containers, make sure you select the latest versions, e.g. 1.12, 1.11, 1.10 (1.10.2), 1.9 (1.9.1). This code might not work if you use PyTorch 1.8, 1.7 or 1.6.
Note: If you're packing your models manually and don't pass the model object to the MultiDataModel constructor, i.e., pass only the image_uri, see corresponding sample code in the FAQ.md.
For batch transform jobs, you need to use both SSHModelWrapper and SSHTransformerWrapper,
as in the following example:
from sagemaker_ssh_helper.wrapper import SSHModelWrapper, SSHTransformerWrapper  # <--NEW--

sagemaker_session = ...
bucket = ...
estimator = ...
...

model = estimator.create_model(entry_point='inference_ssh.py',
                               source_dir='source_dir/inference/',
                               dependencies=[SSHModelWrapper.dependency_dir()])  # <--NEW--

transformer_input = sagemaker_session.upload_data(path='data/batch_transform/input',
                                                  bucket=bucket,
                                                  key_prefix='batch-transform/input')

transformer_output = f"s3://{bucket}/batch-transform/output"

ssh_model_wrapper = SSHModelWrapper.create(model, connection_wait_time_seconds=600)  # <--NEW--

transformer = model.transformer(instance_count=1,
                                instance_type="ml.m5.xlarge",
                                accept='text/csv',
                                strategy='SingleRecord',
                                assemble_with='Line',
                                output_path=transformer_output)

ssh_transformer_wrapper = SSHTransformerWrapper.create(transformer, ssh_model_wrapper)  # <--NEW--

transformer.transform(data=transformer_input,
                      content_type='text/csv',
                      split_type='Line',
                      join_source="Input",
                      wait=False)
The inference.py script is the same as for regular endpoints.
SageMaker SSH Helper supports both Script Processors and Framework processors and setup procedure is similar to training jobs and inference endpoints.
The code to set up a framework processor (e.g. PyTorch) is the following:
from sagemaker.pytorch import PyTorchProcessor
from sagemaker_ssh_helper.wrapper import SSHProcessorWrapper  # <--NEW--

role = ...

torch_processor = PyTorchProcessor(
    base_job_name='ssh-pytorch-processing',
    framework_version='1.9.1',
    py_version='py38',
    role=role,
    instance_count=1,
    instance_type="ml.m5.xlarge"
)

ssh_wrapper = SSHProcessorWrapper.create(torch_processor, connection_wait_time_seconds=600)  # <--NEW--

torch_processor.run(
    source_dir="source_dir/processing/",
    dependencies=[SSHProcessorWrapper.dependency_dir()],  # <--NEW--
    code="process_framework.py"
)
Also add the following lines at the top of process_framework.py:
import sagemaker_ssh_helper
sagemaker_ssh_helper.setup_and_start_ssh()The code to set up a script processor (e.g. PySpark) is the following:
from sagemaker.spark import PySparkProcessor
from sagemaker_ssh_helper.wrapper import SSHProcessorWrapper  # <--NEW--

role = ...

spark_processor = PySparkProcessor(
    base_job_name='ssh-spark-processing',
    framework_version="3.0",
    role=role,
    instance_count=1,
    instance_type="ml.m5.xlarge"
)

ssh_wrapper = SSHProcessorWrapper.create(spark_processor, connection_wait_time_seconds=600)  # <--NEW--

spark_processor.run(
    submit_app="source_dir/processing/process.py",
    inputs=[ssh_wrapper.augmented_input()]  # <--NEW--
)
Also add the following lines at the top of process.py:
import sys
sys.path.append("/opt/ml/processing/input/")

import sagemaker_ssh_helper
sagemaker_ssh_helper.setup_and_start_ssh()Previous sections focused on connecting to non-interactive SageMaker containers with SSM.
Next sections rely on the Session Manager capability to create an SSH tunnel over SSM connection. SageMaker SSH Helper in turn runs SSH session over SSH tunnel and forwards the ports, including the SSH server port 22 itself.
The helper script behind this logic is sm-local-start-ssh:
sm-local-start-ssh "$INSTANCE_ID" \
  -R localhost:12345:localhost:12345 \
  -L localhost:8787:localhost:8787 \
  -L localhost:11022:localhost:22
You can pass -L parameters for forwarding remote container port to local machine (e.g., 8787 for Dask dashboard or 8501 for Streamlit apps) or -R for forwarding local port to remote container. Read more about these options in the SSH manual.
This low-level script takes the managed instance ID as a parameter. Next sections use the high-level command sm-ssh that take the SageMaker resource name as a parameter and resolves it into the instance ID automatically.
The syntax for the SSH Helper CLI command sm-ssh is the following:
sm-ssh [-h] [-v] {list,start-proxy,connect} [fqdn]where fqdn is the resource name with .sagemaker suffix, respectively:
- for model training,
.training.sagemaker - for inference endpoints, i.e., real-time inference,
.inference.sagemaker - for transform jobs, i.e., batch inference,
.transform.sagemaker - for processing jobs, i.e. transforms without a trained model,
.processing.sagemaker - for SageMaker Studio Classic,
.studio.sagemaker- see Local IDE integration with SageMaker Studio over SSH for more details on FQDN format - for SageMaker Notebook instances,
.notebook.sagemaker
For list command, the resource name and the dot . in the suffix can be omitted, i.e.:
sm-ssh list studio.sagemaker– will list all running jupyter servers and kernel gateways and their SSH status, and
sm-ssh list
or
sm-ssh list sagemaker
– will list all resources of all types.
The instances with SSH Helper will be marked Online while other instances will be marked with -.
The connect command starts interactive SSH session into container, e.g.:
sm-ssh connect ssh-training-example-2023-07-25-03-18-04-490.training.sagemakerAlternatively, instead of using sm-ssh connect command, you can use the native ssh command, but it will require you to update your ssh config, typically ~/.ssh/config, with sm-ssh start-proxy command as follows:
Host *.*.sagemaker
  IdentityFile ~/.ssh/%h
  PasswordAuthentication no
  ConnectTimeout 90
  ServerAliveInterval 15
  ServerAliveCountMax 4
  ProxyCommand sm-ssh start-proxy %h
  User root
You can copy the same fragment from the ssh_config_template.txt file.
The sm-ssh start-proxy command will set up the non-interactive SSH session that will serve as a proxy tunnel for SSH command.
As a benefit, you will be able to add additional SSH options like forwarding SSH agent connection with -A option, to securely pass your local SSH keys to remote machine, or forward ports with -R and -L options, akin to passing these options to sm-local-start-ssh command.
An example with SSH Agent and forwarding the web server port 8080:
ssh-add
ssh -A -L localhost:8080:localhost:8080 \
  ssh-training-example-2023-07-25-03-18-04-490.training.sagemaker
As a drawback, you won't get a comprehensive logging since the output of sm-ssh will be suspended by ssh. In case you have connection issues with native ssh, try the sm-ssh command instead and check the output.
Follow the steps in the next section for the IDE configuration, to prepare the sm-ssh for the use on the local machine.
- On the local machine, make sure that you installed the latest AWS CLI v2 and the AWS Session Manager CLI plugin. To do so, perform the automated installation with the sm-local-configure script:
sm-local-configureCaution: If you plan to use sm-ssh tool from the IDE, which you run inside your system Python env, you should install SSH Helper into your system Python env, too.
- Submit your code to SageMaker with SSH Helper as described in previous sections, e.g. as a training job.
Make sure you allow enough time for manually setting up the connection (do not set connection_wait_time_seconds to 0, recommended minimum value is 600, i.e. 10 minutes). Don't worry to set it to higher values, e.g. to 30 min, because you will be able to terminate the waiting loop once you connected.
Instead of using SSM to connect to the container from command line, proceed to the next step for configuring the IDE.
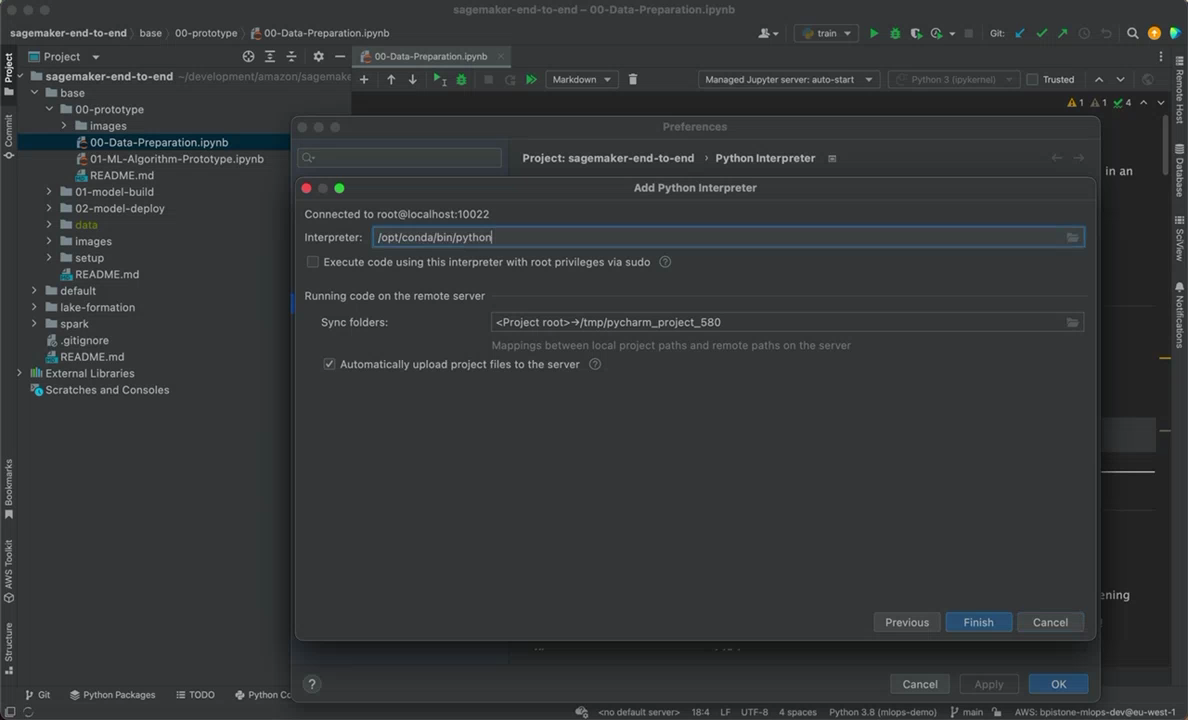
- Configure the remote interpreter in your IDE
Make sure you've configured your ssh config as mentioned in the ~/.ssh/config section and your IDE can access sm-ssh command from the system env.
A. Follow the instructions in the PyCharm docs, to configure the remote interpreter in PyCharm.
In the field for host name, put the same value as for fqdn in the sm-ssh command, e.g., ssh-training-manual-2023-10-02-14-38-56-744.training.sagemaker, and use root as the username.

When PyCharm asks for the SSH key, point to the ~/.ssh/<fqdn> private key file that was automatically generated for you by SSH Helper:

Note: If PyCharm says connection refused, it can be due to timeout. Check that you can connect to this host from your system terminal with ssh and sm-ssh and try configuring the remote interpreter again.
Tip: When you configure Python interpreter in PyCharm, it's recommended to configure the deployment path mapping for you project to point into /root/project_name instead of default /tmp/pycharm_project_123. This is how you will be able to see your project in SageMaker Studio and PyCharm will automatically sync your local dir to the remote dir.
Tip: Also instead of creating a new venv, point the Python interpreter to the existing location.
You can find this location by running a cell with import sys; sys.executable command in a SageMaker Studio notebook. You will get something like /opt/conda/bin/python.
Tip: Now you also can upload and download files from remote and synchronize files with remote.
B. Follow the instructions for VSCode, to configure local Visual Studio Code app
Put the root@fqdn as the hostname to connect to, e.g., root@ssh-training-example-2023-07-25-03-18-04-490.training.sagemaker .

NOTE: The Remote SSH extension described in the above instructions is only for the Visual Studio Code native app. Code Editor in SageMaker Studio and web apps based on Code Server that use extensions from Open VSX Registry might look and work differently. SageMaker SSH Helper DOES NOT support browser-based implementations and haven't been tested with any of Open VSX extensions. If you prefer to use the browser for development, take a look at the Web VNC option.
- Connect to the instance and stop the waiting loop
When you set connection_wait_time_seconds to non-zero value, SSH Helper will run a waiting loop inside your training script, until waiting time is passed, or you manually terminate the loop.
To manually terminate the loop, run the sm-wait stop command from the container (under root):
ssh root@ssh-training-example-2023-07-25-03-18-04-490.training.sagemaker \
  sm-wait stop
Note, that if you stop the waiting loop, SageMaker will run your training script only once, and you will be able to execute additional code from local machine from PyCharm only while your script is running. Once the script finishes, you will need to submit another training job and repeat the procedure again.
Here's a useful trick: submit a dummy script train_placeholder.py with the infinite loop, and while this loop will be running, you can rerun your real training script again and again with the remote interpreter inside the same job.
The workflow in this case is roughly the following:
a. You submit a first job with your training script train.py, and it fails for some reason that you want to troubleshoot.
b. You submit a second job with the placeholder script train_placeholder.py. You run your training script inside this job and change it few times until you find the cause of the problem and fix it. Setting max_run parameter of the estimator is highly recommended for the placeholder job, to avoid unnecessary charges.
c. You submit a third job with your fixed training script train.py to make sure it works now.
The dummy script may look like this:
import time
from datetime import timedelta

from sagemaker_ssh_helper import setup_and_start_ssh, is_last_session_timeout

setup_and_start_ssh()

while not is_last_session_timeout(timedelta(minutes=30)):
    time.sleep(10)
The method is_last_session_timeout() will help to prevent unused resources and the job will end if there's no SSM or SSH sessions for the specified period of time. It will count active SSM sessions, and time out when there are no sessions left.
Caution: Keep in mind that SSM sessions will terminate automatically due to user inactivity, but SSH sessions will keep running until either a user terminates them manually or network timeout occurs, i.e., the user closes the laptop lid, disconnects from Wi-Fi, etc. If the user leaves the local machine unattended and connected to Internet, SSM sessions started by aws ssm start-session command will time out, but SSH-over-SSM sessions started with sm-ssh connect will stay open. Consider sending e-mail notifications for users of the long-running jobs, so the users don't forget to shut down unused resources. See the related question in FAQ for more details and train_placeholder.py that implements the similar logic.
Pro Tip: Make sure that you're aware of SageMaker Managed Warm Pools feature, which is also helpful in the scenario when you need to rerun your code remotely multiple times.
Pro Tip: You can debug your code line by line in this scenario. See the tutorial in PyCharm documentation.
- Run and debug your code
Now when you have your training script or a placeholder script running, you can run additional code on the remote host, debug it line by line and set breakpoints.
If you want to change the control flow and let your training script call back the IDE for debugging, follow the next section on configuring the Debug Server.
Pro Tip: The curious reader should also read the AWS blog post Run your TensorFlow job on Amazon SageMaker with a PyCharm IDE. In contrast to the scenario with SageMaker SSH Helper, the blog instructions show how to use SageMaker local mode. As with Managed Warm Pools, SageMaker local mode helps to test your code faster, but it consumes local resources and doesn't provide the line by line debugging capability (as of writing).
There's another way to debug your code that is specific to the PyCharm Professional feature: Remote debugging with the Python remote debug server configuration. The procedure assumes that you're running a training job, but the same steps apply to inference or data processing, too.
-
In PyCharm, go to the Run/Debug Configurations (Run -> Edit Configurations...), add a new Python Debug Server. Choose the fixed port, e. g.
12345. -
Take the correct version of
pydevd-pycharmpackage from the configuration window and install it either throughrequirements.txtor by callingpipfrom your source code. -
Add commands to connect to the Debug Server to your code after the
setup_and_start_ssh(), e.g., into a training script that you submit as an entry point for a training job:
import sagemaker_ssh_helper
sagemaker_ssh_helper.setup_and_start_ssh()

...

import pydevd_pycharm
pydevd_pycharm.settrace('localhost', port=12345, stdoutToServer=True, stderrToServer=True, suspend=True)Tip: Check the settrace() argument's description in the library source code.
-
Set breakpoints in your code with PyCharm, as needed
-
Start the Debug Server in PyCharm
-
Submit your code to SageMaker with SSH Helper as described in previous sections.
-
On your local machine, once the SSH helper connects to SSM and starts waiting inside the training job, connect to the host with SSH and start the port forwarding for the Debug Server:
ssh -R localhost:12345:localhost:12345 \
  root@ssh-training-example-2023-07-25-03-18-04-490.training.sagemaker
It will reverse-forward the remote debugger port 12345 to your local machine's Debug Server port.
- Stop the waiting loop
As already mentioned, make sure you've configured connection_wait_time_seconds to give yourself time to start the port forwarding before execution of the training script continues, and before it tries to connect to the debug server at port 12345.
Inside the SSH session, run:
sm-wait stop
- After you stop the waiting loop, your code will continue running and will connect to your PyCharm Debug Server.
If everything is set up correctly, PyCharm will stop at your breakpoint, highlight the line and wait for your input. Debug Server window will say “connected”. You can now press, for example, F8 to "Step Over" the code line or F7 to "Step Into" the code line.
Note: This demo is recorded with a previous version of SSH Helper and may be not up-to-date with the recent features. Check the documentation for the most up-to-date steps.
For your local IDE integration with SageMaker Studio, follow the same steps as for configuring the IDE for Remote code execution, but instead of submitting the training / processing / inference code to SageMaker with Python SDK, execute the Jupyter notebook, as described in the next steps.
- Copy SageMaker_SSH_IDE.ipynb into SageMaker Studio and run it.
Alternatively, attach to a domain the KernelGateway lifecycle config script kernel-lc-config.sh (you may need to ask your administrator to do this). Once configured, from the Launcher choose the environment, pick up the lifecycle script and choose 'Open image terminal' (so, you don't even need to create a notebook).
You might want to change the LOCAL_USER_ID variable upon the first run, to prevent users from impersonating each other. For more details see the FAQ on How SageMaker SSH Helper protects users from impersonating each other?.
Note that the
mainbranch of this repo can contain changes that are not compatible with the version ofsagemaker-ssh-helperthat you installed from pip. To ensure the stable performance, check the version withpip freeze | grep sagemaker-ssh-helperand take the notebook and the lifecycle script from the corresponding tag.
- Configure remote interpreter in PyCharm / VS Code to connect to SageMaker Studio
Use app_name.user_profile_name.domain_id.studio.sagemaker or app_name.studio.sagemaker as the fqdn to connect.
To see available apps to connect to, you may run the list command:
sm-ssh list studio.sagemaker
- Using the remote Jupyter Notebook
In recent versions of PyCharm, Jupyter Notebook is tunnelled automatically through remote interpreter connection. You might need to add --allow-root argument to the command line, when your remote interpreter runs under root:

If you wish to connect to the existing notebook server started by SSH Helper or don't use PyCharm, proceed with the next configuration steps.
To make the remote Jupyter Server port 8889 forwarded to the local machine, use SSH:
ssh -L localhost:8889:localhost:8889 \
  root@ssh-ds2.jane-doe.d-egm0dexample.studio.sagemaker
Now you can also connect to a remote Jupyter Server started by SSH Helper inside SageMaker Studio as http://127.0.0.1:8889/?token=<<your_token>>.
You will find the full URL with remote token in the SageMaker_SSH_IDE.ipynb notebook in the output after running the cell with sm-ssh-ide start command. If you use lifecycle configuration, run tail /tmp/jupyter-notebook.log from the image terminal to find the Jupyter Server URL.
- Instructions for remote Jupyter notebooks in PyCharm
- Instructions for remote Jupyter notebooks in VSCode (don't forget to switch kernel to remote after configuring the remote server).
- Connecting to VNC
To make the remote VNC port 5901 forwarded to the local machine, use SSH:
ssh -L localhost:5901:localhost:5901 \
  -R localhost:443:jetbrains-license-server.example.com:443 \
  root@ssh-ds2.jane-doe.d-egm0dexample.studio.sagemaker
Note (PyCharm): The optional -R option will connect the remote port 443 to your local PyCharm license server address. Replace jetbrains-license-server.example.com with your server name and edit your /etc/hosts inside VNC to make this host point to 127.0.0.1 (should be done automatically if you didn't skip the sm-ssh-ide set-jb-license-server in the notebook).
Now you can start the VNC session to vnc://localhost:5901 (e.g. on macOS with Screen Sharing app) and run IDE or any other GUI app on the remote desktop instead of your local machine.
For example, you can run inside VNC the jupyter qtconsole command to start the Jupyter QT app as the alternative to Jupyter web UI:

- If you want to switch to another kernel or instance, feel free to do so from SageMaker Studio UI and re-run SageMaker_SSH_IDE.ipynb.
Keep in mind that in this case the previous kernel will stop and SSM Agent will stop, too.
To allow multiple kernel and instances to be up and running with SageMaker SSH Helper and SSM Agent,
duplicate the notebook and give it a different name, e.g. SageMaker_SSH_IDE-PyTorch.ipynb.
In this case you'll be able to keep two environments in parallel.
If you're using lifecycle configuration script, just start another image terminal with different environment settings from Launcher.
- Don't forget to shut down SageMaker Studio resources, if you don't need them anymore, e.g., launched notebooks, terminals, apps and instances.
At times, you cannot install all the software on your local machine, also because this is the software processes data, and you cannot copy massive amount of the data to your local machine.
You might have thought about AWS Jupyter Proxy, but some web apps like Dask may not fully work through the proxy, so VNC is the recommended alternative.
By combining the noVNC tool with AWS Jupyter Proxy extension you can run virtually any IDE like PyCharm, VSCode, PyDev, or any tool like Blender (to work with 3D data), OpenShot (to work with audio-video data), etc., as well as other webapps from a SageMaker Studio web UI, without installing all of them to your local machine.
It's also helpful in situations when you cannot run SSH client on your local machine to forward ports for web tools, like Dask dashboard. In this case, you run a tool in the remote browser running through the web VNC (browser-in-a-browser), like on the below screenshot. You might notice that PyCharm and VSCode are also running in the background:

To achieve this result, your Administrator should configure your SageMaker IAM role with both SSHSageMakerServerPolicy and SSHSageMakerClientPolicy. Configuration of IAM credentials for the local machine is not required in this case. See the Step 4 in IAM_SSM_Setup.md for more details.
Then follow these steps:
- On the SageMaker Studio System terminal run the commands from server-lc-config.sh.
Alternatively, ask the Administrator to attach the lifecycle config to the SageMaker Studio domain or to your profile as the default JupyterServer config, e.g., with the name sagemaker-ssh-helper-webvnc.
- Follow the step 1 for the IDE configuration procedure, i.e., run the IDE notebook or lifecycle config inside the kernel gateway of your choice.
Instead of your local user ID put the SageMaker Studio user ID (you can get it by running aws sts get-caller-identity from a SageMaker Studio terminal).
- On the System (!) terminal (not image terminal), run:
sm-ssh connect app_name.user_profile_name.domain_id.studio.sagemakerAlternatively, use SSH command to forward the VNC port and add more ports to the command, e.g., -L localhost:8787:localhost:8787 to forward the Dask dashboard that is running inside the kernel gateway:
ssh -L localhost:5901:localhost:5901 \
  -L localhost:8787:localhost:8787 \
app_name.user_profile_name.domain_id.studio.sagemaker- Navigate to
https://d-egm0dexample.studio.eu-west-1.sagemaker.aws/jupyter/default/proxy/6080/vnc.html?host=d-egm0dexample.studio.eu-west-1.sagemaker.aws&port=443&path=jupyter/default/proxy/6080/websockify
Replace both occurrences of d-egm0dexample with your SageMaker Studio domain ID, and eu-west-1 with your AWS Region.
You will see the noVNC welcome screen.
- Press "Connect" and enter your password (default is
123456).
Congratulations! You now have successfully logged into the remote desktop environment running inside a SageMaker Studio kernel gateway.
Some data handling application to try inside the VNC desktop, which you cannot run as a web app otherwise, are:
- 3D Slicer - image computing platform for medical, biomedical, and other 3D images and meshes
- OpenShot - to work with video data
- LibreOffice - work with documents and spreadsheets
Tip: If you have issues with copy-pasting through system clipboard, use the temp file, e.g. clip.txt, and open it in VNC session and SageMaker Studio file browser at the same time.
Pro Tip: To set the resolution that matches your browser window size, make a page screenshot (in Firefox - right-click on an empty area -> Take Screenshot -> Save visible), then inspect the resolution of the image, e.g. 1920x970. Then add and switch resolution inside the VNC session:
$ cvt 1920 970 60
# 1920x970 59.93 Hz (CVT) hsync: 60.35 kHz; pclk: 154.50 MHz
Modeline "1920x970_60.00"  154.50  1920 2040 2240 2560  970 973 983 1007 -hsync +vsync
$ xrandr --newmode "1920x970_60.00"  154.50  1920 2040 2240 2560  970 973 983 1007 -hsync +vsync
$ xrandr --addmode VNC-0 1920x970_60.00
$ xrandr -s 1920x970_60.00If something doesn't work as expected, make sure you looked at our FAQ, especially at the troubleshooting section, as well as at the existing both open and resolved issues.