Evidence
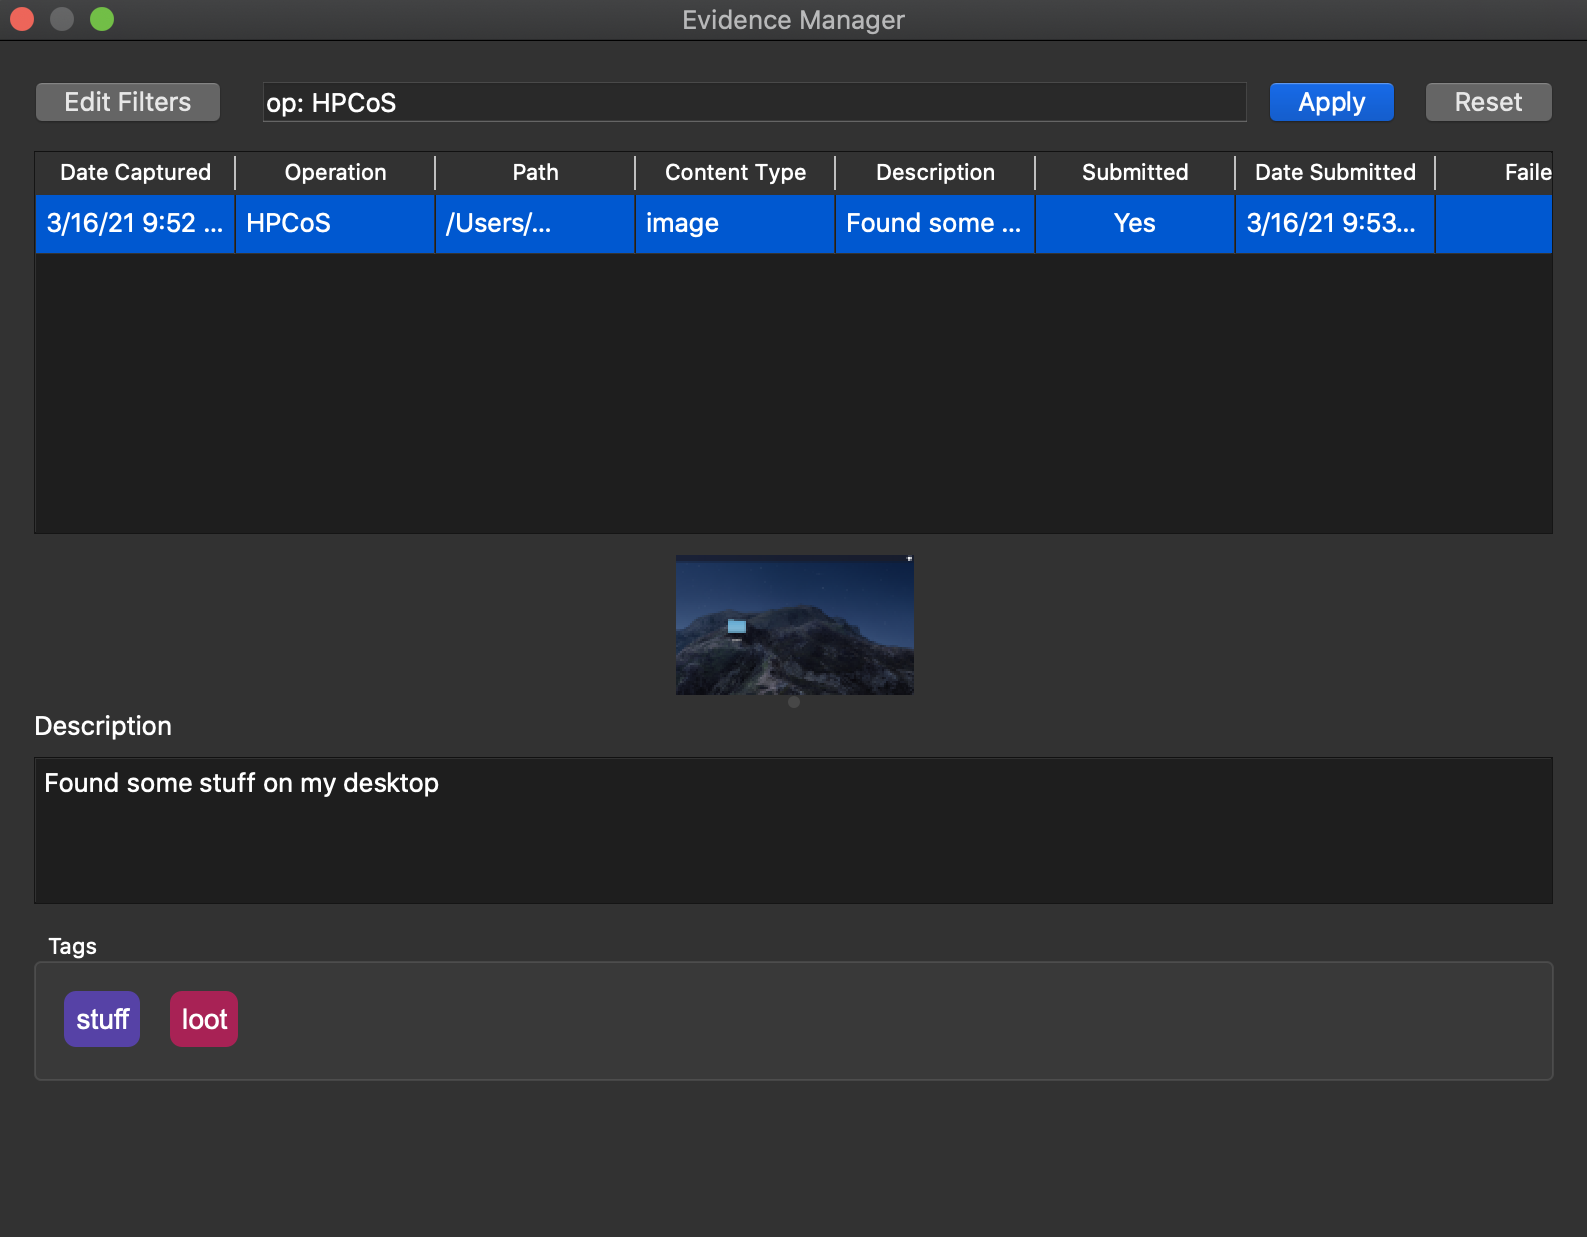
Previous evidence can be reviewed by navigating to View Accumulated Evidence, which will present a screen showing evidence for the current operation. Selecting a row in the evidence list will show:
- A preview of the evidence (Images can be scaled by changing the window size, or my shrinking the description box -- mouse over the divider separating the description from the image)
- The description of the evidence
- Any (active) tags associated with the evidence.
From here you can submit the evidence, if not already submitted. Or, you may delete the file (even if previously submitted -- doing so will remove the file locally, but keep the website copy)
Filtering can be done by specifying items in key:value format. Multiple filters can be added by adding a space between each filter. Keys and values are case insensitive.
| Action | Key | Values | Alias(es) | Notes |
|---|---|---|---|---|
| Show submit errors | err |
t/f, or y/n
|
error, fail, failed
|
Also works with true/false yes/no
|
| Show evidence for operations | op |
operation slug | operation |
Pre-populated with current operation, when reset button is pressed |
| Show evidence taken before a given date | before |
today, yesterday or date in yyyy-MM-dd format, |
to, til, until
|
Starts at midnight of the given day |
| Show evidence taken after a given date | after |
today, yesterday or date in yyyy-MM-dd format, |
from |
Start just before midnight of the next given day |
| Show evidence taken on a given date | on |
today, yesterday or date in yyyy-MM-dd format, |
-- | |
| Show evidence that has not been submitted | submitted |
t/f, or y/n
|
-- | Also works with true/false, yes/no
|
When trying to apply both a "before" date and "after" date filter, the system will adjust the times so that the "before" date is always after the "after" date. Meaning, the timespan must be inclusive. For example, a range of "before March" and "after May" (excluding March and April) is not valid, and will be revised to "After March, Before May"
When applying only one date, the range is unbounded on the other end. That is, dates are implicitly "from the start of time" to "until the end of time"
All data collected from the ashirt application can be exported, and then re-imported, into a new ashirt instance. Doing so creates a copy on the new system, and the user can pick up where they left off. It is currently recommended that this be used only for moving (rather than copying) data from one computer to the other, when the latter will replace the former. For sharing content, it is recommended that the Web UI be used instead.
To begin an export, open the tray menu, and select Edit > Export. This will open a window where the user can choose a destination, and opt to export only configuration details (specifically, the server connection details), only the accumulated evidence, or both. Finally, press the "Export" button. This will kick off a process that gathers this data, and starts moving it into a central directory for easy migration.
To import content, open the tray and select Edit > Import. This will open a similar dialog to export, but for importing content. Navigate to the export directory, and select the system.json file, and then press the "Import" button. This will kick off a process to bring the exported data into the new system.
Once an import or export has been started, you can close the window. A tray message will display once the action completes. To get progress updates, you can simply reopen the import/export menu. Progress will update once the total number of files is known, and for each file copied.
You should never need to access these files outside of the application, however, for clarity, the following files are generate and maintained by this application:
| File type | Path | Notes |
|---|---|---|
| Screenshots | $eviRepo/$operationSlug/ashirt_screenshot_$randomCharacters.png |
Presently, random (english) characters tacked on to the end of a screenshot, to add uniqueness and prevent overwriting |
| Codeblocks | $eviRepo/$operationSlug/ashirt_codeblock_$randomCharacters.json |
Presently, random (english) characters tacked on to the end of the codeblock filename, to add uniqueness and prevent overwriting |
| Configuration | $userDataDirectory/ashirt/config.json |
Manages connection info / configuration in "settings" menu |
| Local Database | $userDataDirectory/ashirt/evidence.sqlite |
|
| Settings | $userDataDirectory/Unknown Organization/ashirt.conf |
Manages state info -- e.g. last used operation ; Managed by Qt |
The above paths reference some variables. Some of these values change depending on what operating system is being used (or in how it is configured). The exact paths are unknown, but this may help you find these files:
| Path Variable | Notes |
|---|---|
$userDataDirectory |
Where user-specific data files are stored. |
| [For Linux] | On the command line, run echo $XDG_CONFIG_HOME (by default, this is typically the ~/.config directory) |
| [For Mac OSX] | Check /Users/(username)/Application Support/
|
| [For windows] | Check C:\Users\(username)\AppData\Local\
|
$eviRepo |
The Evidence Repository value in the "settings" window |
$operationSlug |
The operation slug for a given operation. This is a unique representation of an operation name |
$randomCharacters |
Six random english characters, case-insensitive (for those operating systems that support this). e.g. fTaNpS
|