This document mainly introduces 2 parts.
The first part is the introduction of VA source code structure, this part is to allow developers to quickly understand to master the VA source code framework.
The second part is a description of VA's basic SDK. For more development documents, see: VA Private Library Wiki.
For more development documents, see:VA Private Library Wiki
VA Product Description:Document
The following is the first part, the introduction of the VA source code structure:
The following figure is the root of the VA source code:
You can see that VA has a total of four source code directories, and each directory is described as follows:
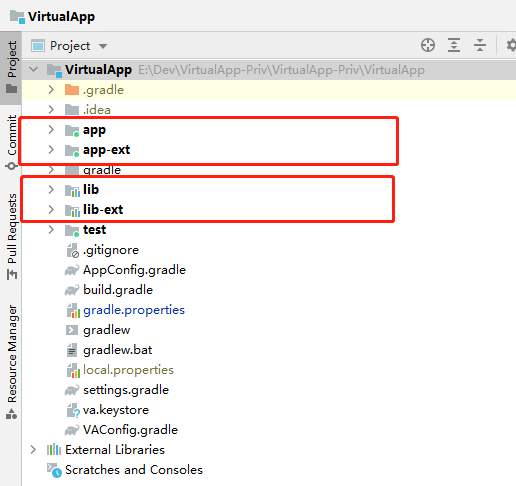
| Directory Name | Function |
|---|---|
| app | The directory where the VA Demo master package source code is located |
| app-ext | The directory where the source code of VA Demo plug-in package is located |
| lib | The directory where the VA library source code is located |
| lib-ext | The directory where the source code of VA Plugin Library is located |
VA compilation configuration profile isVAConfig.gradle:
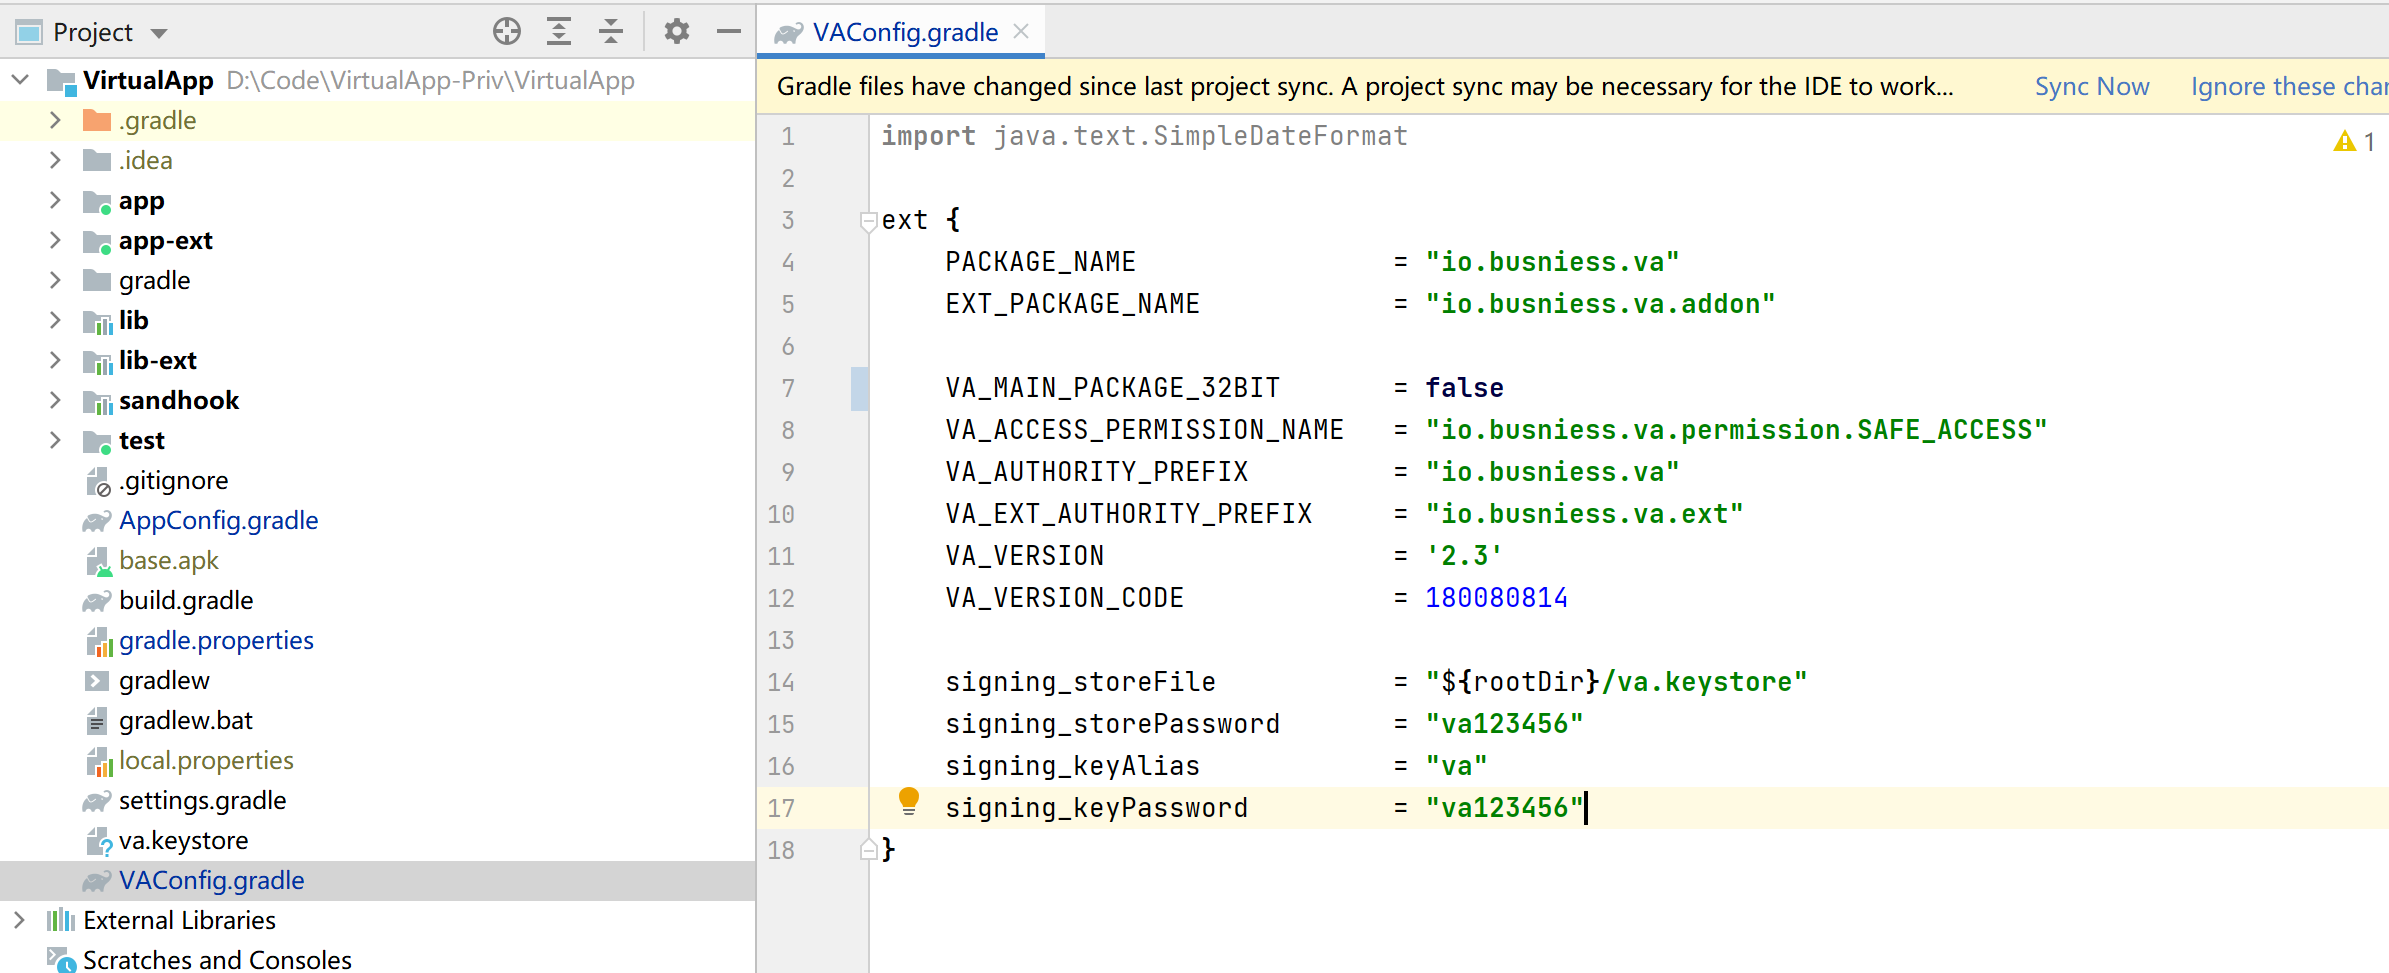
Configuration explanation:
| Configuration Name | Function |
|---|---|
| PACKAGE_NAME | Used to configure the package name of the VA main package |
| EXT_PACKAGE_NAME | Used to configure the package name of the VA plug-in package |
| VA_MAIN_PACKAGE_32BIT | Used to configure whether the VA main package is 32-bit or 64-bit, true is 32-bit, false is 64-bit |
| VA_ACCESS_PERMISSION_NAME | Used to configure the permission names of the 4 major components in VA |
| VA_AUTHORITY_PREFIX | Used to configure the authorities of ContentProvider in the VA main packag |
| VA_EXT_AUTHORITY_PREFIX | Used to configure the authorities of the ContentProvider in the VA plug-in package |
| VA_VERSION | Used to configure the VA library version, developers generally do not need to care |
| VA_VERSION_CODE | Used to configure the VA library version code, developers generally do not need to care |
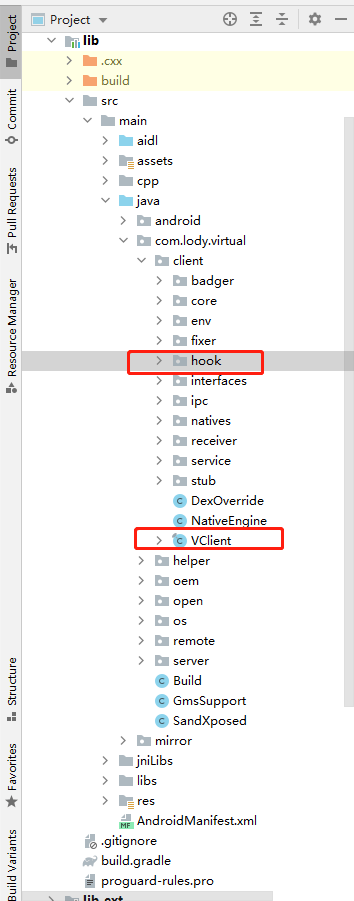
- The code under the
com.lody.virtual.clientpackage runs in the VAPP Client process and is mainly used in the APP Hook part of the VA Framework to complete the HOOK processing for each service.
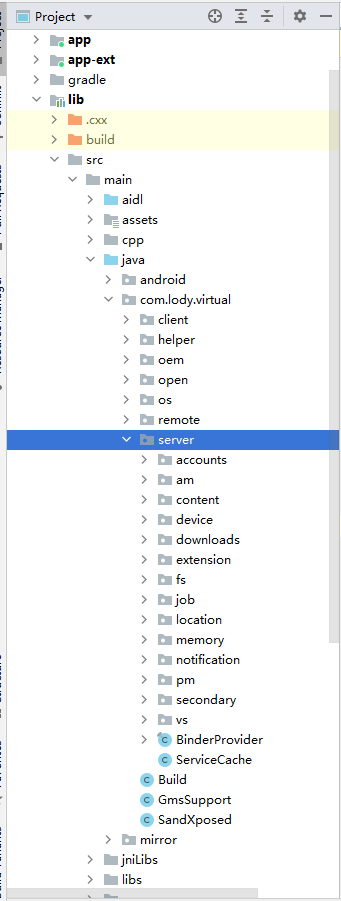
- The code under the
com.lody.virtual.serverpackage runs in the VA Server process. The code is mainly used in the APP Server part of the VA Framework to handle APP installation and other APP requests that are not handled by the Android system.
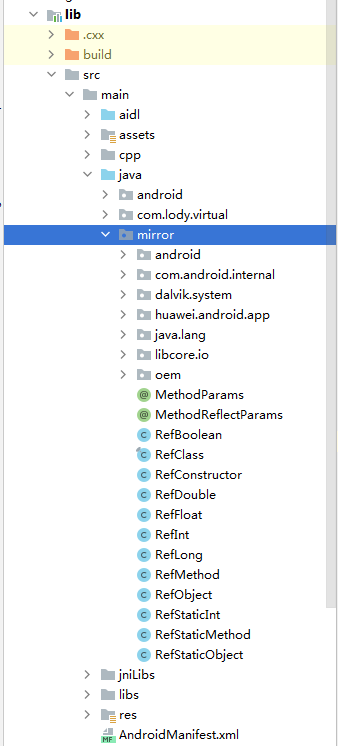
3.The code under themirrorpackage is mainly used for references to the system's hidden classes, and belongs to the tool class, reducing a lot of reflection code's writing.
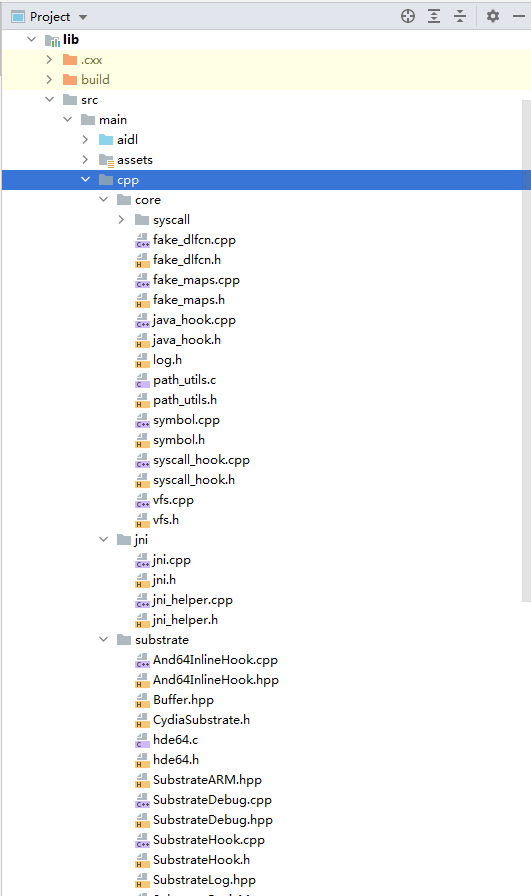
4.The code under thecpppackage is carried out in the VAPP Client process and is mainly used in the VA Native part. Implement IO redirection and jni function HOOK. Among them:substrateimplements hook for arm32 and arm64vfs.cppimplements VA's virtual file system for controlling APP file access restrictionssyscall_hook.cppimplements Hook for IO
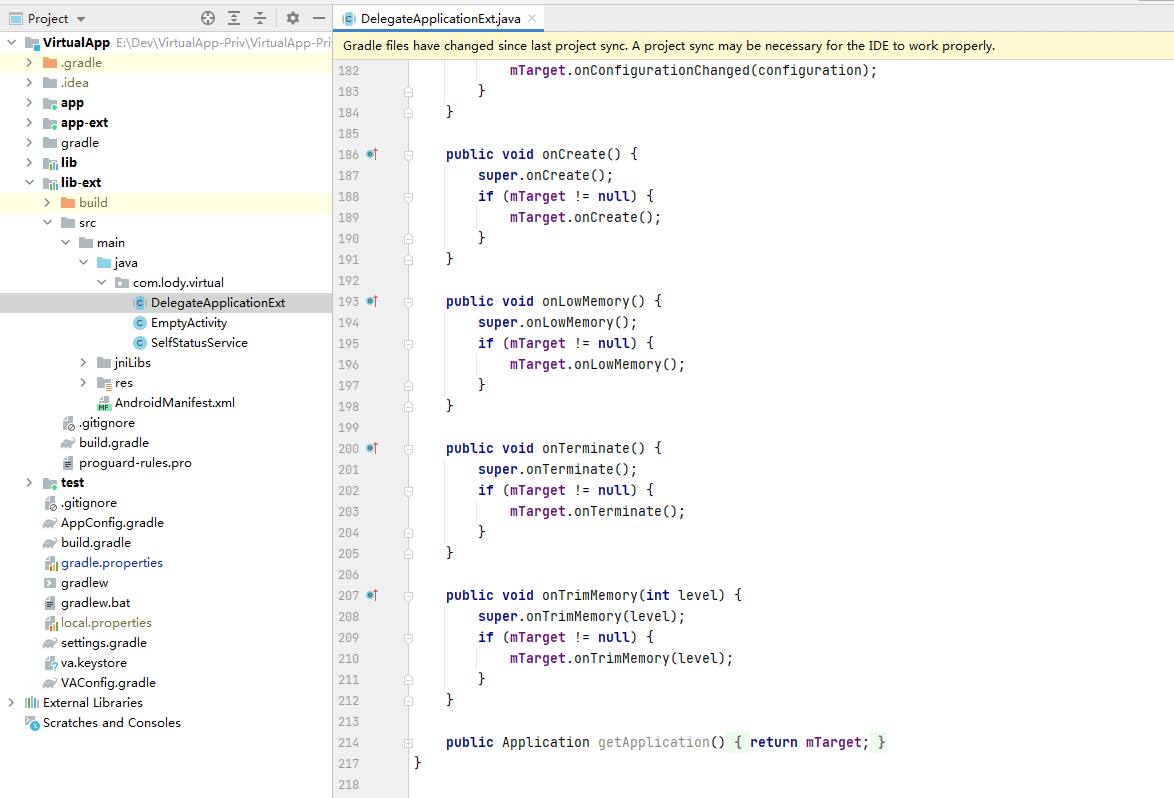
5.DelegateApplicationExt.javaruns in the VA Host Plugin process,used in the VA plug-in package, implementing the loading and execution to the main package code.
The following is the second part, the introduction of using VA SDK:
Multiple modules can be seen:
- app
- app-ext
- lib
- lib-ext
Among them, lib and lib-ext belong to the VirtualAppcore library and extensions,while app and app-ext belong to thesample app.
Create a module of type application, and add the lib module as a dependency
implementation project(':lib')ext {
VA_MAIN_PACKAGE_32BIT = true // The main package is 32-bit
VA_ACCESS_PERMISSION_NAME = "io.busniess.va.permission.SAFE_ACCESS" // The name of the permission used by the VirtualApp component
VA_AUTHORITY_PREFIX = "io.busniess.va" // The authority used by ContentProvider in VirtualApp cannot be duplicated with other Apps.
VA_EXT_AUTHORITY_PREFIX = "io.busniess.va.ext" // The authority used by the ContentProvider in the VirtualApp extension package cannot be duplicated with other Apps.
// ...
}<uses-permission android:name="${VA_ACCESS_PERMISSION_NAME}" />Permission's name must be consistent with those declared in VAConfig.gradle, and adding Placeholder in build.gradle to prevent errors.
android {
    // ...
    manifestPlaceholders = [
                VA_ACCESS_PERMISSION_NAME: rootProject.ext.VA_ACCESS_PERMISSION_NAME,
    ]
} @Override
protected void attachBaseContext(Context base) {
super.attachBaseContext(base);
try {
VirtualCore.get().startup(base, mConfig);
} catch (Throwable e) {
e.printStackTrace();
}
}private SettingConfig mConfig = new SettingConfig() {
@Override
public String getMainPackageName() {
// Name of the main package
return BuildConfig.APPLICATION_ID;
}
@Override
public String getExtPackageName() {
// Name of extension package
return BuildConfig.EXT_PACKAGE_NAME;
}
@Override
public boolean isEnableIORedirect() {
// Whether to enable IO redirection, it is recommended to enable
return true;
}
@Override
public Intent onHandleLauncherIntent(Intent originIntent) {
// Back to the desktop of the Intent interception operation. Here change the action that back to the desktop to return to BackHomeActivity page of the main package.
Intent intent = new Intent();
ComponentName component = new ComponentName(getMainPackageName(), BackHomeActivity.class.getName());
intent.setComponent(component);
intent.addFlags(Intent.FLAG_ACTIVITY_NEW_TASK);
return intent;
}
@Override
public boolean isUseRealDataDir(String packageName) {
// The data path simulates the real path format and requires IO redirection to be enabled. Some of the hardening will check the path format.
return false;
}
@Override
public boolean isOutsidePackage(String packageName) {
// Whether is an external App. Set the external App to be visible to the internal App.
return false;
}
@Override
public boolean isAllowCreateShortcut() {
// Whether allow to create desktop shortcut icons. It is recommended to turn off (false) and implement desktop shortcuts by yourself.
return false;
}
@Override
public boolean isHostIntent(Intent intent) {
// Whether the Intent is handled by VirtualApp.
return intent.getData() != null && "market".equals(intent.getData().getScheme());
}
@Override
public boolean isUseRealApkPath(String packageName) {
// The installation apk path simulates the real path and requires IO redirection to be enabled. Some hardening will check the path format.
return false;
}
@Override
public boolean isEnableVirtualSdcardAndroidData() {
// Enable redirection of `Android/data` directory under external storage.
// Require redirection support.
// Must be enabled after Android 11!!
return BuildCompat.isR();
}
@Override
public String getVirtualSdcardAndroidDataName() {
// Set the redirect path for `Android/data` directory under external storage.
// /sdcard/Android/data/com.example.test/ ==>> /sdcard/{VirtualSdcardAndroidDataName}/{user_id}/Android/data/com.example.test/
return "Android_va";
}
@Override
public FakeWifiStatus getFakeWifiStatus() {
// Modify the wifi information. null is not modified.
return null;
}
@Override
public boolean isHideForegroundNotification() {
// Hide foreground messages, not recommended to hide.
return false;
}
@Override
public boolean isOutsideAction(String action) {
// Action event response of external Intent.
return MediaStore.ACTION_IMAGE_CAPTURE.equals(action)
|| MediaStore.ACTION_VIDEO_CAPTURE.equals(action)
|| Intent.ACTION_PICK.equals(action);
}
@Override
public boolean isDisableDrawOverlays(String packageName) {
// Disable top-level overlay (floating window) for VAPP.
return false;
}
}; @Override
public void onCreate() {
super.onCreate();
VirtualCore virtualCore = VirtualCore.get();
virtualCore.initialize(new VirtualCore.VirtualInitializer() {
@Override
public void onMainProcess() {
// Main process callback
}
@Override
public void onVirtualProcess() {
// Virtual App process callback
}
@Override
public void onServerProcess() {
// Server-side process callback
}
@Override
public void onChildProcess() {
// Other sub-process callback
}
});
}Since VirtualApp will start multiple processes, Application will enter N times, and different processes will go to different callbacks of VirtualInitializer, where additional initialization code can be added depending on the process type.
VirtualCore.java

public VAppInstallerResult installPackage(Uri uri, VAppInstallerParams params);Uri determines the source of the apk that need to be installed,and currently supports both package and file protocols.
Uri packageUri = Uri.parse("package:com.hello.world");File apkFile = new File("/sdcard/test.apk");
Uri packageUri = Uri.fromFile(apkFile);package agreement To install the app, you only need to pass in the package name, not the specific APK path, so the app installed with this protocol is equivalent to double space.
The APP is automatically upgraded as external versions are upgraded and uninstalled as external versions are uninstalled. dynamic in PackageSetting is true。
file agreement It is an internal installation, apk is copied inside the container, completely independent from the external version. dynamic in PackageSetting is false。
| FLAG | Instruction |
|---|---|
| FLAG_INSTALL_OVERRIDE_NO_CHECK | Allow overlay installation |
| FLAG_INSTALL_OVERRIDE_FORBIDDEN | Prohibit overlay installation |
| FLAG_INSTALL_OVERRIDE_DONT_KILL_APP | Overwrite installation, and not kill the already launched APP |
| FLAG | Instruction |
|---|---|
| MODE_FULL_INSTALL | Complete installation |
| MODE_INHERIT_EXISTING | The installed installation mode of the installed. Reserve. |
Reserve parameters, not used for now. Currently the same no matter which one is set.
Specify the abi of the App. You can force the App to run under the specified abi in special need. If you don't specify, the default abi is determined by system rules.
Optional parameters:
- armeabi
- armeabi-v7a
- arm64-v8a
VAppInstallerParams params = new VAppInstallerParams(VAppInstallerParams.FLAG_INSTALL_OVERRIDE_NO_CHECK);
VAppInstallerResult result = VirtualCore.get().installPackage(Uri.parse("package:com.tencent.mobileqq"), params);
if (result.status == VAppInstallerResult.STATUS_SUCCESS) {
    Log.e("test", "install apk success.");
}VAppInstallerParams params = new VAppInstallerParams(VAppInstallerParams.FLAG_INSTALL_OVERRIDE_NO_CHECK);
VAppInstallerResult result = VirtualCore.get().installPackage(Uri.fromFile(new File("/sdcard/test.apk")), params);
if (result.status == VAppInstallerResult.STATUS_SUCCESS) {
Log.e("test", "install apk success.");
}Just install the base package firstly, and then install all the split packages.
File dir = new File("/sdcard/YouTube_XAPK_Unzip/");
VAppInstallerParams params = new VAppInstallerParams(VAppInstallerParams.FLAG_INSTALL_OVERRIDE_NO_CHECK);
VAppInstallerResult result = VirtualCore.get().installPackage(
        Uri.fromFile(new File(dir,"com.google.android.youtube.apk")), params);
for (File file : dir.listFiles()) {
    String name = file.getName();
    if (name.startsWith("config.") && name.endsWith(".apk")) {
        result = VirtualCore.get().installPackage(
            Uri.fromFile(file), params);
    }
}// class VActivityManager
public boolean launchApp(final int userId, String packageName)Example code:
VActivityManager.get().launchApp(0, "com.tencent.mobileqq");// class VActivityManager
public void killAppByPkg(String pkg, int userId)
public void killAllApps()Example code:
// Kill the QQ program process with userid 0
VActivityManager.get().killAppByPkg("com.tencent.mobileqq", 0);
// Kill all App processes
VActivityManager.get().killAllApps();// class VirtualCore
public boolean uninstallPackageAsUser(String pkgName, int userId)
public boolean uninstallPackage(String pkgName)Example code:
// Uninstall the QQ program with userid 0
VirtualCore.get().uninstallPackageAsUser("com.tencent.mobileqq", 0);
// Uninstall the QQ programs installed under all user
VirtualCore.get().uninstallPackage("com.tencent.mobileqq");// class VirtualCore
public List<InstalledAppInfo> getInstalledApps(int flags)VirtualApp implements a set of Xposed interface. Users who can use Xposed can do things that originally need the system built-in Xposed to do.
However, users also need to understand that the scope of Xposed in VA is within the VA app. Cannot overstep the authority to control system or other external apps.
VA provides a callback interface of App creation and launch com.lody.virtual.client.core.AppCallback, the interfaces are as follows:
public interface AppCallback {
    void beforeStartApplication(String packageName, String processName, Context context);

    void beforeApplicationCreate(String packageName, String processName, Application application);

    void afterApplicationCreate(String packageName, String processName, Application application);
}
Interface Instruction:
| Name | Instruction |
|---|---|
| beforeStartApplication | Before APP launch, after creation |
| beforeApplicationCreate | Before the APP is created, application has already prepared, Application.OnCreate is not executed. |
| afterApplicationCreate | After the APP is created, Application.OnCreate is executed. |
Parameter Instruction:
| Name | Instruction |
|---|---|
| packageName | Name of VAPP |
| processName | Process name of VAPP |
| context | Application context of VAPP |
| application | Application of VAPP |
Note: APP creation means that
Applicationis created.
The interface is there, and the next step is how to use it. View[VirualApp Process Instruction](VirualApp Process Instruction.md), we kan see
We just need to put in theVAPP processcallback(onVirtualProcess) set App callback AppCallback and then achieve the purpose.
Host Application code, please refer io/busniess/va/App.java
@Override
    public void onCreate() {
        super.onCreate();
        VirtualCore virtualCore = VirtualCore.get();
        virtualCore.initialize(new VirtualCore.VirtualInitializer() {
            @Override
            public void onVirtualProcess() {
                // Set VAPP launch callback
                virtualCore.setAppCallback(new MyComponentDelegate());
            }
        });
}MyComponentDelegateClass Code
public class MyComponentDelegate implements AppCallback {

    @Override
    public void beforeStartApplication(String packageName, String processName, Context context) {
    }

    @Override
    public void beforeApplicationCreate(String packageName, String processName, Application application) {

        XposedHelpers.findAndHookMethod("android.app.ContextImpl", ClassLoader.getSystemClassLoader(), "getOpPackageName", new XC_MethodHook() {
            @Override
            protected void beforeHookedMethod(MethodHookParam param) {
                VLog.printStackTrace("getOpPackageName");
                param.setResult(VirtualCore.get().getHostPkg());
            }
        });
    }

    @Override
    public void afterApplicationCreate(String packageName, String processName, Application application) {
    }
}
In the above example, a use case for Xposed has been added. The entry point of Xposed is an example of IXposedHookLoadPackage, it provides an interface of void handleLoadPackage(XC_LoadPackage.LoadPackageParam loadPackageParam). There is one parameter of XC_LoadPackage.LoadPackageParam. Here we can't use it exactly one by one, but it's enough. loadPackageParam.classsloadcan use context.getClassLoader() or application.getClassLoader() both are ok. Afterwards XposedHelpers, the same way how to useXposedBridge, is also used here.
For ARM 32 and ARM 64 Hooks, only the header files CydiaSubstrate.h need to be introduced, i.e. the Hook API:
MSHookFunction(Type_ *symbol, Type_ *replace, Type_ **result)
Parameter Instruction:
| Name | Instruction |
|---|---|
| symbol | Address to Hook |
| replace | Your custom Hook function |
| result | Backups of hooked function |
Refer ```syscall_hook.cpp``` code ```cpp auto is_accessible_str = "__dl__ZN19android_namespace_t13is_accessibleERKNSt3__112basic_stringIcNS0_11char_traitsIcEENS0_9allocatorIcEEEE"; void *is_accessible_addr = getSym(linker_path, is_accessible_str); if (is_accessible_addr) { MSHookFunction(is_accessible_addr, (void *) new_is_accessible,(void **) &orig_is_accessible); } ```
Within MSHookFunction, it automatically determines whether the current is ARM32 or ARM64:
_extern void MSHookFunction(void *symbol, void *replace, void **result) {
    if (*result != nullptr) {
        return;
    }
    // ALOGE("[MSHookFunction] symbol(%p) replace(%p) result(%p)", symbol, replace, *result);
#ifdef __aarch64__
    A64HookFunction(symbol, replace, result);
#else
    SubstrateHookFunction(NULL, symbol, replace, result);
#endif
}
Additional development guidance can be found on the VA Private Library Wiki