Table of contents
- Introduction
- Devfiles
- Contribute to Theia or Che-Theia extensions or built-in Che-Theia plugins
- Che-Theia development on che.openshift.io
- How to develop Che-Theia remote plugin mechanism
There are 3 contribution points:
- Theia
- Che-Theia extensions
- Che-Theia plugins
For each of these kinds of contribution, rebuilding the container image is not needed to code, build and test your contribution. We can create a Che workspace that would setup all the containers to build and run Che-Theia. The containers will rely on the same ones used in the CI for the Che-Theia container build. Building che-theia in the che-workspace would be very close to the one build by Docker.
You will find here few devfile that will help you in setting up theses environments
Each devfile could be run on any Che instances. Beware that each of them may need a certain amount of memory. Devfile could be launched through a factory or chectl cli.
$ chectl workspace:start -f devfiles/che-theia-dev.devfile.yaml
Note that this devfile is going to evolve very soon and be splitted into multiple devfiles.
The devfile: <this.repo>/devfiles/che-theia-dev.devfile.yaml
In this section, we show how to setup a Che 7 environment to work on che-theia, and how to use it. For the whole workflows, we will need a workspace with such containers:
- Theia IDE (Editor) container (a.k.a theia-idexxx). It would have Theia editor with a set of plugins. It will also run the Theia instance for testing our development (theia-dev endpoint).
- Che-Theia Dev container (a.k.a che-dev). We will build the che-theia (theia + che-theia extensions) and plugins.
All containers have /projects folder mounted, which is shared among them.
Developer workflow:
- Start the workspace with the devfile, it is cloning Theia and the che-theia plugins.
- Setup Theia sources to include Che-theia extension thanks to
che-theia initcommand (Che-theia dev container) - ….. [ Code on theia or che-theia extension ]
- Build che-theia (theia + che-theia extensions) (Che-theia dev container)
- …...[ Code on the a plugin project ]
- Build the plugin project (Che-theia dev container)
- Run che-theia and will be configured to include the plugin. (Che-theia dev container or theia-ide container)
The following devfile provides examples of commands to build and run che-theia with factory and containers plugins.
In this section we are going to start a new workspace to work on che-theia. The new workspace will have few projects cloned: theia and che-theia. It will also setup the containers and commands in the My workspace view. We will use these commands in the next steps.
The devfile could be started using chectl:
chectl workspace:start -f https://raw.githubusercontent.com/eclipse-che/che-theia/main/devfiles/che-theia-dev.devfile.yaml
At workspace start, Che will clone Theia and Che-theia.
In this section we are going to adapt Theia build so it creates an assembly with che-theia specific extensions.
You can use the che command init ... DEV che-theia (command palette > Run task > … or containers view)
Basically, this command will perform:
[che-dev]
$ che-theia init --dev
This command will checkout all extensions in /projects/theia/che folder and create symbolic link into /projects/theia/packages folder.
By default, extensions list is retrieved from https://github.com/eclipse-che/che-theia/blob/main/che-theia-init-sources.yml
At this point you can code on che-theia extensions inside /projects/theia/che/che-theia/extensions folder. Extensions changes would be taken into account in the next step.
You can use the che command build ... DEV che-theia (command palette > Run task > … or containers view)
Basically, this command will perform:
[che-dev]
$ yarn
$ che-theia production
yarnwill compile theia + additional Che-theia extensions that have been set up byche-theia initche-theia productionwill generate a production like package.
At this stage, you can code on Che-theia plugins. In this devfile, containers and factory plugin are covered.
Che-theia plugins are located in /projects/che-theia/plugins/ folder.
You can use the che command build ... containers-plugin or build ... workspace-plugin (command palette > Run task > … or containers view)
Basically, this command will perform in the right plugin folder:
[che-dev]
$ yarn
yarn will compile the plugin and produce a .theia file which is the plugin itself.
In this section, we are going to run the che-theia assembly built previously and run that with one of the plugins built previously. We will be able to test our changes with a dedicated che-theia instance.
You can use the che command run ... DEV che-theia + workspace-plugin or run ... DEV che-theia + containers-plugin (command palette > Run task > … or containers view)
Basically, this command will start the DEV che-theia with the plugin:
[theia-ide]
$ export HOSTED_PLUGIN=/projects/che-theia/plugins/workspace-plugin/
$ node /projects/theia/production/src-gen/backend/main.js /tmp/theiadev_projects --hostname=0.0.0.0 --port=3130
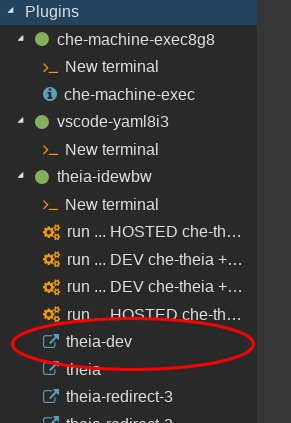
You can then access to your modified Che-theia from the Container view theia-dev endpoint
In this section we show how to run the che-theia assembly but in dev mode: keeping all the information for debugging.
You can use the che command run ... DEV yarn start ... che-theia + workspace-plugin or
run ... DEV yarn start... che-theia + containers-plugin
(command palette > Run task > … or containers view).
To start che-theia in dev-mode with yarn (not using the production che-theia generated). It would keep things like the ability to source map.
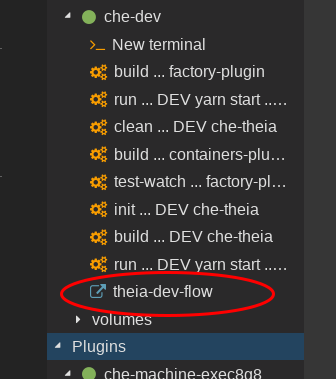
Running dev theia would be located in the che-dev container and theia-dev-flow endpoint:
If you do not have any changes on Theia or Che-theia extension, you could just build the plugins with build ... containers-plugin or build ... workspace-plugin
and run these plugins with the existing che-theia app:
run ... HOSTED che-theia + container-plugin or run ... HOSTED che-theia + workspace-plugin
There is a devfile to develop Che-Theia on che.openshift.io
Projects directory which is a Persistent Volume on che.openshift.io is limited to 1 gigabyte. It's not enough to build Che-Theia.
The main idea is to use /tmp/theia directory. Amount for this directory is limited to 3 gigabytes, which is enough to build Che-Theia and run.
In comparing with /projects, temporary directory is not persisted and is cleared on workspace stop.
Use the badge to create a workspace using factory

To initialize Che-Theia in /tmp/theia directory use '1. Init che-theia' command. With rsync it's become possible to edit sources in /projects with the following synchronizing with /tmp/theia.
[che-dev]
$ mkdir -p /tmp/theia/che/che-theia
$ rsync -rtv /projects/theia/ /tmp/theia/
$ rsync -rtv /projects/che-theia/ /tmp/theia/che/che-theia/
$ cd /tmp/theia
$ che-theia init --alias https://github.com/eclipse-che/che-theia=/tmp/theia/che/che-theia
After changing sources of Theia or Che-Theia use '2. Rsync sources' to synchronize the sources with a mirror in /tmp/theia.
[che-dev]
$ rsync -rtv --exclude='node_modules' --exclude='package.json' --exclude='root-compilation.tsconfig.json' /projects/theia/ /tmp/theia/; \
$ rsync -rtv --exclude='node_modules' --exclude='package.json' /projects/che-theia/ /tmp/theia/che/che-theia/; \
The '3. Build che-theia' command builds Che-Theia. It runs yarn in /tmp/theia directory.
[che-dev]
$ cd /tmp/theia
$ yarn
Before launching Che-Theia we have to prepare dedicated directories for plugins, default plugins and for projects, which is used as workspace directory.
Use '4.1. Prepare theia-* dirs' command to prepare all the directories in one click. The command will run the following in theia-editor container.
[theia-ide]
$ mkdir /projects/theia-default-plugins
$ mkdir /projects/theia-plugins
$ mkdir /projects/theia-projects-dir
$ cd /default-theia-plugins
$ cp * /projects/theia-default-plugins/
To launch Che-Theia run '4.2. Launch' command. It will set necessary variables and start Che-Theia in che-dev container.
[che-dev]
$ cd /tmp/theia/examples/assembly
$ export CHE_PROJECTS_ROOT="/projects/theia-projects-dir"
$ export THEIA_DEFAULT_PLUGINS="local-dir:///projects/theia-default-plugins"
$ export THEIA_PLUGINS="local-dir:///projects/theia-plugins"
$ export THEIA_PLUGIN_ENDPOINT_DISCOVERY_PORT="2506"
$ yarn theia start /projects/theia-projects-dir --hostname=0.0.0.0 --port=3010
In a real Che workspace, many plugins are run in their own "sidecar" container. The idea is that the container furnishes any "native" dependencies the plugin needs. For example the container that runs the theia IDE back end does not contain a Java SDK, so in order to run a plugin that needs a Java installation, we'll run the plugin inside a container that has Java installed.
As when working on developing Che-Theia itself, the approach is to run a copy of the Theia back end on a different port than that we use for the self hosting workspace.
So, starting with a workspace to develop che-theia, we'll have to add a container that will serve as the sidecar running our plugin.
  - mountSources: true
    memoryLimit: 2Gi
    type: dockerimage
    image: 'quay.io/eclipse/che-theia-dev:next'
    alias: remote-1
    env:
      - value: '2504'
        name: THEIA_PLUGIN_ENDPOINT_DISCOVERY_PORT
      - value: 'local-dir:///projects/plugins-1/'
        name: THEIA_PLUGINS
      - value: /projects/java-11-openjdk
        name: JAVA_HOME
Notice the two environment variables we added: THEIA_PLUGIN_ENDPOINT_DISCOVERY_PORT and THEIA_PLUGINS. They will be used to tell the plugin host process we will run in the container where to announce it's presence and where to pick up the plugins it should run. Note that if you want to make the development process more realistic, you can point the THEIA_PLUGINS variable to some non-shared location, as would be the case in a real Che workspace. Anything in /tmp would serve.
We'll also have to add the discovery endpoint setting to the container running the theia backend:
 - mountSources: true
    endpoints:
      - name: theia-dev-flow
        port: 3010
        attributes:
          protocol: http
          public: 'true'
    memoryLimit: 2Gi
    type: dockerimage
    image: 'quay.io/eclipse/che-theia-dev:next'
    alias: theia-dev
    env:
      - value: '2504'
        name: THEIA_PLUGIN_ENDPOINT_DISCOVERY_PORT
This way, the IDE and the remote plugin host process can find each other.
The container in question must be able to work as a plugin sidecar for any plugin you want to run in it. If you are trying to debug a plugin that already has a sidecar container, it would make sense to base remote-1 container on the sidecar that runs the original plugin. In that case, you would have to add a copy of node to sidecar container, since they generally don't contain one and we need to run the runtime host process, which is a node application. In this case, however, I've started with a theia-dev image and just point it to a JDK I've copied to /projects/java-11-openjdk by setting JAVA_HOME.
If we want to debug later on, we'll have to add the node-debug2 Che plugin to our workspace:
  - type: chePlugin
    reference: >-
      https://raw.githubusercontent.com/eclipse/che-plugin-registry/master/v3/plugins/ms-vscode/node-debug2/1.42.3/meta.yaml
    alias: node-debug
Note that some earlier versions of the plugin did not work in a self-hosting setup, so make sure you are using a recent one.
We can now add plugins to run in the sidecar container by adding them to the folder /projects/plugins-1 (or whatever we define as THEIA_PLUGINS env variable). If we're just interested in debugging the theia plugins host process, we can download a *.vsix file to the folder: it will be unpacked to a subfolder of /tmp. If we need to debug the plugin, we can checkout the source code and build it according the the instructions for the plugin:
$ cd /projects/plugins-1/
$ git clone https://github.com/redhat-developer/vscode-java
$ cd vscode-java
$ npm run compileNow we can run the IDE:
-
Open a terminal for the
remote-1container. -
In that container, type
cd /projects/theia/che/che-theia/extensions/eclipse-che-theia-plugin-remote/lib/node -
And then run the remote backend like so:
node plugin-remote.jsThe terminal should spew out some text saying it's found the plugin we're trying to run -
Open a terminal for the
theia-devcontainer -
cd /projects/theia/examples/assembly -
yarn run start --hostname=0.0.0.0 --port=3010 --plugins=local-dir:/projects/theia/pluginsThe theia back end should start up as normal -
Now click on
theia-dev-flowin the "My Workspace" sidebar panel
In order to debug the remote plugin host process, we can just add a parameter to step 2 above: node --inspect-brk=8888 plugin-remote.js
The node process will wait upon startup until we connect the debugger using an attach debug configuration like this one:
{
  // Use IntelliSense to learn about possible attributes.
  // Hover to view descriptions of existing attributes.
  "version": "0.2.0",
  "configurations": [
    {
        "type": "node",
        "request": "attach",
        "name": "VSCode Java Extension",
        "port": 8888,
        "sourceMaps": true
    }
  ]
}
Once the debugger has attached, the process will be suspended and you'll have to continue in order to complete the startup. You should now be able to put breakpoints in any source in the plugin host or target plugin source.