This guide will help you get the most out of your HubPress blog. It will teach you how to configure the various features of your blog so you can make it your own.
If you don’t care too much about customising your blog at this stage, and just want to start writing, review the helpful info in the Writer’s Guide to get you writing blog posts the right way.
|
Note
|
You do not need any special systems administrtion knowledge to use HubPress. We’ve split out the Administration information so the README remains small in size. |
The HubPress Administration Console is available at /hubpress:
-
https://[username].github.io/hubpress/for GitHub Hosted blogs, or -
https://[username].github.io/[repositoryName]/hubpress/for Domain Hosted blogs. -
https://[cname_domain]/hubpressfor custom domain-hosted (CNAME) blogs.
|
Note
|
If you are using a CNAME, you might need to access your Administration console using the https://<username>.github.io address pattern initially, so your CNAME redirect will work.
|

Enter your GitHub credentials to log into HubPress Admin.
Once you authenticate, a personal token is created for future calls from HubPress to the GitHub API.
This is synchronized across all sessions of HubPress. If you open the Administration Console on your PC and then your Tablet, the token is applicable to all devices.
The Posts view is the default view you see when you first log onto HubPress
When you first start HubPress, the Posts view is empty.
As you create blog posts, the page populates with the list of posts on the left, and a rendered preview of the blog post itself on the right.
To start blogging with HubPress, click the pencil icon in the top right of the screen.
This creates an empty blog post for you, ready for your next great idea, or discovery you want to tell the world about.
There are certain structural requirements you must meet in a HubPress blog post, before it can be saved and published to your blog site. See the Writer’s Guide for tips about creating posts successfully with HubPress.
|
Note
|
New in 0.5.0
You can now delete blog posts instead of having to rename them and use them again later.
|
If you have a post you need to edit to delete, you can do so by accessing the Action Overflow (three dots) menu.
This menu contains the Edit and Delete functions applicable to each post.
You can configure basic blog settings (such as CNAME and Pagination) and social media accounts you want to connect to your blog.
Each settings group is separated into tabs, to logically group the settings.
-
On the Posts View, click the Menu button.
-
Click Settings to load the Settings view.
This tab contains basic information configured in the /hubpress/config.json file.
The following fields are configurable:
- Git CNAME
-
Lets you specify a custom domain name for your blog. See Setting Up A Custom Domain for instructions about setting up a CNAME for your blog.
- Live Preview Render Delay
-
Controls how long the live render takes to refresh, in milliseconds. For fast typists, setting this field to a value over
2000(two seconds) will result in a smoother editing experience because the live preview will not be regenerated so frequently. Setting this value below2000will result in the live preview refreshing faster, but may result in some visible cursor delay when typing.
The Title and Description fields allow you to give your blog a name, and tell visitors what they can expect from your blog posts.
The Logo and Cover Image fields allow you to specify art asset that will be used on each page of your blog:
-
An HTML link to an image hosting service. For example gravatar, for your avatar.
-
A link to an image committed to the /images directory of your blog repository.
|
Important
|
The format you specify in these fields is important for repository-hosted images. |
You must use the pattern /images/<filename> so the static site generator can create the image paths to each sub-page of your blog.
Failing to specify the leading forward-slash will mean the absolute path generated in the HTML pages will break.
You’ll know this has happened when Page 2 of your blog onwards does not have any cover or logo images.
See the Adding Images section in the Writer’s Guide for more information about using Images.
The Theme is selectable from the list of themes stored in the /themes directory.
This field is a free-text field, but you need to specify the theme according to the folder name. The current folder names are:
-
casper
-
ghostium
-
ichi
-
roon
-
saga
-
uno
-
uno-zen
|
Note
|
New in 0.5.0
Theme names have all been changed to lowercase for consistency.
If you find your theme is not loading, check the site settings and adjust the names accordingly.
|
The Google Analytics field takes the Google Analytics Tracking ID of your site. For example UA-1234567-1.
The Disqus shortname field takes your Disqus user name that you specified when registering a new site for Disqus.
Only the shortname is required, not a link to your profile page.
If you have not enabled Disqus for your site, create a site profile at https://disqus.com/admin/create/ with the name of your blog to get started.
Because HubPress is hosted on GitHub, you can update by pulling down the latest changes from the HubPress master repository.
If you’re new to GitHub, the repository you forked the project from is referred to as Upstream.
You update HubPress by creating a Pull Request (PR) against the hubpress.io upstream repository.
With the cross-compare fork feature of GitHub, you can easily update to the latest version.
-
Click the
Comparebutton in your HubPress repository.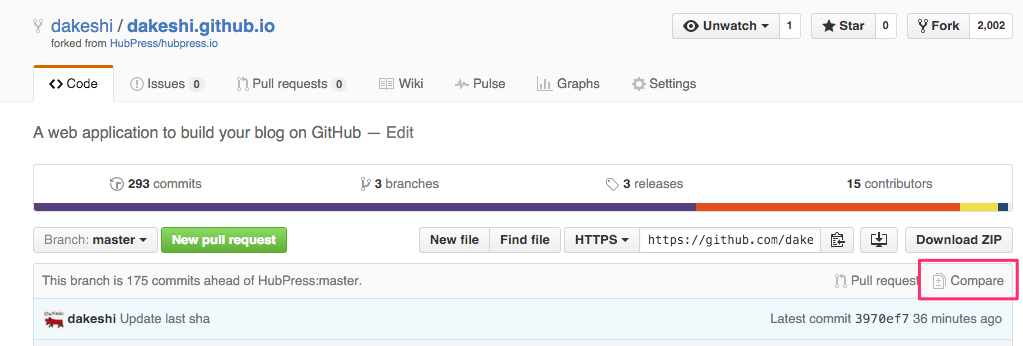
-
Change the base fork to your repository, and set the branch according to your repository configuration (
masterorgh-pages).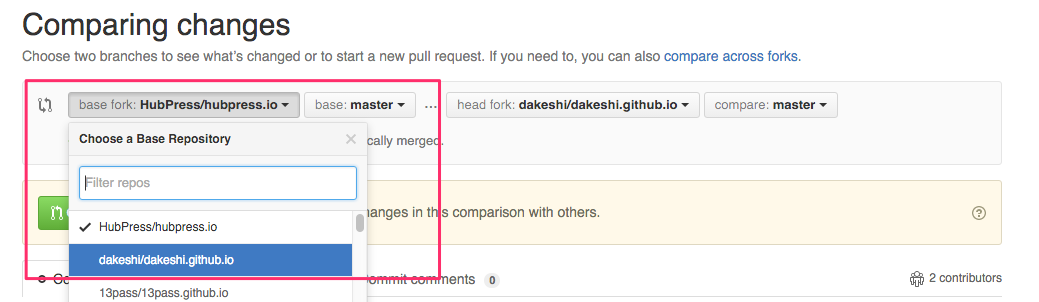
-
Select
Compare across forks.
-
Change the head fork to the
HubPress/hubpress.iorepository.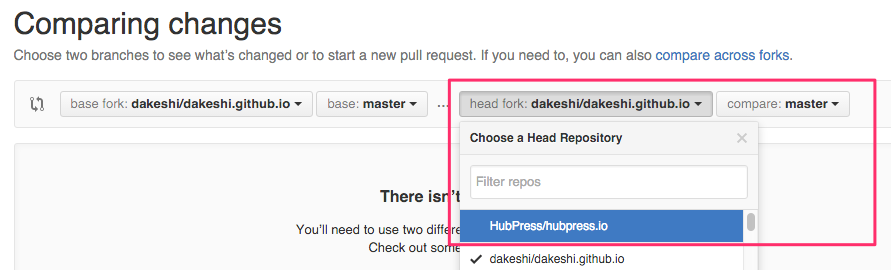
-
Create the Pull Request.
-
Apply the Pull Request to your instance of HubPress.
You can use the most recent HubPress version after apply the PR to your repository.
For a video demonstration of the PR process, see the following YouTube video.
|
Note
|
New in 0.5.0
You can now work as a team on blog posts.
Each user granted access to the blog instance is credited with their GitHub name on posts they create.
|
You can use the same HubPress instance with multiple authors by adding contributors to the repo in which HubPress is hosted.
- Attribution
-
Posts are attributed based on the first person who created the blog post entry. Edits by other contributors are attributed to the first person who created the post.
- Site Changes
-
Changes to settings (themes, blog name, social links) will not affect the author data attributed to each post.
-
Open your HubPress site on GitHub.
-
Click
Settings⇒Collaborators. -
Add the GitHub users for which you want to grant access to your blog.
Once you have added contributors, they will be notified by the GitHub notification system. Once they accept the invitation, they can instantly contribute to content development on the blog.
HubPress' unique authoring environment is backed by a locally-stored database, specific to your Browser and Operating System.
If you switch devices or browser instances, you lose the synchronicity between browsers. HubPress subsequently gets a globally-corrupted GitHub authentication token and any attempts to synchronize any changes from the primary Chrome instance fails.
In most cases, resetting the Hosted App Data in the browser is all it takes to bring normality back to your HubPress fork.
Clear the browser Cache and Data in Android.
-
Tap Settings > Apps > Chrome.
-
Clear Cache and Data.
-
Restart the Chrome App.
HubPress is forced to rebuild the local database, and will resync its GitHub authentication token.
Chrome Desktop shares similar behavior with Chrome for Android.
Rather than having to reset the entire cache and data in the app, Chrome Desktop is a little less extreme in what you need to reset.
-
Close the malfunctioning HubPress tab in the browser.
-
Click
Settings. -
Click
Show advanced settings. -
In the
Privacygroup, clickClear browsing data. -
Select "Obliterate the following items from: `The beginning of time`".
-
Clear all check-marks except for
Hosted app data. -
Click
Clear browsing data. -
Open a tab, and load the HubPress Admin Console for your blog.
-
Attempt to republish a post.
You should have a successful post publish where the process previously failed.
There are some commonly-asked questions in the issue tracker that are worth calling out here.
HubPress only supports the HTML5 backend.
Specifying other backend types will result in an error similar to:
Uncaught RuntimeError: asciidoctor: FAILED: missing converter for backend 'deckjs'. Processing aborted.
If you do want to use a different backend to process your AsciiDoc files, the Asciidoctor User Guide can help you work out the backend that is right for you, for use with the asciidoctor command-line script.
You can edit your posts in a local copy of your HubPress repository, however you will need to log onto HubPress Admin to publish your post.
If you want a near WYSIWYG interface to edit your AsciiDoc files, applications like Atom Editor or AsciidocFX Editor are excellent choices.
HubPress is now on Gratipay!

It’s not the only way you can help us, but it is certainly a welcome one. Donations are a great way to show your appreciation for the platform: it inspires us to dedicate extra time away from our families and day jobs to make HubPress an awesome blogging platform for you.
