- 掌握词云分析工具
- 掌握Python爬虫
- 掌握Xpath工具
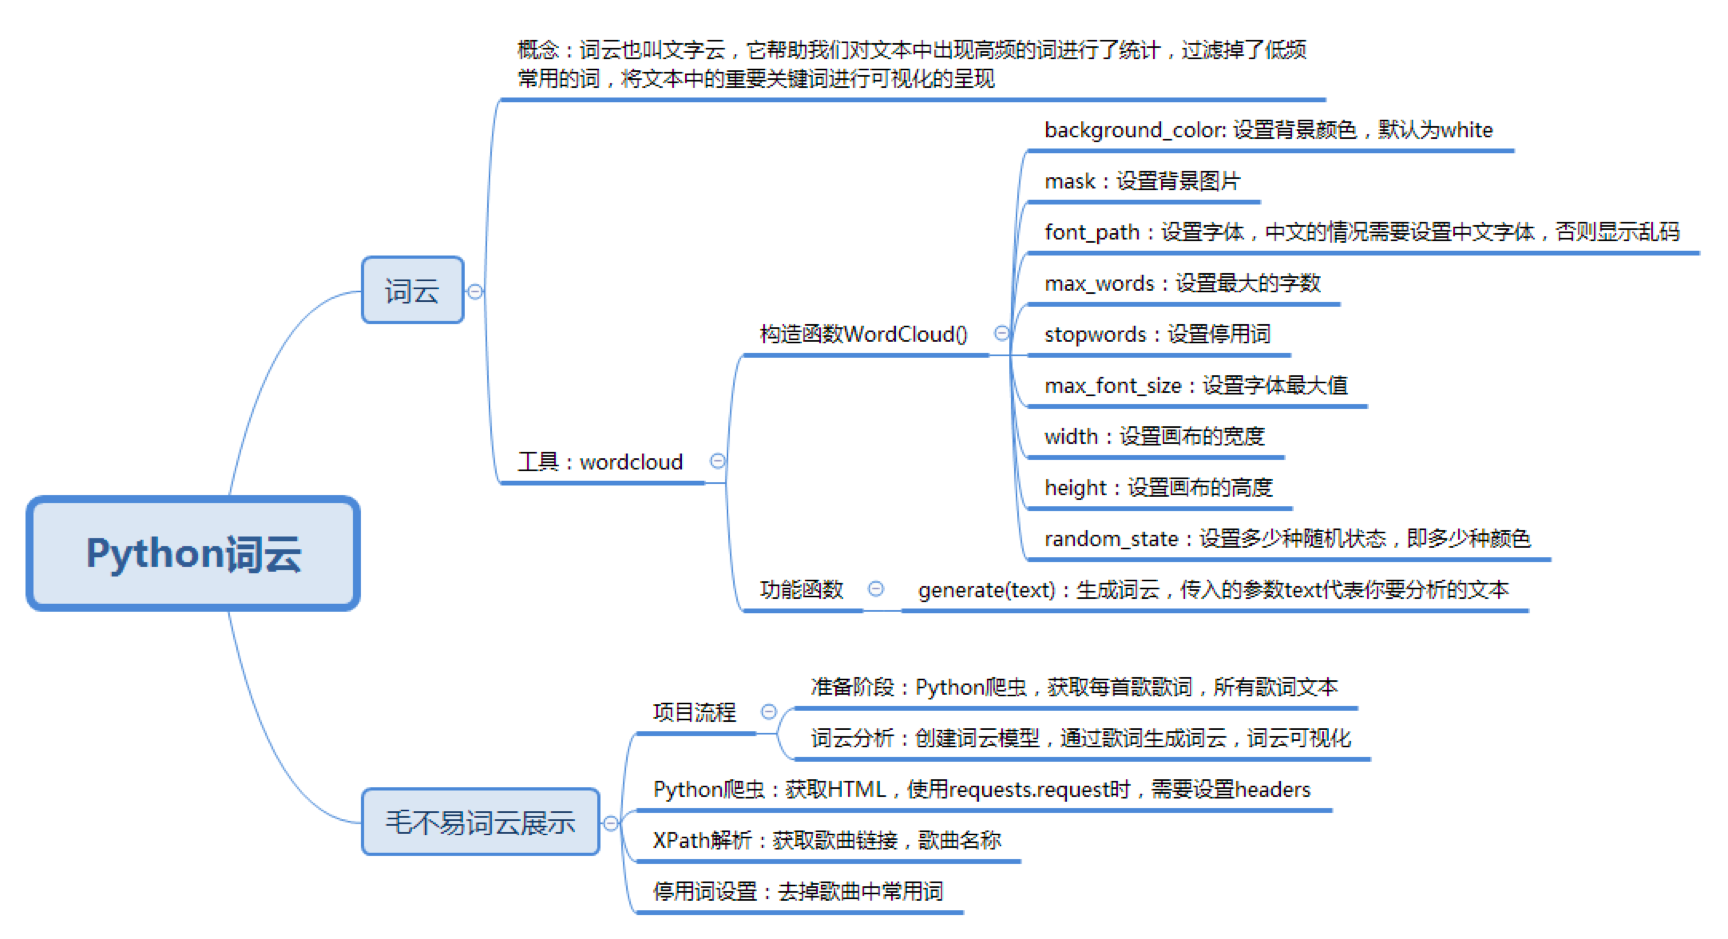
词云 == 文字云
目的: 统计文本中高频出现的词 去掉重复常用词 将重要关键词进行可视化,方便文本分析者更快更好的了解文本的重点,同时具有美观度
名称: WordCloud
安装: pip install wordcloud
wc = WordCloud(
  background_color='white',  # 设置背景颜色
  mask=backgroud_Image,  # 设置背景图片
  font_path='./SimHei.ttf',  # 设置字体,针对中文的情况需要设置中文字体,否则显示乱码
  max_words=100,  # 设置最大的字数
  stopwords=STOPWORDS,  # 设置停用词
  max_font_size=150,  # 设置字体最大值
  width=2000,  # 设置画布的宽度
  height=1200,  # 设置画布的高度
  random_state=30  # 设置多少种随机状态,即多少种颜色
)
生成词云的方式
# text 代表要分析的文本

wordcloud=generate(text)
保存图片的方式
wordcloud.tofile('a.jpg')可视化方式
import matplotlib.pyplot as plt
plt.imshow(wordcloud)
plt.axis("off")
plt.show()
完整案例
专栏前 15 节的标题进行词云可视化
# -*- coding:utf-8 -*-
import matplotlib

matplotlib.use('Qt4Agg')
from wordcloud import WordCloud
import matplotlib.pyplot as plt
import jieba
from PIL import Image
import numpy as np


# 生成词云
def create_word_cloud(f):
  print('根据词频计算词云')
  text = " ".join(jieba.cut(f, cut_all=False, HMM=True))
  wc = WordCloud(
    font_path="./SimHei.ttf",
    max_words=100,
    width=2000,
    height=1200,
  )
  wordcloud = wc.generate(text)
  # 写词云图片
  wordcloud.to_file("./wordcloud.jpg")
  # 显示词云文件
  plt.imshow(wordcloud)
  plt.axis("off")
  plt.show()


if __name__ == '__main__':

  f = '''数据分析全景图及修炼指南\
  学习数据挖掘的最佳学习路径是什么?\
  Python 基础语法:开始你的 Python 之旅\
  Python 科学计算:NumPy\
  Python 科学计算:Pandas\
  学习数据分析要掌握哪些基本概念?\
  用户画像:标签化就是数据的抽象能力\
  数据采集:如何自动化采集数据?\
  数据采集:如何用八爪鱼采集微博上的“D&G”评论?\
  Python 爬虫:如何自动化下载王祖贤海报?\
  数据清洗:数据科学家 80% 时间都花费在了这里?\
  数据集成:这些大号一共 20 亿粉丝?\
  数据变换:大学成绩要求正态分布合理么?\
  数据可视化:掌握数据领域的万金油技能\
  一次学会 Python 数据可视化的 10 种技能'''
  create_word_cloud(f)
去掉停用词
# 去掉停用词
def remove_stop_words(f):
     stop_words = ['学会', '就是', '什么']
     for stop_word in stop_words:
           f = f.replace(stop_word, '')
return f1 具体步骤

# -*- coding:utf-8 -*-

# 网易云音乐 通过歌手 ID,生成该歌手的词云
import matplotlib

matplotlib.use('Qt4Agg')

import requests
import sys
import re
import os
from wordcloud import WordCloud
import matplotlib.pyplot as plt
import jieba
from PIL import Image
import numpy as np
from lxml import etree
# plt.figure()
headers = {
  'Referer': 'http://music.163.com',
  'Host': 'music.163.com',
  'Accept': 'text/html,application/xhtml+xml,application/xml;q=0.9,image/webp,image/apng,*/*;q=0.8',
  'User-Agent': 'Chrome/10'
}

def plt_show():
  try:
    plt.show()
  except UnicodeDecodeError:
    plt_show()
# 得到某一首歌的歌词
def get_song_lyric(headers, lyric_url):
  res = requests.request('GET', lyric_url, headers=headers)
  if 'lrc' in res.json():
    lyric = res.json()['lrc']['lyric']
    new_lyric = re.sub(r'[\d:.[\]]', '', lyric)
    return new_lyric
  else:
    return ''
    print(res.json())


# 去掉停用词
def remove_stop_words(f):
  stop_words = ['作词', '作曲', '编曲', 'Arranger', '录音', '混音', '人声', 'Vocal', '弦乐', 'Keyboard', '键盘', '编辑', '助理',
                'Assistants', 'Mixing', 'Editing', 'Recording', '音乐', '制作', 'Producer', '发行', 'produced', 'and',
                'distributed']
  for stop_word in stop_words:
    f = f.replace(stop_word, '')
  return f


# 生成词云
def create_word_cloud(f):
  print('根据词频,开始生成词云!')
  f = remove_stop_words(f)
  cut_text = " ".join(jieba.cut(f, cut_all=False, HMM=True))
  wc = WordCloud(
    font_path="./wc.ttf",
    max_words=100,
    width=2000,
    height=1200,
  )
  print(cut_text)
  wordcloud = wc.generate(cut_text)
  # 写词云图片
  wordcloud.to_file("wordcloud.jpg")
  # 显示词云文件
  plt.imshow(wordcloud)
  plt.axis("off")
  plt_show()


# 得到指定歌手页面 热门前 50 的歌曲 ID,歌曲名
def get_songs(artist_id):
  page_url = 'https://music.163.com/artist?id=' + artist_id
  # 获取网页 HTML
  res = requests.request('GET', page_url, headers=headers)
  # 用 XPath 解析 前 50 首热门歌曲
  html = etree.HTML(res.text)
  href_xpath = "//*[@id='hotsong-list']//a/@href"
  name_xpath = "//*[@id='hotsong-list']//a/text()"
  hrefs = html.xpath(href_xpath)
  names = html.xpath(name_xpath)
  # 设置热门歌曲的 ID,歌曲名称
  song_ids = []
  song_names = []
  for href, name in zip(hrefs, names):
    song_ids.append(href[9:])
    song_names.append(name)
    print(href, '  ', name)
  return song_ids, song_names


# 设置歌手 ID,毛不易为 12138269
artist_id = '12138269'
[song_ids, song_names] = get_songs(artist_id)
# 所有歌词
all_word = ''
# 获取每首歌歌词
for (song_id, song_name) in zip(song_ids, song_names):
  # 歌词 API URL
  lyric_url = 'http://music.163.com/api/song/lyric?os=pc&id=' + song_id + '&lv=-1&kv=-1&tv=-1'
  lyric = get_song_lyric(headers, lyric_url)
  all_word = all_word + ' ' + lyric
  print(song_name)
# 根据词频 生成词云
create_word_cloud(all_word)