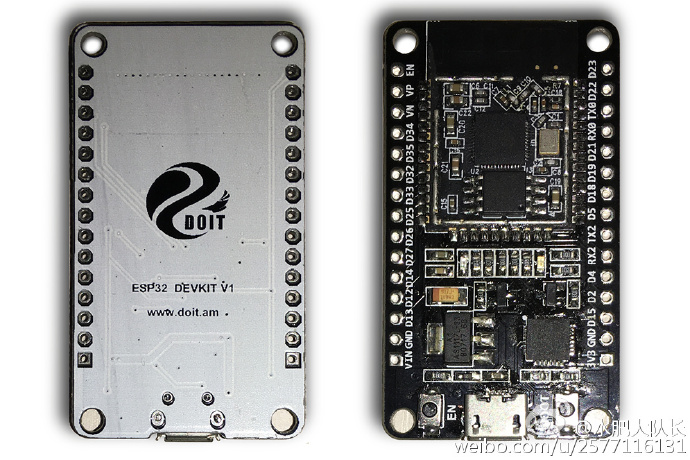
This tutorial will cover integration of the ESP32 with the Arduino IDE.
The ESP32 is in many ways the bigger brother or possibly a successor to the immensely successful ESP8266. The ESP32 chip as part of the NodeMCU Devkit board is still considered a board for developers since the first version of the silicon for the ESP32 has bugs. The community in collaboration with the manufacturer is working through the process of finding fixes to some of the issues. An early release of the board definitely gives the community a flavor or what's coming it way and also allows the community to kick off initiatives to build the relevant libraries, etc. to support the ESP32 on common development platforms like the Arduino IDE, Platform.io, etc.
In this tutorial we'll go over the process to install the relevant software required to get the DoIT NodeMCU Devkit v1 based on the ESP32 integrated into your Arduino IDE.
The ESP32 esp32.net is a 2.4 GHz Wi-Fi and Bluetooth combo chip with TSMC low power 40nm technology. The ESP32 offers some of the best power performance and RF performance combined with Robustness, versatility and reliability. ESP32 is highly-integrated with in-built antenna switches, RF balun, power amplifier, low-noise receive amplifier, filters, and power management modules. ESP32 adds priceless functionality and versatility to your applications with minimal Printed Circuit Board (PCB) area requirements. ESP32 can perform as a complete standalone system or as a slave device to a host MCU, reducing communication stack overhead on the main application processor. ESP32 can interface with other systems to provide Wi-Fi and Bluetooth functionality through the SPI / SDIO or I2C / UART interfaces. Engineered for mobile devices, wearable electronics and IoT applications, ESP32 achieves ultra-low power consumption with a combination of several types of proprietary software. The state-of-the-art power saving features include fine resolution clock gating, power modes, and dynamic power scaling. ESP32 is capable of functioning reliably in industrial environments with an operating temperature ranging from -40°C to +125°C. Powered by advanced calibration circuitries, ESP32 can dynamically remove external circuit imperfections or adapt to changes in external conditions.
Some of the key features of the ESP32 include -
- 240 MHz dual core Tensilica LX6 microcontroller with 600 DMIPS
- Integrated 520 KB SRAM
- Integrated 802.11 b/g/n HT40 Wi-Fi transceiver, baseband, stack and LWIP
- Integrated dual mode Bluetooth (classic and BLE)
- 16 MB flash, memory-mapped to the CPU code space
- 2.3V to 3.6V operating voltage
- -40°C to +125°C operating temperature
- On-board PCB antenna / IPEX connector for external antenna
In terms of sensors the ESP32 offers -
- Ultra-low noise analog amplifier
- Hall sensor
- 10x capacitive touch interfaces
- 32 kHz crystal oscillator
In terms of GPIO's the ESP32 offers -
- 3 x UARTs, including hardware flow control
- 3 x SPI
- 2 x I2S
- 12 x ADC input channels
- 2 x DAC
- 2 x I2C
- PWM/timer input/output available on every GPIO pin
- OpenOCD debug interface with 32 kB TRAX buffer
- SDIO master/slave 50 MHz
- Supports external SPI flash up to 16 MB
- SD-card interface support
Some of the security related features includes -
- WEP, WPA/WPA2 PSK/Enterprise
- Hardware accelerated encryption: AES/SHA2/Elliptical Curve Cryptography/RSA-4096
From a performance standpoint the ESP32's features include -
- Supports sniffer, Station, SoftAP and Wi-Fi direct mode
- Max data rate of 150 Mbps@11n HT40, 72 Mbps@11n HT20, 54 Mbps@11g, and 11 Mbps@11b
- Maximum transmit power of 19.5 dBm@11b, 16.5 dBm@11g, 15.5 dBm@11n
- Minimum receiver sensitivity of -98 dBm
- 135 Mbps UDP sustained throughput
- 5 μA power consumption in deep sleep
The ESP32-DevKitC is a low-footprint, minimal system development board which is powered by our latest ESP-WROOM-32 module and can be easily adjusted to a breadboard.The ESP32-Devkit is built around the ESP-WROOM-32, this minimal system development board achieves optimal performance with its rich peripheral set, Wi-Fi and Bluetooth radio solutions, which are offered by our latest SoC, the ESP32. The limit is your imagination!
The board is designed so that you can get right into application design and development without worrying about RF performance and antenna design. The ESP32-DevKitC has your basic system requirements already covered. Just plug in the USB cable and you’re good to go!
The ESP32-DevKit contains the entire basic support circuitry for the ESP-WROOM-32, including the USB-UART bridge(CH340), reset- and boot-mode buttons, LDO regulator and a micro-USB connector. All pin export GPIO is available to the developer. The ESP32-DevKitC pinout is optimized for prototyping on a breadboard. The on-board LDO output is led out for powering additional off-board electronics. Peripheral outputs are grouped together for hassle-free prototyping.
You can pick up a board at the following websites -
- Bangood.com or from
- AliExpress.
The boards will generally take around 2-4 weeks to ship from china depending on which part of the world you live in. Have patience and grab a cup of coffee...:)
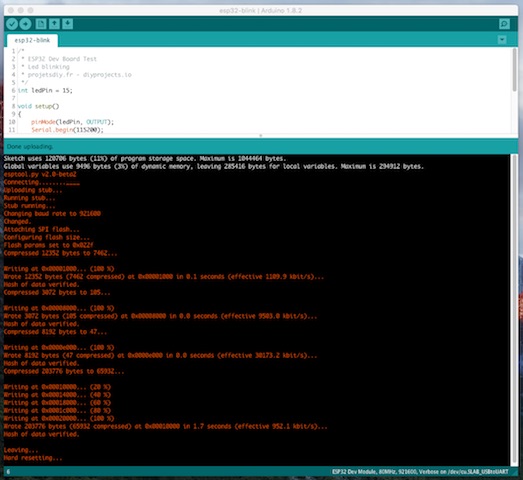
The end state with your ESP32 Dev Module configured for use within Arduino will look something like this....
Let's now get started with the installation and configuration process.
- Step 1 - Download and install the latest Arduino IDE Windows Installer from arduino.cc
- Step 2 - Download and install Git from git-scm.com.
Personally I prefer the command line verion of git but you can work with the GUI if that's what you prefer. For tutorials on how to use git and the common git commands please refer to the main page of this website. You'll find introductory tutorials on using git for purposes of source code managemet.
If you prefer using the GUI version of git and would prefer seeing the GUI version in action please head off to the RandomNerdTutorials Website
- Step 3 - Open up your Arduino installation folder. For me this happened to be C:\Program Files (x86)\Arduino\
- Step 4 - Create the additional folders (espressif\esp32) in your Arduino installation folder called "hardware" - C:\Program Files (x86)\Arduino\hardware\espressif\esp32
- Step 5 - Start Git GUI or open up a Git console and and clone the ESP32 repository into the Arduino folder - C:\Program Files (x86)\Arduino\hardware\espressif\esp32
- Step 6 - Issue the following command at the git console to clone the repository
> git clone https://github.com/espressif/arduino-esp32.git
- Step 7 - You will now find a folder called arduino-esp32 inside the espressif\esp32 folder where you just ran the git clone command.
- Step 8 - Lets now move all of the contents of the arduino-esp32 folder into espressif\esp32 folder. This means you'll be moving all the content from inside arduino-esp32 to one folder higher up in the heirarchy leaving the arduino-esp32 folder empty.
- Step 9 - Download and install Python 2.7 onto your machine. The URL for Python is - https://www.python.org/downloads/.
- Step 10 - Let's now install python 2.7. While installing python you'll be asked to select the components for installation. Please make sure you choose all the components including the option at the end which suggests that Python will be added to the system PATH variable. This is very important.
- Step 11 - Logoff and reboot the machine. I found that the PATH variable was not being set and i needed to reboot my windows laptop for the PATH variable to be set at logon. Open a command window and type python, you should see the Python interpreter in action.
- Step 12 - Open up Windows Explorer and now head into c:\Program Files (x86)\Arduino\hardware\espressif\esp32\tools.
- Step 13 - Double click on get.exe and the process of download, compilation of the tools will begin. With this step now complete you should be able to open your Arduino IDE and find support for ESP32 now integrated into the IDE.
- Step 14 - Head over to the Tools section of your Arduino IDE and look for "ESP32 - Dev Module". Select the relevant COM port and you are now ready to start hacking with your ESP32.
You can learn more about the installation process at the following links -
- https://github.com/espressif/arduino-esp32
- http://randomnerdtutorials.com/installing-the-esp32-board-in-arduino-ide-windows-instructions/
- http://dagrende.blogspot.com.au/2017/01/how-to-use-doit-esp32-devkit.html
- https://www.losant.com/blog/getting-started-with-esp32-and-platformio
- https://www.instructables.com/id/ESP32-With-Arduino-IDE/
We hope you've been able to get your ESP32 integrated into your Arduino IDE. You should now be able to write and compile programs for your ESP32.
Thanks!!! Keep Hacking!!!

