In this HowTo will focus on measuring and reporting temperature and humidity using the DHT11, DHT22 using the ESP8266 (NodeMCU). Capturing temperature and humidity might just be the most common project among hackers out there. The DHT11, DHT22 combined with the ESP8266 make the entire process a piece of cake (literally speaking that is...:)). In this section we will provide an introduction to the ESP8226 and its features including a high level overview of both the DHT11, DHT22 sensors. So why wait, hop on-board and lets get going!!!!!
The DHT11, DHT22 sensors are very basic and slow, but are great for hobbyists who want to do some basic data logging. The DHT sensors are made of two parts, a capacitive humidity sensor and a thermistor. There is also a very basic chip inside that does some analog to digital conversion and spits out a digital signal with the temperature and humidity. The digital signal is fairly easy to read using any microcontroller.
Here are the specs of the DHT22 v/s DHT11 -
-
DHT11 : Ultra low cost
- 3 to 5V power and I/O
- 2.5mA max current use during conversion (while requesting data)
- Good for 20-80% humidity readings with 5% accuracy
- Good for 0-50°C temperature readings ±2°C accuracy
- No more than 1 Hz sampling rate (once every second)
- Body size 15.5mm x 12mm x 5.5mm
- 4 pins with 0.1" spacing
-
DHT22 : Low cost
- 3 to 5V power and I/O
- 2.5mA max current use during conversion (while requesting data)
- Good for 0-100% humidity readings with 2-5% accuracy
- Good for -40 to 125°C temperature readings ±0.5°C accuracy
- No more than 0.5 Hz sampling rate (once every 2 seconds)
- Body size 15.1mm x 25mm x 7.7mm
- 4 pins with 0.1" spacing
The DHT22 is a little more accurate than the DHT11 and good over a slightly larger range. Both use a single digital pin and are 'sluggish' in that you can't query them more than once every second or two. You can read more about the DHT22 here DHT22 - Adafruit and the DHT11 here DHT11 - Adafruit.
Here's what Wikipedia has to say, "NodeMCU is an open source IoT platform.It includes firmware which runs on the ESP8266 Wi-Fi SoC from Espressif Systems[6], and supporting hardware which is based on the ESP-12 module. The term "NodeMCU" by default refers to the firmware rather than the dev kits. The firmware uses the Lua scripting language. It is based on the eLua project, and built on the Espressif Non-OS SDK for ESP8266. It uses many open source projects, such as lua-cjson and spiffs.
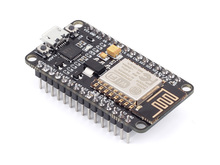
NodeMCU was created shortly after the ESP8266 came out. On December 30, 2013, Espressif Systems began production of the ESP8266. The ESP8266 is a Wi-Fi SoC integrated with a Tensilica Xtensa LX106 core, widely used in IoT applications. NodeMCU started on 13 Oct 2014, when Hong committed the first file of nodemcu-firmware to GitHub.Two months later, the project expanded to include an open-hardware platform when developer Huang R committed the gerber file of an ESP8266 board, named devkit v0.9. Later that month, Tuan PM ported MQTT client library from Contiki to the ESP8266 SoC platform and committed to NodeMCU project, then NodeMCU was able to support the MQTT IoT protocol, using Lua to access the MQTT broker. Another important update was made on 30 Jan 2015, when Devsaurus ported the u8glib to NodeMCU project, enabling NodeMCU to easily drive LCD, Screen, OLED, even VGA displays.
In summer 2015 the creators abandoned the firmware project and a group of independent but dedicated contributors took over. By summer 2016 the NodeMCU included more than 40 different modules. Due to resource constraints users need to select the modules relevant for their project and build a firmware tailored to their needs".
You can pick up a NodeMCU ESP8266 from either of the following locations -
Here's what wikipedia has to say, "As Arduino.cc began developing new MCU boards based on non-AVR processors like the ARM/SAM MCU and used in the Arduino Due, they needed to modify the Arduino IDE so that it would be relatively easy to change the IDE to support alternate tool chains to allow Arduino C/C++ to be compiled down to these new processors. They did this with the introduction of the Board Manager and the SAM Core. A "core" is the collection of software components required by the Board Manager and the Arduino IDE to compile an Arduino C/C++ source file down to the target MCU's machine language. Some creative ESP8266 enthusiasts have developed an Arduino core for the ESP8266 WiFi SoC that is available at the GitHub ESP8266 Core webpage. This is what is popularly called the "ESP8266 Core for the Arduino IDE" and it has become one of the leading software development platforms for the various ESP8266 based modules and development boards, including NodeMCUs. For more information on all things ESP8266, check out the ESP8266 Community Forum on GitHub."
This tutorial links to code to get both the DHT11 and DHT22 working with the NodeMCU ESP8266. Let's look at the list of components required to get started -
- 1 x DHT11 or DHT22
- 1 x 10 KOhm Resistor
- 1 x NodeMCu ESP8266
- Dupont Wires : Male to Male
- Dupont Wires : Male to Female
- 1 x Breadboard
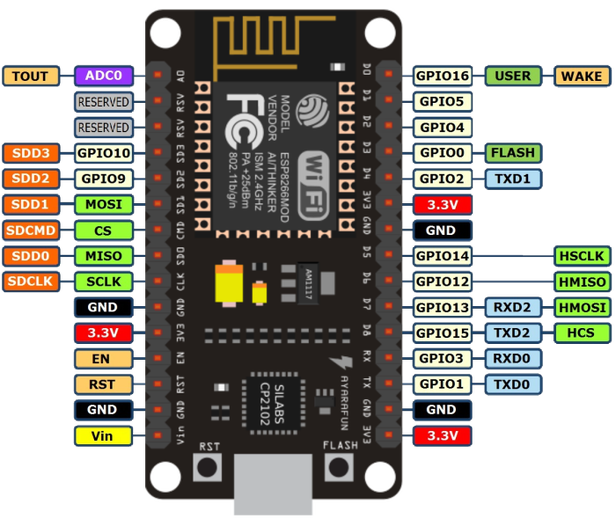
Once you have procured all the above parts you should be good to proceed with the connections. Let's step through the connections in detail -
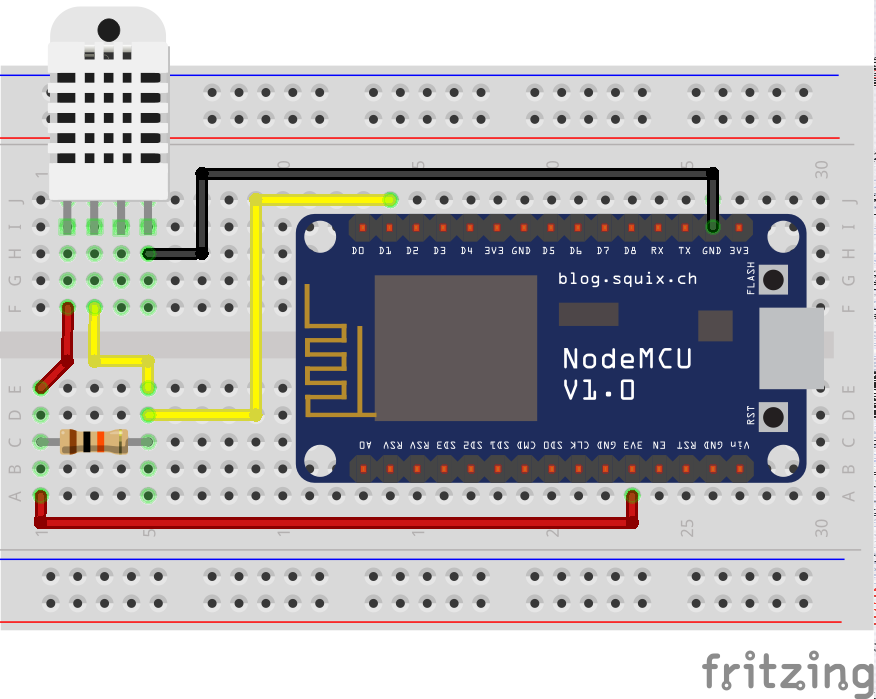
- Step 1 : 3V3 on the NodeMCU ESP8266 going to one end of the 10K resistor
- Step 2 : Connect a dupont male to female wire from the same end of the 10K resistor (Step 1 above) to the Vcc of the DHT22, DHT11
- Step 3 : Ground from the NodeMCU ESP8266 connects to the Ground on the DHT22, DHT11
- Step 4 : D0 (GPIO 16) from the NodeMCU ESP822 connects to the other end of the 10K resistor.
- Step 5 : Connect up the other end of the 10K resistor (step 4) to the Signal or Data pin on the DHT22, DHT11
The entire circuit is documented above and is pretty simple in terms of the connections.
Once you have sorted out the components and built your circuit using a bread board you are good to start hacking with some code. We will assume you have your IDE (Integrated Development Environment) setup and ready to go with regards to programming the NodeMCU ESP8266. Configuration of your IDE to program your ESP8266 is out of scope of this tutorial. In this tutorial we assume you have setup the Arduino IDE to program your NodeMCU ESP8266. The Arduino IDE seems to be the most commonly used development platform for the NodeMCU and also happens to be very easy to get up and running since the library support is almost out of the box.
Let's take a look at the projects which we might consider using -
- Location for all of the code related to measurement of temperature and humidity - Link
- Code for the DHT11 based on the SimpleDHT library
- Code for the DHT22 based on the SimpleDHT library
- ESP8266 Web Server based on the SimpleDHT library
- Simple implementation of the Adafruit based arduino library for DHT11, DHT22
- Advanced implementation of the Adafruit based arduino library for the DHT11, DHT22
You can download both the SimpleDHT and the Adafruit DHT library using the library manager on the Arduino. However a point to note is that i haven't been able to get either the NodeMCU ESP8266 or the NodeMCU ESP32 working with the DHT22 with either of the above libraries i.e. Adafruit DHT or the SimpleDHT. It's only when i tried to get the setup working with a DHT11 and the SimpleDHT library did i have much success.
Hope you've had fun hacking with the DHT11, DHT22. The code in many cases is based on inspiration obtained from the work done by others, building upon what they've left behind. Hope you have found the tutorial helpful in setting up your own IoT devices around the house picking up temperature, humidity data.
Happy Hacking!!!!