In this section we continue our discussion of how to use Spring Security with Angular in a "single page application". Here we show how to use Spring Session together with Spring Cloud to combine the features of the systems we built in parts II and IV, and actually end up building 3 single page applications with quite different responsibilities. The aim is to build a Gateway (like in part IV) that is used not only for API resources but also to load the UI from a backend server. We simplify the token-wrangling bits of part II by using the Gateway to pass through the authentication to the backends. Then we extend the system to show how we can make local, granular access decisions in the backends, while still controlling identity and authentication at the Gateway. This is a very powerful model for building distributed systems in general, and has a number of benefits that we can explore as we introduce the features in the code we build.
Reminder: if you are working through this section with the sample application, be sure to clear your browser cache of cookies and HTTP Basic credentials. In Chrome the best way to do that is to open a new incognito window.
Here’s a picture of the basic system we are going to build to start with:
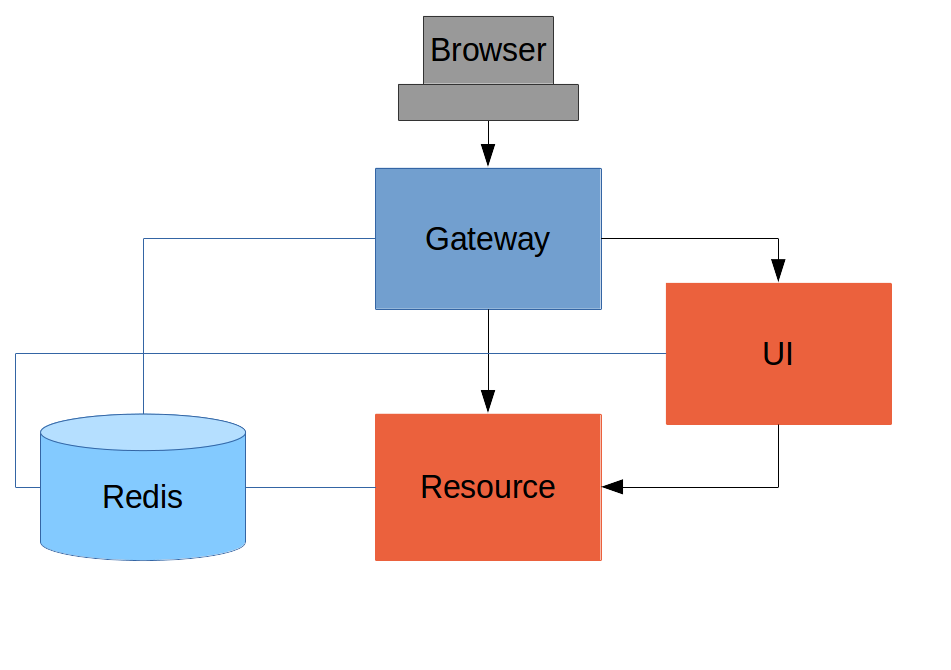
Like the other sample applications in this series it has a UI (HTML and JavaScript) and a Resource server. Like the sample in Section IV it has a Gateway, but here it is separate, not part of the UI. The UI effectively becomes part of the backend, giving us even more choice to re-configure and re-implement features, and also bringing other benefits as we will see.
The browser goes to the Gateway for everything and it doesn’t have to know about the architecture of the backend (fundamentally, it has no idea that there is a back end). One of the things the browser does in this Gateway is authentication, e.g. it sends a username and password like in Section II, and it gets a cookie in return. On subsequent requests it presents the cookie automatically and the Gateway passes it through to the backends. No code needs to be written on the client to enable the cookie passing. The backends use the cookie to authenticate and because all components share a session they share the same information about the user. Contrast this with Section V where the cookie had to be converted to an access token in the Gateway, and the access token then had to be independently decoded by all the backend components.
As in Section IV the Gateway simplifies the interaction between clients and servers, and it presents a small, well-defined surface on which to deal with security. For example, we don’t need to worry about Cross Origin Resource Sharing, which is a welcome relief since it is easy to get wrong.
The source code for the complete project we are going to build is in Github here, so you can just clone the project and work directly from there if you want. There is an extra component in the end state of this system ("double-admin") so ignore that for now.
In this architecture the backend is very similar to the "spring-session" sample we built in Section III, with the exception that it doesn’t actually need a login page. The easiest way to get to what we want here is probably to copy the "resource" server from Section III and take the UI from the "basic" sample in Section I. To get from the "basic" UI to the one we want here, we need only to add a couple of dependencies (like when we first used Spring Session in Section III):
<dependency>
  <groupId>org.springframework.session</groupId>
  <artifactId>spring-session</artifactId>
</dependency>
<dependency>
  <groupId>org.springframework.boot</groupId>
  <artifactId>spring-boot-starter-redis</artifactId>
</dependency>
Since this is now a UI there is no need for the "/resource" endpoint. When you have done that you will have a very simple Angular application (the same as in the "basic" sample), which simplifies testing and reasoning about its behaviour greatly.
Lastly, we want this server to run as a backend, so we’ll give it a non-default port to listen on (in application.properties):
server.port: 8081
security.sessions: NEVER
If that’s the whole content application.properties then the application will be secure and accessible to a user called "user" with a password that is random, but printed on the console (at log level INFO) on startup. The "security.sessions" setting means that Spring Security will accept cookies as authentication tokens but won’t create them unless they already exist.
The Resource server is easy to generate from one of our existing samples. It is the same as the "spring-session" Resource server in Section III: just a "/resource" endpoint Spring Session to get the distributed session data. We want this server to have a non-default port to listen on, and we want to be able to look up authentication in the session so we need this (in application.properties):
server.port: 9000
security.sessions: NEVER
We are going to be POSTing changes to our message resource, which is a new feature in this tutorial. It means that we are going to need CSRF protection in the backend, and we need to do the usual trick to make Spring Security play nicely with Angular:
@Override
protected void configure(HttpSecurity http) throws Exception {
	http.csrf()
			.csrfTokenRepository(CookieCsrfTokenRepository.withHttpOnlyFalse());
}
The completed sample is here in github if you want to take a peek.
For an initial implementation of a Gateway (the simplest thing that could
possibly work) we can just take an empty Spring Boot web application and add the
@EnableZuulProxy annotation.
As we saw in
Section I there are
several ways to do that, and one is to use the
Spring Initializr to generate a skeleton project.
Even easier, is to use the Spring Cloud Initializr
which is the same thing, but for Spring Cloud
applications.
Using the same sequence of command line operations as in Section I:
$ mkdir gateway && cd gateway
$ curl https://cloud-start.spring.io/starter.tgz -d style=web \
  -d style=security -d style=cloud-zuul -d name=gateway \
  -d style=redis | tar -xzvf -
You can then import that project (it’s a normal Maven Java project by default) into your favourite IDE, or just work with the files and "mvn" on the command line. There is a version in github if you want to go from there, but it has a few extra features that we don’t need yet.
Starting from the blank Initializr application, we add the Spring Session dependency (like in the UI above). The Gateway is ready to run, but it doesn’t yet know about our backend services, so let’s just set that up in its application.yml (renaming from application.properties if you did the curl thing above):
zuul:
  sensitive-headers:
  routes:
    ui:
      url: http://localhost:8081
   resource:
      url: http://localhost:9000
security:
  user:
    password:
      password
  sessions: ALWAYS
There are 2 routes in the proxy, both of which pass cookies downstream using the sensitive-headers property, one each for the UI and resource server, and we have set up a default password and a session persistence strategy (telling Spring Security to always create a session on authentication). This last bit is important because we want authentication and therefore sessions to be managed in the Gateway.
We now have three components, running on 3 ports. If you point the browser at http://localhost:8080/ui/ you should get an HTTP Basic challenge, and you can authenticate as "user/password" (your credentials in the Gateway), and once you do that you should see a greeting in the UI, via a backend call through the proxy to the Resource server.
The interactions between the browser and the backend can be seen in your browser if you use some developer tools (usually F12 opens this up, works in Chrome by default, may require a plugin in Firefox). Here’s a summary:
| Verb | Path | Status | Response |
|---|---|---|---|
GET |
/ui/ |
401 |
Browser prompts for authentication |
GET |
/ui/ |
200 |
index.html |
GET |
/ui/*.js |
200 |
Angular assets |
GET |
/ui/js/hello.js |
200 |
Application logic |
GET |
/ui/user |
200 |
authentication |
GET |
/resource/ |
200 |
JSON greeting |
You might not see the 401 because the browser treats the home page load as a single interaction. All requests are proxied (there is no content in the Gateway yet, beyond the Actuator endpoints for management).
Hurrah, it works! You have two backend servers, one of which is a UI, each with independent capabilities and able to be tested in isolation, and they are connected together with a secure Gateway that you control and for which you have configured the authentication. If the backends are not accessible to the browser it doesn’t matter (in fact it’s probably an advantage because it gives you yet more control over physical security).
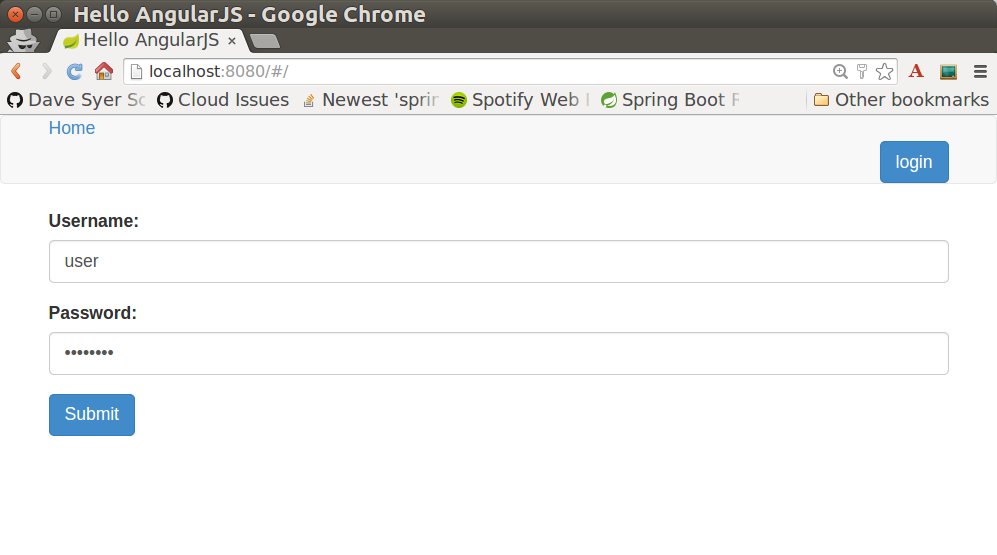
Just as in the "basic" sample in Section I we can now add a login form to the Gateway, e.g. by copying the code from Section II. When we do that we can also add some basic navigation elements in the Gateway, so the user doesn’t have to know the path to the UI backend in the proxy. So let’s first copy the static assets from the "single" UI into the Gateway, delete the message rendering and insert a login form into our home page (in the <app/> somewhere):
<div class="container" [hidden]="authenticated">
<form role="form" (submit)="login()">
<div class="form-group">
<label for="username">Username:</label> <input type="text"
class="form-control" id="username" name="username"
[(ngModel)]="credentials.username" />
</div>
<div class="form-group">
<label for="password">Password:</label> <input type="password"
class="form-control" id="password" name="password"
[(ngModel)]="credentials.password" />
</div>
<button type="submit" class="btn btn-primary">Submit</button>
</form>
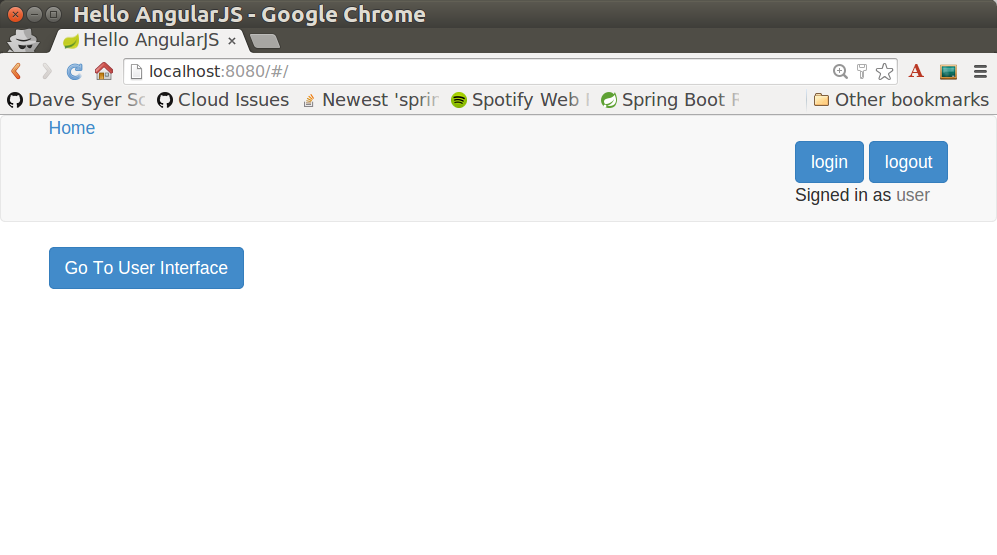
</div>Instead of the message rendering we will have a nice big navigation button:
<div class="container" [hidden]="!authenticated">
	<a class="btn btn-primary" href="/ui/">Go To User Interface</a>
</div>
If you are looking at the sample in github, it also has a minimal navigation bar with a "Logout" button. Here’s the login form in a screenshot:
To support the login form we need some TypeScript with a component implementing the login() function we declared in the <form/>, and we need to set the authenticated flag so that the home page will render differently depending on whether or not the user is authenticated. For example:
include::src/app/app.component.tswhere the implementation of the login() function is similar to that in Section II.
We can use the self to store the authenticated flag because there is only one component in this simple application.
If we run this enhanced Gateway, instead of having to remember the URL for the UI we can just load the home page and follow links. Here’s the home page for an authenticated user:
Up to now our application is functionally very similar to the one in Section III or Section IV, but with an additional dedicated Gateway. The advantage of the extra layer may not be yet apparent, but we can emphasise it by expanding the system a bit. Suppose we want to use that Gateway to expose another backend UI, for users to "administrate" the content in the main UI, and that we want to restrict access to this feature to users with special roles. So we will add an "Admin" application behind the proxy, and the system will look like this:
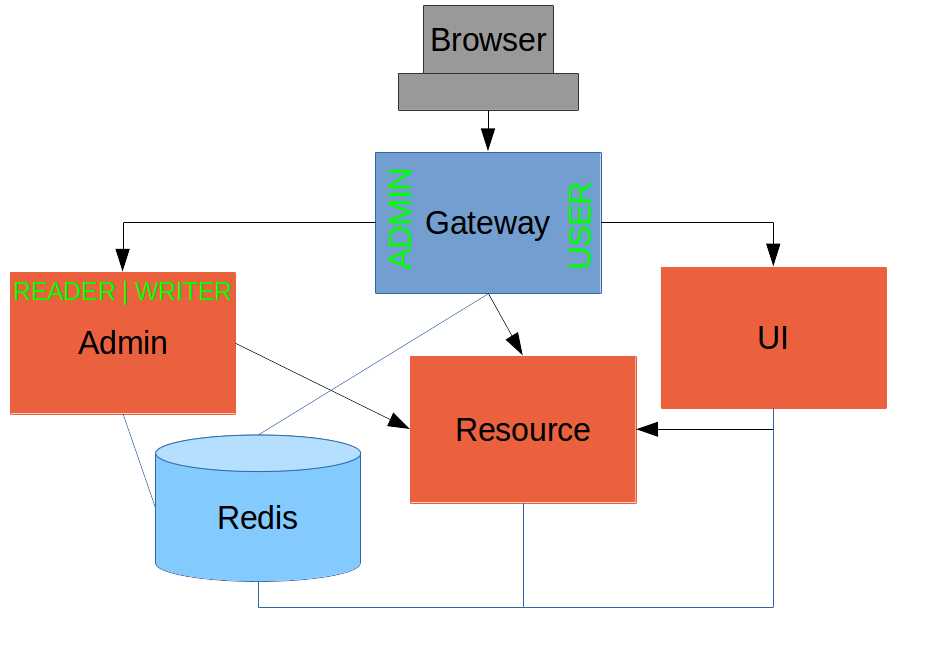
There is a new component (Admin) and a new route in the Gateway in application.yml:
zuul:
  sensitive-headers:
  routes:
    ui:
      url: http://localhost:8081
    admin:
      url: http://localhost:8082
    resource:
      url: http://localhost:9000
The fact that the existing UI is available to users in the "USER" role is indicated on the block diagram above in the Gateway box (green lettering), as is the fact that the "ADMIN" role is needed to go to the Admin application. The access decision for the "ADMIN" role could be applied in the Gateway, in which case it would appear in a WebSecurityConfigurerAdapter, or it could be applied in the Admin application itself (and we will see how to do that below).
So first, create a new Spring Boot application, or copy the UI and edit it. You won’t need to change much in the UI app except the name to start with. The finished app is in Github here.
Suppose that within the Admin application we want to distinguish between "READER" and "WRITER" roles, so that we can permit (let’s say) users who are auditors to view the changes made by the main admin users. This is a granular access decision, where the rule is only known, and should only be known, in the backend application. In the Gateway we only need to ensure that our user accounts have the roles needed, and this information is available, but the Gateway doesn’t need to know how to interpret it. In the Gateway we create user accounts to keep the sample application self-contained:
@Configuration
public class SecurityConfiguration extends WebSecurityConfigurerAdapter {

  @Autowired
  public void globalUserDetails(AuthenticationManagerBuilder auth) throws Exception {
    auth.inMemoryAuthentication()
      .withUser("user").password("password").roles("USER")
    .and()
      .withUser("admin").password("admin").roles("USER", "ADMIN", "READER", "WRITER")
    .and()
      .withUser("audit").password("audit").roles("USER", "ADMIN", "READER");
  }

}
where the "admin" user has been enhanced with 3 new roles ("ADMIN", "READER" and "WRITER") and we have also added an "audit" user with "ADMIN" access, but not "WRITER".
|
Tip
|
In a production system the user account data would be managed in a backend database (most likely a directory service), not hard coded in the Spring Configuration. Sample applications connecting to such a database are easy to find on the internet, for example in the Spring Security Samples. |
The access decisions go in the Admin application. For the "ADMIN" role (which is required globally for this backend) we do it in Spring Security:
@Configuration
public class SecurityConfiguration extends WebSecurityConfigurerAdapter {

@Override
  protected void configure(HttpSecurity http) throws Exception {
    http
    ...
      .authorizeRequests()
        .antMatchers("/index.html", "/").permitAll()
        .antMatchers("/admin/**").hasRole("ADMIN")
        .anyRequest().authenticated()
    ...
  }

}
For the "READER" and "WRITER" roles the application itself is split, and since the application is implemented in JavaScript, that is where we need to make the access decision. One way to do this is to have a home page with a computed view embedded in it via the router:
<div class="container">
	<h1>Admin</h1>
	<router-outlet></router-outlet>
</div>
The route is computed when the component loads:
@Component({
  selector: 'app-root',
  templateUrl: './app.component.html',
  styleUrls: ['./app.component.css']
})
export class AppComponent {

  user: {};

  constructor(private app: AppService, private http: HttpClient, private router: Router) {
    app.authenticate(response => {
      this.user = response;
      this.message();
    });
  }

  logout() {
    this.http.post('logout', {}).subscribe(function() {
        this.app.authenticated = false;
        this.router.navigateByUrl('/login');
    });
  }

  message() {
    if (!this.app.authenticated) {
      this.router.navigate(['/unauthenticated']);
    } else {
      if (this.app.writer) {
        this.router.navigate(['/write']);
      } else {
        this.router.navigate(['/read']);
      }
    }
  }
...
}
the first thing the application does is look at check if the user is authenticated, and computes the route by looking at the user data. The routes are declared in the main module:
const routes: Routes = [
  { path: '', pathMatch: 'full', redirectTo: 'read'},
  { path: 'read', component: ReadComponent},
  { path: 'write', component: WriteComponent},
  { path: 'unauthenticated', component: UnauthenticatedComponent},
  { path: 'changes', component: ChangesComponent}
];
Each of those components (one for each route) has to be implemented separately. Here’s the ReadComponent as an example:
link:admin/src/app/read.component.ts[role=include]link:admin/src/app/read.component.html[role=include]The WriteComponent is similar, but has a form to change the message in the backend:
link:admin/src/app/write.component.ts[role=include]link:admin/src/app/write.component.html[role=include]The AppService also needs to provide the data to compute the route, so in the authenticate() function we see this:
        http.get('/user').subscribe(function(response) {
            var user = response.json();
            if (user.name) {
                self.authenticated = true;
                self.writer = user.roles && user.roles.indexOf("ROLE_WRITER")>0;
            } else {
                self.authenticated = false;
                self.writer = false;
            }
            callback && callback(response);
        })
To support this function on the backend we need the /user endpoint, e.g. in our main application class:
@SpringBootApplication
@RestController
public class AdminApplication {

  @RequestMapping("/user")
  public Map<String, Object> user(Principal user) {
    Map<String, Object> map = new LinkedHashMap<String, Object>();
    map.put("name", user.getName());
    map.put("roles", AuthorityUtils.authorityListToSet(((Authentication) user)
        .getAuthorities()));
    return map;
  }

  public static void main(String[] args) {
    SpringApplication.run(AdminApplication.class, args);
  }

}|
Note
|
the role names come back from the "/user" endpoint with the "ROLE_" prefix so we can distinguish them from other kinds of authorities (it’s a Spring Security thing). Thus the "ROLE_" prefix is needed in the JavaScript, but not in the Spring Security configuration, where it is clear from the method names that "roles" are the focus of the operations. |
We are going to use the roles to make access decisions in the Gateway as well (so we can conditionally display a link to the admin UI), so we should add the "roles" to the "/user" endpoint in the Gateway as well. Once that is in place we can add some JavaScript to set up a flag to indicate that the current user is an "ADMIN". In the authenticated() function:
this.http.get('user', {headers: headers}).subscribe(data => {
  this.authenticated = data && data['name'];
  this.user = this.authenticated ? data['name'] : '';
  this.admin = this.authenticated && data['roles'] && data['roles'].indexOf('ROLE_ADMIN') > -1;
});
and we also need to reset the admin flag to false when a user logs out:
this.logout = function() {
    http.post('logout', {}).subscribe(function() {
        self.authenticated = false;
        self.admin = false;
    });
}
and then in the HTML we can conditionally show a new link:
<div class="container" [hidden]="!authenticated">
	<a class="btn btn-primary" href="/ui/">Go To User Interface</a>
</div>
<br />
<div class="container" [hidden]="!authenticated || !admin">
	<a class="btn btn-primary" href="/admin/">Go To Admin Interface</a>
</div>
Run all the apps and go to http://localhost:8080 to see the result. Everything should be working fine, and the UI should change depending on the currently authenticated user.
Now we have a nice little system with 2 independent user interfaces and a backend Resource server, all protected by the same authentication in a Gateway. The fact that the Gateway acts as a micro-proxy makes the implementation of the backend security concerns extremely simple, and they are free to concentrate on their own business concerns. The use of Spring Session has (again) avoided a huge amount of hassle and potential errors.
A powerful feature is that the backends can independently have any kind of authentication they like (e.g. you can go directly to the UI if you know its physical address and a set of local credentials). The Gateway imposes a completely unrelated set of constraints, as long as it can authenticate users and assign metadata to them that satisfy the access rules in the backends. This is an excellent design for being able to independently develop and test the backend components. If we wanted to, we could go back to an external OAuth2 server (like in Section V, or even something completely different) for the authentication at the Gateway, and the backends would not need to be touched.
A bonus feature of this architecture (single Gateway controlling authentication, and shared session token across all components) is that "Single Logout", a feature we identified as difficult to implement in Section V, comes for free. To be more precise, one particular approach to the user experience of single logout is automatically available in our finished system: if a user logs out of any of the UIs (Gateway, UI backend or Admin backend), he is logged out of all the others, assuming that each individual UI implemented a "logout" feature the same way (invalidating the session).
Thanks: I would like to thank again everyone who helped me develop this series, and in particular Rob Winch and Thorsten Späth for their careful reviews of the sections and sources code. Since Section I was published it hasn’t changed much but all the other parts have evolved in response to comments and insights from readers, so thank you also to anyone who read the sections and took the trouble to join in the discussion.