import { Tab, Tabs } from 'nextra-theme-docs'
import ExtendedTabs from '../../../components/ExtendedTabs/ExtendedTabs'; import { dataItems } from '../../../utils/constants'; import { useRef, useEffect } from 'react'
export function DynamicCode({ children }) { const ref = useRef() useEffect(() => { const projToken = new URLSearchParams(window.location.search).get("projectToken"); if (ref.current && projToken) { const token = [...ref.current.querySelectorAll('code span')].find(el => (el.innerText === '"YOUR_TOKEN"' || el.innerText === '@"YOUR_TOKEN"')) if (token) { token.innerText = '"' + projToken + '"' } } }); return
You can use Mixpanel's SDKs to track events from your website, web application, or backend servers. We recommend server-side tracking, since it is more reliable and easier to maintain than web/mobile tracking.
Note: You'll need your Project Token to authenticate, which you can get here.
<Tabs items={['snippet', 'npm', 'yarn']}>
html <!-- Paste this right before your closing </head> tag --> <script type="text/javascript"> (function (f, b) { if (!b.__SV) { var e, g, i, h; window.mixpanel = b; b._i = []; b.init = function (e, f, c) { function g(a, d) { var b = d.split("."); 2 == b.length && ((a = a[b[0]]), (d = b[1])); a[d] = function () { a.push([d].concat(Array.prototype.slice.call(arguments, 0))); }; } var a = b; "undefined" !== typeof c ? (a = b[c] = []) : (c = "mixpanel"); a.people = a.people || []; a.toString = function (a) { var d = "mixpanel"; "mixpanel" !== c && (d += "." + c); a || (d += " (stub)"); return d; }; a.people.toString = function () { return a.toString(1) + ".people (stub)"; }; i = "disable time_event track track_pageview track_links track_forms track_with_groups add_group set_group remove_group register register_once alias unregister identify name_tag set_config reset opt_in_tracking opt_out_tracking has_opted_in_tracking has_opted_out_tracking clear_opt_in_out_tracking start_batch_senders people.set people.set_once people.unset people.increment people.append people.union people.track_charge people.clear_charges people.delete_user people.remove".split( " "); for (h = 0; h < i.length; h++) g(a, i[h]); var j = "set set_once union unset remove delete".split(" "); a.get_group = function () { function b(c) { d[c] = function () { call2_args = arguments; call2 = [c].concat(Array.prototype.slice.call(call2_args, 0)); a.push([e, call2]); }; } for ( var d = {}, e = ["get_group"].concat( Array.prototype.slice.call(arguments, 0)), c = 0; c < j.length; c++) b(j[c]); return d; }; b._i.push([e, f, c]); }; b.__SV = 1.2; e = f.createElement("script"); e.type = "text/javascript"; e.async = !0; e.src = "undefined" !== typeof MIXPANEL_CUSTOM_LIB_URL ? MIXPANEL_CUSTOM_LIB_URL : "file:" === f.location.protocol && "//cdn.mxpnl.com/libs/mixpanel-2-latest.min.js".match(/^\/\//) ? "https://cdn.mxpnl.com/libs/mixpanel-2-latest.min.js" : "//cdn.mxpnl.com/libs/mixpanel-2-latest.min.js"; g = f.getElementsByTagName("script")[0]; g.parentNode.insertBefore(e, g); } })(document, window.mixpanel || []); </script>
text npm install --save mixpanel-browser
text yarn add mixpanel-browser
npm install mixpanel-react-native
Under your application's iOS folder, run:
pod install
Note: For XCode 12.5+, there is a known compile issue, please refer to this workaround.
Add mixpanel_flutter: ^2.0.0 to your package's pubspec.yaml file and run:
flutter pub get
- In Xcode, select File > Swift Packages > Add Package Dependency.
- Follow the prompts using the URL for this repository and must select a version greater than or equal to v4.0.0
CocoaPods
- Create a Podfile in your Xcode project directory by running
pod initin your terminal, edit the Podfile generated, and add the following line:pod 'Mixpanel'. - Run
pod installin your Xcode project directory. CocoaPods should download and install the Mixpanel library, and create a new Xcode workspace. Open up this workspace in Xcode or typingopen *.xcworkspacein your terminal.
Carthage
Add github "mixpanel/mixpanel-iphone" to your Cartfile.
Swift Package Manager (requires Xcode 12+)
- In Xcode, select File > Swift Packages > Add Package Dependency.
- Paste the URL
https://github.com/mixpanel/mixpanel-swiftand a minimum semantic version of v2.8.0.
CocoaPods
- Create a Podfile in your Xcode project directory by running
pod initin your terminal, edit the Podfile generated, and add the following line:pod 'Mixpanel-swift'. - Run
pod installin your Xcode project directory. CocoaPods should download and install the Mixpanel library, and create a new Xcode workspace. Open up this workspace in Xcode or typingopen *.xcworkspacein your terminal.
Carthage
Add github "mixpanel/mixpanel-swift" to your Cartfile.
Add implementation 'com.mixpanel.android:mixpanel-android:7.+' as a dependency to your build.gradle file.
Once you've updated build.gradle, you can force Android Studio to sync with your new configuration by clicking the Sync Project with Gradle Files icon at the top of the window:

If it cannot find the dependency, you should make sure you've specified mavenCentral() as a repository in build.gradle.
Next, add the following permissions in your AndroidManifest.xml:
<!--Required to allow the application to send events to Mixpanel.-->
<uses-permission android:name="android.permission.INTERNET" />

<!--Optional, but recommended so we can send data intelligently based on network conditions -->
<uses-permission android:name="android.permission.ACCESS_NETWORK_STATE" />

<!-- Optional, but recommended so events will contain information about bluetooth state-->
<uses-permission android:name="android.permission.BLUETOOTH" />
Add https://github.com/mixpanel/mixpanel-unity.git#master to the dependencies section of com.mixpanel.unity.
Alternatively, you can download and install the .unitypackage file from our releases page.
```js Javascript import mixpanel from 'mixpanel-browser';mixpanel.init("YOUR_TOKEN", {debug: true, track_pageview: true, persistence: 'localStorage'});
// Set this to a unique identifier for the user performing the event. mixpanel.identify('USER_ID')
// Track an event. It can be anything, but in this example, we're tracking a Sign Up event. mixpanel.track('Sign Up', { 'Signup Type': 'Referral' })
🎉 Congratulations, you've tracked your first event! You can see it in Mixpanel via the [Events page](https://mixpanel.com/report/events).

You can also follow our video walkthrough [here](https://www.loom.com/embed/fbba03274dc441b49b578e8a734b1d99).
</DynamicCode>
</Tab>

<Tab>
```python Python
from mixpanel import Mixpanel

mp = Mixpanel("YOUR_TOKEN")

# Note: you must supply the user_id who performed the event as the first parameter.
mp.track(user_id, 'Signed Up',  {
  'Signup Type': 'Referral'
})
🎉 Congratulations, you've tracked your first event! You can see it in Mixpanel via the Events page.
For more options, see the reference and code for each SDK in Github.
```js Node.js var Mixpanel = require("mixpanel");var mixpanel = Mixpanel.init("<YOUR_TOKEN>");
// Note: you must supply the user_id who performed the event in the distinct_id field
mixpanel.track("Signed Up", {
distinct_id: user_id,
"Signup Type": "Referral",
});
🎉 Congratulations, you've tracked your first event! You can see it in Mixpanel via the [Events page](https://mixpanel.com/report/events).

For more options, see the reference and code for each SDK in [Github](https://github.com/mixpanel).

</Tab>

<Tab>
```go Go
package main

import (
	"context"
	"github.com/mixpanel/mixpanel-go"
)

func main() {
	ctx := context.Background()

	mp := mixpanel.NewApiClient("PROJECT_TOKEN")
	if err := mp.Track(ctx, []*mixpanel.Event{
		mp.NewEvent("Signed Up", mixpanel.EmptyDistinctID, map[string]any{
			"Signup Type": "Referral",
		}),
	}); err != nil {
		panic(err)
	}
}
🎉 Congratulations, you've tracked your first event! You can see it in Mixpanel via the Events page.
For more options, see the reference and code for each SDK in Github.
```ruby Ruby require 'mixpanel-ruby' mp = Mixpanel::Tracker.new(PROJECT_TOKEN)mp.track(user_id, 'Signed Up', { 'Signup Type' => 'Referral' })
🎉 Congratulations, you've tracked your first event! You can see it in Mixpanel via the [Events page](https://mixpanel.com/report/events).

For more options, see the reference and code for each SDK in [Github](https://github.com/mixpanel).

</Tab>


<Tab>
```java Java
import com.mixpanel.mixpanelapi.ClientDelivery;
import com.mixpanel.mixpanelapi.MessageBuilder;
import com.mixpanel.mixpanelapi.MixpanelAPI;

MessageBuilder messageBuilder = new MessageBuilder(PROJECT_TOKEN);

// You can send properties along with events
JSONObject props = new JSONObject();
props.put("Signup Type", "Referral");

// Create an event
JSONObject sentEvent = messageBuilder.event(userId, "Signup", props);

ClientDelivery delivery = new ClientDelivery();
delivery.addMessage(sentEvent);

// Use an instance of MixpanelAPI to send the messages to Mixpanel's servers.
MixpanelAPI mixpanel = new MixpanelAPI();
mixpanel.deliver(delivery);",
🎉 Congratulations, you've tracked your first event! You can see it in Mixpanel via the Events page.
For more options, see the reference and code for each SDK in Github.
```javascript import React from "react"; import { Button, SafeAreaView } from "react-native"; import { Mixpanel } from "mixpanel-react-native";const trackAutomaticEvents = false; const mixpanel = new Mixpanel("Your Token", trackAutomaticEvents); mixpanel.init();
const SampleApp = () => { return ( <Button title="Select Premium Plan" onPress={() => mixpanel.track("Signed Up", { "Signup Type": "Referral" }) } /> ); };
export default SampleApp;
🎉 Congratulations, you've tracked your first event! You can see it in Mixpanel via the [Events](https://mixpanel.com/report/events) page.

For more options, see the reference and code for each SDK in [Github](https://github.com/mixpanel).

</Tab>

<Tab>
```dart
import 'package:mixpanel_flutter/mixpanel_flutter.dart';
class _YourClassState extends State<YourClass> {
  Mixpanel mixpanel;

  @override
  void initState() {
    super.initState();
    initMixpanel();
  }

  Future<void> initMixpanel() async {
    // Replace with your Project Token
    // Once you've called this method once, you can access `mixpanel` throughout the rest of your application.
    mixpanel = await Mixpanel.init("Your Token", trackAutomaticEvents: false);
  }
🎉 Congratulations, you've tracked your first event! You can see it in Mixpanel via the Events page.
For more options, see the reference and code for each SDK in Github.
```objc#import "Mixpanel/Mixpanel.h"
- (BOOL)application:(UIApplication _)application didFinishLaunchingWithOptions:(NSDictionary _)launchOptions { ... Mixpanel *mixpanel = [Mixpanel sharedInstanceWithToken:@"YOUR_TOKEN" trackAutomaticEvents: NO]; [mixpanel track:@"Signed Up" properties:@{ @"Signup Type": @"Referral" }]; ... }
🎉 Congratulations, you've tracked your first event! You can see it in Mixpanel via the [Events](https://mixpanel.com/report/events) page.

For more options, see the reference and code for each SDK in [Github](https://github.com/mixpanel).
</DynamicCode>
</Tab>

<Tab>
<DynamicCode>
Import Mixpanel into `AppDelegate.swift`, and initialize Mixpanel within `application:didFinishLaunchingWithOptions`:

```swift
import Mixpanel

func application(_ application: UIApplication,
                 didFinishLaunchingWithOptions launchOptions: [NSObject: AnyObject]?) -> Bool {
    ...
    // Replace with your Project Token
    Mixpanel.initialize(token: "YOUR_TOKEN", trackAutomaticEvents: false)
    Mixpanel.mainInstance().track(event: "Signed Up", properties: [
        "Signup Type": "Referral",
    ])
    ...
}
🎉 Congratulations, you've tracked your first event! You can see it in Mixpanel via the Events page.
For more options, see the reference and code for each SDK in Github.
```java import com.mixpanel.android.mpmetrics.MixpanelAPI;public class MainActivity extends ActionBarActivity { private MixpanelAPI mp;
@Override protected void onCreate(Bundle savedInstanceState) { super.onCreate(savedInstanceState); setContentView(R.layout.activity_main);
trackAutomaticEvents = false;
// Replace with your Project Token
mp = MixpanelAPI.getInstance(this, "YOUR_TOKEN", trackAutomaticEvents);
}
private void sendToMixpanel() throws JSONException { JSONObject props = new JSONObject(); props.put("Signup Type", "Referral"); mp.track("Signed Up", props); } }
🎉 Congratulations, you've tracked your first event! You can see it in Mixpanel via the [Events](https://mixpanel.com/report/events) page.
For more options, see the reference and code for each SDK in [Github](https://github.com/mixpanel).
</DynamicCode>
</Tab>
<Tab>
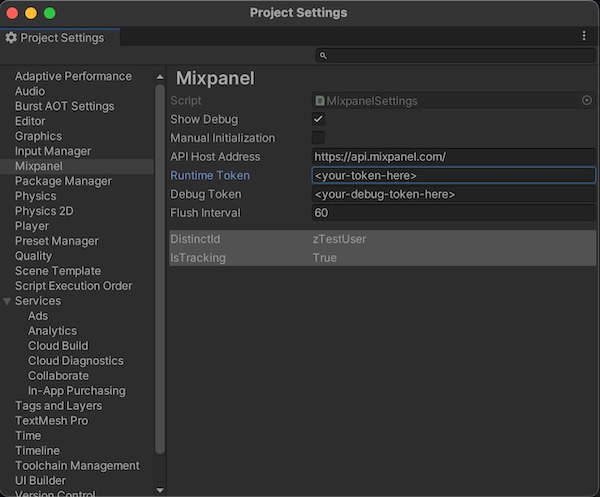
To initialize the library, first open the unity project settings menu for Mixpanel. (Edit -> Project Settings -> Mixpanel) Then, enter your project token into the Token and Debug Token input fields within the inspector. If you prefer to initialize Mixpanel manually, you can select the `Manual Initialization` in the settings and call `Mixpanel.Init()` to initialize.
Add the following sample code to a part of your application:
```csharp
using mixpanel;
var props = new Value();
props["Signup Type"] = "Referral";
Mixpanel.Track('Signup', props);
🎉 Congratulations, you've tracked your first event! You can see it in Mixpanel via the Events page.
For more options, see the reference and code for each SDK in Github.
If you don't see an SDK or an integration in your language, you can send events to our API directly.Here's a sample script. Just plug in your Project Token at the top, run the script, and visit our Events page to see the events in our UI.
# Fill this out
PROJECT_TOKEN = ""  # Get this from mixpanel.com/settings/project

import json
import time
import requests


events = [
    {"event": "my_test_event", "properties": {"time": int(time.time()), "distinct_id": "test_user_1", "$insert_id": "04ce0cf4-a633-4371-b665-9b45317b4976", "city": "San Francisco"}},
    {"event": "another_event", "properties": {"time": int(time.time()), "distinct_id": "test_user_2", "$insert_id": "3b033b9a-6bc9-4b70-90c3-a53e11f6896e", "city": "Seattle"}}
]
resp = requests.post(
    "https://api.mixpanel.com/import",
    params={"strict": "1"},
    auth=(PROJECT_TOKEN, ""),
    headers={"Content-Type": "application/json"},
    data=json.dumps(events)
)

print(resp.json())
🎉 Congratulations, you've tracked your first event! You can see it in Mixpanel via the Events page.
See our API reference for more details.
Best Practices for Scale
You can use this API at scale, for example to backfill historical data into Mixpanel or as part of a high-throughput streaming pipeline. We provide walkthroughs for Amazon S3 and Google Cloud Storage to provide a more production-grade example of how to use this API at scale.
Here are some other best practices:
- Be explicit about what is tracked to Mixpanel rather than implicitly tracking everything, both for performance and security reasons. Avoid sending user generated content, high-cardinality IDs, or large semi-structured objects.
- Import a more recent time window first (last 7 days or last 30 days) before backfilling historical data. Mixpanel's autocomplete menus populate events and properties based on the last 30 days of data, so this is the best way to test that data looks as expected.
- Leverage batching and compression. Each request to /import can send 2000 events to Mixpanel and can be sent compressed using gzip. The sample code in this guide does both.
- When using Cloud Storage, partition files into ~200MB of JSON (or ~200K records) each. Each file is processed in parallel by Cloud Functions/Lambda and must be ingested by the function within the configured timeout.
- Log any 400 errors returned by the API. These are non-retryable and indicate something malformed with the data. This should be extremely unlikely once the API is up and running. If a batch contains a mix of valid and invalid data, we will ingest the valid data.
Limits
Our Import API is built to ingest billions of events per day across our customers. That said, we do rate limit at very high scale to ensure quality of service and real-time ingestion. Please refer to our Import API docs for details.
All of our sample code transparently retries and backoff from rate limit exceptions. If you require a higher-limit for a 1-time backfill, please reach out to us at apis@mixpanel.com.
Yes, if you pass track_pageview: true in the mixpanel.init() call, Mixpanel will automatically track a "Page View" event every time a new page is loaded. Learn more here.
If tracking from web, make sure you've disabled ad blockers and your Do Not Track (DNT) browser settings are set to false when testing your JavaScript implementation. If the DNT setting is set to true, then Mixpanel won't collect information from that Mixpanel instance. We also recommend setting up a proxy server so that you don't lose events due to ad-blockers.
If tracking from a mobile device, events may take 1-2 minutes to appear because Mixpanel's mobile SDKs buffer events for 1 minute, or when the app transitions to the background, to conserve battery life and bandwidth. You can call .flush() in the mobile SDKs to manually flush events to Mixpanel.
If a user opts out of tracking, you can call the .optOutTracking() method on any of our client-side SDKs; this prevents any subsequent data being tracked from that user's device. Learn more here.
For iOS specifically: Mixpanel does not use IDFA, so it does not require user permission through the AppTrackingTransparency(ATT) framework. For more details, refer to our Apple App Developer Privacy Guidance.
No, our Mixpanel JavaScript SDK does not set or use any third-party cookies. If you wish to disable cookies entirely, you can set the disable_persistence option to true when initializing your Mixpanel JS instance. Note that disabling persistence will disable the use of super properties and anonymous -> identified user tracking.
When tracking on web, we recommend using localStorage, as this is more reliable:
mixpanel.set_config({ persistence: "localStorage" });If tracking client-side, just call .identify(<user_id>) when a user logs in and .reset() when they log out. Mixpanel will automatically stitch the user journey across logged out and logged in.
If tracking server-side, check out our server-side best practices guide. For more information, read our comprehensive guide on Identifying Users.