A full build has different steps:
- Specifying the compiler using environment variables
- Configuring the project
- Building the project
For the subsequent builds, in case you change the source code, you only need to repeat the last step.
By default (if you don't set environment variables CC and CXX), the system default compiler will be used.
CMake uses the environment variables CC and CXX to decide which compiler to use. So to avoid the conflict issues only specify the compilers using these variables.
Commands for setting the compilers
-
Debian/Ubuntu/MacOS:
Set your desired compiler (
clang,gcc, etc):-
Temporarily (only for the current shell)
Run one of the followings in the terminal:
-
clang
CC=clang CXX=clang++ -
gcc
CC=gcc CXX=g++
-
-
Permanent:
Open
~/.bashrcusing your text editor:gedit ~/.bashrcAdd
CCandCXXto point to the compilers:export CC=clang export CXX=clang++Save and close the file.
-
-
Windows:
-
Permanent:
Run one of the followings in PowerShell:
-
Visual Studio generator and compiler (cl)
  [Environment]::SetEnvironmentVariable("CC", "cl.exe", "User")
  [Environment]::SetEnvironmentVariable("CXX", "cl.exe", "User")
  refreshenv
Set the architecture using vcvarsall:
vcvarsall.bat x64 -
clang
[Environment]::SetEnvironmentVariable("CC", "clang.exe", "User") [Environment]::SetEnvironmentVariable("CXX", "clang++.exe", "User") refreshenv -
gcc
  [Environment]::SetEnvironmentVariable("CC", "gcc.exe", "User")
  [Environment]::SetEnvironmentVariable("CXX", "g++.exe", "User")
  refreshenv
-
-
Temporarily (only for the current shell):
	$Env:CC="clang.exe"
	$Env:CXX="clang++.exe"
-
To configure the project, you could use cmake, or ccmake or cmake-gui. Each of them are explained in the following:
With Cmake directly:
cmake -S . -B ./build
Cmake will automatically create the ./build folder if it does not exist, and it wil configure the project.
Instead, if you have CMake version 3.21+, you can use one of the configuration presets that are listed in the CmakePresets.json file.
cmake . --preset <configure-preset>
cmake --build
With the Cmake Curses Dialog Command Line tool:
ccmake -S . -B ./build
Once ccmake has finished setting up, press 'c' to configure the project,
press 'g' to generate, and 'q' to quit.
To use the GUI of the cmake:
2.c.1) Open cmake-gui from the project directory:
cmake-gui .
2.c.2) Set the build directory:

2.c.3) Configure the generator:
In cmake-gui, from the upper menu select Tools/Configure.
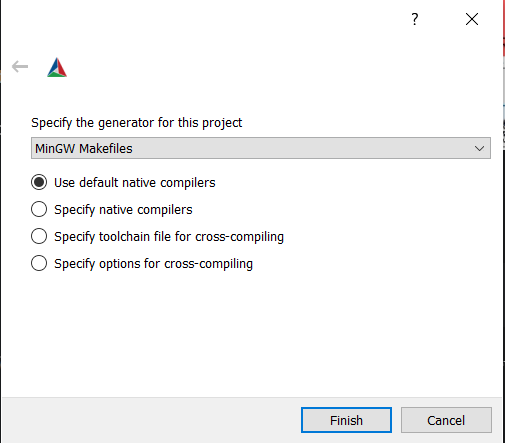
Warning: if you have set CC and CXX always choose the use default native compilers option. This picks CC and CXX. Don't change the compiler at this stage!
Windows - MinGW Makefiles
Choose MinGW Makefiles as the generator:
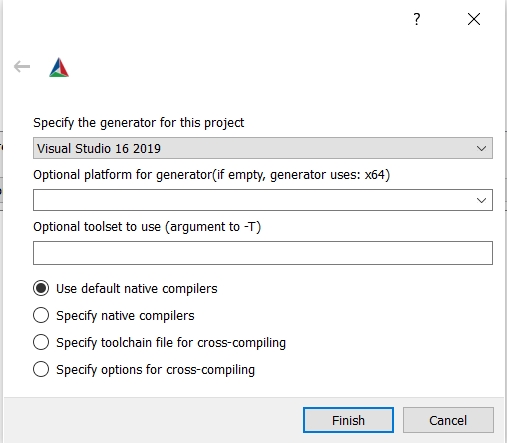
Windows - Visual Studio generator and compiler
You should have already set C and CXX to cl.exe.
Choose "Visual Studio 16 2019" as the generator:
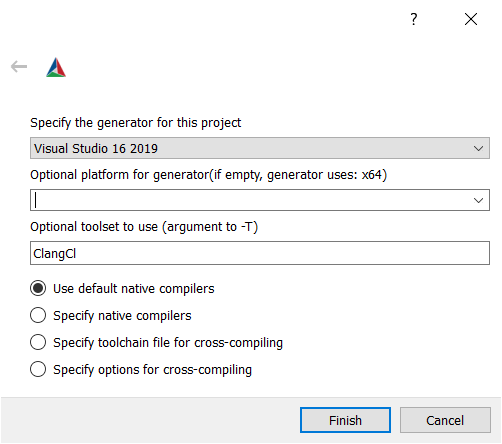
Windows - Visual Studio generator and Clang Compiler
You should have already set C and CXX to clang.exe and clang++.exe.
Choose "Visual Studio 16 2019" as the generator. To tell Visual studio to use clang-cl.exe:
- If you use the LLVM that is shipped with Visual Studio: write
ClangClunder "optional toolset to use".
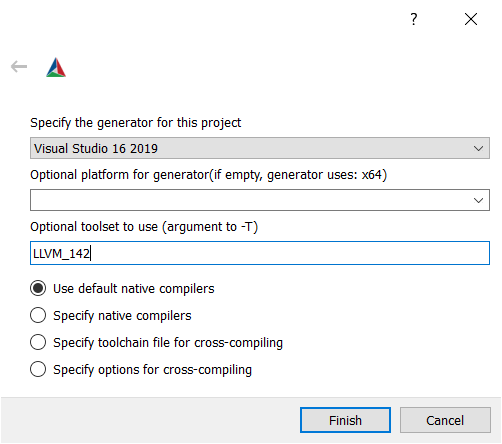
- If you use an external LLVM: write
LLVM_v142under "optional toolset to use".
2.c.4) Choose the Cmake options and then generate:
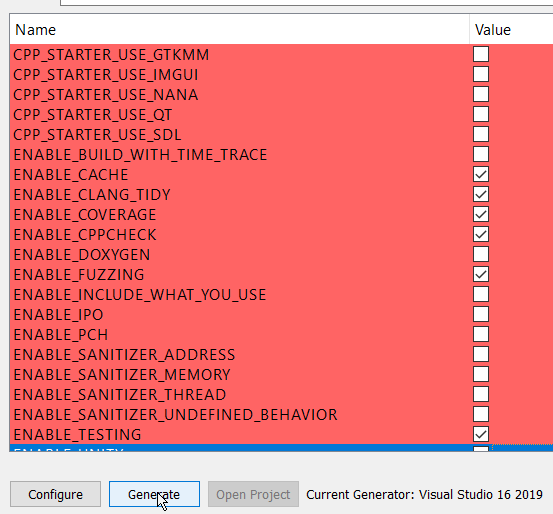
Once you have selected all the options you would like to use, you can build the project (all targets):
cmake --build ./build
For Visual Studio, give the build configuration (Release, RelWithDeb, Debug, etc) like the following:
cmake --build ./build -- /p:configuration=Release
You can use the ctest command run the tests.
cd ./build
ctest -C Debug
cd ../