Author: Fuse Team
Level: Beginner
Technologies: Camel, ActiveMQ
Summary: This quickstart demonstrates how to use the camel-amq component o connect to the local A-MQ broker and use JMS messaging between two Camel routes.
Target Product: Fuse
Source: https://github.com/jboss-fuse/quickstarts
In this quickstart, orders from zoos all over the world will be copied from the input directory into a specific output directory per country.
In this example we will use two containers, one container to run as a standalone A-MQ broker, and another as a client to the broker, where the Camel routes is running. This scenario is illustrated in the figure below:
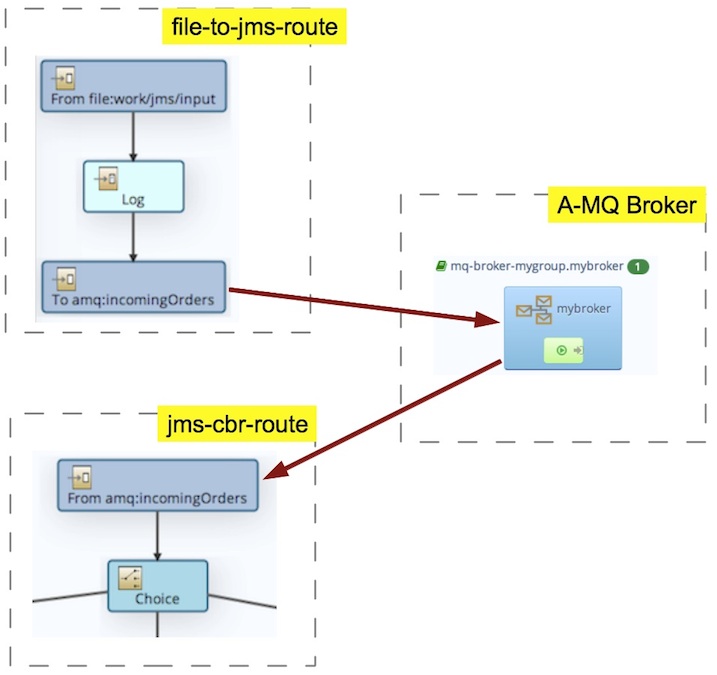
The two Camel routes send and receives JMS message using the amq:incomingOrders endpoint, which is a queue on the A-MQ broker.
Before building and running this quick start you need:
- Maven 3.1.1 or higher
- JDK 1.7 or 1.8
- JBoss Fuse 6
-
Start JBoss Fuse 6 by running bin/fuse (on Linux) or bin\fuse.bat (on Windows).
-
In the JBoss Fuse console, enter the following command:
fabric:create --wait-for-provisioning
The example comes as source code and pre-built binaries with the fabric8 distribution.
To try the example you do not need to build from source first. Although building from source allows you to modify the source code, and re-deploy the changes to fabric. See more details on the fabric8 website about the developer workflow.
To build from the source code:
- Change your working directory to
quickstarts/camel-amqdirectory. - Run
mvn clean installto build the quickstart.
After building from the source code, you can upload the changes to the fabric container:
- It is assumed that you have already created a fabric and are logged into a container called
root. - Change your working directory to
quickstarts/camel-amqdirectory. - Run
mvn fabric8:deployto upload the quickstart to the fabric container.
If you run the fabric:deploy command for the first then, it will ask you for the username and password to login the fabric container.
And then store this information in the local Maven settings file. You can find more details about this on the fabric8 website about the Maven Plugin.
The following information is divded into two sections, whether you are using the command line shell in fabric, or using the web console
This example requires using an A-MQ broker first.
You can deploy a new A-MQ broker from the console command line, as follows:
-
It is assumed that you have already created a fabric and are logged into a container called
root. -
Create a new A-MQ standalone broker profile using
mygroupas group name, and named mybrokermq-create --kind StandAlone --group mygroup mybroker -
Create a child container as the A-MQ broker using the mybroker profile.
container-create-child --profile mq-broker-mygroup.mybroker root mybroker
After installing the A-MQ broker we can install the example from the console command line, as follows:
-
Create a new child container and deploy the
quickstarts-camel.amqprofile in a single step, by entering the following command at the console. Notice we have add--profile mq-client-mygroupso the client connects to correct A-MQ group; as you can have multiple broker groups in fabric8.fabric:container-create-child --profile quickstarts-camel.amq --profile mq-client-mygroup root mychild -
Wait for the new child container,
mychild, to start up. Use thefabric:container-listcommand to check the status of themychildcontainer and wait until the[provision status]is shown assuccess.
This example requires using an A-MQ broker first.
- It is assumed that you have already created a fabric and are logged into a container called
root. - Login the web console
- Click the Service button in the navigation bar, and then click the MQ button in the sub navigation bar.
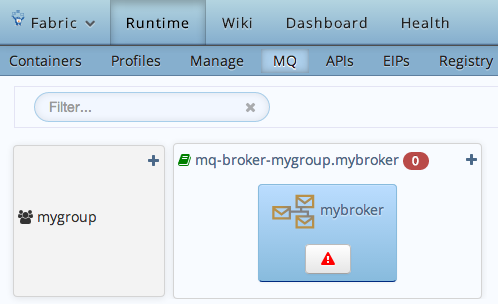
- Click the Create broker configuration button
- Select StandAlone as kind, and enter
mygroupas group, andmybrokeras broker name. - Click the Create broker button, and wait until the screen changes to show the A-MQ groups, as shown in the figure below:
- To create a new container using this broker profile, you can click the red triangle button (alert icon) which takes you to the Create New Container page, having pre-selected the broker profile.
- Enter
mybrokeras the container name and specify an Host, and click the Create and start container button
After installing the A-MQ broker we can install the example from the web console, as follows:
- It is assumed that you have already created a fabric and are logged into a container called
root. - Login the web console
- Click the Wiki button in the navigation bar
- Select
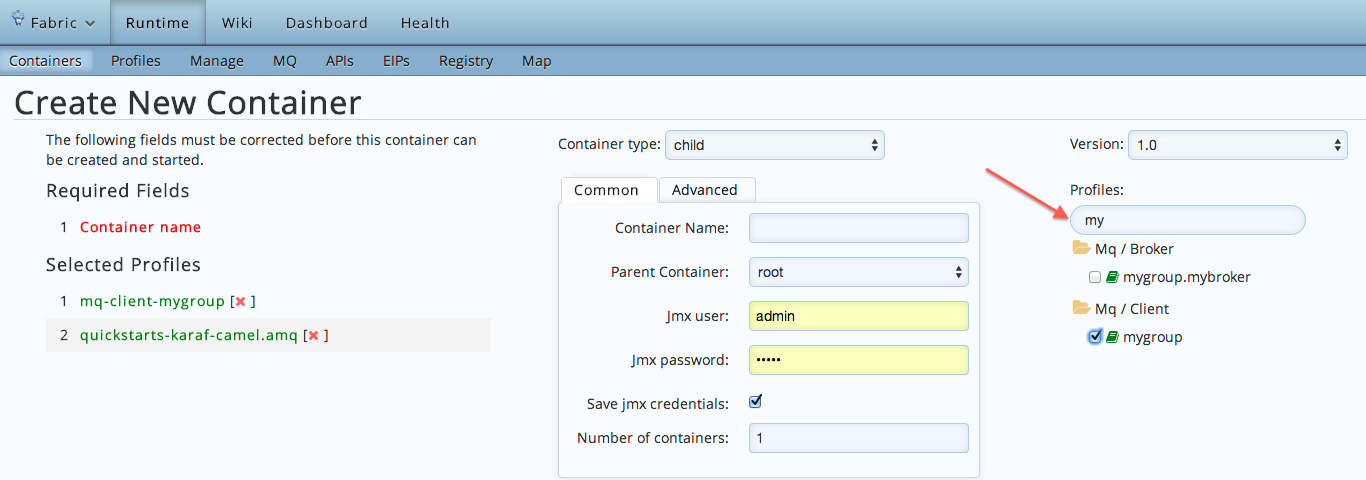
quickstarts-->camel.amq - Click the
Newbutton in the top right corner - In the Create New Container page, specify an Host. After creating the container, in the profiles filter field enter
myand select themq-client-mygroupfrom the list, as shown in the figure below. We do this so the client connects to correct A-MQ group; as you can have multiple broker groups in fabric8.
- And in the Container Name field enter
mychildand click the Create and start container button
The following information is divded into two sections, whether you are using the command line shell in fabric, or using the web console
To use the application be sure to have deployed the quickstart in fabric8 as described above. Successful deployment will create and start a Camel route in fabric8.
- As soon as the Camel route has been started, you will see a directory
instances/mychild/work/jms/inputin your fabric8 installation. - Copy the files you find in this quickstart's
src/main/fabric8/datadirectory to the newly createdinstances/mychild/work/jms/inputdirectory. - Wait a few moments and you will find the same files organized by country under the
instances/mychild/work/jms/outputdirectory.
order1.xmlinwork/jms/output/othersorder2.xmlandorder4.xmlinwork/jms/output/ukorder3.xmlandorder5.xmlinwork/jms/output/us
- Use
log:displayto check out the business logging. Receiving order order1.xml Sending order order1.xml to another country Done processing order1.xml
-
Login the web console
-
Click the Runtime button in the navigation bar
-
Select the
mychildcontainer in the containers list, and click the open button right next to the container name. -
A new window opens and connects to the container. Click the Camel button in the navigation bar.
-
In the Camel tree, expand the
Endpointstree, and select the second node, which isfile://work/jms/input, and click the Send button in the sub navigation bar. -
Click the Choose button and mark [x] for the five
data/order1.xml...data/order5.xmlfiles, as shown in the figure below.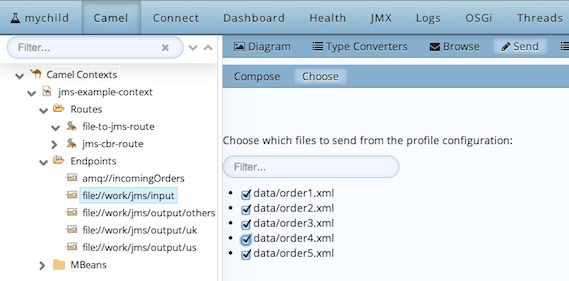 -
Click the Send 5 files button in the top right corner
-
In the Camel tree, expand the
Routesnode, and select the second node, which is thejms-cbr-routeroute. And click the Route Diagram button to see a visual representation of the route. -
Notice the numbers in the diagram, which illustrate that 5 messages has been processed, of which 2 were from UK, 2 from US, and 1 others.
-
You can click the Log button the navigation bar to see the business logging.
The following information is divded into two sections, whether you are using the command line shell in fabric, or using the web console
To stop and undeploy the example in fabric8:
-
Disconnect from the child container by typing Ctrl-D at the console prompt.
-
Stop and delete the child container by entering the following command at the console:
fabric:container-stop mychild fabric:container-delete mychild -
Stop and delete the A-MQ container by entering the following command at the console:
 fabric:container-stop mybroker
 fabric:container-delete mybroker
To stop and undeploy the example in fabric8:
- In the web console, click the Runtime button in the navigation bar.
- Select the
mychildandmybrokercontainers in the Containers list, and click the Stop button in the top right corner. After that click Delete button.