简体中文 | English
a react render solution for Multi-State View.


Preview the example live on StackBlitz:

$ npm install --save stateview
The smallest example,only have 2 states : Logined and UnLogin。
import React from 'react';

import { Stateview, Layer } from 'stateview';

export default () => {

  function unlogin() {
    stateview.show('unlogin')
  }

  function logined() {
    stateview.show('logined')
  }

  return (
    <Stateview default='unlogin'>
      <Layer state='logined'>
        <h1>Logined, <button onClick={unlogin}>go to UnLogin</button></h1>
      </Layer>
      <Layer state='unlogin'>
        <h1 >UnLogin, <button onClick={logined}>go to Logined</button></h1>;
      </Layer>
    </Stateview>
  );
}
Note:in this example use window.stateview api
import { Stateview, Layer } from 'stateview';Core Concept
- Stateview Component
- Props
- default='unlogin' show default state
- nonblock non block element,default show div,if props have nonblock,show span
- Props
- Layer Component
- Props
- state='logined' state is a state name or path
- component={} a view component rendered for state
- if props has children,show children prior。if no childer,show the component prop
- Props
在具体的Layer状态对应的视图组件里使用。
window.stateview
winodw.stateview[groupName]
API
- stateview.show(path: string) 显示具体的状态,参数可以是一个,也可以是数组
- stateview.datashow('unlogin', { ... }) 显示具体的状态,参数2个,第二个参数是数据
- stateview.getStateBy(path: string) 根据path,获取State信息
- stateview.getComponentBy(path: string) 根据path,获取Component信息
- stateview.getStates() 获取所有States信息
带嵌套的3个状态示例
- root
    - 已登录logined
        - 可领 candraw
        - 次数不足 notdraw
    - 未登录unlogin
entry
import React from 'react';

import { Stateview, Layer } from 'stateview';
import { Logined, UnLogin } from '../layers/1';

export default () => {
  return (
    <Stateview default='unlogin'>
      <Layer state='logined' component={<Logined name='跳转到未登录状态' />} />
      <Layer state='unlogin' component={<UnLogin name='跳转到登录状态' />} />
    </Stateview>
  );
}
unlogin
import React from 'react';

export function UnLogin(props: any) {

  function sayHello() {
    window.stateview.show('logined')
  }

  return <h1 >UnLogin, <button onClick={sayHello}>{props.name}</button></h1>;
}
logined
import React from 'react';
import { Stateview, Layer } from 'stateview';
import { CanDraw, NotDraw } from './logined/index';

export function Logined(props: any) {

  function sayHello() {
    window.stateview.show('unlogin')
  }

  return <>
    <h1>Logined, <button onClick={sayHello}>{props.name}</button></h1>
    <Stateview default='notdraw'>
      <Layer state='candraw' component={<CanDraw name='跳转到未登录状态' />} />
      <Layer state='notdraw' component={<NotDraw name='跳转到可领状态' />} />
    </Stateview>
  </>;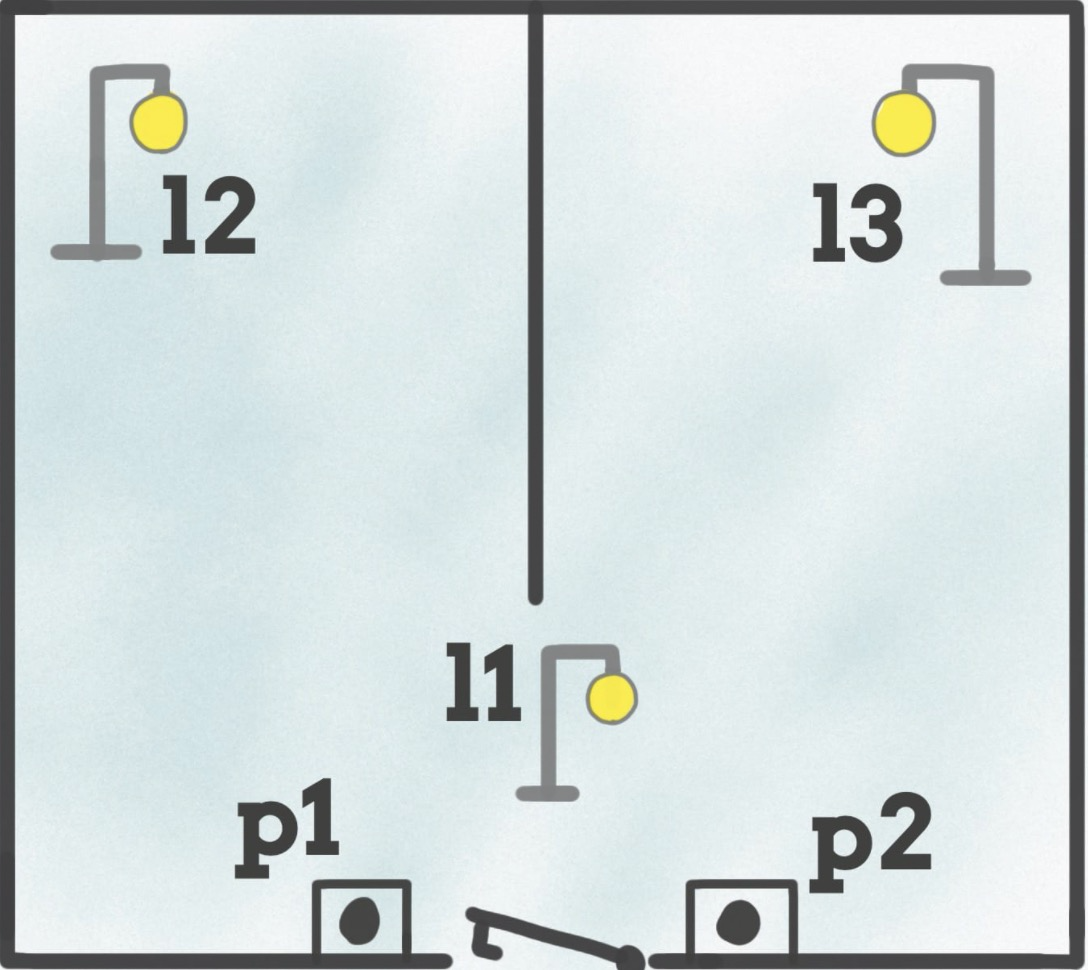
}使用stateview首先你需要改变一下设计思维。从状态的角度去思考组成的组成。下面以tab为例
由2部分组成
- header 互斥逻辑,一个是高亮量,另一个是正常态
- panel 2选1显示,排他逻辑
header假设有2个,由2个stateview并排显示即可,每个header item有高亮量和正常态,定一个react组件即可(注意此时block,意味着它是非块级元素,由span渲染)
export function Header(props: any) {
  return <>
    <Stateview nonblock default='play1' >
      <Layer state='play0' component={<Play0 />} />
      <Layer state='play1' component={<Play1 />} />
    </Stateview>
    <Stateview nonblock default='like0' height="200px" >
      <Layer state='like0' component={<Like0 />} />
      <Layer state='like1' component={<Like1 />} />
    </Stateview>
  </>;
}
panel就1个stateview,里面内嵌2个layer即可
export function Panel(props: any) {
  return <>
    <Stateview default='p1'>
      <Layer state='p1' component={<P1/>} />
      <Layer state='p2' component={<P2/>} />
    </Stateview>
  </>;
}header切换的时候,选中1个是高亮态,其他需要设置为正常态、注意当状态是高亮的时候,点击无行为
import React from 'react';
import styles from './player.less';

export function Like0(props: any) {

  function sayHello() {
    stateview.show('p2')
    stateview.show('like1')
    stateview.show('play0')
  }

  return <span onClick={sayHello}><svg t="1639443196975" className={styles.icon} viewBox="0 0 1024 1024" version="1.1" xmlns="http://www.w3.org/2000/svg" p-id="1341" width="200" height="200"><path d="M511.4 511.9m-426.3 0a426.3 426.3 0 1 0 852.6 0 426.3 426.3 0 1 0-852.6 0Z" fill="#FFFFFF" p-id="1342"></path><path d="M511.4 958.2c-60.2 0-118.7-11.8-173.7-35.1-53.1-22.5-100.9-54.7-141.9-95.6-41-41-73.2-88.7-95.6-141.9-23.3-55-35.1-113.5-35.1-173.7s11.8-118.7 35.1-173.7c22.5-53.1 54.7-100.9 95.6-141.9 41-41 88.7-73.2 141.9-95.6 55-23.3 113.5-35.1 173.7-35.1s118.7 11.8 173.7 35.1c53.1 22.5 100.9 54.7 141.9 95.6 41 41 73.2 88.7 95.6 141.9 23.3 55 35.1 113.5 35.1 173.7s-11.7 118.7-35 173.7C900.2 738.8 868 786.5 827 827.5s-88.7 73.2-141.9 95.6c-55 23.3-113.4 35.1-173.7 35.1z m0-852.6c-224 0-406.3 182.3-406.3 406.3s182.3 406.3 406.3 406.3 406.3-182.3 406.3-406.3c0.1-224-182.2-406.3-406.3-406.3z" fill="#FF7A4E" p-id="1343"></path><path d="M531.9 250.5l58.4 118.4c4.4 8.9 12.9 15 22.6 16.5l130.6 19c24.7 3.6 34.5 33.9 16.7 51.3l-94.5 92.1c-7.1 6.9-10.3 16.9-8.7 26.6l22.3 130.1c4.2 24.6-21.6 43.3-43.6 31.7L519 674.8c-8.8-4.6-19.2-4.6-28 0l-116.8 61.4c-22.1 11.6-47.9-7.1-43.6-31.7l22.3-130.1c1.7-9.8-1.6-19.7-8.7-26.6l-94.5-92.1c-17.9-17.4-8-47.7 16.7-51.3l130.6-19c9.8-1.4 18.3-7.6 22.6-16.5L478 250.5c11-22.4 42.9-22.4 53.9 0z" fill="#FF7A4E" p-id="1344"></path></svg></span>;
}
这样实现状态非常快,且清晰
$ npm i
$ npm run dev- Fork it
- Create your feature branch (
git checkout -b my-new-feature) - Commit your changes (
git commit -am 'Add some feature') - Push to the branch (
git push origin my-new-feature) - Create new Pull Request
Refer to the CONTRIBUTING.
Copyright © i5ting. All rights reserved.
Licensed under the MIT license.