Learn to use AWS Lambda to create scalable micro-services in less time and cost far less to run than "traditional" server-based apps.


- What is Lambda?
- How does it work?
- Create and Test Your Own AWS Lambda Function
- Further Reading
- Glossary
- Concerns
- Pricing
- FAQ
Amazon Web Services (AWS) Lambda lets you run JavaScript (Node.js), Java & Python scripts/apps in Amazon's (virtually) infinitely-scalable cloud environment without having provision VM instances or other "orchestration"; Everything is dynamically auto-scaled so if you have 1 user or 1 billion you pay for usage.
AWS are effectively disrupting their (own) existing business with Lambda. Instead of forcing us to pay for EC2 instances in fixed increments and have complex application monitoring/scaling, AWS have built a much simpler way of building & running micro-services.
Lambda also disrupts other Platform-as-a-Service ("PaaS") providers such as Heroku, Google App Engine, Azure or Modulus where you pay for a specific amount of compute power & RAM but have a scaling delay and scale in a fixed increment (instances).
No access to a filesystem or memory persistence (e.g. on-instance Redis)
so you cannot store data or the result of an operation locally.
The lack of local persistence on Lambda is resolved by having low-latency access to AWS S3 and other AWS Datastores e.g: ElastiCache (in-memory cache), DynamoDB (NoSQL ssd-based database), RDS (relational database), however there's an important (and potentially expensive) catch: PUT/POST/GET requests to all AWS data stores are NOT Free! While per-run costs on Lambda are tiny, if you GET and PUT something to S3 on each execution cycle you could rack up the bill!
- General Intro (if you're completely new, watch the video!): https://aws.amazon.com/lambda/
- How it Works: https://docs.aws.amazon.com/lambda/latest/dg/lambda-introduction.html
- Getting Started Guide (Overview): https://docs.aws.amazon.com/lambda/latest/dg/welcome.html
- Create a Lambda function inline
- Create a Lambda function using a .zip folder
- Create a Lambda function using the AWS API Gateway
- Use the callback parameter with node v4.3
- Trigger a Lambda function using an event from DynamoDB
- Trigger a Lambda function using the Simple Notification System
- Trigger a Lambda function when an email comes in to the AWS Simple Email Service (SES)
- Continuous Integration using Codeship
- Testing Lambda Functions
- Upload Lambda Function to S3 and deploy to Lambda
- Deploying Lambda Functions using Gulp
- Versioning and Aliasing Lambda Functions
- Create an API with GET/POST Methods using Lambda functions to retrieve/update records from a DynamoDB table
Here's a super simple walkthrough of a 'HELLO WORLD!' example to help get you started with AWS Lambda:
-
If you haven't already done so, create a free AWS account here.
-
Sign in to the AWS management console, select your region in the top right hand corner and then open the AWS Lambda console.
-
On the 'Learn to Build' section click on 'see all' and then select 'Run a Serverless "Hello World!"'.
-
Select that you want to make a blueprint and search for the 'hello-world' example.
-
Once you have found this follow the instructions given to set up your function. This will include setting a role (a role is an AWS identity with permission policies that determine what the identity can or cannot do in AWS. For more information on roles click here). Like the tutorial suggests we chose the 'lambda_basic_execution' role because our function is extremely simple.
-
AWS Lambda expects us to export an object which has a property called handler. You can specify the handler and the runtime you wish to give it in the 'Function code' section:

- Now your function has been created you have the chance to edit its code. Under the 'Function code' title, edit the existing inline code. Here's our example:

The value of that property is a function that takes two arguments, event and context. The event will be created by us and the context consists of the runtime information which will be supplied by AWS lambda. They both take the form of JSON objects.
- In the 'Basic Settings' section you can specify the amount of memory that each AWS Lambda instance should be allocated. Note: by increasing the memory, this also increases the cost of your function runtime!

- We can test our function by clicking on the 'Test' button in the top right. Here we will be able to specify the payload of the event that gets passed to our function. There will be an existing event template but we changed the key value pairs as shown below:

Click the 'Test' button to test your function and then click to expand the results.
- Below your function you should now be able to see the results from your test. Here are the results from our example:

You can reconfigure your test at any time. Click on the 'Actions' dropdown beside the 'Test' button and select the 'Configure test event' option.
An alternative (and perhaps more commonly used) way of creating an AWS Lambda function is to write it in a text editor, zip it up and then upload it. Here's how:
-
Follow the first two steps of the previous example if you haven't already created an AWS account.
-
On the 'Select blueprint' page hit the 'skip' button because we'll be creating our own.
-
On the 'Configure Function' page give your Lambda function a name and then select the 'Upload a .ZIP file' radio button. It will then prompt you to upload a file.

- Open up your text editor and write your Lambda function just as you would if you were writing it inline and then save it as a
.jsfile:

-
Zip up this file by typing the following into the command line. The command consists of the first filename which is the zip file you want to create (call it whatever you like .zip) followed by the files you want to zip up. In our example you can see the name of the
.jsfile we created earlier:$ zip -r hello-world.zip hello-world.jsYou should now be able to see a
.ZIPfile alongside your.jsfile.NOTE: If your function has any dependencies then you must include your
node_modulesfile within your .ZIP file. Simply addnode_modulesafter the files you wish to zip up! -
Go back to the 'Configure Function' page and click the 'Upload' button and select the .ZIP file you just created.
-
Next select the Lambda function handler and role. The handler is the name of the
.jsfile that contains your function followed by the name of the handler you are exporting. We've selected the basic execution role just like the previous example:

- Just like the previous example, click 'next' and if you are happy with your function click 'Create function'. Your new function should now show up in your list of AWS Lambda functions:

This function can now be tested in the same way as the inline example.
Another really cool thing about AWS Lambda is that you can invoke a Lambda function through a web endpoint i.e. they can be triggered via HTTP calls. You can configure these endpoints straight from the AWS Lambda console:
-
Open your AWS Lambda console and click on the function that you wish to create an endpoint for. (If you haven't created a Lambda function already you can do so by following one of the previous examples!)
-
On this page Select the 'API endpoints' tab and then click '+ Add API endpoint':

- Configure your API endpoint settings:
- API endpoint type : API Gateway
- API name : whatever-you-like (we recommend having all lower case letters separated by a dash for readability)
- Resource name: /YourLambdaFunctionName
- Method : GET/POST/PUT/DELETE...
- Deployment stage : Defines the path through which an API deployment is accessible
- Security : Defines how your function can be invoked
- The path will be a URI ending in >> .../deploymentStage/ResourceName

We've set our 'Security' to be 'Open with access key' because this is an example of a more common use case. These keys can be configured by following the link in the blue box. Our example URI will end in >> .../prod/Concatenate
Click 'Submit' once you are happy with your Lambda function configuration.
- You should now be able to see your function listed at a URL that has been generated by AWS Lambda.

- Now let's test our endpoint to see if our Lambda function is being invoked. Go to the AWS console and then click on 'API Gateway' under Application Services. This will take you to a list of your APIs where you should see the one we just created. Click on the title.

- Click on the METHOD beneath your Lambda function, in our case it's 'POST'. Then click on the word 'TEST' with the lightning bolt underneath it:

- Enter the input values that your API will be expecting (this is the event object we have been using to previously test our functions) then click the blue 'Test' button on the right. Your response body should then return the results of your Lambda function :

By default, access to your API Endpoint and therefore the Lambda function are set to 'Private' this means that when you attempt to access/visit the function you just created the API Gateway endpoint for in the previous section will not be accessible if you attempt to access it.
-
If you aren't already viewing the API Gateway, select it from your AWS Console Menu:

-
Create an API Key in the Amazon API Gateway section of the AWS Console:

-
Create a New API Key:

-
Name your key, Enable it and click
Savebutton:
-
Once you enable your API Key, a section will appear below the creation form that allows you to assign the new API Key to one of your APIs "Stage". Select the API & Stage (in our case the API is
LambdaMicroserviceand the stage isprod) then click theAddbutton: You should now see that the API Key is Enabled for your
 prodstage:
-
Copy the API key from this screen and save it to your notepad.

-
Return to your AWS Console and select Lambda. This will display the list of your Lambda functions. Select the
ConcatenateLambda function you created earlier.
-
When you are viewing your Lambda Function, select the API Endpoints tab and copy the API endpoint URL:

-
With the endpoint URL and API Key copied you can now run a
cURLCommand in your terminal to access the endpoint:
curl --header "x-api-key: LhGU6jr5C19QrT8yexCNoaBYeYHy9iwa5ugZlRzm" https://r09u5uw11g.execute-api.eu-west-1.amazonaws.com/prod/Concatenate
Note: I slightly modified my Lambda function to return a timestamp so I know when the function gets executed:
exports.handler = function(event, context) {
    console.log('Received event:', JSON.stringify(event, null, 2));
    console.log('context:', JSON.stringify(context, null, 2));
    event.key1 = event.key1 || 'Hello'; // set default values
    event.key2 = event.key2 || 'World!';
    console.log('value1 =', event.key1);
    console.log('value2 =', event.key2);
    var date = new Date();
    var time = date.toString();
    context.succeed(event.key1 + ' ' + event.key2 + ' >> ' + time );
};
For even more steps on enabling API Keys on AWS API Gateway, see: https://docs.aws.amazon.com/apigateway/latest/developerguide/how-to-api-keys.html
Create an API with GET/POST Methods that uses Lambda functions to retrieve/update records from a DynamoDB table
- First we'll need to create a table in DynamoDB. Go to the DynamoDB console and then click the 'Create Table' button. Give your table a name (call it something relevant to the type of data your DynamoDB table will hold). We've called ours 'Users'. The 'Primary key' is made up of a 'Partition key' (hash key) and an optional 'Sort key'. (The partition key is used to partition data across hosts for scalability and availability):


For 'Table settings' just check the 'Use default settings' checkbox and then click the blue 'Create' button:

- Once the table is created, click on the 'Alarms' tab and then delete the basic alarms if they have been created:

Then click on the 'Capacity' tab and then specify the 'Read' and 'Write' capacity units as 3 each and then click 'Save':

- Next we will have to create a policy that allows your AWS functions to access Cloudwatch logs as well as the table you just created. Go to the IAM console, select 'Roles' and then 'Create new role'. We've called ours 'APIGatewayLambdaExecRole':

Select the 'AWS Lambda' role:

And then click 'Next step' to skip the 'Attach Policy' section:

In the 'Review' section click the blue 'Create Role' button to finish:

Click on the title of the role you just created then click the down arrow for 'Inline Policies'. Follow the link to create an inline policy:

Click on the 'Custom Policy' radio button and then click 'Select':

Give your custom policy a name (we've called ours 'LogAndDynamoDBAccess') and then enter the following in the 'Policy Document' section. Make sure your "Resource" at the bottom is set to the ARN of your table and the second "SID" is set to "_YourTableName_DynamoDBReadWrite". (the ARN can be found in your 'Table details' by going to your DynamoDB console and clicking on your table.):
{
  "Version": "2012-10-17",
  "Statement": [
      {
          "Sid": "AccessCloudwatchLogs",
          "Action": [
              "logs:*"
          ],
          "Effect": "Allow",
          "Resource": "arn:aws:logs:*:*:*"
      },
      {
          "Sid": "UsersDynamoDBReadWrite",
          "Effect": "Allow",
          "Action": [
              "dynamodb:DeleteItem",
              "dynamodb:GetItem",
              "dynamodb:PutItem",
              "dynamodb:UpdateItem"
          ],
          "Resource": [
              "arn:aws:dynamodb:eu-west-1:655240720487:table/Users"
          ]
      }
  ]
}
- Now we need to create the Lambda functions for adding and retrieving data to and from the table (we'll be creating our functions in a text editor, zipping them up and then uploading them to Lambda. Follow the instructions in the previous 'HELLO WORLD!' .zip example on how to do this):
Create a new .js file that will contain our first Lambda function. This function will GET information from the DynamoDB table. We've called the file getUserInfo.js. Here is the code:
var AWS = require('aws-sdk');
var DOC = require('dynamodb-doc');
var dynamo = new DOC.DynamoDB();

exports.handler = function(event, context) {
  var callback = function(err, data) {
    if (err) {
      console.log('error on getUserInfo: ', err);
      context.done('Unable to retrieve user information', null);
    } else {
      if(data.Item && data.Item.users) {
        context.done(null, data.Item.users);
      } else {
        context.done(null, {});
      }
    }
  };

  dynamo.getItem({TableName:"Users", Key:{username:"default"}}, callback);
};
Zip up the file and then upload it to Lambda:
zip -r getUserInfo.zip getUserInfo.js

For the Role, select the one we created earlier. Then click 'Next' and then 'Create function':

Click 'Test' to test the function. The results should return an empty objext {}.
Create a second .js file that will contain our second Lambda function. This function will UPDATE information in our DynamoDB table. We've called the file updateUserInfo.js. Here is the code:
var AWS = require('aws-sdk');
var DOC = require('dynamodb-doc');
var dynamo = new DOC.DynamoDB();

exports.handler = function(event, context) {
  var item = { username:"default",
               users: event.users || {}
          };

  var callback = function(err, data) {
    if (err) {
      console.log(err);
      context.fail('unable to update users at this time');
    } else {
      console.log(data);
      context.done(null, data);
    }
  };

  dynamo.putItem({TableName:"Users", Item:item}, callback);
};
Again zip up the file and then upload it to Lambda:
zip -r updateUserInfo.zip updateUserInfo.js
Follow the same steps as the previous function to create the second one, giving it the same role. They should both now appear in your functions section:

Test the function with a sample event relevant to your data. We created the following sample event:
{
  "users": [
            {
              "id": 1,
              "name": "John Smith",
              "location": "London"

            }
           ]
}
You should see an empty obect just like the first function {}.
Go back to the GetUserInfo function and then click 'Test' again. You should now see a returned result with the object in your sample event like this:
[
  {
    "id": 1,
    "location": "London",
    "name": "John Smith"
  }
]
- We're going to have to create one more Lambda function. It essentially does nothing but it is required by the OPTIONS method for CORS (Cross Origin Resource Sharing which is a mechanism that allows restricted resources on a web page to be requested from ). The function is as follows:
  exports.handler = function(event, context) {
    context.succeed('');
  }
Upload it just like the previous Lambda functions:

- Next go to the Amazon API Gateway console and create a new API by clicking 'Create API'. Give it a name, we've called our API 'SecureUsers':

It used to be the case that in order to terminate a lambda function you had to use context.succeed, context.fail or context.error. Now that AWS Lambda supports node v4.3, we are able to make use of the callback parameter which allows us to explicitly return information back to the caller.
The callback takes two parameters taking the following form callback(Error error, Object result); Let's walk through a quick example of how to implement the callback.
Let's write a simple Lambda function that returns some text after it's been invoked through an SNS topic:
exports.handler = function (event, context, callback) {
  const message = JSON.parse(event.Records[0].Sns.Message);
  const text = message.content.text;
  // checking that the text exists
  if (text && text.length) {
    return callback(null, `Here is some text: ${text}`);
  } else {
    // if no text was found return this message
    return callback(null, 'No text was found');
  }
}
Lambda functions can be set up to be triggered by events from other AWS services like Dynamo DB tables. This can be used to build applications that react to data modifications.
- In your AWS Console click on the DynamoDB tab. Then click the blue 'Create Table' button.
-
Set the 'Table Name' field to be 'LambdaTest' and in the 'Primary Key' field, set 'Partition Key' to be 'Id' of type 'String'. Then click the blue 'Create' button. You will then be directed to the DynamoDB dashboard.
-
Click the 'Manage Stream' button and in the pop up window, select the 'New and Old images' option.


You now have a DynamoDB table with streams enabled.
- Select the 'Tables' option in the navigation pane and select the table you just created.

- Click 'Create New Trigger' > 'New Function'. This opens the Lambda Console.

- The 'Event Source Type' and 'DynamoDB table' fields should already have been filled in. Click 'Next'.

-
In the 'Configure Function' section, give your lambda function a name in the 'Name' field. e.g. 'DynamoDBLambda'. The 'Runtime' should be set to 'Node.js' and the 'Description' should already have been filled in.
There will already be some default code in the 'Lambda Function Code' section. You can leave the code as it is. It is just logging the data from each data row in the event from DynamoDB along with the action e.g. 'INSERT', 'MODIFY'. We will see the output of these logs in a later step.
console.log('Loading function');

exports.handler = function(event, context) {
//console.log('Received event:', JSON.stringify(event, null, 2));
event.Records.forEach(function(record) {
    console.log(record.eventID);
    console.log(record.eventName);
    console.log('DynamoDB Record: %j', record.dynamodb);
});
context.succeed("Successfully processed " + event.Records.length + " records.");
};
-
In the 'Lambda function handler and role' section, select the 'DynamoDB event stream role' option. This will open a new window to create an Identity and Access Management Role (IAM). Click the blue 'Allow' button to enable the creation of the role. This is necessary to enable permission for DynamoDB to invoke your Lambda function.


-
Then click 'Next'
-
On the final Review page, in the 'Event Sources' section choose the 'Enable now' option. Then Click 'Create Function'

-
Go back to the DynamoDB dashboard and select the 'Tables' tab > 'LambdaTest'. Click 'Create Item'. This will open a pop up window. Enter an 'Id' for your data point. This can be any string you want. Then click 'Save'.


-
Add in some more items and perform some actions to edit/delete the entries in the table e.g. add attributes, delete items. This can be done by selecting the entry and then clicking the 'Actions' dropdown menu. Each of these actions will be logged by our Lambda function and will be visible in the Cloudwatch logs.


-
Back in the AWS dashboard open the Lambda console and select the function that you just created.
-
Select the 'Monitoring' tab and then the 'View Logs in CloudWatch' option. Select one of the log streams. You should see the console.log output from the lambda function capturing the create, edit and delete operations you performed on data entries in the DynamoDB table.


You can now modify the lambda function to perform different operations with the event data from DynamoDB.
Amazon SNS is a Publisher/Subscribe System. You can create, subscribe and publish to 'Topics' which are the AWS term for a messaging channel. Lambda functions can be subscribed to topics so when a message is published to that topic, the Lambda function will be invoked with the payload of the published message as an input parameter. The Lambda function can then do any number of things with the information in the message including publishing further messages to the same topic or other topics.
-
In the AWS SNS console click the 'Create Topic' button.

-
In the pop up that opens up add the name of your topic e.g. 'Lambda Test' and then click the blue 'Create Topic' button. You should see a message that says 'Successfully created topic'.

-
Follow the instructions in this previous section to create a Lambda function. In Step 3 of the process select the 'sns-message' blueprint. This function will simply log the message pushed to the SNS topic.
-
Under 'Configure Event Sources' you can select the Lambda topic the function should subscribe to. Select the one we just created: 'LambdaTest'.

-
Give your function a name e.g. 'LambdaSNSTest'. There will already be default code in the Lambda Function Code section to console.log the message:
console.log('Loading function');

exports.handler = function(event, context) {
  //console.log('Received event:', JSON.stringify(event, null, 2));
  var message = event.Records[0].Sns.Message;
  console.log('From SNS:', message);
  context.succeed(message);
};
-
In the Execution Role section select 'basic execution role'. In the pop up window, enable the creation of a lambda_basic_execution role and click 'Allow'.
-
On the final Review page, in the 'Event Sources' section choose the 'Enable now' option. Then Click 'Create Function'. You should be redirected back to the Lambda Console with a confirmation messsage: 'Congratulations! Your Lambda function "LambdaSNSTest" has been successfully created and configured with SNS: LambdaTest as an event source.'

-
Open the SNS console and select the 'Topics' tab in the left hand menu. Select the 'LambdaTest' topic created in an earlier step. Then click the blue 'Publish to Topic' button.

-
The opens the message editor. The topic ARN is the 'Amazon Resource Name' for the topic. ARNs are used to specify a resource unambiguously across all of AWS. We don't need to worry about them for this example! Give your message a subject and add some text to the message body. Leave the 'Time to Live' field blank and click 'Publish Message' in the bottom right hand corner of the screen. You should be redirected back the SNS console.

NB: Using the JSON Messsage Generator option it is possible to format messages differently for different viewing platforms. Find out more on the AWS SNS docs.
-
Open up the Cloudwatch logs. Select the 'Logs' tab in the left hand menu.

-
Click on the LambdaSNSTest option and click on the first Log Stream. It will take you to the log output from the SNS message that we published!


-
Using Lambda to test Lambda!
This method uses Lambda itself as the test platform. This involves creating a “unit” test that calls the Lambda function being tested and then either summarizes whether it succeeded or failed and/or records its output in DynamoDB. AWS lambda has a 'unit and load test harness' blueprint that you can use to test another Lambda function when it is live on AWS. The harness has two modes: 'Unit' and 'Load' so simple scale testing can also be performed.
More information and an example can be found here
-
Generating mock events and testing locally using a Node.js assertion library
The event and context objects can be mocked so that the lambda function can be tested locally before deployment. Using the 'Test' function in the AWS Lambda console it is possible to view the format of different event objects e.g. DynamoDB events, SNS notifications,
Have a look at mock-events.js to see some examples. These can be used to create helper functions to generate mock events.
The context object has the following form:
{
//methods
success,
done,
fail,
getRemainingTimeInMillis,

//properties
functionName,
functionVersion,
invokedFunctionArn,
memoryLimitInMB,
awsRequestId,
logGroupName,
logStreamName,
identity: {
  cognito_identity_id,
  cognito_identity_pool_id
},
clientContext: {
  client: {
    installation_id,
    app_title,
    app_version_name,
    app_version_code,
    app_package_name,
    Custom,
  },
  env: {
    platform_version
    platform,
    make,
    model,
    locale,
  }
}
}
It is slightly harder to mock because the methods (
success,done,fail) are asynchronous and also have to be mocked, but has been done on an npm module using promises.It doesn't yet account for different invocation types i.e. Event or Request/Response. From the AWS docs about the
context.sucessfunction:If the Lambda function is invoked using the Event invocation type (asynchronous invocation), the method will return "HTTP status 202, request accepted" response. If the Lambda function is invoked using the RequestResponse invocation type (synchronous invocation), the method will return HTTP status 200 (OK) and set the response > body to the string representation of the result.
The following is an example lambda function and associated test using the 'mock-context-object' module and the 'tape' assertion library.
// very simple lambda function
exports.handler = function(event, context) {
  context.succeed(event.key1);  // SUCCESS with message
};
// test set up and simple test
var context = require('aws-lambda-mock-context');
var test = require('tape');

var lambdaToTest = require('../functions/lambdaTest.js');

// creating context object
var ctx = context();
// text event object
var testEvent = {
  key1: 'name'
}

var response = null
var error = null;

test("Capture response", t => {
  lambdaToTest.handler(testEvent, ctx);
  //capture the response or errors
  ctx.Promise
    .then(resp => {
      response = resp;
      t.end();
    })
    .catch(err => {
      error = err;
      t.end();
    })
})

test("Check response", t => {
  t.equals(response, 'name');
  t.end();
})
More info on testing lambda functions locally can be found here and an example of testing by mocking the context object can be found here.
-
Using grunt-aws-lambda plugin
This plugin for Grunt has helpers for running Lambda functions locally as well as for packaging and deployment of Lambda functions.
More info and an example can be found here
Start by creating a blank AWS Lambda function that will be called whenever a new email comes in.
For this you need your own domain, and you need to verify the domain with AWS, this can take up to 72hrs, so have a nice drink and chill out while you wait 😎 ☕
See here for how: https://docs.aws.amazon.com/ses/latest/DeveloperGuide/verify-domain-procedure.html
Click rule sets on the bottom left and create a new rule set with whatever name you like. If you want to have your function triggered by emails sent to any address in your domain you can leave recipient blank, else you can add the recipient you want to trigger the function.
In that rule set add an action for your Lambda function. This tells AWS to run your action when an email is received by SES.
This is all you need to do to make your function trigger from SES, but depending on what your Lambda function does, it might be kind of hard to verify that it's run (though you can look at the stats for the function to see how and when it's been run) so let's make it save the body of your email to your bucket!
This next section is an illustration of how Lambda function can be used with SES, not a recommendation for usage. If you set this up on your own AWS account, it's possible a SPAMer will flood your Lambda and cause you to waste loadz-a-money on S3 writes...
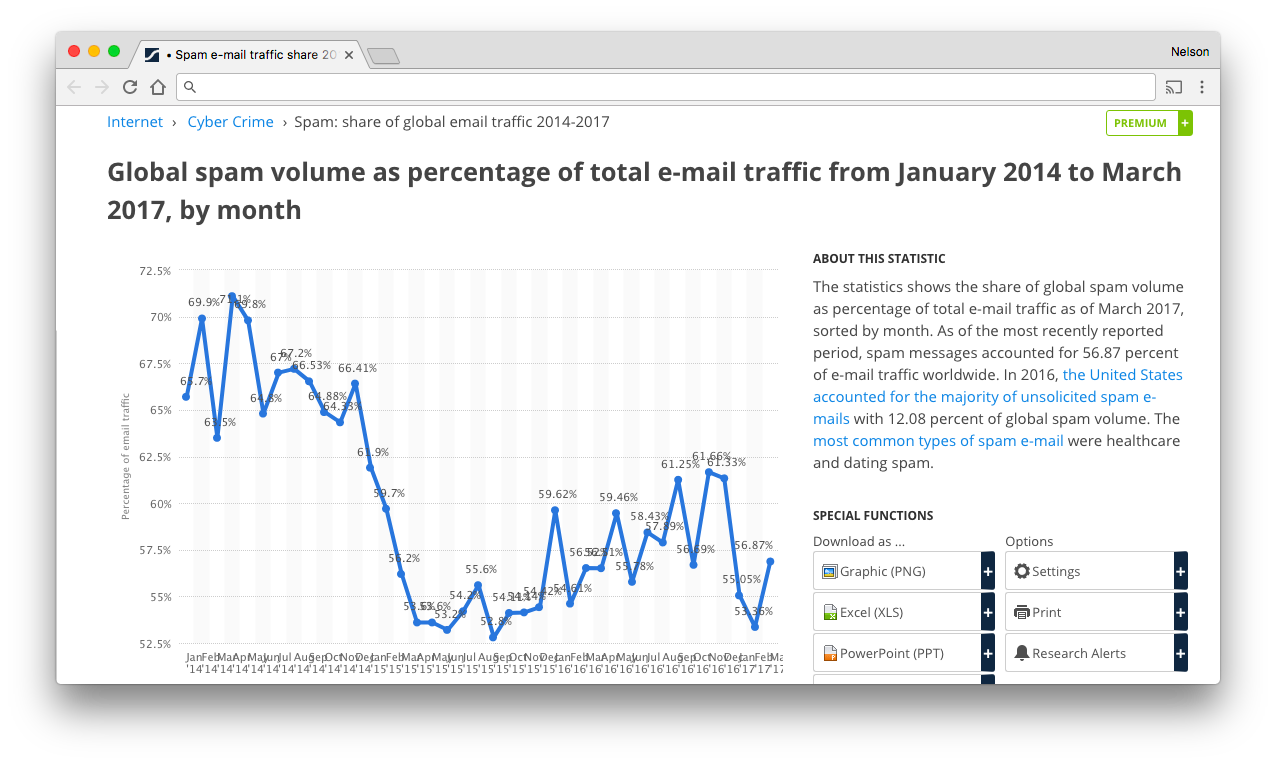
 $0.05 per 1,000 writes to S3 might not sound like a lot, but it will add up if you consider the volume of spam sent/received. (if you use GMail you won't realise it because Google has amazing filters, but an "un-protected" email address will get hundreds and a reasonably popular domain will get thousands of SPAM emails per day)
Fun Fact: Over 50% of email is SPAM see: https://www.statista.com/statistics/420391/spam-email-traffic-share/
Continue with care 💵
Go back to the rule set you created for your Lambda function. Add a new action to it, this one should be an S3 action, with the bucket you want to use selected. This will save the email to S3. Make sure this action is positioned above your Lambda function:
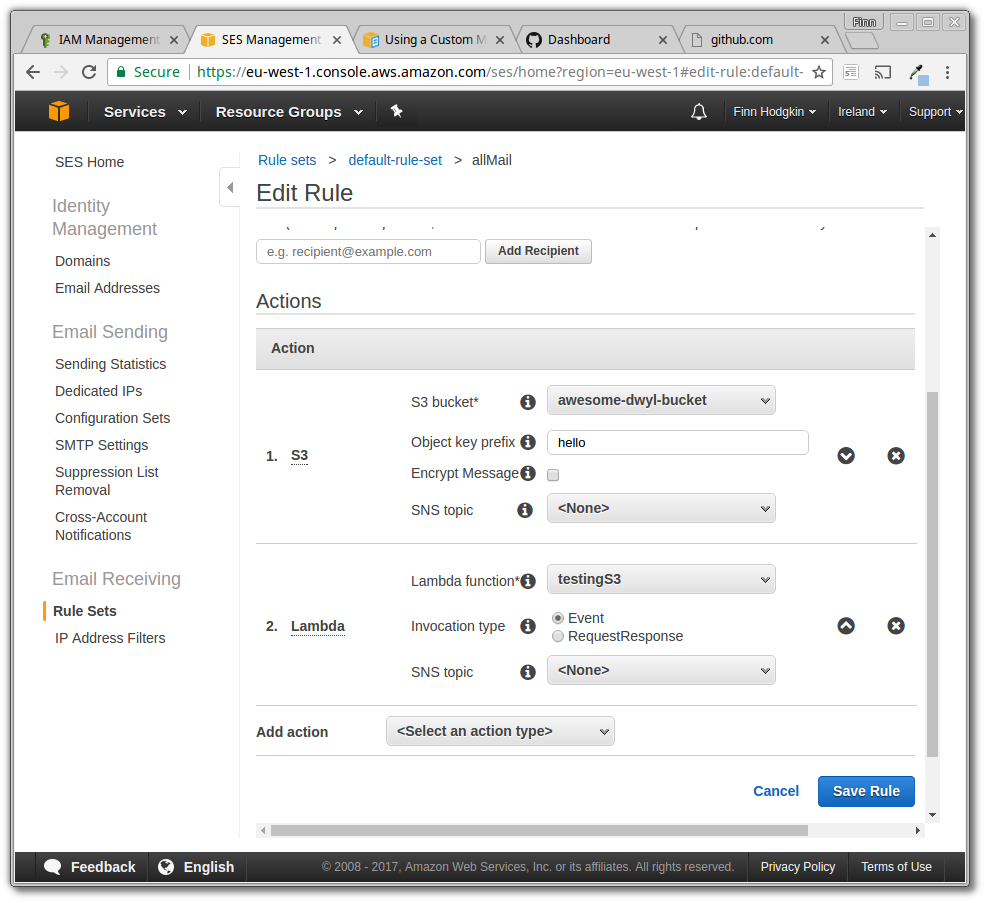
This saves the email in a slightly weird way that we don't have that much control over, so we want our Lambda function to take the file written from the S3 action and process it separately.
Before this can happen you need to set up a role to give your function access to S3, for the policy of the role put something like this:
{
    "Version": "2012-10-17",
    "Statement": [
        {
            "Effect": "Allow",
            "Action": "logs:CreateLogGroup",
            "Resource": "arn:aws:logs:us-east-2:YOUR-USER-ID-HERE:*"
        },
        {
            "Effect": "Allow",
            "Action": [
                "logs:CreateLogStream",
                "logs:PutLogEvents",
                "s3:*"
            ],
            "Resource": [
                "arn:aws:logs:us-east-2:271861816104:log-group:/aws/lambda/getHelloWorld:*",
                "arn:aws:s3:::YOUR-BUCKET-HERE",
                "arn:aws:s3:::YOUR-BUCKET-HERE/*"
            ]
        }
    ]
}
The s3:* property under Action allows all s3 functionality for any functions with this role. The last two properties under Resource give access to your bucket and any subdirectories within it.
In the permissions tab of your S3 bucket select "Any Authenticated AWS User" and give read and write access for object access and permission access.
(I'm sure there is a better way than this, please raise an issue if you know how 🙏)
So now when we receive an email it is save to S3 and a function is triggered. Next we need we need to hook the two up so our Lambda function reads the saved file, and saves the body in a nice readable way.
To do this we can change our Lambda function to look like this:
var AWS = require('aws-sdk');
var s3 = new AWS.S3( {
    signatureVersion: 'v4'
} ); //Make a new instance of the AWS.S3 object, telling it which signature version to use


exports.handler = (event, context, callback) => {
    s3.getObject({ //get the saved object from your S3 bucket
        Bucket: YOUR-BUCKET-NAME-HERE,
        Key: 'YOUR-SUBDIRECTORY-THAT-S3-SAVES-TO/' + event.Records[0].ses.mail.messageId
    }, (err, res) => { //The contents of the file will be passed into the callback as res

        const params = {
            Bucket: BUCKET-YOU-WANT-TO-SAVE-TO,
            Key: FILE-NAME-YOU-WANT,
            Body: res.Body.toString() //res.Body is a buffer so you can call
						// "toString()" on it to make it into a string
        };

        s3.putObject(params, (err, res) => { //this will put the file you
						// specified in params in the bucket
            console.log(err, res); // you'll either get an error or response
						// depending on if the file was added to the bucket properly
            callback(null, 'Success!');
        })
    })


};
Check out the comments in the code to see what it does, and once you understand it, adapt it to your specific needs!
If you've put all this together, you should have an AWS set up where you can send an email to an address and the body of it is saved to a bucket!
After writing your tests, the next step is to set up Continuous Integration (CI) for your Lambda Functions so every time you push up your code to GitHub, the tests are run and the code is deployed to AWS if the tests pass. This example goes through how to set up CI using Codeship.
Some initial set up of your project repo is required. This involves having a lambda function file in the correct format (with an exports.handler function), and a data.json file with a test event. The flow will be as follows:
- Push code to GitHub
- This triggers Codeship
- Codeship runs the tests
- If tests pass, Codeship deploys Lambda function to AWS, else build fails
- Codeship invokes Lambda function on AWS with the test event to check live version is working as expected
- If successful, Codeship reports build succeeded!
Follow along with this simple example to try out setting up the process yourself
-
Create a FREE account on Codeship and connect to your GitHub account
-
Fork this repo on Github!
-
Create a project in Codeship connecting to your forked repo.
If you have any problems with the Step 1 or 3, follow the instructions on the Codeship documentation.
- Create a hello-world Lambda function on AWS following the steps in this earlier section. In the 'Configuration' tab Make sure that the name of the handler is changed from 'index.handler' to 'LambdaTest.handler'. 'LambdaTest' will be the name of the zip file that we upload to AWS through Codeship.
Also make a note of the ARN for the lambda function - it can be found in the top right hand corner of the page. It should have the form: arn:aws:lambda:YOUR_AWS_REGION:YOUR_AWS_ACCOUNT_ID:function:YOUR_FUNCTION_NAME. You'll need it when setting up the Deployment Script on Codeship.

- Create a User for Codeship in AWS and get an AWS 'access key' and 'access secret key'.
We need to give Codeship access to the lambda function on AWS so it can update and invoke the function. AWS IAM best practices suggest creating a Group with an access policy to which Users can be added.
Navigate to the 'Identity and Access Management' section of the AWS console.

Select the 'Users' tab from the left hand menu. Click the blue 'Create New Users' button. Give the first user the name 'Codeship' (We've already done this!). Make sure the 'Generate an access key for each user' checkbox is ticked. Then click 'Create'.


On the next screen, click the 'Show User Security Credentials' arrow. It will show you an 'access key' and 'access secret key' for this user. Copy the keys and paste them somewhere safe. You won't be shown them again.
Next select the 'Groups' tab in the left hand pane. Click the blue 'Create Group' button.

Give the group the name 'CI' or any name of your choice. In the next page under 'Attach Policy', just click 'Next Step'. We will be adding our own custom policy.
Navigate back to the Groups tab and click on your newly created group. Select the 'Users' tab and click on the blue 'Add Users to this Group' button. You can then add the user we just created.
To give Codeship access to update, invoke and retrieve your AWS Lambda function, you need to add an access policy. Select the tab 'Permissions' and then click on 'Inline Policy' > 'Create new one'.

Select the 'Custom Policy' option and click 'Select'.

In the 'Policy Name' field add 'Codeship Policy' and in the 'Policy Document' add in the following text:
  {
    "Version": "2012-10-17",
    "Statement": [
        {
            "Effect": "Allow",
            "Action": [
                "lambda:UpdateFunctionCode",
                "lambda:UpdateFunctionConfiguration",
                "lambda:InvokeFunction",
                "lambda:GetFunction",
                "lambda:CreateFunction",
            ],
            "Resource": [
              "YOUR_LAMBDA_FUNCTION_ARN_HERE"
            ]
        }
    ]
}
Then click 'Validate Policy' and if the validation is successful, click 'Create Policy'.
- Add the AWS User Environment variables to your Codeship project. In the Environment tab in Codeship, add your 'AWS_ACCESS_KEY', 'AWS_SECRET_ACCESS_KEY' and 'AWS_DEFAULT_REGION' (usually 'us-east-1'). This is needed in order to authorise the Codeship to execute commands from the aws cli.

- Set up Test and Deployment Scripts for your Codeship project
Click the the Test tab in your project settings.

You should already see the follow default code:
# We support all major Node.js versions. Please see our documentation for a full list.
# https://documentation.codeship.com/basic/languages-frameworks/nodejs/
#
# By default we use the Node.js version specified in your package.json file and fall
# back to the latest version from the 0.10 release branch.
#
# You can use nvm to install any Node.js version you require
#nvm install 0.10
nvm install 0.10
We're using tape to run the tests so it also needs to be installed globally on the virtual machine. Add this line in at the end:
npm install -g tape
npm install
AWS Lambda used to only support Node 0.10 so our tests (which are written in es6) are piped through babel so that they could be run without Node 4.0. However this would be no longer required.
Under 'Configure Test Pipelines', in the 'Test Commands' tab add npm test.
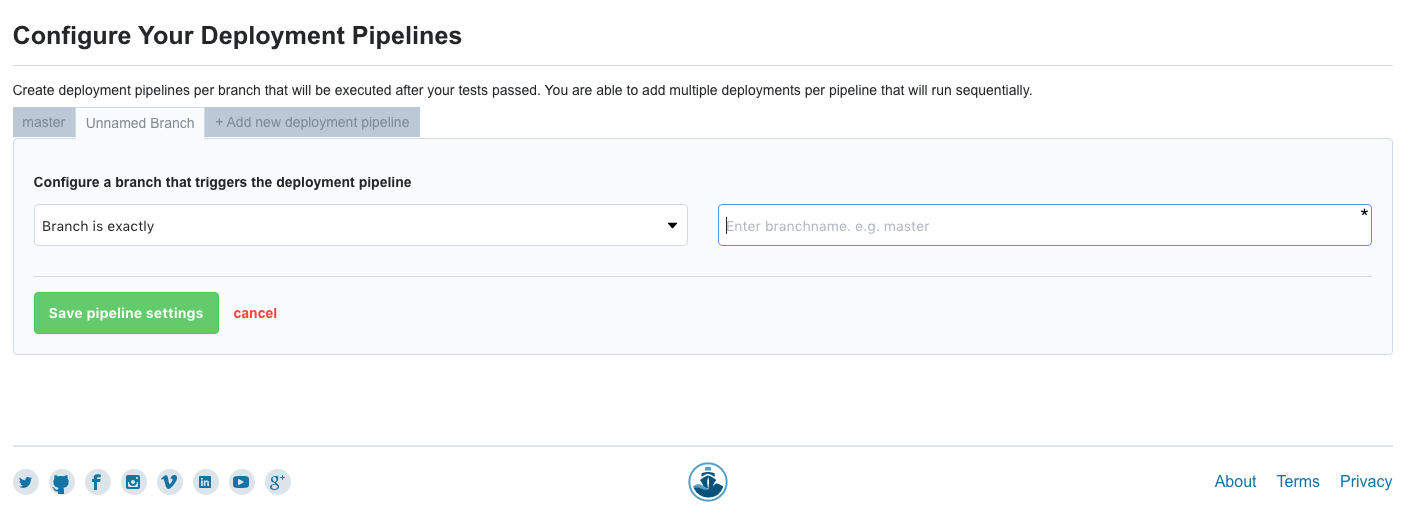
In the Deployment Tab, under 'Configure Deployment Pipeline' select the name of the branch on GitHub that you want to test.
Then choose the 'Custom Script' option.

This next page looks like this. We will add our own script to the deployment commands.

We're going to first zip up the lambda function, then use the AWS cli to update the version on AWS, and finally invoke it with a test event. Add in the following code to the deployment commands:
pip install awscli
zip -r LambdaTest.zip -j lambda-testing/functions/LambdaTest.js
aws lambda update-function-code --function-name LambdaTest --zip-file fileb://LambdaTest.zip
aws lambda get-function --function-name YOUR_LAMBDA_FUNCTION_ARN_HERE
aws lambda invoke --function-name YOUR_LAMBDA_FUNCTION_ARN_HERE --payload file://lambda-testing/tests/data.json --log-type Tail lambda_output.txt
cat lambda_output.txt- Make a change and push up to GitHub! Try modifying the LamdaTest.js file and/or the data.json file, commit the change and push the code up to GitHub. This should trigger Codeship. View the build log to make sure the build is successful and the test passes.
Also have a look at the monitoring tab in your Lambda function console. You should see a spike where the function was invoked by Codeship.

For more information have at the Codeship documentation:
Upload Your Lambda Function to an S3 Bucket and Automatically Deploy it to Lambda (bash script example)
In this example will build a script that will execute the neccessary steps to upload a Lambda function to S3 where it can be stored and then automatically deploy it to Lambda.
We will be writing our own bash script that will involve the use of some of the AWS CLI commands. Follow these instructions on how to get set up with the AWS CLI on your local machine:
-
If you haven't already done so, set up an account with AWS here.
-
You'll then need to get your 'access key ID' and 'secret access key' by doing the following:
- Open the IAM console
- In the navigation pane choose 'Users'
- Click your IAM username
- Click 'Security Credentials' and then 'Create Access Key'
- To see your access key, choose Show User Security Credentials. Your credentials will look something like this:
- Access Key ID: AKIAIOSFODNN7EXAMPLE
- Secret Access Key: wJalrXUtnFEMI/K7MDENG/bPxRfiCYEXAMPLEKEY
- Click 'Download Credentials' and store them in a secure location
-
Install the AWS CLI via a method of your choice here.
-
Once it's installed you have to configure it. Type
aws configurein the command line. You should see something like this:
$ aws configure
AWS Access Key ID [None]: AKIAIOSFODNN7EXAMPLE
AWS Secret Access Key [None]: wJalrXUtnFEMI/K7MDENG/bPxRfiCYEXAMPLEKEY
Default region name [None]: eu-west-1
Default output format [None]: ENTER
Enter your aws access key, secret access key and region then press enter on the last option.
You should now be good to go!
-
Next write a Lambda function in your text editor if you haven't already. Check out our previous example up until step 4 (we'll be automating the zipping in this example).
-
Once you've done this you'll want to create a new S3 bucket that will store all of your uploaded Lambda functions. Click on the S3 console on the AWS Management Console window:

Click the 'Create Bucket' button. Give your S3 Bucket a name and select its region. We've called ours 'lambda-function-container':

- Next you'll want to write a bash script that will perform 3 commands. The first is to create your deployment package (a .ZIP file containing your lambda function and its dependencies). The second will upload the deployment package to your newly created S3 Bucket. The third will deploy your Lambda function from S3.
To do so create a new file and call it whatever you want and save it as a .sh file. We've called ours 'lambda-upload-create.sh'. The 3 commands require variables as input which is why we've included the echo & read bash commands in order to temporarily save these inputs:

We tried to have as few variable inputs as possible so that it reduces the margin for error when typing it into the command line. These are followed by our zip and AWS CLI commands:
The first command (zip) takes two inputs, the name of the zip file you want to create and the names of the files you want to zip up. (in our case its going to be upload and upload.js seeing as we have no dependencies)
zip -r "$ZipFileName.zip" $FilesToBeZippedThe upload command 'put-object' takes three inputs, the name of the bucket, the key which is the file path of the zip file and the body which is the same as the key in this case.
aws s3api put-object --bucket $BucketName --key "./$ZipFileName.zip" --body "./$ZipFileName.zip"The deployment command 'create-function' takes five inputs, the function name which can be anything you like, the runtime which in our case is nodejs, the role which is the ARN for an IAM role you have used/created in the IAM console, the code which consists of the bucket name that you're deploying from and the key which is the file path of the zip and finally the description of your function which is optional.
aws lambda create-function --function-name $FunctionName --runtime nodejs \
--role $Role --handler "$ZipFileName.handler" \
--code S3Bucket="$BucketName",S3Key="./$ZipFileName.zip" \
--description $Description- Let's create the script that we'll run in our
package.jsonthat will trigger the.shfile we just created:

In order to be able to run our script we have to make it executable. Type this command into your terminal:
chmod +x (filenameOfScript.sh)
- One final step before we'll be able to run our script. Go back to AWS and go to the IAM console because you need to add some policies that enable you to perform certain methods like 'create-function' or 'put-object'.
Click on the groups and then select 'Create Group'. We've made a 'Public' group, click on it once you've created it:

Click on the 'Attach Policy' button and then select 'IAMFullAccess' from the list:

Click on the 'Create Group Policy' in the Inline Policies section:

Select the 'Custom Policy' and then press the 'Select' button:

Create your custom policy. We've included the necessary effects, actions and resources to have complete access. Then click 'Apply Policy':

Once your group has been created you'll need to add a user to it. Any user who is added to that group will have the same permissions. If you haven't created a user you can do that here:

Go back to the group you just created and then click 'Add Users to Group' and then select a user to add. The user should be the one that has the access key id and secret access key assigned to it that you're using for the AWS CLI.

We should now be able to take our script for a spin!
- In the command line, run the script in your
package.json. Ours is as follows:$ npm run upload
This should prompt the echo and read commands first:
Enter the name of the files you wish to zip (eg. lambdaFunction.js node_modules): upload.js
Enter the name of the output zip file (eg. lambdaFunction): upload
Enter the name of the s3 bucket you wish to upload to: lambda-function-container
Enter the name of your lambda function: Upload
Enter the ARN of the role you wish to implement: arn:aws:iam::655240711487:role/lambda_basic_execution
After you've hit enter it should return this:
adding: upload.js (deflated 17%)
{
    "ETag": "\"519e9cfc9a2ee33412ba813c82f33a56fa3\""
  }
{
  "CodeSha256": "nbYYHfHKyYSlb09Dpw7vf7wB93F+9V8XEmaTBU=",
  "FunctionName": "Upload",
  "CodeSize": 249,
  "MemorySize": 128,
  "FunctionArn": "arn:aws:lambda:eu-west-1:655240711487:function:Upload",
  "Version": "$LATEST",
  "Role": "arn:aws:iam::655240711487:role/lambda_basic_execution",
  "Timeout": 3,
  "LastModified": "2016-01-28T13:31:28.627+0000",
  "Handler": "upload.handler",
  "Runtime": "nodejs",
  "Description": "Bash Script Tutorial"
}- Go to S3 to check if the deployment package has been uploaded. You should see your
.ZIPfile:

- Go to Lambda to check if your Lambda function has been enabled:

That's all! You should now be able to upload and deploy a Lambda function with a single bash script.
Gulp can be used to automate the zipping, deployment and testing of Lambda functions on AWS. The Codeship deployment script can then be reduced to a single command gulp deploy!
The syntax to create a new Gulp task is:
gulp.task('name of task', function() {
  return  //gulp functions to run
})
There many plugins for performing actions like retrieving, moving and zipping files. These actions are also chainable.
We will go through a simple gulp script with tasks for each of the steps involved.
-
Require in all the relevant modules and files. We'll be using the aws-sdk to deploy and invoke the lambda function. We also need to read in the
package.jsonfile in order to add the node modules to the zip file.var AWS = require('aws-sdk'); var gulp = require('gulp'); var zip = require('gulp-zip'); var install = require('gulp-install'); var runSequence = require('run-sequence'); var fs = require('fs'); var packageJson = require('./package.json');
-
Declare Constants.
var region       = 'eu-west-1';  //AWS region
var functionName = 'LambdaTest';
var outputName   = 'LambdaTest.zip'; //name to be given to output zip file

// the ARN of the execution role to be given to the lambda function - change this to a role from your account
var IAMRole = 'arn:aws:iam::685330956565:role/lambda_basic_execution';

// the paths of the files to be added to the zip folder
var filesToPack = ['./lambda-testing/functions/LambdaTest.js'];
Make sure the IAM role is changed to the ARN of a role from your AWS account and the region is set to the AWS region you want to deploy the Lambda function to!
-
Create an archive folder and add the project files
gulp.task('js', function () {
  return gulp.src(filesToPack, {base: './lambda-testing/functions'})
    .pipe(gulp.dest('dist/'));
});
gulp.srctakes an array of file paths as the first argument and an options object as the second. If you specify a base file path in the options only the folders/files after the base are copied i.e. in this case, only the LambdaTest.js file is copied into the archive folder (dist). -
Add the node modules to the archive folder
gulp.task('node-modules', function () {
  return gulp.src('./package.json')
    .pipe(gulp.dest('dist/'))
    .pipe(install({production: true}));
});
In this task, the
package.jsonfile is copied to the archive folder and the 'gulp-install' module is used to do annpm install --productionof all the listed dependencies. -
Zip up the archive folder and save it.
gulp.task('zip', function () {
  return gulp.src(['dist/**', '!dist/package.json'])
    .pipe(zip(outputName))
    .pipe(gulp.dest('./'));
});
All the files in the dist folder apart from the
package.jsonfile are zipped up using the 'gulp-zip' module and save in the root of the project folder. -
Upload the zip file to AWS. If the function already exists, update it, otherwise create a new Function.
We can create an 'upload' task with gulp:
gulp.task('upload', function() {})
Inside the function we first have to do a bit of set up:
AWS.config.region = region; // this is set to eu-west-1 from the constants declared in step 1
var lambda = new AWS.Lambda();
var zipFile = './' + outputName; // the outputName has also been set in step 1
First we need to check if the function already exists on AWS before deciding whether to create a function or update a function.
lambda.getFunction({ FunctionName: functionName }, function(err, data) {
  if (err) createFunction();
  else updateFunction();
});
We also need a function to retrieve the saved zip file in order to pass it in as a parameter in our create function command.
function getZipFile (callback) {
  fs.readFile(zipFile, function (err, data) {
        if (err) console.log(err);
        else {
          callback(data);
        }
  });
}
The
getZipFilefunction takes a callback which gets called with the file data if the file is read successfully.Using the aws-sdk we can then define a function to create a new Lambda function from this zip file.
function createFunction () {

  getZipFile(function (data) {
    var params = {
      Code: {
        ZipFile: data // buffer with the zip file data
      },
      FunctionName: functionName, // functionName was set in the constants in step 1
      Handler: 'LambdaTest.handler',  // need to set this as the name of our lambda function file is LambdaTest.js
      Role: IAMRole,  // IAMRole was set in the constants in step 1
      Runtime: 'nodejs'
    };

    lambda.createFunction (params, function (err, data) {
      if (err) console.error(err);
      else console.log('Function ' + functionName + ' has been created.');
    });
  });

}
Similarly we can also define
updateFunction:function updateFunction () { getZipFile(function (data) { var params = { FunctionName: functionName, ZipFile: data }; lambda.updateFunctionCode(params, function(err, data) { if (err) console.error(err); else console.log('Function ' + functionName + ' has been updated.'); }); }); }
-
Invoke the function with a test event to check the live version is working as expected.
We have to first get the function to make sure it exists and only invoke it if there isn't an error.
In the parameters for invoking the function, a JSON object can be specified as the 'Payload' and the 'InvocationType' can be specified as 'RequestResponse' if you want to get a response body.
gulp.task('test-invoke', function() {
  var lambda = new AWS.Lambda();

  var params = {
    FunctionName: functionName,
    InvocationType: 'RequestResponse',
    LogType: 'Tail',
    Payload: '{ "key1" : "name" }'
  };

  lambda.getFunction({ FunctionName: functionName }, function(err, data) {
    if (err) console.log("Function" + functionName +  "not found", err);
    else invokeFunction();
  });

  function invokeFunction() {
    lambda.invoke(params, function(err, data) {
      if (err) console.log(err, err.stack);
      else console.log(data);
    })
  }
})
-
Create a deployment task that runs all the above tasks in series in the correct order.
The
runSequencemodule takes a comma separated list of gulp task names or a list of arrays with gulp tasks, and ends with a callback. The tasks are run in the order they are specified. To run two tasks in parallel specify them in the same array.gulp.task('deploy', function (callback) { return runSequence( ['js', 'node-modules'], ['zip'], ['upload'], ['test-invoke'], callback ); });
In the AWS console you can only view functions by region, so if you can't see the function after it has been created, check you're looking at the correct region (in the dropdown menu in the top right of the console)

-
Add the deployment script to Codeship or your package.json
In Codeship just add
gulp-deployto your Deployment script and you're good to go!Note: Make sure the Access Policy of the Codeship User in the IAM console on AWS has permissions for all the actions you're trying to execute. i.e. getting, creating, updating and invoking lambda functions.
Here we will implement the previous example of uploading a Lambda function to S3 and then deploying it from the bucket. Intead of using a bash script we can use Gulp. We can make some small adjustments to the Gulp example that we just created in order to deploy from S3. This is a continuation from that so please check it out before you look at this one:
-
We're going to want to create a new Gulp task that will upload our zip file. We've called our task 'upload-to-s3' and we've included it just after our zip task.
The first thing we do is create a new S3 instance using the AWS SDK because we'll need to access some S3 methods. We then declare the path of the zip file we want to upload to be used as the S3 Key. We then created a 'getZipFile' function that will get the 'Body' for the parameters and also wrap around the 'putObject' method. We then write the S3 method which takes params (an object with 'Bucket', 'Key' and 'Body' within it) and a callback that handles errors is called when a response from the service is returned.
gulp.task('upload-to-s3', function () {
  var s3 = new AWS.S3();
  var zipFilePath = './' + outputName;
  getZipFile(function (data) {
    var params = {
      Bucket: 'lambda-function-container',
      Key: zipFilePath,
      Body: data
    };
    s3.putObject(params, function(err, data) {
      if (err) console.log('Object upload unsuccessful!');
      else console.log('Object ' + outputName + ' was uploaded!');
    });
  });
  function getZipFile (next) {
    fs.readFile(zipFilePath, function (err, data) {
          if (err) console.log(err);
          else {
            next(data);
          }
    });
  }
});
-
Next we need to add our new task to the list of tasks in our runSequence that we've already created. We want it to come after zipping but before our 'upload' task:
gulp.task('deploy', function (callback) {
  return runSequence(
    ['js', 'node-mods'],
    ['zip'],
    ['upload-to-s3'],
    ['upload'],
    ['test-invoke']
    callback
  );
});
-
In order for our Lambda function to be deployed from S3, we're going to have to adjust our 'createFunction' & 'updateFunction' Lambda methods that we created previously.
We needed to change the 'Code' parameter from
ZipFile: datato:function createFunction () { var params = { Code: { S3Bucket: bucketName, S3Key: zipFile }, FunctionName: functionName, Handler: 'LambdaTest.handler', Role: IAMRole, Runtime: 'nodejs' }; lambda.createFunction (params, function (err, data) { if (err) console.error("CREATE ERROR", err); else console.log('Function ' + functionName + ' has been created.'); }); }
We then needed to do the same with our 'updateFunction':
function updateFunction () {
    var params = {
      FunctionName: functionName,
      S3Bucket: bucketName,
      S3Key: zipFile
    };

    lambda.updateFunctionCode(params, function(err, data) {
      if (err) console.error(err);
      else console.log('Function ' + functionName + ' has been updated.');
    });
}
-
Because we added some more AWS methods, we'll need to update our policy so that it supports this. Go to your IAM console and add the necessary methods. Here's ours:
 We included a 'getObject' method to check if the object had been uploaded already.
function checkObject (fn) {
  var params = {
    Bucket: bucketName,
    Key: zipFile
  };
  s3.getObject(params, function (err, data) {
    if (err) console.log('BUCKET ERROR', err);
    else fn();
  });
}
-
Your script should be good to go! Once you've run it go to your S3 and Lambda consoles to check if your Lambda function has been uploaded and deployed:


We decided to write dpl to make deploying your Lambda functions extremely easy. Here's how to implement it.
$ npm install dpl --save-dev- Configure your environment variables.
You need
AWS_REGIONandAWS_IAM_ROLEexport AWS_REGION=eu-west-1 export AWS_IAM_ROLE=arn:aws:iam::123456789:role/LambdaExecRole - Add the list of files to deploy to your
package.json:"files_to_deploy": [ "package.json", "index.js", "lib/" ]
- Add the deployment script to your
package.json"scripts": { "deploy": "dpl" }
- Run the script
$ npm run deploy
Multiple versions of a Lambda function can be running at the same time on AWS. Each one has a unique ARN. This allows different versions to be used in different stages of the development workflow e.g. development, beta, staging, production etc. Versions are immutable.
An alias is a pointer to a specific Lambda function version. Aliases are however mutable and can be changed to point to different versions. For example you might have two aliases 'DEV' and 'PROD', standing for 'development' and 'production' respectively. Event sources such as S3 buckets, DynamoDB tables or SNS topics can be configured with a Lambda function alias so that the ARN of the specific version doesn't need to be updated every time in the event source mapping. When new versions are upgraded to production, only the alias needs to be changed and the event source will automatically point to the correct version. This workflow also enables easy rollbacks to previous versions.
When you create a Lambda function e.g. 'helloworld', its version is automatically set to $LATEST. The version is the last part of the Lambda function's ARN:
arn:aws:lambda:aws-region:acct-id:function:helloworld:$LATESTThe $LATEST version is mutable i.e. if a Lambda function is updated either in the console or using the cli, the code in the $LATEST version is updated.
You can also publish a new version from the $LATEST version. The ARN of the published version will have the version number replaced: e.g. for Version 1:
arn:aws:lambda:aws-region:acct-id:function:helloworld:1Published versions are immutable so if you want to change any part of the code or configuration, you have to modify $LATEST and then publish a new version.
If the $LATEST version is not changed, then a new version cannot be published.
An alias can be created for an existing Lambda function. The alias and lambda function have different ARNS as they are both unique AWS resources.
Using aliases means that calling event source doesn't have to know the specific Lambda function version the alias is pointing to. It enables
- new versions to easily be promoted or rolled back (aliases can easily be mapped to different function versions)
- easier event source mappings - more control over which versions of your function are used with specific event sources in your development environment
Walkthrough of implementing versioning and aliasing using the AWS CLI on the AWS Lambda docs.
Create an API with GET/POST Methods that uses Lambda functions to retrieve/update records from a DynamoDB table
-
First we'll need to create a table in DynamoDB. Go to the DynamoDB console and then click the 'Create Table' button. Give your table a name (call it something relevant to the type of data your DynamoDB table will hold). We've called ours 'Users'. The 'Primary key' is made up of a 'Partition key' (hash key) and an optional 'Sort key'. (The partition key is used to partition data across hosts for scalability and availability):
For 'Table settings' just check the 'Use default settings' checkbox and then click the blue 'Create' button:
-
Once the table is created, click on the 'Alarms' tab and then delete the basic alarms if they have been created:
Then click on the 'Capacity' tab and then specify the 'Read' and 'Write' capacity units as 3 each and then click 'Save':
-
Next we will have to create a policy that allows your AWS functions to access Cloudwatch logs as well as the table you just created. Go to the IAM console, select 'Roles' and then 'Create new role'. We've called ours 'APIGatewayLambdaExecRole':
Select the 'AWS Lambda' role:
And then click 'Next step' to skip the 'Attach Policy' section:
In the 'Review' section click the blue 'Create Role' button to finish:
Click on the title of the role you just created then click the down arrow for 'Inline Policies'. Follow the link to create an inline policy:
Click on the 'Custom Policy' radio button and then click 'Select':
Give your custom policy a name (we've called ours 'LogAndDynamoDBAccess') and then enter the following in the 'Policy Document' section. Make sure your "Resource" at the bottom is set to the ARN of your table and the second "SID" is set to "_YourTableName_DynamoDBReadWrite". (the ARN can be found in your 'Table details' by going to your DynamoDB console and clicking on your table.):
{ "Version": "2012-10-17", "Statement": [ { "Sid": "AccessCloudwatchLogs", "Action": [ "logs:*" ], "Effect": "Allow", "Resource": "arn:aws:logs:*:*:*" }, { "Sid": "UsersDynamoDBReadWrite", "Effect": "Allow", "Action": [ "dynamodb:DeleteItem", "dynamodb:GetItem", "dynamodb:PutItem", "dynamodb:UpdateItem" ], "Resource": [ "arn:aws:dynamodb:eu-west-1:655240720487:table/Users" ] } ] } -
Now we need to create the Lambda functions for adding and retrieving data to and from the table (we'll be creating our functions in a text editor, zipping them up and then uploading them to Lambda. Follow the instructions in the previous 'HELLO WORLD!' .zip example on how to do this):
Create a new
.jsfile that will contain our first Lambda function. This function will GET information from the DynamoDB table. We've called the filegetUserInfo.js. Here is the code:var AWS = require('aws-sdk'); var DOC = require('dynamodb-doc'); var dynamo = new DOC.DynamoDB(); exports.handler = function(event, context) { var callback = function(err, data) { if (err) { console.log('error on getUserInfo: ', err); context.done('Unable to retrieve user information', null); } else { if(data.Item && data.Item.users) { context.done(null, data.Item.users); } else { context.done(null, {}); } } }; dynamo.getItem({TableName:"Users", Key:{username:"default"}}, callback); };
Zip up the file and then upload it to Lambda:
zip -r getUserInfo.zip getUserInfo.jsFor the Role, select the one we created earlier. Then click 'Next' and then 'Create function':
Click 'Test' to test the function. The results should return an empty objext
{}.Create a second
.jsfile that will contain our second Lambda function. This function will UPDATE information in our DynamoDB table. We've called the fileupdateUserInfo.js. Here is the code:var AWS = require('aws-sdk'); var DOC = require('dynamodb-doc'); var dynamo = new DOC.DynamoDB(); exports.handler = function(event, context) { var item = { username:"default", users: event.users || {} }; var callback = function(err, data) { if (err) { console.log(err); context.fail('unable to update users at this time'); } else { console.log(data); context.done(null, data); } }; dynamo.putItem({TableName:"Users", Item:item}, callback); };
Again zip up the file and then upload it to Lambda:
zip -r updateUserInfo.zip updateUserInfo.jsFollow the same steps as the previous function to create the second one, giving it the same role. They should both now appear in your functions section:
Test the function with a sample event relevant to your data. We created the following sample event:
{
 "users": [
           {
             "id": 1,
             "name": "John Smith",
             "location": "London"

           }
          ]
}
You should see an empty obect just like the first function
{}. Go back to the GetUserInfo function and then click 'Test' again. You should now see a returned result with the object in your sample event like this:[ { "id": 1, "location": "London", "name": "John Smith" } ] -
We're going to have to create one more Lambda function. It essentially does nothing but it is required by the OPTIONS method for CORS (Cross Origin Resource Sharing which is a mechanism that allows restricted resources on a web page to be requested from ). The function is as follows:
  exports.handler = function(event, context) {
    context.succeed('');
  }
Upload it just like the previous Lambda functions:
-
Next go to the Amazon API Gateway console and create a new API by clicking 'Create API'. Give it a name, we've called our API 'SecureUsers':
Click on the 'Create Resource' button and then give your resource a name. We've called ours 'Users':

Click 'Create Resource' again to confirm it:

-
On the left hand side, click the endpoint you just created. Ours is
/users. Then click 'Create Method' and set it to 'GET':
Select the 'Lambda function' radio button and then assign it to the Get function we created earlier then press 'Save':

Click 'Test'. You should see an empty object
{}in the response body:
-
Repeat the previous step but instead of a 'GET', set the method to 'POST':

Click 'Test' but this time in the request body, add in some details. We've added two users:
{"users": [ {"id": 1, "name": "Peter", "surname": "Smith"}, {"id": 2, "name": "John", "surname": "Walsh"} ] } -
Go back to your 'GET' method and then click 'Test' again. You should now be able to see that the table has been updated with the details you tested your 'POST' request with.

All done! You can now set up Lambda functions that manipulate information in an AWS DynamoDB table that are invoked through the API Gateway!
Serverless is a framework that allows you to build applications that run on AWS Lambda and AWS API Gateway.
This framework makes it extremely easy to deploy Lambda functions and API Gateway endpoints from your local machine. It is also super easy to test your functions locally too. If you want to know more about it check out the Serverless repo
We'll go through the steps to set up their example project 'serverless-starter'. If you haven't checked out our previous examples on how to create and deploy a Lambda function we strongly recommend that before you get stuck into this one: Here are the steps to set up the Serverless example project 'serverless-starter'.
-
First create an AWS account if you haven't done so already. Follow the steps in our previous examples in order to do this.
-
Go to your IAM console. We're going to have to create a new 'User' that our serverless application will be able to use and attach the neccessary policy in order to initialize it. Go to the 'Users' tab and then click 'Create New Users'. Give your user a name and then click 'Create'. We've called ours 'serverless-admin':

Once you've created your user, click show credentials. Make a note of them and then download them. (keep them safe...we'll need them later)

Click on your newly created user and then click the blue 'Attach Policy' button. Select the 'AdministratorAccess' policy and then click the 'Attach Policy' button again to attach it.

Here's the summary of our serverless-admin user:

-
Next you're going to have to install the AWS CLI if you haven't already done so. You can do so via any of the methods here. Once you've done that, type the
aws configurecommand into the command line. Use the Access ID and Secret Access ID from the user you just set up, select your region and then press enter for the last option:$ aws configure AWS Access Key ID [None]: AKIAIOSFODNN7EXAMPLE AWS Secret Access Key [None]: wJalrXUtnFEMI/K7MDENG/bPxRfiCYEXAMPLEKEY Default region name [None]: eu-west-1 Default output format [None]: ENTER
(note: you'll still need to reconfigure your AWS CLI, even if you've done so previously)
-
Now you should be good to get started with Serverless. Run this command to install it globally:
$ npm install serverless -g
-
It's time to set up your project. For demonstration purposes we've chosen to run serverless-starter which is a boilerplate example provided by Serverless. In future we'll show you how to set up your own project but for now this is all you need to get used the framework. Run this command in your terminal:
$ serverless project install serverless-starterYou'll see this screen and then be prompted to insert some data:

Enter the name of the bucket you'd like Serverless to back up your Lambda functions with and an email that alarms can be sent to. Select your region and then select the default AWS profile:
Serverless: Enter a universally unique project bucket name:  (serverless-starter-nkatqu-ejl6y9.com) learn-serverless
Serverless: Enter an email to use for AWS alarms:  (me@serverless-starter-nkatqu.com) example@email.com
Serverless: Select a region for your project:
  us-east-1
  us-west-2
> eu-west-1
  ap-northeast-1
Serverless: Select an AWS profile for your project:
> default
Serverless: Creating stage "dev"...
Serverless: Creating region "eu-west-1" in stage "dev"...
Serverless: Creating your project bucket on S3: serverless.eu-west-1.learn-serverless...
Serverless: Deploying resources to stage "dev" in region "eu-west-1" via Cloudformation (~3 minutes)...
Serverless: No resource updates are to be performed.
Serverless: Successfully created region "eu-west-1" within stage "dev"
Serverless: Successfully created stage "dev"
Serverless: Installing nodejs dependencies for component: restApi...
serverless-helpers-js@0.0.3 node_modules/serverless-helpers-js
└── dotenv@1.2.0
Serverless: Successfully initialized project "serverless-starter"
Serverless: Successfully installed project "serverless-starter"
-
You should now be able to see the serverless-starter files in your directory:

-
Click on it. Let's have a look at what's inside. Click on the 'restApi' folder. In there you should see lib, multi and single directories:

lib- holds code shared across all of your functions
multi- this is a Serverless module that contains multiple Lambda functions
single- this is another Serverless module containing one Lambda function with multiple endpointsIn the
multidirectory click on thecreatedirectory and then thes-function.jsonfile. This file contains endpoint configuration information for that Lambda function.
In the
singledirectory click on thealldirectory and then navigate to itss-function.jsonfile. Here you can see that a single function has been configured with multiple endpoints. (GET, POST, PUT, DELETE)
-
Next we're going to run our Lambda functions locally. Type the following command in your command line. The third piece is the route to your function. We're testing the 'all' function and so ours is:
$ serverless function restApi/single/allYou should then see the function run and return the results:
Serverless: Running restApi/single/all...
Serverless: -----------------
Serverless: Success! - This Response Was Returned:
Serverless: {"message":"Your Serverless function ran successfully via the 'GET' method!"}
Note: The function will take the event from the event.json file so you can configure whatever your payload is there. Our test function expects an object with a 'httpMethod' key so our event.json file looks like this:
{ "httpMethod": "GET" } -
Once we are happy with our Lambda functions and API Gateway endpoints we can deploy them from the command line using the
$ serverless dash deploycommand. You then use the up and down arrow keys to navigate to, and select (by pressingenter). The ones you select will then be deployed after you've moved back down to 'Deploy' and pressedenter. The selected ones show up in yellow:
You'll then see this in your terminal:

-
We can then go to AWS and check out the S3, Lambda and API Gateway consoles to see if everything has been deployed correctly:
API Gateway

S3

Lambda

(The Serverless framework automates a lot of the processes that we have covered in previous examples such as uploading to S3 and deploying to Lambda)
- Walkthrough Custom Events: https://docs.aws.amazon.com/lambda/latest/dg/walkthrough-custom-events.html
- Admin Events: https://docs.aws.amazon.com/lambda/latest/dg/walkthrough-s3-events-adminuser.html
- lambdash: AWS Lambda Shell Hack https://alestic.com/2014/11/aws-lambda-shell
- Lambda Persistence: https://alestic.com/2014/12/aws-lambda-persistence
- Lambda Speed (faster execution): https://alestic.com/2014/11/aws-lambda-speed
- Lambda Execution Environment and Available Libraries: https://docs.aws.amazon.com/lambda/latest/dg/current-supported-versions.html
- Intro to Lambda by Jeff Douglas (Cloud Legend) https://www.topcoder.com/blog/amazon-lambda-demo-tutorial/ + https://youtu.be/m7egclrPzSg
- Alternatives to Lambda: https://www.quora.com/Are-there-any-alternatives-to-Amazon-Lambda
- IAM - Identity and Access Management
- ARN - Amazon Resource Number
- Event Source - Event sources publish events that cause a Lambda function to be invoked.
As exciting as this incredible service is, it's only natural to have few concerns:
AWS Lambda has a default safety throttle limit of 100 concurrent Lambda function executions per account. see: https://docs.aws.amazon.com/lambda/latest/dg/limits.html
Q: Does this mean we can "only" process 100 requests at any given time?
A: No, it depends on how long the Lambda function takes to complete.
e.g: a request that takes 90ms to complete means your Lambda function can
handle 1000 concurrent requests out of the box.
If that sounds low don't panic, if you need more you can easily
request a Service Limit Increase by submitting a ticket to AWS Support.
As AWS Lambda is an innovative approach to executing code in a dynamically scalable way, no other vendors are offering something similar you will be bound to AWS until everyone else catches up (copies AWS). Depending on the up-take in the developer community, other providers could catch up quite quick (the underlying infrastructure to run micro-apps-as-a-service is not especially complex!)
At present the cost savings of not having idle capacity or having to spend time/effort provisioning/managing servers far out-weigh the risk of vendor lock-in.
- Image gets uploaded from Browser/Mobile App to Lambda function
- Lambda does image-rezie and compression
- Lambda POSTs the original image (900kb) and re-sized (100kb) to S3
Total time: 120ms (which gets rounded up to 200ms)
- 2 POST requests (one for original one for compressed image) = $0.005/1000x2 = $0.00001
- Lambda request $0.0000002
- Lambda execution cost $0.00001667*2 = $0.00003334
So $0.00004354 per request
Or $43.54 to upload One Milion images.
Just the Lambda component of this is: $33.54
Given how efficient Node.js is you could probably run a single small/medium EC2 instance for the same budget; crucially with Lambda though, you would not pay for the idle time e.g. while your users are asleep!
Note: the S3 storage costs would still be the same if you used a Heroku or EC2 instance to handle the upload/resize/compresion task.
1,000,000 images x (900,000 + 100,000) = 100 Gigabytes or 100 GB
So 100 x $0.030 = $30 per month to store a million images!
- GET: $0.004 per 10,000 requests
- PUT, COPY, POST, or LIST Requests: $0.005 per 1,000 requests
- $0.0300 per GB stored
You are charged for the total number of requests across all your functions. Lambda counts a request each time it starts executing in response to an event notification or invoke call, including test invokes from the console.
- First 1 million requests per month are free
- $0.20 per 1 million requests thereafter ($0.0000002 per request)
- Execution time is rounded up to the nearest 100ms
- You are charged $0.00001667 for every GB-second used
See: https://aws.amazon.com/lambda/pricing/ for more pricing examples.
You might want to add some additional functionality to your Lambda functions in the form of an NPM module. Here are four easy steps you need to take in order to do so!
-
Firstly let's create a new directory that will hold our Lambda function and all of its modules
$ mkdir lambdaNPM $ cd lambdaNPM -
Install an NPM package of your choice. We'll use the
aws-sdkas an example$ npm install --prefix=~/lambdaNPM aws-sdk aws-sdk@2.0.27 node_modules/aws-sdk ├── xmlbuilder@0.4.2 └── xml2js@0.2.6 (sax@0.4.2) $ ls node_modules aws-sdk -
Test that the module has been installed
$ echo 'var AWS = require("aws-sdk");console.log(AWS.EC2.apiVersions)'> test.js
$ node test.js
[ '2013-06-15*','2013-10-15*','2014-02-01*','2014-05-01*','2014-06-15*','2014-09-01*','2014-10-01' ]
Here we're just requiring the sdk and then piping the code into
test.js. Then if we runtest.jswe should be able to see the EC2 API versions printed in the console. This is a trivial test just to prove that the module has been installed. -
Create your function
At this point we’ve successfully created a directory containing one or more npm-installed packages and verified that the packages can load and execute by running a test script locally. You can now delete the test script and continue by creating a real Lambda function that takes advantage of the modules that you’ve just installed, testing it the same way. To deploy the resulting function and modules to Lambda, just zip up the entire lambdaTestFunction directory and use Lambda’s createFunction API, CLI, or the console UI to deploy it.
Credit to the AWS Compute Blog Post