This example template automatically provisions a demo envirionment of single node Teradata Vantage express and Azure Databricks workspace. Major components to deploy include:
- 1 Vnet with 3 subnets (2 for Databricks, 1 for Teradata VM)
- 1 Azure VM (hosting Teradata Vantage Express)
- 1 VNet injected Azure Databricks Workspace
- NSGs
For setting up the VM hosting Teradata Vantage Express, we will follow the official installation guide: https://quickstarts.teradata.com/run-vantage-express-on-microsoft-azure.html; this readme provides more details in each step.
.
├── main.tf
├── outputs.tf
├── data.tf
├── providers.tf
├── variables.tf
├── vnet.tf
├── workspace.tf
├── terraform.tfvars
├── images
├── modules
    ├── teradata_vm
        ├── main.tf
        ├── outputs.tf
        ├── providers.tf
        ├── variables.tf
terraform.tfvars is provided as reference variable values, you should change it to your need.
Step 1: Preparation
Clone this repo to your local, and run az login to interactively login and authenticate with azurerm provider.
Step 2: Deploy resources
Change the terraform.tfvars to your need, then run:
terraform init
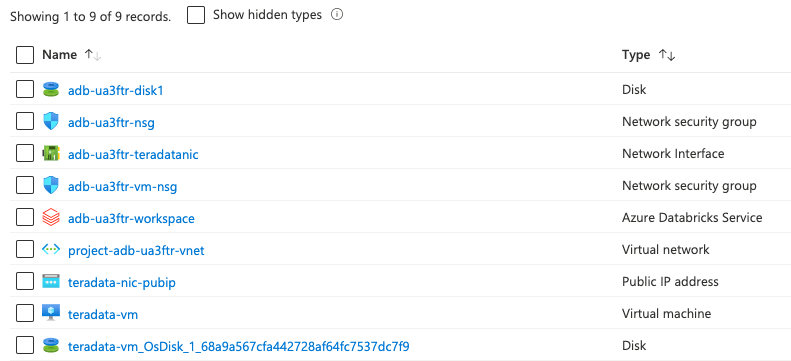
terraform applyThis will deploy all resources wrapped in a new resource group to your the default subscription of your az login profile; you will see the public ip address of the VM hosting Teradata Vantage Express after the deployment is done. After deployment, you will get below resources:
Step 3: Configure Teradata Vantage Express VM
The VM's private key has been generated for you in local folder; replace the public ip accordingly. SSH into Teradata VM by:
ssh -i <private_key_local_path> azureuser@<public_ip>Inside the VM, we should run the commands stored inside teradata_vm_configs.sh step by step.
Note that you need to modify two commands manually to make it work:
The first place to modify:
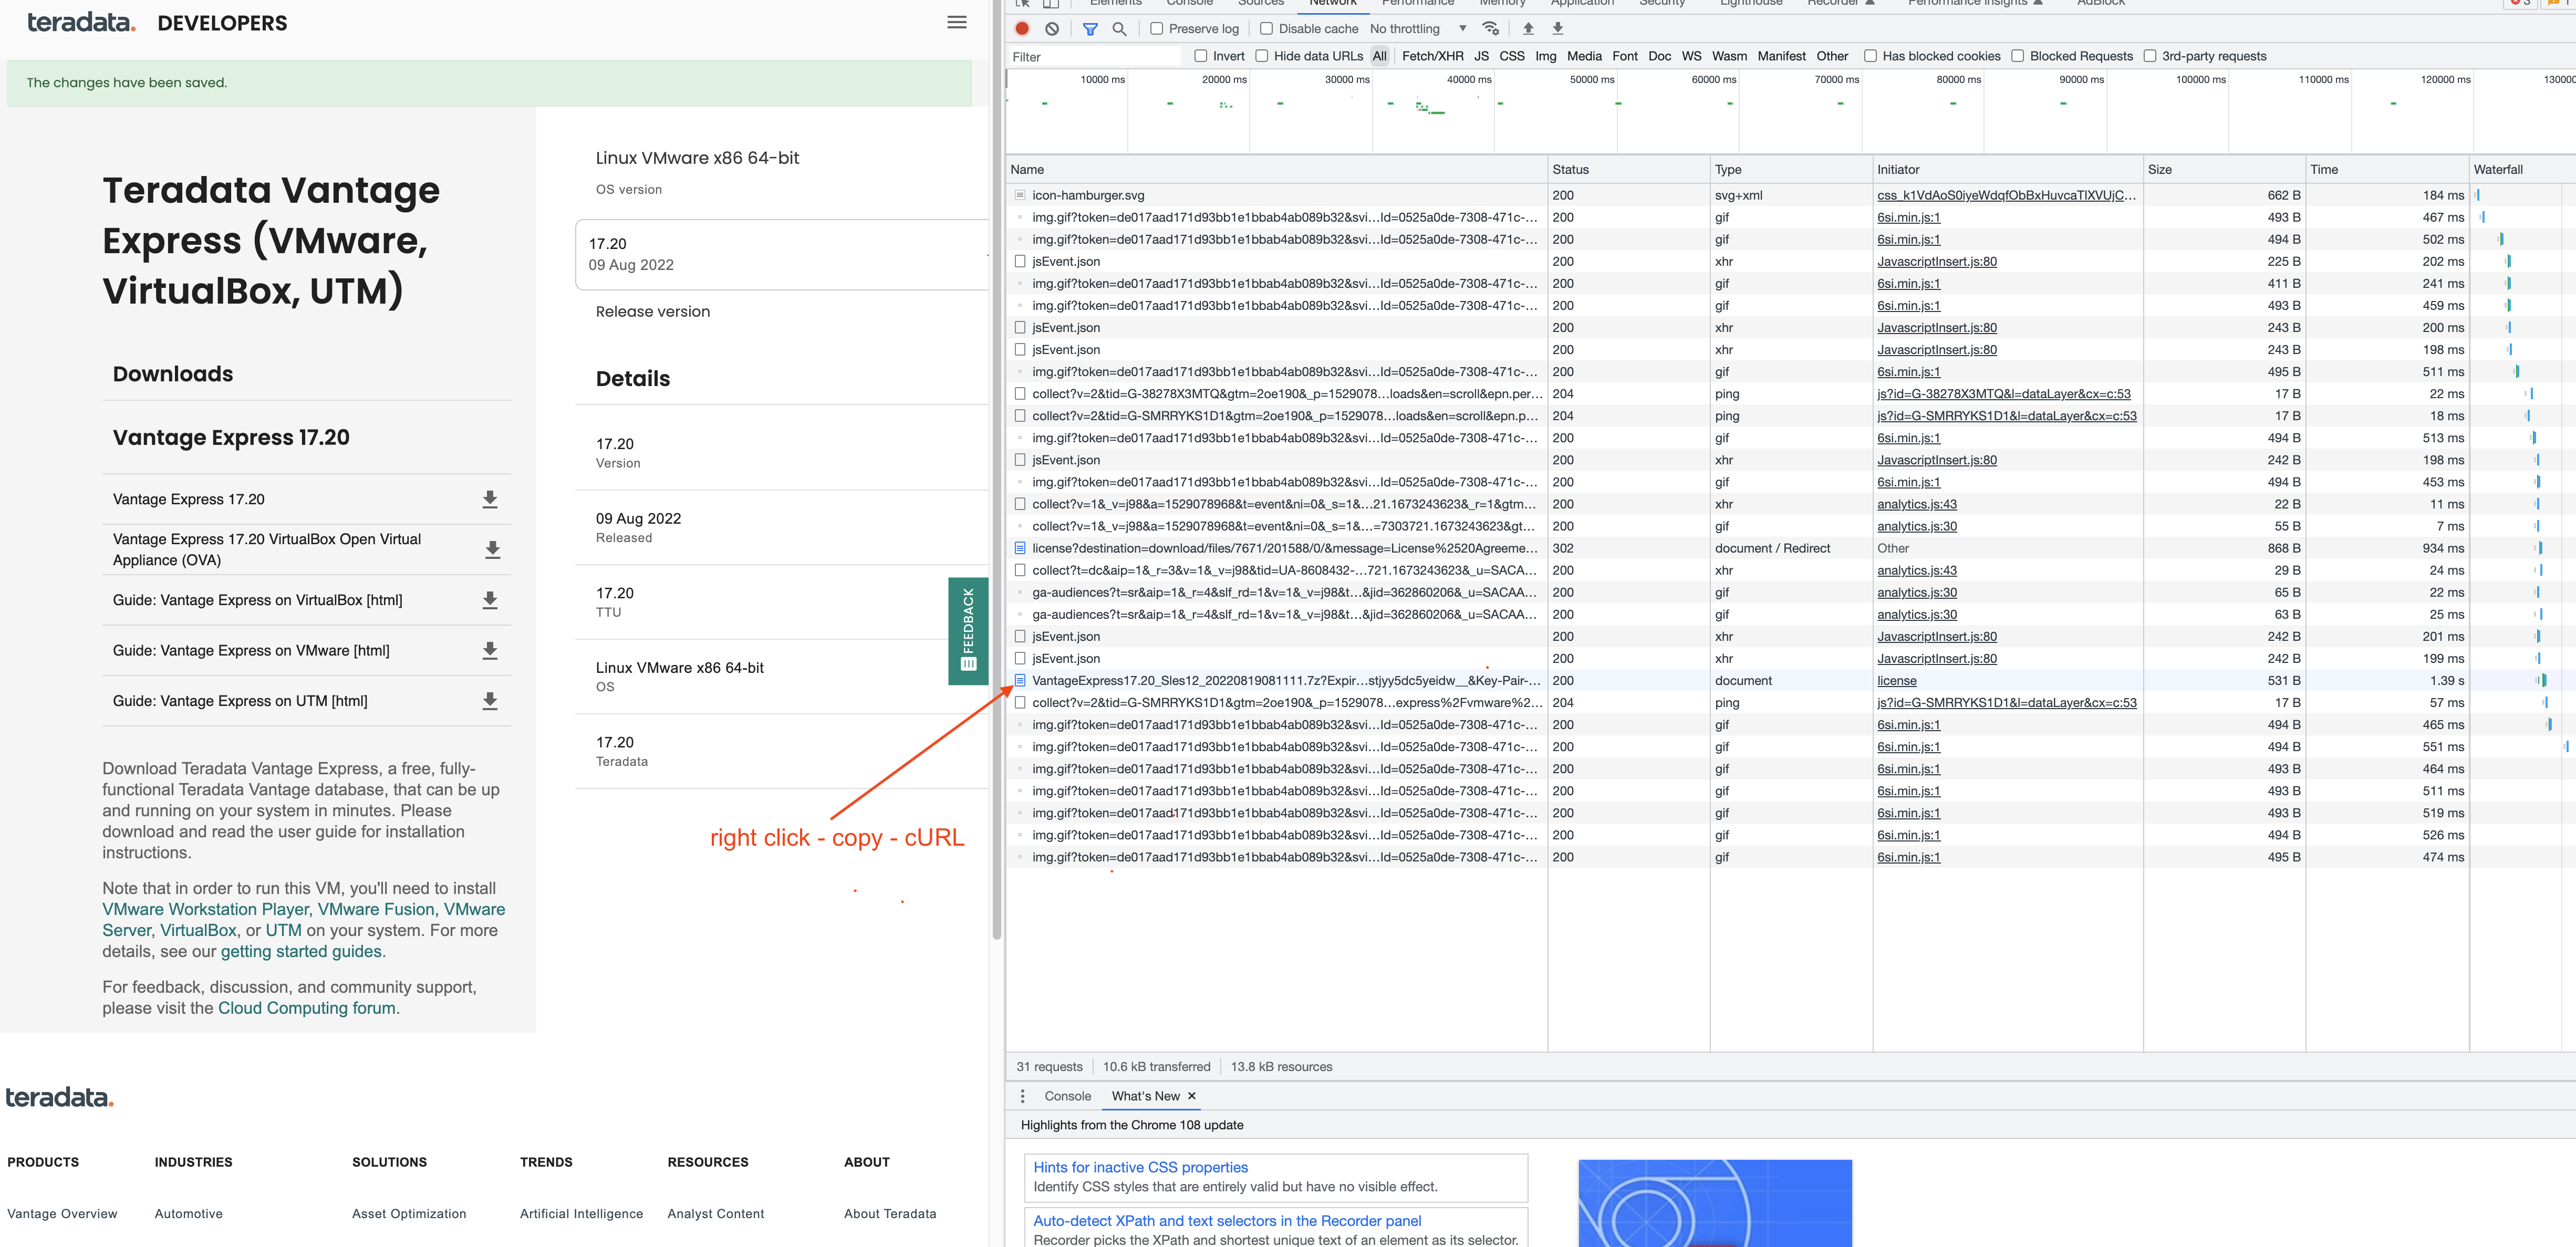
curl -o ve.7z 'https://d289lrf5tw1zls.cloudfront.net/database/teradata-express/VantageExpress17.20_Sles12_20220819081111.7z?Expires=1673417382&Signature=tiXioXzo0wg53m6ELyXenLwOeWPZFeYV4rAZIM3qw886SkkK67Pb8mHCr~jHza7FTrMfeZXTXtnis4x7WEbXsmQCfkRo2~zv97n9oE1kDiOVYRt7b61xORtPJPyVKMUs4mbebgJEl8gOAO-wqIWSmBs~mA4wZyb2X63dHcE70R2wyFHwwiiZzlcC-bb7wYuZe0emT4aTeGW6ndXXEKvGSK~OCIXx5uLNqboRAaIS0BksEOl8HjP6iYurue~kNkIGtlG3rW~XtBkfvL7hpTPG7RF1z7zvG1XXtMyxMfLXu-lt4JnCl4jodjGD8iszh6LZ28TubyIXz1y9kBYF-aq3mQ__&Key-Pair-Id=xxxxxxxx'This is the cURL command to download Teradata Vantage Express from Teradata website. You can get the URL from here https://downloads.teradata.com/download/database/teradata-express/vmware; register an account and download the VM; when you clicked the download button, press F12 to open your browser's network flow, find the latest entry started with VantageExpress, right click and copy the cURL; trim off the Http header and update the command above.
The second place to check/modify:
export VM_IMAGE_DIR="/opt/downloads/VantageExpress17.20_Sles12"
Make sure you change the value to the version of VantageExpress you downloaded. If you've successfully run all the set up commands inside teradata_vm_configs.sh, you are now ready to SSH into your vmbox.
Step 4: SSH into Teradata Vantage Express VMBox and write bteq
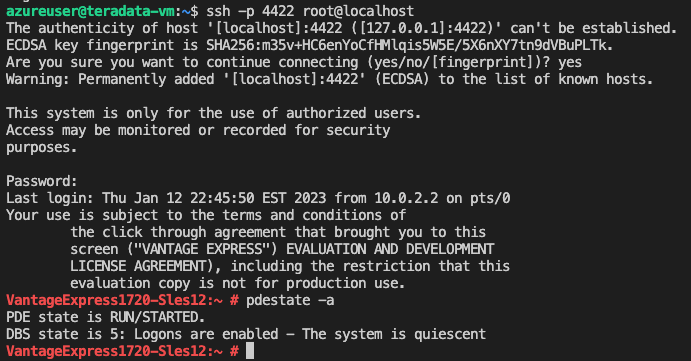
Inside your Azure VM, now we have created vmbox (that's your Teradata Vantage Express VM) and we can ssh into it by:
ssh -p 4422 root@localhostPassword is root; and then run
pdestate -ato check the TD service is up and running; if successful you should see below:
Next, we can use bteq to create databases and tables. Run:
bteqthen enter
.logon localhost/dbc
then enter dbc.
Now you are able to create databases / tables in TD; for example:
CREATE DATABASE HR
AS PERMANENT = 60e6,
    SPOOL = 120e6;
CREATE SET TABLE HR.Employees (
GlobalID INTEGER,
FirstName VARCHAR(30),
LastName VARCHAR(30),
DateOfBirth DATE FORMAT 'YYYY-MM-DD',
JoinedDate DATE FORMAT 'YYYY-MM-DD',
DepartmentCode BYTEINT
)
UNIQUE PRIMARY INDEX ( GlobalID );INSERT INTO HR.Employees (
GlobalID,
FirstName,
LastName,
DateOfBirth,
JoinedDate,
DepartmentCode
)
VALUES (
101,
'Adam',
'Tworkowski',
'1980-01-05',
'2004-08-01',
01
);Then you can query this table inside bteq:
SELECT * FROM HR.Employees;
Step 5: Automatically spin up Teradata when Azure VM starts
Refer to official guide to set up.
Step 6: Integration with Azure Databricks
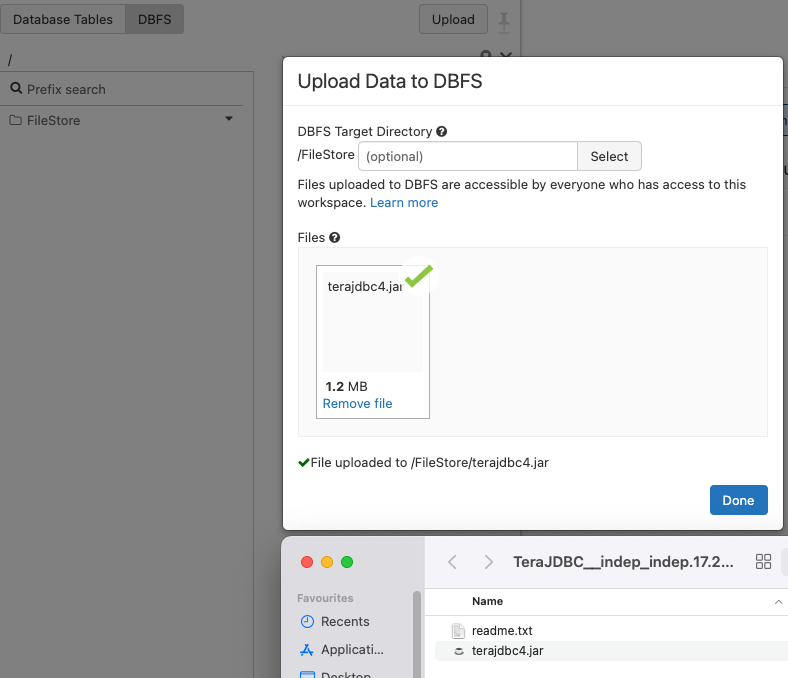
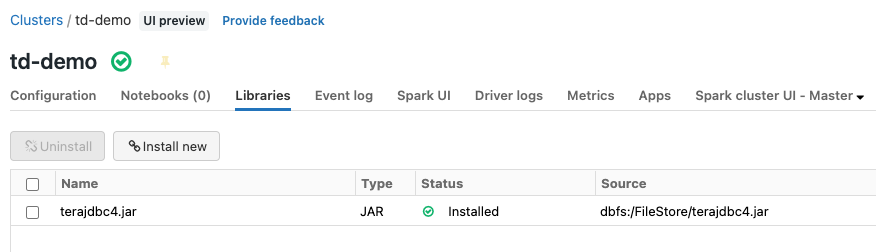
Now your Teradata VM is running; let's set up the Databricks cluster to connect to it. First we need to download TD JDBC driver from https://downloads.teradata.com/download/connectivity/jdbc-driver. Then upload the driver to your workspace dbfs.
Then create a cluster with the uploaded jdbc driver installed.
Then follow the notebook examples, to connect to your TD VM public IP, below shows how to read from Databricks to TD tables:
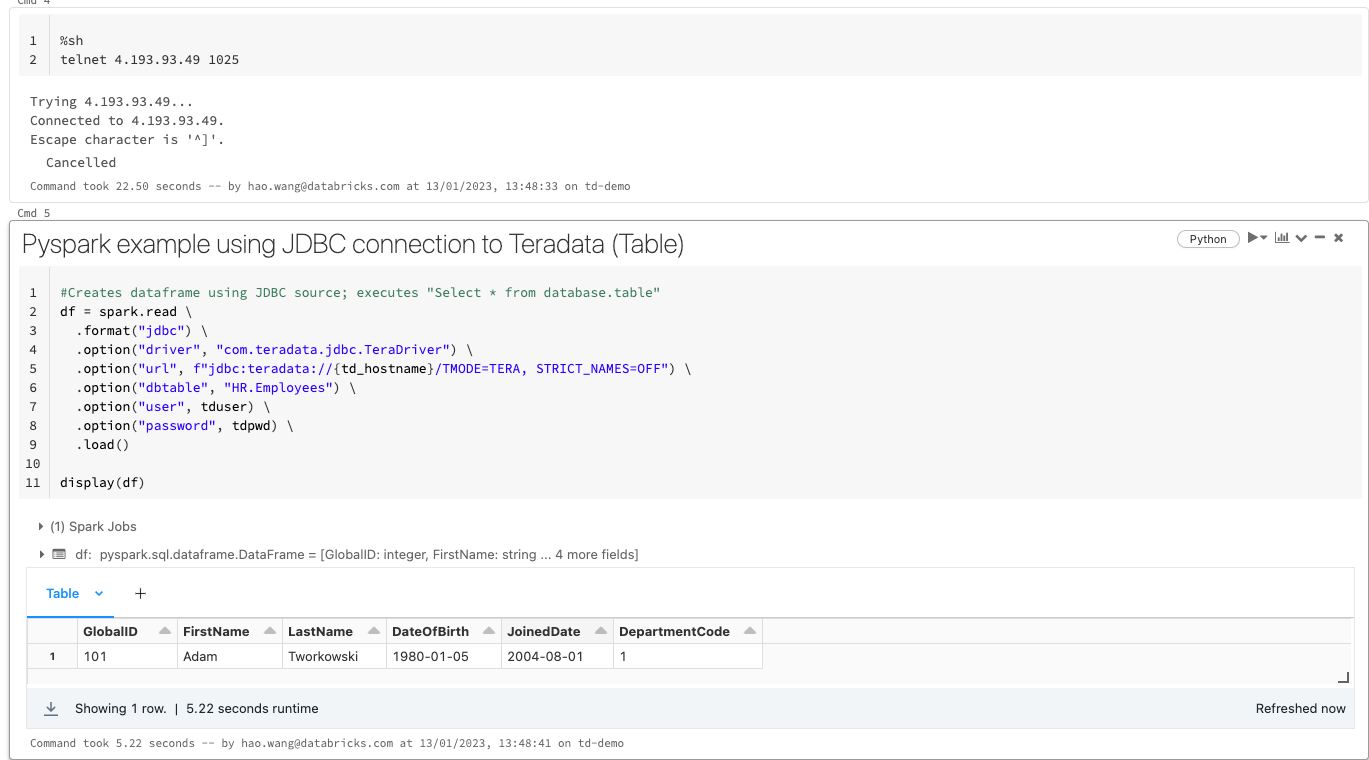
For a full integration example, you can upload the notebooks under artifacts from this repo to your workspace.
kex_exchange_identification: read: Connection reset by peer: you need to wait for the vmbox to start, try again in a few minutes.vt-x is not available (verr_vmx_no_vmx): This is because you've altered the VM size and chose a size that's incompatible with gen2 image. You should choose VM that supports:Nested Virtualization: Supported. Please refer to: https://learn.microsoft.com/en-us/azure/virtual-machines/generation-2 for compatibility. As we are doing SSH twice, you need nested Virtualization.