- What is the DOM?
- What kind of events are there?
- What is an event listener?
- How do I select something in the DOM using JS?
Javascript is one of the most popular programming languages. Earlier Javascript was only used for designing interactive web pages, but now it is used for Full Stack Development. One of many methods of running Javascript is through the web browser, in which we interact with elements on the page. When a web page is loaded, the browser creates a Document Object Model of the page.
Prominent companies like Netflix, Walmart, and PayPal have built their entire applications around JavaScript.
Participants will be able to:
- Write HTML code and make changes with JavaScript
- Incorporate methods on the DOM to make web pages interactive
- Select HTML elements by their element type, class, and ID with JavaScript
- Learn ways to link JavaScript to HTML
- Learn to use element properties like
.insertAdjacentElement() - Implement classes & attributes by using
.setAttribute()&.getAttribute() - Walk through some methods to traverse and delete nodes
- How to incorporate JavaScript into a webpage
- How to select HTML elements
- Common and useful JavaScript methods for basic interactivity
- Dynamically add or remove HTML elements
- JS HTML DOM (slides)
- JavaScript and DOM tutorial on Tutorial Republic or Vanilla DOM Manipulation - App Academy (see Guided Practice for how to choose)
- How To Make Changes to the DOM - This tutorial explains how to create new nodes and insert them into the DOM, replace existing nodes, and remove nodes.
- Remember to use
.to select classes and#to select ids. - There are several JavaScript methods that achieve similar goals but through different means. You should understand how they're different so you can use them appropriately.
.appendChild()vs.insertAdjacentText()
- "Vanilla JavaScript" is just a cute way of saying plain JavaScript without any extra libraries; an example of a library is jQuery. Vanilla JavaScript is not its own special form of JavaScript.
DOM stands for Document Object Model. Each event in DOM has an event handler, aka event listener, where developers can add JavaScript to set up any automatic actions they would like to trigger once the event takes place. An example of an event is a button click. An event listener could be given a function that changes the background color of the webpage when the button is clicked.
Some common examples of events are:
- Mouse events (MouseEvent): mousedown, mouseup, click, dblclick, mousemove, mouseover, mousewheel, mouseout, contextmenu
- Window events: scroll, resize, hashchange, load, unload
- Keyboard events (KeyboardEvent): keydown, keypress, keyup
The addEventListener() method allows us to add event listeners on the HTML DOM object such as Document, Element, or Window. The first argument in addEventListener() should be a string, then the name of the event it should listen for. The second argument in addEventListener() is either a function to call when the event is fired or an object that implements handleEvent.
Syntax: target.addEventListener(type, listener [, options]);
In the previous example, the first argument would be the 'click' event on the button, and the second argument is a function that changes the page background color when the 'click' event fires.
Here's an example with a function as the listener:
const button = document.querySelector('button');
button.addEventListener('click', function () {
  document.body.style.backgroundColor = 'blue';
});
On button click, the background of the body will be changed to blue.
Here's an example with an object as the listener:
const ColorChangeButton = function (element) {
  this.handleEvent = function (event) {
    switch (event.type) {
      case 'click':
        document.body.style.backgroundColor = 'blue';
        break;
      case 'dblclick':
        document.body.style.backgroundColor = 'orange';
        break;
    }
  };

  // Note that the listeners in this case are |this|, not this.handleEvent
  element.addEventListener('click', this, false);
  element.addEventListener('dblclick', this, false);

  // You can properly remove the listeners this way:
  element.removeEventListener('click', this, false);
  element.removeEventListener('dblclick', this, false);
};
const s = new ColorChangeButton(document.body);
Also note in the above example that if you no longer need a particular event listener, you can remove it using .removeEventListener().
Event propagation is the flow in which the events propagate to reach its target. It is the process of calling all the listeners for the given event type. We can register several listeners on one node for the same event type. The listeners are called in the order of their registration on reaching the node. The flow of propagation can be to the event target from the window and back, thus making it bi-directional. The stopPropagation() method prevents the further propagation of any other event.
Syntax: event.stopPropagation()
Event bubbling is a way of event propagation. It refers to the order in which event handlers are called when an event is nested inside another event and both elements implement a listener for the same event. When an event takes place on an element, first the handlers are run on the inner-most element and then are successively run on its parent till it reaches the outer-most DOM element, like a bubble in water; this is known as event bubbling.
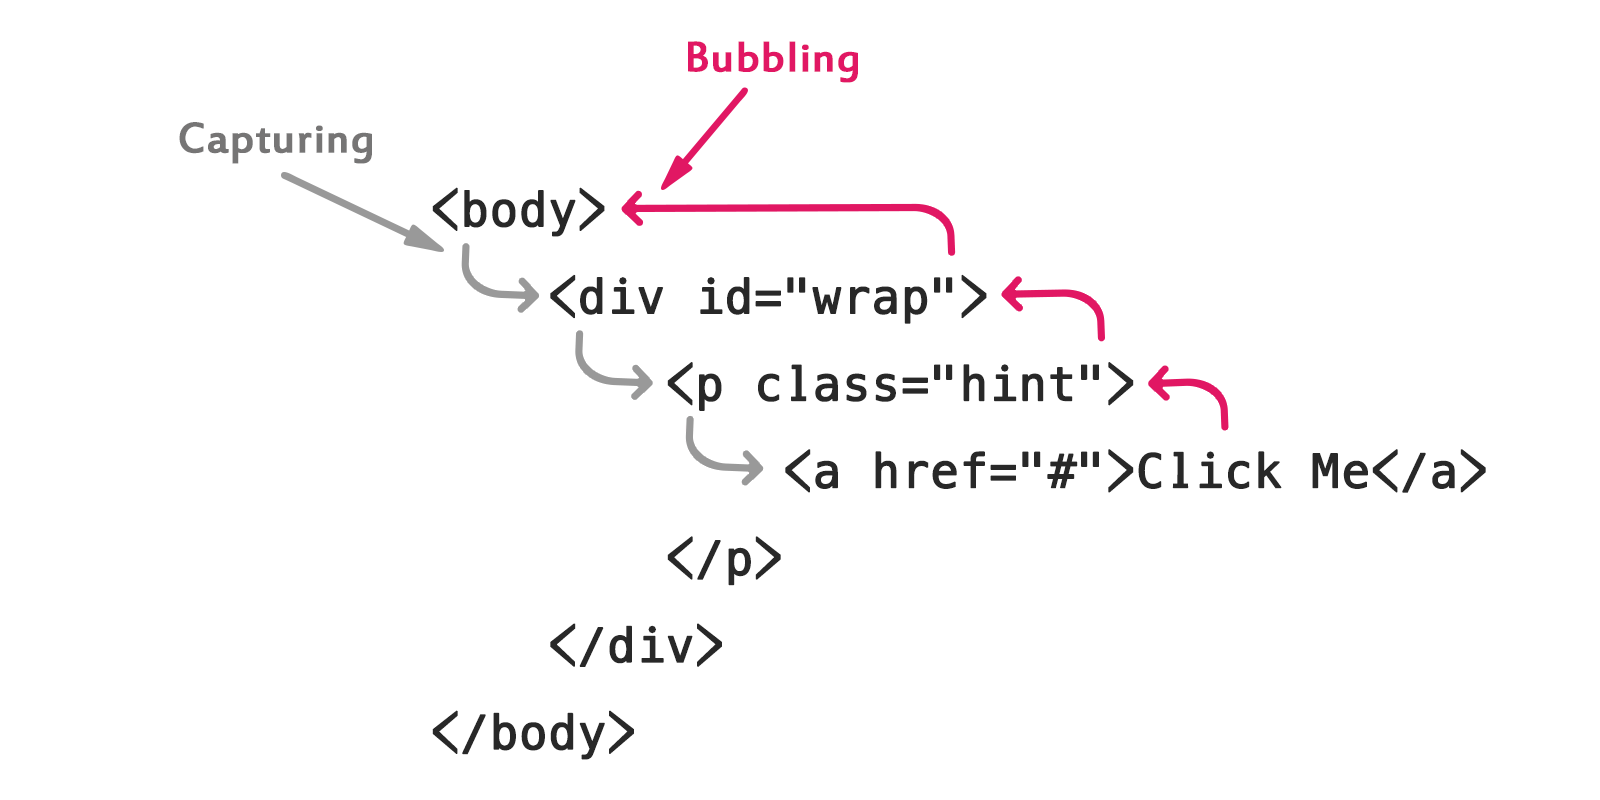
In the above diagram, if we are implementing a listener for 'click' event that runs an alert() function on the button as well as on the div and body, then first the event handler is run on the button, then on the div and then the body, as the button is nested inside the div, which is again nested inside the body. On clicking the button we get three alerts, one for the button, one for the outer div, and one for the body(button -> div -> body). So here the event "bubbles" from the innermost element to its parents.
Work through the JavaScript Event Propagation on TutorialRepublic
Or, work through the JavaScript and DOM tutorial on Treehouse if you have a SF Public Library card
If you aren't using Treehouse, follow this Vanilla DOM Manipulation - App Academy tutorial instead. Try the 5-question quiz that comes after as well. If you don't know an answer after a minute or two, just move on, and try it again at the end of this outline.
Note: Our goal is to only provide free resources, so if you can't get Treehouse for free, don't use it. We have a lot of instances of Treehouse in the curriculum, but now that we’ve expanded beyond the Bay Area not every participant has free or inexpensive access. If you're in the Bay Area you will be able to get Treehouse through the SF Public Library, but you need a library card.
For each of the following links, read the code and play around with its functionality. You can refresh the webpage to reset it.
Here is some code and a sandbox for .getElementById() & .innerHTML showing the difference between method and property.
Here is some code and a sandbox for .getElementsByTagName().
Here is some code and a sandbox for .createElement().
Here is some code and a sandbox for .appendChild().
Here is some code and a sandbox for .removeChild().
Here is some code and a sandbox for .getAttribute().
Here is some code and a sandbox for .setAttribute().
Here is some code and a sandbox for .addEventListener().
Here is some code and a sandbox for event bubbling.
Here is some code and a sandbox for .stopPropagation().
-
Create a new directory inside your assignments directory and give it the name
js-dom-play. -
Navigate into
js-dom-play. Create a file calledindex.html. -
Read this example code and talk through it with your pair partner. Once you understand what it does, copy it into
index.htmlusing TextEdit or WordPad and save the file. -
Open
index.htmlin a new Chrome tab. What do you see? Is this what you expected, based on the code you read? -
Create a new directory also inside
js-dom-playcalledstatic. Navigate tostatic. Remember that all CSS and JS files go in thisstaticfolder. -
Create a file in the
staticdirectory calledscript.js. -
Read this example code and talk through it with your pair partner. Once you understand what it does, copy it into
script.jsand save the file. -
Refresh the Chrome tab that is currently rendering
index.html. What happens? What do you see? What are you now able to do?
Text Editor Note: 'Rich text' is something that is often turned on by default in TextEdit or WordPad, but it does not play nicely with JS. One thing it does, for example, is turn quotes into curly quotes. See if you can dig into settings and make sure it's set to 'plain text' instead, or the rich text may start causing problems. Make sure you re-save your files to use plain text too if you were able to change the setting.
-
Using the JavaScript documentation or other resources as your guide, add another div with a class containing an image, a paragraph describing the image, and a button with JavaScript functionality.
-
Using the Javascript documentation or other resources as your guide, add a list in between the two divs using appropriate methods.
- Javascript official Documentation
- JavaScript HTML DOM hands-on experience on w3schools
- Introduction to DOM
- Where in an HTML document do you link an external JavaScript file and why?
- What is the DOM?
- Name at least 5 methods for making changes to the DOM you used or saw today.
- Where would you look to find more JavaScript DOM methods?
- What are different ways of traversing the DOM?