#Lesson 1 - Welcome! The Internet and JavaScript
##Goals After this class, you should:
- Understand the course plan and resources
- Have your development environments ready
- Be familiar with the fundamentals of Node and JavaScript
##Welcome to Olin.js! We are excited to have you following along with these lessons and hope that this proves to be a useful resource for learning application development with Node.js.
##Introduction to the Internet

This is obviously a comic misconception about the true nature of the internet, so let's dive deeper and have a look at the true nature of our old friend.
###TCP/IP The underlying backbone of what we call the internet is the Internet Protocol, also known as IP. Under IP, every device that connects to the network through a router or gateway is assigned an IP address by the router or gateway it connects to. When one device wants to connect to another over the internet, it simply needs to know its address and it can use that to request a connection on a specific port over IP. For all intents and purposes, think of a port as a numbered slot on a computer that can host multiple IP connections. Most devices have ports numbered 1-65535 with some sections reserved.
With a connection established, the devices can start sending arbitrary data to each other. In order to ensure that all of the data is transmitted correctly and in order, we use the Transmission Control Protocol, or TCP. TCP on the sender's side takes care of organizing data into packets, numbering them, and sending them out over IP. On the receiver's side, as packets come in, they are put in order and checked for any missing data. If there's a packet missing, the receiver will ask the sender to send another copy until it has all of the packets.
Together TCP/IP is known as the Internet Protocol Suite. There are many other protocols that you can use to communicate over the internet, but this suite is the backbone of most connections, and as we'll see, of HTTP. That's about all you'll need to know about TCP/IP for this class. If you'd like to know a little more about how TCP/IP works, here's a good analogy.
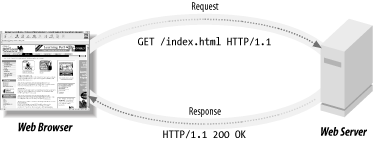
###HTTP The HyperText Transfer Protocol (HTTP) is the popular protocol used for exchanging resources - like web pages, images, and even raw data - over the web. Yes, it's yet another protocol and it lays out the format of data to be sent out over TCP. HTTP is designed for a client-server architecture, in which a client makes a request to a server, to which the server sends a response. Requests and responses have a simple plaintext format that is divided into a header section, and a body section.
#####HTTP Requests To understand an HTTP request, let's see what one looks like!
    GET /wiki/List_of_HTTP_header_fields HTTP/1.1
    Host: en.wikipedia.org:80
    Connection: keep-alive
    Cache-Control: max-age=0
    Accept: text/html,application/xhtml+xml,application/xml;q=0.9,image/webp,*/*;q=0.8
    User-Agent: Mozilla/5.0 (Macintosh; Intel Mac OS X 10_9_5) AppleWebKit/537.36 (KHTML, like Gecko) Chrome/39.0.2171.95 Safari/537.36
    Referer: https://www.google.com/
    Accept-Encoding: gzip, deflate, sdch
    Accept-Language: en-US,en;q=0.8
Now at first it might look a bit intimidating, but if you read through it carefully, you'll see there's nothing to be afraid of. Let's start at the top.
GET /wiki/List_of_HTTP_header_fields HTTP/1.1
This line actually tells us 3 things. 1) We want to GET the resource located at the URL 2) /wiki/List_of_HTTP_header_fields, and we are expecting this transaction to use 3) version 1.1 of the HTTP protocol. The next line is the start of the field-value part of the header. As an example, the first field-value pair,
Host: en.wikipedia.org:80
is required under version 1.1 and tells the server the domain name and port number it is expecting to connect to. This is important for scenarios where a single server can be running multiple VMs, each supporting a different domain, and the hardware needs to know which VM to send the request to. One field you might recognize is the User-Agent field, which tells the server the application that is making the request.
User-Agent: Mozilla/5.0 (Macintosh; Intel Mac OS X 10_9_5) AppleWebKit/537.36 (KHTML, like Gecko) Chrome/39.0.2171.95 Safari/537.36
Even though this request was made by Chrome, you might notice that there are a number of different browser names hidden in there. The reason for that is a long story so just read the short summary.
The rest of the field-values are there to give special instructions to the server in the event that it needs that extra information. You won't really care about that stuff for a while, and when you need to know about it you'll be able to look it up pretty easily. (Hint: The above request is for a page that lists common HTTP headers.)
Sometimes a client will want to send data to a server (submit a form, upload a file), and in that case we'll use a POST or PUT request instead of GET. For those requests, rather than send additional data in the header, it gets sent in the body. This particular request doesn't have a body, but we can see how it would work by looking at the response to this request.
#####HTTP Responses Following is the response generated by Wikipedia after receiving the above request.
    HTTP/1.1 200 OK
    Server: Apache
    X-Content-Type-Options: nosniff
    Content-language: en
    Content-Encoding: gzip
    Vary: Accept-Encoding,Cookie
    X-Powered-By: HHVM/3.3.1
    Last-Modified: Thu, 08 Jan 2015 12:24:09 GMT
    Content-Type: text/html; charset=UTF-8
    Content-Length: 23650
    Accept-Ranges: bytes
    Age: 56536
    Connection: keep-alive
    Cache-Control: private, s-maxage=0, max-age=0, must-revalidate

    <!DOCTYPE html>
    <html lang="en" dir="ltr" class="client-nojs">
    .
    .
    .
    </html>
You'll notice the format is similar to the request, but with a few noticeable differences. First, we notice the first line
HTTP/1.1 200 OK
now leads with the HTTP version number, and is followed by a number. This number is known as a status code. 200 OK means everything went OK. There are a whole bunch of different status codes, but you're probably most familiar with 404 NOT FOUND, maybe 500 INTERNAL SERVER ERROR, and you didn't realize it until now - 200 OK. Don't bother memorizing them all right now. You'll learn more about when certain ones are appropriate in the future.
The next difference you'll notice is that most of the headers are different. That's just the server giving us some metadata about the resource we requested. The two you should pay particular attention to are
Content-Type: text/html; charset=UTF-8
Content-Length: 23650
which tell us that there is a body to this response, it is text meant to be interpreted as html, and it is 23650 bytes long (with UTF-8 that means 23650 characters). After the header section there is a single blank line followed by those 23650 bytes of content.
So that's the basics of HTTP - just simple formatted text. Now let's look at how we interact with servers over the internet.
###Browser Browsers are a form of internet client that we are all familiar with. They serve as a very user-friendly way to make requests to various servers around the world and then display the html responses. When we type a URL into a browser and press enter the browser looks up the IP address associated with the user-friendly domain name like "facebook.com", and starts the IP connection. It then builds a request from a standard set of headers and sends it off to the server. When it gets some HTML as a response, it renders it.
###Servers The server's job is to constantly listen for incoming connections, accept those connections, parse requests, and send back responses. Elegantly handling all the responsibilities of a server is complex. Luckily, there are many excellent open-source frameworks which simplify the work required to build a server.
There are also additional integration challenges, such as connecting to databases, that we can make significantly easier by using other frameworks. Throughout the last few decades, several different combinations of these frameworks have become popular and whichever combination you choose to use is called your Server Stack. Some such popular server stacks get cute names such as LAMP (Linux, Apache, MySQL, and PHP) and MEAN (MongoDB, Express, Angular, and Node). Throughout this course we will focus on implementing server architectures that utilize Node.js.
##JavaScript Many of you are likely familiar with JavaScript, but don't worry if you aren't. JavaScript, despite what the name suggests, has no connection to Java. The language's name was changed from LiveScript to JavaScript to capitalize on the hot new browser, NetScape, adding support for the hot new web language, Java. In 1995.
Needless to say, JavaScript has been around for a long time.
It is the only actual programming language that runs within your browser itself. Syntactically, it is probably one of the more loose programming languages and looks similar to Python. It was originally designed for being used for quick, small, lightweight tasks within browsers and has since grown into its own language. Only in relatively recent years have JavaScript, personal computers, and browsers gotten good enough to safely be able to run more serious JavaScript code. In fact, JavaScript started out as a very slow language and has gone through rapid iterations of improvements lately.
We (and every modern browser) will use ES5, a modern release of JavaScript with some useful language additions. It is a scripted language (meaning it executes line by line rather than compiling the whole program first) and has a relatively unique object-oriented implementation. You will get to hear A LOT more about JavaScript in the coming weeks, so we will leave it here for now. ##Node Acording to the official website,
"Node.js® is a platform built on Chrome's JavaScript runtime for easily building fast, scalable network applications. Node.js uses an event-driven, non-blocking I/O model that makes it lightweight and efficient, perfect for data-intensive real-time applications that run across distributed devices."
What this really means is that it is JavaScript running on the server, accepting incoming requests and handling them. The thing that makes Node.js so awesome is that it is entirely non-blocking. To understand exactly what this means, realize that with other server frameworks, when a request comes in, the server has to process that request and send the response before it can accept the next incoming request. Node is structured in such a way that when a request comes in, it can immediately continue listening for other requests.
##Github (Depending on far along in the git tutorials you got, some of this might be review.) ###Workspace, Local, and Remote The "remote" repository references what is on github.com. The "local" repository references the repository on your local machine. Your "workspace" references the changes on your local files that have not been committed to the local repository.
The lifecycle of pushing a change to the remote repository is as follows:
- You make some change to a file called "index.js"
- You stage this file to be committed by running
git add index.js - You commit these changes to your local repository by running
git commit -m "made some change" - You push these changes to the remote repository by running
git push origin master
When you run a git pull origin master, you are pulling the changes from the remote repository to your local repository.
When you push or pull, you specify origin master after your command. Why is that? "origin" is the name of your remote repository, and "master" is the name of the branch you want to push to. When you are coding on your own branch, you will run something like git push origin bills-branch to push to your branch instead of to master.
###Branching and Pull Requests and Conflicts When you are working with multiple people, the easiest way to use git is to have each person work on their own branch. This minimizes merge conflicts and headaches.
To create a new branch called "branchname", run git checkout -b branchname. Note: when you actually make branches, name it something more descriptive than "new-branch" or "bills-branch". It is a common practice to separate branches by features, and so naming your branch after its feature is commonly done.
Switching between branches is called "checking out" and can be done by git checkout branchname. This changes your workspace to what is on that branch. To check what branch you are on, you can always run git status.
Once on your new branch, you can add files and commit changes as normal. However, when you push, you must specify to push to your branch with git push origin branchname.
Once your feature is done on your branch, you will create a pull request on Github for your teammates to review. This represents you "requesting" that your changes be merged into the master branch. Pull requests create an environment where your teammates can look at your code and review it before it is incorporated into the main master branch. Click here to learn how to create a pull request on Github. Once your pull request is accepted by your teammates, you can merge it and your feature will appear on the master branch!
If other people have committed things onto master since you branched off, you might encounter the merge conflicts. These are way more scary than they sound. If your branch has merge conflicts, one way to resolve them is to pull the new commits from master onto your branch. To do this, make sure you are on your branch and run git pull origin master. If there are conflicts you will get a message like this:
CONFLICT (content): Merge conflict in index.js
To fix this, open up index.js in your text editor and find a section that looks something like this:
<<<<<<< HEAD
var foo = 3;
=======
var foo = 4;
>>>>>>> master
Is this example, your feature branch made a change that foo should be 3, but someone else has committed on master to change foo to be 4. "HEAD" refers to your current local repository, which is pointed at your branch. "master" refers to what is on the master branch. You now need to decide which line is the one you want, and delete all the other lines and markers. If you want to keep foo at 3, then delete all the other lines so that the above code segment is now just:
var foo = 3;This fixes this one conflict. Now save the file and git add it. Go through all the conflict files and fix them all. After all these conflicts are fixed and the files added, you can run git commit and git push origin branchname. Your branch should now have no merge conflicts and should be able to be merged in your pull request.
Optional: This method uses merge (through pull) to fix conflicts. Another way to fix conflicts is to rebase. Read this stackoverflow if you want to know the difference between merge and rebase.
###Stashing
If you want to save all your current work in your workspace, you can stash it. Running git stash saves all the changes you've made in your workspace and reverts your code back to what is saved in git from your last commit. If you ever need to get those changes back, you can run git stash apply, which will take your latest stashed changes and put them back into your workspace.
You can keep stashing multiple things and git will save all of them for you. Run git stash list to see all your currently saved stashes:
stash@{0}: WIP on master: 049d078 added the index file
stash@{1}: WIP on master: c264051 Revert "added file_size"
stash@{2}: WIP on master: 21d80a5 added number to log
Running git stash apply will apply the latest stash (stash@{0}). If you want to apply an older stash, you can run git stash apply stash@{num}, replacing num with the stash number in the list.
A example of using stashing could be if you have a bug and you want to see if you just created the bug or if the bug is in your last commit, you can git stash, re-run your code and check if the bug still exists, and then git stash apply to get back to where you were before.
#In-Class Exercises (We’re not expecting you to finish all of these activities! Pick the ones which are interesting and challenging to you, and feel free to work with the people around you.)
##Git and Github:
- If you find a bug in the Olin.js repo at any point, please make a pull request to fix it!
- Draw out how each of the commands you know works
- Find a git command you don’t know about, read the documentation, and call over a teaching team member to explain it to
- It’s common practice for a team of developers to have a standard git workflow -- come up with one as a group
- Find git documentation you like & can refer to in the future
- With a partner: cause & resolve a merge conflict
- using only a master branch between the two of you
- using branching/merging
##Internet:
- Pick a website, open the "Network" tab of the developer console, and identify what some of the requests are doing (this won’t be easy for all of the requests -- don’t worry if it’s not obvious what some of them do)
- Challenge: find requests which aren’t GET
##Javascript:
- Write some simple JavaScript functions in https://jsfiddle.net/ (remember: ctrl+shift+j opens the developer console -- that’s where your console.logs will print). If you need function ideas, try the first couple of these problems: https://projecteuler.net/archives
- If you like learning from textbooks, this one is pretty good: http://eloquentjavascript.net/
- Practice debugging JavaScript (Please fork the jsfiddles before editing them!)
- Find some information about how JavaScript compares to and contrasts with a programming language you’re used to
Go through the following introductory tutorials on JavaScript and Node.
##JavaScript Tutorial
For details about the JavaScript tutorial, check out its GitHub repo.
To get to the tutorial, run these commands from your terminal:
$ sudo npm install -g javascripting
$ javascripting
##Node Tutorial
The Node tutorial process is similar.
$ sudo npm install -g learnyounode
$ learnyounode
##Submission
When you're finished, fill out the Homework Submission Survey.